
Related Manuals for ProForm 480 Pi


Summary of Contents for ProForm 480 Pi
- Page 1 © Model No. 831.291600 USER'S MANUAL Serial No. Serial Number Decal EXERCISE lIKell#l,_l_ HELPLINE! 1-800-736-6879 SEARS, ROEBUCK AND CO. HOFFMAN ESTATES, IL 60179 www.proform.com new products, prizes, fitness tips, and much more!
-
Page 2: Table Of Contents
TABLE OF CONTENTS IMPORTANT PRECAUTIONS ..............BEFORE YOU BEGIN ............... ASSEMBLY ................OPERATION AND ADJUSTMENT ............. HOW TO FOLD AND MOVE THE TREADMILL ..........TROUBLE-SHOOTING ..............CONDITIONING GUIDELINES ............... ORDERING REPLACEMENT PARTS ..........Back Cover FULL 90-DAY WARRANTY ............Back Cover Note: An EXPLODED DRAWING and a PART LIST are attached in the center of this manual. - Page 3 The decals shown have been placed on your treadmill. If a decal is missing, or if it is not legible, please call our toll-free HELPLINE to order a free replacement decal (see the front cover of this manual). Apply the decal in the location shown. Note: The decal is shown at 38% of actual size.
-
Page 4: Before You Begin
BEFORE YOU BEGIN Congratulations for selecting the new PROFORM ®480 Monday through Saturday, 7 a.m. until 7 p.m. Central Pi treadmill. The 480 Pi treadmill combines advanced Time (excluding holidays). To help us assist you, technology with innovative design to help you get the... -
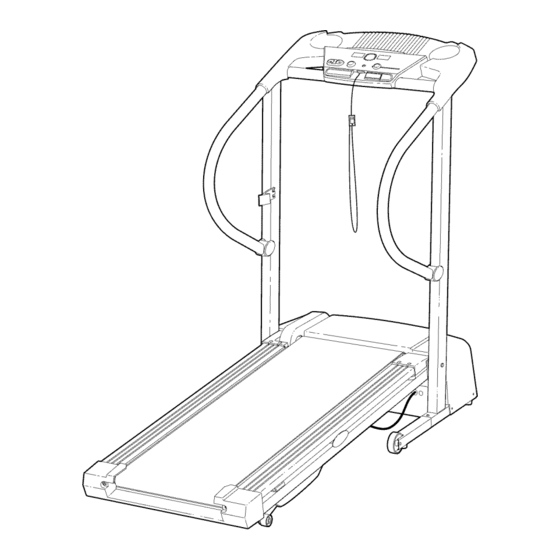
Page 5: Assembly
ASSEMBLY Assembly requires two people. Set the treadmill in a cleared area and remove all packing materials. Do not dispose of the packing materials until assembly is completed. Assembly requires the included allen wrench and your own phillips screwdriver and wire cutters _?_. Note: The underside of the treadmill walking belt is coated with high-performance lubricant. - Page 6 3. Thread thetwoincluded wiretiesthrough theindicated holes in thetubeonrightsideoftheUpright ( 11). Lookintothetuberightupright ( 88)andmakesurethe Wires(21)havebeen secured tothesideshown. T ighten thewiretiesandcutofftheexcess fromtheends. Ties 4. Place theConsole B ase(46)ontheposts ontheUpright. Make a loopwiththeindicated p lastic tiesandinsert t he twoWires (21)through theloops. P ull o utonlyenough of thetwoWires toconnect them totheconnectors inthe Console Base.
-
Page 7: Operation And Adjustment
SEARS or call toll-free 1-800-366-7278 OPERATION AND ADJUSTMENT THE PERFORMANT LUBE WALKING BELT an equipment-grounding conductor and a grounding plug. Plug the power cord into a surge suppressor, Your treadmill features a walking belt coated with and plug the surge suppressor into an appropriate PERFORMANT LUBE a high-performance lubricant. - Page 8 CONSOLE DIAGRAM _ WARNI risk of serous inj, S ON/ .JD:gS j ,u'n rails before sfartit FT BUT-FON read and undersi manual, all instru, ",SET, THEN the warnings bef_ TIME DISTANCE LAPS CALORIES FAT CALS, £T SPEED Keepchildren a_ SPEED POWER INCUNE ON I RESET SPEED...
- Page 9 Follow the steps below to operate the console. ollow your progress with the LED track and 'the displays. Insert the key fully into the power switch. The LED Track--The track in the center of the Inserting the key will not turn on the dis- console represent a dis- tance of 1/4 mile.
-
Page 10: How To Fold And Move The Treadmill
HOW TO FOLD AND MOVE THE TREADMILL HOW TO FOLD THE TREADMILL FOR STORAGE Before folding the treadmill, unplug the power cord. CAUTION: You must be able to safely lift 45 pounds (20 kg) in order to raise, lower, or move the treadmill. Hold the treadmill with your hands in the locations shown at the right. - Page 11 HOW TO LOWER THE TREADMILL FOR USE 1. Hold the upper end of the treadmill with your right hand as shown. Using your left thumb, press the storage latch and hold it. Pivot the treadmill until the frame and foot rail are past the storage latch.
-
Page 12: Trouble-Shooting
TROUBLE-SHOOTING Most treadmill problems can be solved by following the simple steps below. Find the symptom that applies, and follow the steps listed. If further assistance is needed, call our toll-free HELPLINE at 1-800-736-6879, Monday through Saturday, 7 a.m. until 7 p.m. Central Time (excluding holidays). PROBLEM: The power does not turn on SOLUTION: a. - Page 13 PROBLEM: The incline will not work SOLUTION: a. Make sure that the two wires under the console are fully plugged in. (Refer to assembly step 4 on page 6. WARNING: Do not disconnect or connect the wires while the treadmill power cord is plugged in.) PROBLEM: The walking belt slows when walked on...
-
Page 14: Conditioning Guidelines
CONDITIONING GUIDELINES training zone. It may also be helpful to set the speed control on the console to FAT BURN to help you main- tain the proper intensity level. (See page 9.) Aerobic Exercise If your goal is to strengthen your cardiovascular sys- tem, your exercise must be "aerobic."... - Page 15 Training Zone Exercise to cool down. This will increase the flexibility of your muscles and will help to prevent post-exercise problems. After warming up, increase the intensity of your exer- cise until your pulse is in your training zone for 20 to EXERClSE FREQUENCY 60 minutes.
-
Page 16: Ordering Replacement Parts
REMOVE THIS EXPLODED DRAWING AND PART LIST FROM THE MANUAL Save this EXPLODED DRAWING and PART LIST for future reference. Note: Specifications are subject to change without notice. For information about ordering replacement parts, see the back cover of the User's Manual. - Page 17 PART LISTmModel No. 831.291600 Ro o2A Qty. Description Qty. Description Handrail Front Roller/Pulley Key/Clip Front Roller Adj. Bolt Incline Wheel Incline Leg Pivot Bolt Battery Cover Extension Leg Screw/Handrail Screw Foot Rail Power Cord Lift Motor Power Cord Grommet Rear Roller Circuit Breaker 3/8"...
- Page 18 6"} & I"-3...
-
Page 19: Full 90-Day Warranty
SEARS The model number and serial number of your PROFORM ®480 Pi Model No. 831.291600 treadmill are listed on a decal attached to the frame. See the front cover of this manual to find the location of the decal. QUESTIONS? All replacement parts are available for immediate purchase or special order when you visit your nearest SEARS Service Center.