Table of Contents
Advertisement
Available languages
Available languages
Quick Links
Download this manual
See also:
Instructions for Using
| KEA
®
ELECTRIC RANGE
For questions
about features,
operation/performance,
parts, accessories
or service, call: 1-866-664-2449
In Canada, call for assistance,
installation
or service, call:
1-866-664-2449
CUISINII:RE I_LECTRIQUE
Au Canada, pour assistance,
installation
ou service, composer
le 1-866-664-2449
Table of Contents/Table
des matieres ........................................
2
W10266955A
Advertisement
Table of Contents

Related Manuals for IKEA ELECTRIC RANGE


Summary of Contents for IKEA ELECTRIC RANGE
- Page 1 | KEA ® ELECTRIC RANGE For questions about features, operation/performance, parts, accessories or service, call: 1-866-664-2449 In Canada, call for assistance, installation or service, call: 1-866-664-2449 CUISINII:RE I_LECTRIQUE Au Canada, pour assistance, installation ou service, composer le 1-866-664-2449 Table of Contents/Table des matieres ........
-
Page 2: Table Of Contents
TABLE OF CONTENTS TABLEDESMATIERES SI_CURITI_ DE LA CUISINII=RE ........... RANGE SAFETY ................La bride antibasculement ............The Anti-Tip Bracket ..............COOKTOP USE ................UTILISATION DE LA TABLE DE CUlSSON ........ 23 Commandes de la table de cuisson .......... 23 Cooktop Controls ................. Ceramic Glass ................ -
Page 3: Range Safety
RANGE SAFETY Your safety and the safety of others are very important. We have provided many important safety messages in this manual and on your appliance. Always read and obey all safety messages. This is the safety alert symbol. This symbol alerts you to potential hazards that can kill or hurt you and others. All safety messages will follow the safety alert symbol and either the word "DANGER"... - Page 4 iMPORTANT SAFETY iNSTRUCTiONS WARN(NG: To reduce the risk of fire, electrical shock, [] Protective Liners - Do not use aluminum foil to line surface injury to persons, or damage when using the range, follow unit drip bowls or oven bottoms, except as suggested in basic precautions, including the following: the manual.
-
Page 5: Cooktop Use
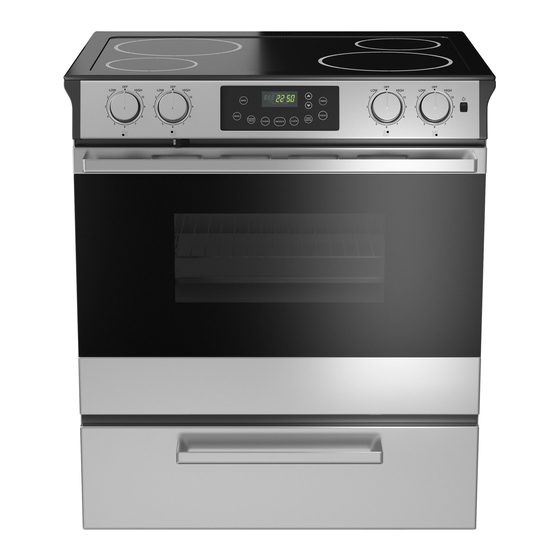
COOKTOP USE °oFF HIGH o® ©o A. Surface cooking area Iocator E. Right front control knob B. Left front control knob F. Oven light C. Left rear control knob G. Hot surface indicator light H. Electronic oven control D. Right rear control knob Hot Surface Indicator Light... -
Page 6: Home Canning
Use cookware about thesame size asthesurface c ooking area. Cookware should n otextend m ore than 1/2" (1.3 cm) outside t hearea. IMPORTANT: Do not leave empty cookware on a hot surface cooking area, element or surface burner. _..... Ideal cookware should have a flat bottom, straight sides and a well-fitting lid, and the material should be of medium-to-heavy thickness. -
Page 7: Electronic Oven Control
ELECTRONIC OVEN CONTROL C_HOiO_& COOK& D& A. Bake E. Cancel I. Clean (on self-clean models) J. Cook & hold B. Clock/timer display F. Keep warm G. Clock K. Broil C. More (+)/less (-) buttons D. Timer H. Delay (on self-clean models) To Cancel the Clock Display: If you do not want the time of day to display: Press and hold CANCEL and CLOCK for 3 seconds, the time of... -
Page 8: Control Lock
OVEN USE The Control Lock shuts down thecontrol panel pads (buttons) to prevent unintended useoftheoven(s). Odors and smoke are normal when the oven is used the first few The Control Lock ispreset unlocked, butcanbelocked. times, or when it is heavily soiled. Iftheoven iscurrently inuse, t hecontrols c annot belocked. -
Page 9: Bakeware
BAKEWARE Hot air must be able to circulate around food to cook evenly, so allow 2" (5 cm) of space around bakeware and oven walls. Use the following chart as a guide. NUMBER OF POSITION ON RACK PAN(S) Center of rack. Side by side or slightly staggered. -
Page 10: Cook & Hold
When the Delay time has expired: Coo< & 4oc "DELAY" will turn off. "BAKE," "HOLD," and the baking time will be displayed. Baking will begin. To set a Delay when Cook & Hold has already been programmed: 1. Press DELAY. "DELAY" will flash and "00:00" appears in the Food Poisoning Hazard display. -
Page 11: Automatic Shut-Off/Sabbath Mode
• Trim excess fat to reduce spattering. Slit the remaining fat on the edges to avoid curling. • Pull out oven rack to stop position before turning or removing The oven will automatically turn off after 12 hours if you food. -
Page 12: Range Care
RANGE CARE Prepare Cooktop and Storage Drawer: • Remove plastic items from the cooktop because they may melt. • Remove all items from the storage drawer. How the Cycle Works IMPORTANT: The heating and cooling of porcelain on steel in the oven may result in discoloring, loss of gloss, hairline cracks and Burn Hazard... -
Page 13: General Cleaning
To Delay Start Self-Clean: Before delay starting Self-Clean, make sure the door is closed completely or it will not lock and the cycle will not begin. IMPORTANT: Before cleaning, make sure all controls are off and 1. Press DELAY. the oven and cooktop are cool. Always follow label instructions on cleaning products. -
Page 14: Oven Light
Heavy soil, dark streaks, specks and discoloration OVEN DOOR EXTERIOR • Cooktop Polishing Creme or nonabrasive cleanser: Rub product into soil with a damp paper towel or soft cloth. Cleaning Method: Continue rubbing until white film disappears. • Glass cleaner and paper towels or nonabrasive plastic Burned-on soil... -
Page 15: Storage Drawer (On Some Models)
The storage drawer can be removed. Before removing, make sure For normal range use, it is not suggested to remove the oven drawer is cool and empty. door. However, if removal is necessary, make sure the oven is off and cool. Then, follow these instructions. The oven door is heavy. To Remove: To Remove: 1. -
Page 16: Assistanceor Service
Factory specified parts will fit right and work right because they are made with the same precision used to build every new IKEA® appliance. Call the Whirlpool Canada LP Customer eXperience Centre toll To locate factory specified parts in your area, call us or your free: 1-866-664-2449. -
Page 17: Warranty
How to reach us if you need our service If outside the 50 United States and Canada, contact your authorized IKEA retailer to determine if another warranty applies. If you need service, please read the Installation Instructions and/or the "Troubleshooting"... - Page 18 Keep this book and your sales slip together for future Dealer name reference. You must provide proof of purchase or installation date for in-warranty service. Address Write down the following information about your major appliance Phone number to better help you obtain assistance or service if you ever need it. You will need to know your complete model number and serial Model number number.
-
Page 20: Si_Curiti_ De La Cuisinii=Re
SECURITE DE LA CUISINIERE Votre securite et celle des autres est tres importante. Nous donnons de nombreux messages de securite importants dans ce manuel et sur votre appareil menager. Assurez-vous toujours lire tousles messages de securite et de vous y conformer. Ce symbole d'alerte de securite vous signale les dangers potentiels de deces et de blessures graves &... - Page 21 IMPORTANTES INSTRUCTIONS DE SECURITE AVERTISSEMENT • NE PAS TOUCHER LES ¢:LEMENTS DE SURFACE OU : Pour r6duire le risque d'incendie, de L'ESPACE PRF:S DES ¢:L¢:MENTS - Les 616ments de choc 61ectrique, de blessures ou de dommages Iors de I'utilisation de la cuisini@e, il convient d'observer certaines surface peuvent 6tre chauds m6me Iorsqu'ils ont une teinte pr6cautions 616mentaires dont les suivantes : fonc6e.
- Page 22 IMPORTANTES INSTRUCTIONS DE SECURITE Pour les cuisini_res avec programme d'autonettoyage • Nettoyer la table de cuisson avec prudence - Si une _ponge ou un chiffon mouill_ est utilis_ pour essuyer les • Ne pas nettoyer le joint de la porte - Le joint de la porte renversements sur une surface de cuisson chaude, _viter est essentiel pour I'_tanch_it&...
-
Page 23: Utilisation De La Table De Culsson
UTILISATION DE LA TABLEDECUISSON • HIGH ®o E. Bouton de commande avant droit A. Repere de zone de cuisson _ la surface B. Bouton de commande avant gauche F. Lampe du four C. Bouton de commande arriere gauche G. T_moin d'allumage de la table de cuisson D. -
Page 24: Vitroceramique (Sur Certains Modeles)
La zone de cuisson & la surface devient rouge Iorsqu'un el6ment • Veiller & ce que les matieres qui pourraient fondre, telles que est allum& L'el6ment s'allume et s'eteint pour maintenir le niveau le plastique ou le papier d'aluminium, ne touchent pas la de temperature choisi. -
Page 25: Preparation De Conserves & La Maison
Utiliser le tableau suivant comme guide pour les caracteristiques du materiau de I'ustensile de cuisson. Lors de la pr@paration de conserves pendant de Iongues USTENSILE CARAOTERISTIQUES p@riodes, alterner I'utilisation des surfaces de cuisson, des Aluminium @l@mentsou des brQleurs de surface entre les quantit@s •... -
Page 26: Commande I_Lectronique Du Four
COMMANDE ELECTRONIQUE DU FOUR A. Bake (cuisson au four) E. Cancel (annulation) I. Clean (autonettoyage) - sur les modeles autonettoyants B. Afficheur horloge/minuterie F. Keep warm (maintien au chaud) J. Cook & Hold (cuisson et C. Bloc boutons "+" et "-" G. -
Page 27: Verrouillage Des Commandes
Ajustement du calibrage de la temperature du four : 1. Appuyer sur BAKE (cuisson au four). 2. Entrer 550 ° en appuyant sur la touche de la fleche vers le La caracteristique de verrouillage desactive les touches haut. tableau de commande (boutons) pour emp_cher une utilisation... -
Page 28: Positionnement Des Grilles Et Des Ustensiles De Cuisson
de cu di_ _tc_ sso_s Le materiau des ustensiles de cuisson affecte les resultats de cuisson. 8uivre les recommandations du fabricant et utiliser le IMPORTANT • Pour eviter des dommages permanents au fini en format d'ustensiles recommande dans la recette. 8e servir du porcelaine, ne pas placer d'aliments ou d'ustensiles de cuisson tableau suivant comme guide. -
Page 29: 12Ventdu Four
4. Pour des resultats optimaux, laisser le four prechauffer completement. Lorsque la temperature reglee du four est atteinte, un long signal sonore se fait entendre. Pour afficher de nouveau la temperature reglee pendant le prechauffage, appuyer sur la touche BAKE. Pour modifier la temperature du four durant le prechauffage, appuyer deux fois sur BAKE, puis la fleche vers le haut ou vers le bas jusqu'&... -
Page 30: Maintien Au Chaud
Utilisation : Pour r_gler la mise en marche diff_r_e d'un programme Cook & Hold : 1. Appuyer sur la touche KEEP WARM. Avant de proceder au reglage, s'assurer que I'horloge est regl6e "WARM" et "000" clignotent sur I'afficheur. & la bonne heure. Voir la section "Horloge". 2. -
Page 31: Arr_T Automatique/Mode Sabbat
TABLEAU DE CUISSON AU GRIL Pour obtenir des resultats optimaux, placer I'aliment _ au moins 3" (7,0 cm) de I'el6ment du gril. Les durees de cuisson sont Le four s'arr_te automatiquement apres 12 heures si vous le citees a titre indicatif seulement; on peut les regler en fonction laissez accidentellement en marche. -
Page 32: Entretien De La Culsinii_Re
ENTRETIEN D E LA CUISINIERE Preparation de la table de cuisson et du tiroir de remisage • Enlever les articles de plastique de la table de cuisson car ils peuvent fondre. • Vider completement le tiroir de remisage. Comment fonctionne le programme IMPORTANT : Le chauffage et le refroidissement de la porcelaine... -
Page 33: Nettoyage Gen6Ral
Pour diff_rer I'autonettoyage " " Avant de differer I'autonettoyage, s'assurer que la porte est completement fermee sinon elle nese verrouillera pas et le IMPORTANT • Avant le nettoyage, s'assurer que toutes les programme ne commencera pas. commandes sont desactivees et que le four et la table de cuisson 1. - Page 34 Renversements de matibres sucr_es (gel_es, confiseries, Methode de nettoyage : sirop) • Nettoyant a vitre et chiffon doux ou eponge : • Grattoir pour table de cuisson : Appliquer le nettoyant & vitre sur un chiffon doux ou une Nettoyer pendant que la table de cuisson est encore tiede. eponge, pas directement sur le tableau.
-
Page 35: Lampe Du Four
/ _ / _ _ _ _,,_,,,_ La lampe du four est une ampoule standard de 40 watts pour II n'est pas recommande d'enlever la porte du four pour une appareil menager. Avant le remplacement, s'assurer que le four et utilisation normale. - Page 36 Lesr_sultats decuisson surlatabledecuisson nesont Le programme d'autonettoyage ne fonctionne pas paslesr_sultats pr_vus La porte du four est-elle ouverte? • Utilise-t-on un ustensile de cuisson appropri_? Fermer la porte du four completement. Voir la section "Ustensiles de cuisson". Une fonction a-t-elle _t_ entree? •...
-
Page 37: Assistance Ou Service
Pour plus d'assistance chaque nouvel appareil IKEA®. Si vous avez besoin de plus d'assistance, vous pouvez Pour Iocaliser des pieces specifiees par I'usine dans votre region, soumettre par ecrit toute question ou preoccupation &... -
Page 38: Garantie
Si vous residez & I'exterieur des 50 €:tats des €:tats-Unis et du Canada, contactez votre marchand IKEA autorise pour determiner si une autre garantie s'applique. Si vous avez besoin d'une intervention d'entretien ou de reparation, veuillez lire les Instructions... - Page 39 Conservez ce manuel et votre re<;u de vente ensemble pour Nom du marchand r_f_rence ult_rieure. Pour le service sous garantie, vous devez presenter un document prouvant la date d'achat ou Adresse d'installation. Numero de t_lephone Inscrivez les renseignements suivants au sujet de votre gros appareil menager pour mieux vous aider a obtenir assistance ou Numero de module service en cas de besoin.
- Page 40 W10266955A 4/09 © 2009 Printed in U.S.A. All rights reserved. ® IKEA is a registered trademark of Inter-lkea Systems B.V. Tous droits reserves. ® IKEA est une marque deposee de Inter-lkea Systems B.V. Imprime aux E.-U.