Table of Contents
Advertisement
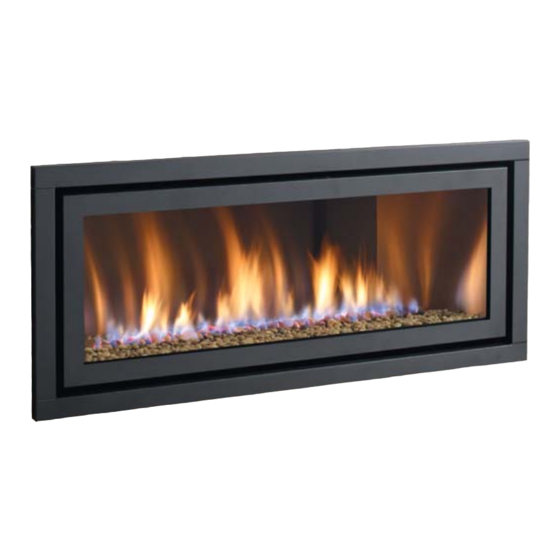
Regency Horizon
www.regency-fi re.com
WARNING:
If the information in these instructions are not followed exactly,
a fi re or explosion may result causing property damage,
personal injury or loss of life.
FOR YOUR SAFETY
Do not store or use gasoline or other fl ammable vapors and
liquids in the vicinity of this or any other appliance.
Installation and service must be performed by a qualifi ed
installer, service agency or the gas supplier.
Tested by:
918-883c
FPI FIREPLACE PRODUCTS INTERNATIONAL LTD. 6988 Venture St., Delta, BC Canada, V4G 1H4
Gas Fireplace
Installer: Please complete the details on the back cover
and leave this manual with the homeowner.
Homeowner: Please keep these instructions for future reference.
HZ54E
™
FOR YOUR SAFETY
What to do if you smell gas:
Do not try to light any appliance
Do not touch any electrical switch:
do not use any phone in your
building.
Immediately call your gas supplier
from a neighbour's phone. Follow
the gas supplier's instructions.
If you
supplier, call the fi re department.
Owners &
Installation Manual
MODELS: HZ54E-NG Natural Gas
HZ54E-LP Propane
Horizon HZ54 Product Video
cannot reach your gas
04/09/13
Advertisement
Table of Contents

Related Manuals for Regency Horizon HZ54E-NG

Summary of Contents for Regency Horizon HZ54E-NG
- Page 1 Owners & Regency Horizon HZ54E ™ Installation Manual Gas Fireplace MODELS: HZ54E-NG Natural Gas HZ54E-LP Propane www.regency-fi re.com Horizon HZ54 Product Video WARNING: FOR YOUR SAFETY If the information in these instructions are not followed exactly, What to do if you smell gas: ...
- Page 2 Congratulations! ® You are the owner of a state-of-the-art Gas Fireplace by REGENCY . The HZ54E has been designed to provide you with all the warmth and charm of a wood fi replace at the fl ick of a switch.
-
Page 3: Manufactured Mobile Home Requirements
Manufactured Home Construction and Safety Standard, Title 24 CFR, Part 3280, in the Untied States, or the Standard for Installation in Mobile Homes, CAN/CSA Z240 MH, in Canada. Regency Horizon HZ54E Gas Fireplace... -
Page 4: Table Of Contents
Main Assembly ............62 Unit Installation with Vertical Termination ....28 Accessories ..............63 Unit Installation ............29 Horizontal Termination .........29 WARRANTY with Flex Vent System .........29 High Elevation .............30 The Warranty: Limited Lifetime ........67 Gas Line Installation ............30 Regency Horizon HZ54E Gas Fireplace... -
Page 5: Safety Label
The State of Massachusetts requires the installation of a carbon monoxide alarm in accordance with NFPA 720 and a CO alarm with battery back up in the same room where the gas appliance is installed. Regency Horizon HZ54E Gas Fireplace... -
Page 6: Requirements
(e) A copy of all installation instructions for all Product Approved side wall horizontally vented gas fueled equipment, all venting instructions, all parts lists for venting instructions, and/or all venting design instructions shall remain with the appliance or equipment at the completion of the installation. Regency Horizon HZ54E Gas Fireplace... -
Page 7: Dimensions
DIMENSIONS UNIT DIMENSIONS 52-5/8” (1337mm) 59” (1499mm) 19-3/4” (502mm) 10-5/8” (270mm) 1-1/2” 20-1/2” (521mm) (38mm) 48-1/2” (1232mm) FACEPLATE & DOOR FRAME OVERLAY DIMENSIONS Regency Horizon HZ54E Gas Fireplace... -
Page 8: Installation
SHOULD STAY AWAY TO AVOID BURNS 8) To prevent injury, do not allow anyone who is OR CLOTHING IGNITION. unfamiliar with the operation to use the fi replace. 9) Wear gloves and safety glasses for protection while doing required maintenance. Regency Horizon HZ54E Gas Fireplace... -
Page 9: Installation Checklist
The Heat Release Kit expels warm air from the fi replace to the outside of the building, allowing the fi replace to be operated with less heat entering the room. The kit may be used on either the left or right side. Regency Horizon HZ54E Gas Fireplace... -
Page 10: Clearances
fi restop is used. Note 0" No hearth required Installed Close Installed Close to Ceiling to Floor NON-COMBUSTIBLE REQUIREMENTS Metal Stud (header) 60-1/2" (1537mm) Wood Stud Wood Stud Non-combustible Material 52-7/8” Non-combustible Material 3-7/8" 5-1/2” ( 99mm) (140mm) Regency Horizon HZ54E Gas Fireplace... -
Page 11: Top Non Combustible Facing Board
Non-combustible board MUST BE PRIMED. Note: Due to the high temperatures being emitted from this appliance, incorrectly mudded joints may crack. Keep mud thickness to a minimum. Regency Horizon HZ54E Gas Fireplace... -
Page 12: Mantel Clearances
Top of Fireplace 28-1/8” Opening To Unit Base Legs MANTEL LEG CLEARANCES Combustible mantel leg clearances as per diagram: 4”(102mm) MANTEL LEG Non-Combustible 1.5" (38mm) 5-1/2” (140mm) Allowable mantel leg projection 8” (203mm) 11” (279mm) Regency Horizon HZ54E Gas Fireplace... -
Page 13: Framing & Finishing
fi nishing around the unit. This is to ensure the removal of the faceplate and for the safe operation of this appliance. 1-1/2" 0" (fl ush) 52-7/8 ” Nailing Strip Flush w/unit Factory Set Unit Unit shown without faceplate Regency Horizon HZ54E Gas Fireplace... - Page 14 Dangerous operating conditions will occur if minimum framing dimensions are not adhered to. Metal Stud (Header) on edge Metal Stud (Header) on edge Non-Combustible Facing (Located on the right side of the fireplace) Regency Horizon HZ54E Gas Fireplace...
-
Page 15: Unit Assembly Prior To Installation
Each direct vent gas appliance must use it's own separate vent system. Common vent systems are prohibited. Remove this screw to release top standoff / nailing Standoff strip Diagram 2 Regency Horizon HZ54E Gas Fireplace... -
Page 16: Vent Restrictor Position
THIS HOLE SETS THE VENTR ESTRICTOR VENT RESTRICTOR AT 2-1/2” AT 1” Vent Restrictor Set 5 Vent Restrictor Set 3 2” SET 4 THIS HOLE SETS THE VENTR ESTRICTOR AT 2” Vent Restrictor Set 4 Regency Horizon HZ54E Gas Fireplace... -
Page 17: Exterior Vent Termination Requirements
* Clearance in accordance with local installation codes and the requirements of the gas supplier 3 feet (91cm) within a height of 15 feet (4.5m) above the meter / regulator assembly 3 feet (91cm) above - if within 10 feet (3m) horizontally Regency Horizon HZ54E Gas Fireplace... -
Page 18: Venting Arrangements
2) Only Flex pipe purchased from FPI may be used for Flex installations. 3) Horizontal vent must be supported every 3 feet. 4) A wall thimble is mandatory for all horizontal terminations due to high temperatures. Regency Horizon HZ54E Gas Fireplace... -
Page 19: Rigid Pipe Venting Systems
FPI venting systems as well as Simpson Dura-Vent Direct Vent Pro, ICC Excel and Selkirk Direct-Temp. AstroCap XL is a proprietary trademark of FPI Fireplace Products International Ltd. Dura-Vent® and Direct Vent are registered and/or proprietary trademarks of Simpson Dura-Vent Co. Inc. Regency Horizon HZ54E Gas Fireplace... -
Page 20: 5" X 8" Rigid Pipe Cross Reference Chart
5DWS Offset Support 58DVA-ES - N/A from FPI 5DT-OS Wall Thimble-Black 58DVA-WT 5DT-WT 5DWT TE-5DE90 Wall Thimble Support/Ceiling Support 58DVA-DC TE-5DE90B - N/A from FPI Firestop Spacer 58DVA-FS 5DT-FS 5DFS Trim Plate-Black 58DAV-WFS 5DT-TP 5DCP Regency Horizon HZ54E Gas Fireplace... - Page 21 1 foot of run towards the termination. 36” (914mm) 29-13/16” (757mm) 39-7/16” (1002mm) Never allow the vent to run downward - this could cause high temperatures and may present a possible fi re hazard. 48” (1219mm) 38-1/4” (972mm) 47-7/8” (1216mm) Regency Horizon HZ54E Gas Fireplace...
-
Page 22: Venting Arrangements
Firestops are required at each fl oor level and whenever passing through a wall. through a wall. • A wall thimble is mandatory for all horizontal terminations due to • A wall thimble is mandatory for all horizontal terminations due high temperatures. to high temperatures. Regency Horizon HZ54E Gas Fireplace... - Page 23 Please note min. 1 foot 5' Min. 4' Max. 10' Min. 7' Max. between 90 elbows is 6' Min. 6' Max. 11' Min. 9' Max. required. VENT RESTRICTOR SETTING: Vent restrictor factory set at Set 1, no adjustment required. Regency Horizon HZ54E Gas Fireplace...
- Page 24 Please note min. 1 foot 5' Min. 6' Max. 8' Min. between 90 elbows is 6' Min. 8' Max. 9' Min. required. VENT RESTRICTOR SETTING: Vent restrictor factory set at Set 1, no adjustment required. Regency Horizon HZ54E Gas Fireplace...
-
Page 25: Venting Arrangements
Set 1 to Set 2 or Set 4 if required. Note: Must use optional fl ue adaptor when using Rigid Pipe (Part # 770-994). Max. 10’ (3m)(centerline to centerline) Minimum length of pipe between elbows 12” (305mm) Regency Horizon HZ54E Gas Fireplace... -
Page 26: Venting Arrangements
Set 1 to Set 4 or Set 5 if required. Note: Must use optional fl ue adaptor when using Rigid Pipe (Part # 770-994). Max. 10’ (3m)(centerline to centerline) Minimum length of pipe between elbows 12” (305mm) Regency Horizon HZ54E Gas Fireplace... -
Page 27: Unit Installation With Horizontal Termination
The location of the horizontal vent termination on an exterior wall must meet all local and national building codes, and must not be blocked or obstructed. See "Exterior Vent Termination Locations" Diagram 7 section for more details. Regency Horizon HZ54E Gas Fireplace... -
Page 28: Unit Installation With Vertical Termination
fl ashing until the height of the vent cap meets the minimum height requirements specifi ed in Diagram 5 or local codes. Note that for steep roof pitches, the vertical height must be increased. Diagram 3 Regency Horizon HZ54E Gas Fireplace... -
Page 29: Unit Installation
1-3/8"(35mm) and fasten with the 3 screws. NOTE: Horizontal sections must be supported at intervals not exceeding 3 feet (0.9 meter). (Flame picture and performance will be affected by sags in the liner). Regency Horizon HZ54E Gas Fireplace... -
Page 30: High Elevation
Do not use open fl ame for leak testing. Note: To properly check gas pressure, both inlet and manifold pressures should be checked using the valve pressure ports on the valve. Regency Horizon HZ54E Gas Fireplace... -
Page 31: Valve Cover Removal
2) The valve cover is located on the right side underneath the glass door - loosen 2 screws securing the valve cover (see Diagram 1 below). Diagram 3 Diagram 1 Valve cover 3) Slide the valve cover upward. Diagram 2 Regency Horizon HZ54E Gas Fireplace... -
Page 32: Aeration Adjustment
If the optional remote control is used, the AA batteries normally installed into the battery holder must be removed. The AA batteries in the receiver now operate the unit. Having AA batteries in both the battery holder and receiver will damage the gas valve. Regency Horizon HZ54E Gas Fireplace... -
Page 33: Ac Power Adaptor Installation (For Surefi Re Systems)
5) Neatly tuck any loose AC Power Adaptor wires neatly underneath / inside the appliance. Note: (keep wires away from the heat as much as possible). FCM - COM 03/04/2013 919-063 Regency Horizon HZ54E Gas Fireplace... -
Page 34: Profl Ame System Gtmf With Optional Fan
INSTALLATION PROFLAME SYSTEM GTMF WITH OPTIONAL FAN Proflame System Configuration 886 GTMF Wire Diagram SureFire™ Switch Ground Black White Neutral Black Green Live Ground 120V AC 60 Hz Black Black Black Fan Thermodisc (normally open) Regency Horizon HZ54E Gas Fireplace... -
Page 35: Optional Fan Wiring Diagram
(dedicated use Copper Ground by unit fan only) 120 Volts White (Neutral) 60 Hz Black (Hot) 14 AWG wire Caution: Ensure that the wires do not touch any hot surfaces and are away from sharp edges. Regency Horizon HZ54E Gas Fireplace... -
Page 36: Optional Wall Thermostat
Switch the remote receiver to "remote" mode. Wire Size Max. Length The remote control is ow ready for operation. 14 GA. 50 Ft. 16 GA. 32 Ft. 18 GA. 20 Ft. 20 GA. 12 Ft. 22 GA. 9 Ft. Regency Horizon HZ54E Gas Fireplace... - Page 37 Note 1 ~ Profl ame Flame Modulator for GTM & GTMF Remote Controls are sold seperately. Choice of NG or LP fl ame modulator (to match unit fuel type). See Regency Retail Price pages for complete details Note 2 ~ FPI Profl ame Remote Controls come standard with white wall mount switch & cover plate.
-
Page 38: Battery & On | Off Switch Installation
3) Disconnect connector from battery holder and remove from tray – (battery holder is attached by Velcro to tray). 4) Install - 4 AA batteries, reconnect the connector to the battery pack and put back onto Velcro strip Regency Horizon HZ54E Gas Fireplace... -
Page 39: Gt Remote Installation
Velcro strip 5) Locate the Green and White wires from the DFBC module wire harness; connect the spade connectors from the receiver wire harness, (TH) Green to (DFBC) Green and (TH/TP) White to (DFBC) White Regency Horizon HZ54E Gas Fireplace... -
Page 40: Gtm Remote Installation
(TH) Green to (DFBC) Green and (TH/TP) White to (DFBC) White 8) Install the stepper motor in the same location the hi/lo knob was removed from - with 2 screws as shown below. Regency Horizon HZ54E Gas Fireplace... - Page 41 12) Program Receiver and transmitter (refer to manual) Note: DO NOT USE 4 AA batteries in the battery pack on the tray; the DFBC is now powered by the receiver batteries in the wall. Regency Horizon HZ54E Gas Fireplace...
-
Page 42: Gtmf Remote Installation
- with 2 screws as shown below. 5) Locate the Green and White wires from the DFBC module wire harness; connect the spade connectors from the receiver wire harness, (TH) Green to (DFBC) Green and (TH/TP) White to (DFBC) White Regency Horizon HZ54E Gas Fireplace... - Page 43 fl oor of the unit with a velcro pad. unit. 16) Match the remote control to the receiver - see remote control instructions. Heat shield 17) Reverse step 1. 18) Check to ensure there are no gas leaks.. Regency Horizon HZ54E Gas Fireplace...
-
Page 44: Optional Refl Ective Panel Installation
Left Side Bracket Fit side panel tab into slot Right side back panel tab fi tted into slot Left side panel in position Bracket shown in place on right side of the fi rebox Regency Horizon HZ54E Gas Fireplace... -
Page 45: Glass Crystals Or Optional Ceramic Stones
Optional Ceramic Spa Stones shown on burner. For units P33S, P33SE, L676S, U32S, U32SE, E33S only For units P33S,P33SE L676S, U32S, U32SE, E33S only Glass Crystals shown on Burner and Firebox Floor For Units HZI390E, HZI390EB, HZI540EB only Regency Horizon HZ54E Gas Fireplace... -
Page 46: Glass Crystals Or Optional Pebbles
Natural River Pebbles shown surrounding the a Horizon Burner River Pebbles shown surrounding a Sunrise Burner Glass Crystals shown surrounding the Burner Regency Horizon HZ54E Gas Fireplace... -
Page 47: Optional Log Set Installation
3) Pin clips are attached to the lip edge of the bottom cover (not the burner) see diagrams 3 & 4. Measurements to centre of pins. Burner Bottom Cover Side measurements Lip Edge from corner edge. Regency Horizon HZ54E Gas Fireplace... - Page 48 4) Install the glass crystals (see glass crystal installation section in this manual). Diagram 6 5) Place platinum embers on glass crystals as shown in diagram 7. Diagram 7 6) If installing optional pebbles - install pebbles before log installation. Diagram 8 Regency Horizon HZ54E Gas Fireplace...
- Page 49 Note: Logs should be oriented exactly as shown in diagram 10. Diagram 10 9) Install the following: a) *Glass door b) *Faceplate and door frame *Refer to these sections in the HZ54 manual for detailed instructions. Log Set Installed (shown with optional pebbles) Diagram 11 Regency Horizon HZ54E Gas Fireplace...
-
Page 50: Faceplate & Door Frame Overlay Installation
1/2" return as shown in the diagram below. Magnet Position 2) Place 3 of the supplied magnets on the lower corners of the Door Frame Overlay, this will keep the Faceplate in position after it has been installed. Regency Horizon HZ54E Gas Fireplace... - Page 51 fi nishing that protrudes slightly beyond the faceplate. sliding the plate up or down as required. Faceplate Mounting Slots First Mounting Slot (recommended) Completed Faceplate & Door Frame Overlay Installation Regency Horizon HZ54E Gas Fireplace...
-
Page 52: Optional Fan Installation
Aerial View of the inside of the unit shown. 7) Remove bottom cover by undoing 3 screws securing it to the fi rebox base, lift up and out. Regency Horizon HZ54E Gas Fireplace... - Page 53 fl oor of the fi rebox. Ground Lug 16) Slide the thermodisc into the bracket on the bottom side of the fan access panel - check fan access panel gasket - replace if necessary. Fan Access Panel Regency Horizon HZ54E Gas Fireplace...
- Page 54 GTMF remote (see GTMF installation maintain these fan motors on a regular basis by vacuuming instructions in this manual). the fan blades and housing using a soft brush nozzle. 10” 6-1/2” 7” RECEIVER Top View Regency Horizon HZ54E Gas Fireplace...
-
Page 55: Operating Instructions
fi lm will bake on and become very diffi cult to remove. Use a non-abrasive cleaner and DO NOT ATTEMPT TO CLEAN THE GLASS WHILE IT IS HOT. Regency Horizon HZ54E Gas Fireplace... -
Page 56: Copy Of Lighting Plate Instructions
If service is to be performed - you must disconnect power to the unit, from the battery pack, refer to manual. Appuyez sur le bouton ON / OFF Si le service est effectuée, vous devez débrancher l'appareil, du bloc-piles, voir le manuel d'instruction pour plus de détails. DO NOT REMOVE THIS INSTRUCTION PLATE 918-628b Regency Horizon HZ54E Gas Fireplace... -
Page 57: Maintenance Instructions
7) In the event this appliance has been serviced should be done by a licensed or check that the vent-air system has been properly qualifi ed service person. resealed & reinstalled in accordance with the manufacturer's instructions. 8) Verify operation after servicing. Regency Horizon HZ54E Gas Fireplace... -
Page 58: Glass Door Removal
4) Remove the door frame overlay by swinging out 45 from the bottom and lift up and out. 6) Remove valve cover - (see valve cover removal section in this manual). Regency Horizon HZ54E Gas Fireplace... -
Page 59: Valve Tray Replacement
Prior to removing burner - remove the following (if installed): 4) Remove the door frame overlay by swinging out 45 from the bottom -crystals and lift up and out. -pebbles -spa stones -logs -Inner panels Regency Horizon HZ54E Gas Fireplace... -
Page 60: Hz54E-Ng Unit
8) Partially lift out valve tray. 9) Disconnect the inlet gas line. Green Wire Orange Wire 4) Disconnect the green ground wire from the valve bracket. 10) Replace valve and reverse steps. Green ground wire Regency Horizon HZ54E Gas Fireplace... -
Page 61: Hz54E-Lp Unit
Location of screws securing burner 10) Partially lift out valve tray. 11) Disconnect the inlet gas line. Burner Bracket 6) With burner removed - lift out burner tray. Gas Inlet Line 12) Replace valve and reverse steps. Regency Horizon HZ54E Gas Fireplace... -
Page 62: Parts List
White Switch Plate Wire 476-011 Flush Door 911-019 Wire (Valve to Burner ON/OFF) 948-409 Flue Collar 476-080 Lifting Handle 946-556 Heatwave Kit 946-570 Heatrelease Kit HEAT WAVE DUCT KIT 918-883 Manual HEAT RELEASE DUCT KIT Regency Horizon HZ54E Gas Fireplace... -
Page 63: Accessories
Starfi re Crystals 946-678 Cobalt Blue Crystals 5 pound bag of glass crystals 946-775 Black Refl ective Crystals 946-776 Copper Crystals 946-777 Starfi re Crystals 946-778 Cobalt Blue Crystals 946-672 Natural River Pebbles 946-674 Ceramic Spa Stones Regency Horizon HZ54E Gas Fireplace... - Page 64 NOTES Regency Horizon HZ54E Gas Fireplace...
- Page 65 NOTES Regency Horizon HZ54E Gas Fireplace...
- Page 66 NOTES Regency Horizon HZ54E Gas Fireplace...
-
Page 67: Warranty
Fireplace Products are designed with reliability and simplicity in mind. In addition, our internal Quality Assurance Team carefully inspects each unit thoroughly ® before it leaves our facility. Fireplace Products is pleased to extend this limited lifetime warranty to the original purchaser of a Regency Product. This warranty is Regency not transferable. - Page 68 Installer: ___________________________________________________________ Phone #: ___________________________________________________________ Date Installed: ______________________________________________________ Serial No.: __________________________________________________________ Horizon HZ54 Video Regency Horizon and SureFire™ are trademarks of FPI Fireplace Products International Ltd. Printed in Canada © Copyright 2010, FPI Fireplace Products International Ltd. All rights reserved.