
Related Manuals for Fluke 744


Summary of Contents for Fluke 744
- Page 1 ® Documenting Process Calibrator Users Manual PN 691287 September 1998 Rev.1, 2/99 © 1998,1999 Fluke Corporation. All rights reserved. Printed in U.S.A. All product names are trademarks of their respective companies.
- Page 2 LIMITED WARRANTY & LIMITATION OF LIABILITY Each Fluke product is warranted to be free from defects in material and workmanship under normal use and service. The warranty period is three years and be- gins on the date of shipment. Parts, product repairs and services are warranted for 90 days. This warranty extends only to the original buyer or end-user customer of a Fluke authorized reseller, and does not apply to fuses, disposable batteries or to any product which, in Fluke’s opinion, has been misused, altered, neglected...
-
Page 3: Table Of Contents
Table of Contents Title Page Introduction........................1 Standard Equipment...................... 3 Safety Information ......................7 Getting Started Exercise ....................10 Operating Features ....................... 12 Input and Output Jacks..................... 12 Keys ........................14 Display........................17 Setting Up the Calibrator ....................19 Using the Strap and Bail................... 19 Charging the Battery.................... - Page 4 Users Manual Displaying the Date and Time ................... 24 Using the Backlight ....................26 Personalizing the Calibrator ..................26 Using Measure Mode..................... 28 Measurement Ranges....................28 Measuring Electrical Parameters ................28 Testing Continuity ..................... 30 Measuring Pressure ....................30 Measuring Temperature.................... 34 Using Thermocouples ..................
- Page 5 Contents (continued) Using Manual Step ....................60 Using Auto Step....................61 Ramping the Output..................... 62 Simultaneous Measure/Source ..................65 Calibrating a Process Instrument .................. 68 Generating “As Found” Test Data................68 Adjusting the Transmitter..................73 “As Left” Test Run ....................74 Test Comments ......................
- Page 6 Users Manual Calibration Data ......................99 In Case of Difficulty ....................99 Service Center Calibration or Repair ................ 100 Replacement Parts ......................101 Accessories........................102 Specifications......................... 104 DC Voltage Measurement..................105 AC Voltage Measurement ..................106 DC Current Measurement ..................107 Resistance Measurement..................
- Page 7 List of Tables Table Title Page Summary of Source and Measure Functions ..............4 Input/Output Jacks and Connectors ................... 12 Key Functions ........................15 Battery Life ......................... 22 Thermocouple Types Accepted..................35 RTD Types Accepted ......................37 Simultaneous MEASURE/SOURCE Functions with Loop Power Disabled ....... 66 Simultaneous MEASURE/SOURCE Functions with Loop Power Enabled ......
- Page 8 Users Manual...
- Page 9 List of Figures Figure Title Page Standard Equipment ......................5 Definition of Symbols ......................7 Jumper Connections for Demonstration................11 Measure/Source Example ....................11 Input/Output Jacks and Connectors ................... 13 Keys ........................... 14 Elements of a Typical Display .................... 18 Using the Bail and Installing the Strap ................
- Page 10 Users Manual Connections for Supplying Loop Power................51 Connections for Sourcing Pressure ..................54 Connections for Simulating a Thermocouple..............57 Connections for Simulating an RTD ................... 58 Checking a Relay Output Trip Alarm .................. 64 Calibrating a Thermocouple Temperature Transmitter............70 Limit Switch Terminology....................
-
Page 11: Introduction
Documenting Process Calibrator addition to these functions, the calibrator has the Introduction following features: The Fluke 744 Documenting Process Calibrator General features: (hereafter referred to as the calibrator) is a battery- powered, hand-held instrument that measures and An analog display to make it easy to read sources electrical and physical parameters, and measurements when the input is unstable. - Page 12 Europe: +31 402-678-200 readings), with display indicator of damped Japan: +81-3-3434-0181 status. Singapore: +65-738-5655 Display of measurements in engineering units, percent of scale, square-law inputs, or custom Anywhere in the world: +1-425-356-5500 units. Or visit us on the World Wide Web: www.fluke.com...
-
Page 13: Standard Equipment
Documenting Process Calibrator Standard Equipment 744 Users Manual Standard Equipment English (PN 691287) The items listed below and shown in Figure 1 are French (PN 691300) included with your calibrator. If the calibrator is German (PN 691311) damaged or something is missing, contact the place Italian (PN 691318) of purchase immediately. -
Page 14: Summary Of Source And Measure Functions
Users Manual Table 1. Summary of Source and Measure Functions Function Measure Source dc V 0 V to +/-300 V 0 V to 15 V (10 mA max) ac V 0 V to 300 V rms, 20 Hz to 5 kHz No sourcing Frequency 1 Hz to 1 kHz (100 mV to 300 V rms) - Page 15 Documenting Process Calibrator Standard Equipment ( ZERO) AC20 Test Clip (2 Red and 2 Black) TL24 Test Leads (2 Red and 2 Black) Jumper (2 Black) TP20 Test Probe (1 Red and 1 Black) Strap ot01f.eps Figure 1. Standard Equipment...
- Page 16 Users Manual BP7235 BC7217 Nickel-Metal Hydride Battery Charger Battery Pack HART Interface Cable HART Mode Users Guide Users Manual ot02f.eps Figure 1. Standard Equipment (cont)
-
Page 17: Safety Information
Documenting Process Calibrator Safety Information this manual, otherwise the protection provided by Safety Information the calibrator may be impaired. This calibrator is designed and tested in accordance Symbols used on the calibrator and in this manual with IEC1010-1 and CAN/CSA C22.2 No. are explained in Figure 2. - Page 18 Users Manual Do not use the calibrator if it operates Safety Information (cont) abnormally. Protection may be impaired. A Warning identifies conditions and actions that pose When in doubt, have the calibrator serviced. hazards to the user; a Caution identifies conditions and actions that may damage the calibrator or the Select the proper function and range for your equipment under test.
- Page 19 Warning (cont) Do not use any battery eliminator other than Do not apply more than the rated voltage, as the Fluke model BE9005 Battery Eliminator. marked on the calibrator, between the terminals, or between any terminal and earth Caution ground.
-
Page 20: Getting Started Exercise
Users Manual 5. Press to switch to the SOURCE screen. Getting Started Exercise The calibrator is still measuring dc voltage, and The following is a brief getting started exercise that you can see the active measurements at the top will make it easier to understand the instructions in of the display. - Page 21 Documenting Process Calibrator Getting Started Exercise ( ZERO) gj4s.eps Figure 4. Measure/Source Example ot03f.eps Figure 3. Jumper Connections for Demonstration...
-
Page 22: Operating Features
Users Manual Input and Output Jacks Operating Features Figure 5 shows the calibrator input and output jacks. Table 2 explains their use. Table 2. Input/Output Jacks and Connectors Name Description Battery Eliminator jack Jack for the Model BE9005 Battery Eliminator. Use the battery eliminator for bench-top applications where ac line power is available. - Page 23 Documenting Process Calibrator Operating Features DOCUMENTING PROCESS CALIBRATOR ot05f.eps Figure 5. Input/Output Jacks and Connectors...
-
Page 24: Keys
Users Manual Keys Figure 6 shows the calibrator keys and Table 3 DOCUMENTING PROCESS CALIBRATOR explains their functions. The softkeys are the four unmarked blue keys just below the display. Softkey functions are defined by the labels that appear above the softkey during operation. -
Page 25: Key Functions
Documenting Process Calibrator Operating Features Table 3. Key Functions Name Description Cycles the calibrator through MEASURE, SOURCE, and MEASURE/SOURCE modes. Selects mA (current) measure or source function. For loop power on/off, go to the Setup mode. Enters and exits Setup mode to modify operating parameters. Softkeys Perform the function defined by the label above each key on the display. - Page 26 Users Manual Table 3. Key Functions (cont) Name Description Adjust the display contrast. keys Make choices from lists on the display. Increase or decrease the source level when using the step feature. In calculator mode, provide arithmetic functions (+ - Terminates a numeric entry when setting a source value, or confirms your choice in a list.
-
Page 27: Display
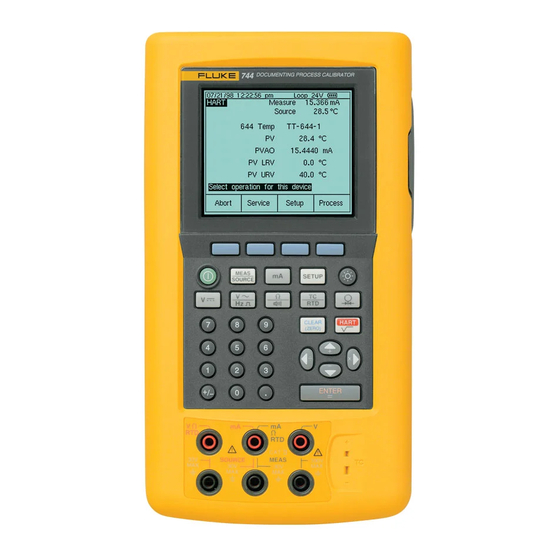
Documenting Process Calibrator Operating Features Measured Value: Shows the measured value in Display your choice of engineering units or percent of Figure 7 shows the features of a typical display. The scale. display shown is MEASURE mode. Near the top of the display is “Source Off.”... - Page 28 Users Manual Loop Power Annunciator Time and Date Display Battery Gauge Status Bar Source Status Undamped (Unsettled) Mode Indicator Indicator Custom Units Indicator Secondary Value Measured Value Softkey Labels ot07c.eps Figure 7. Elements of a Typical Display...
-
Page 29: Setting Up The Calibrator
Documenting Process Calibrator Setting Up the Calibrator Setting Up the Calibrator support. Figure 8 also shows you how to open the Using the Strap and Bail bail to stand the calibrator at a comfortable viewing After you unpack the calibrator, attach its carrying angle for benchtop use. -
Page 30: Charging The Battery
Users Manual the charger). Full charge is maintained after that Charging the Battery time in trickle-charge mode (blinking indicator light Before you use the calibrator for the first time, on the charger). Switching between charging modes charge its battery pack in the external battery is automatic. - Page 31 Documenting Process Calibrator Setting Up the Calibrator gj9f.eps Figure 9. Removing the Battery and Using the Charger...
-
Page 32: Battery Life
Users Manual NiMH battery. Calibrator performance is guaranteed Battery Life to meet specifications until the battery gauge reads The calibrator senses which battery is installed empty ( (standard NiMH, or optional Ni-Cd model BP 7217). If the NiMH battery is installed, a battery gauge bar To replace the battery, refer to “Replacing the graph shows on the upper right of the display. -
Page 33: Preserving Battery Life
Using the Optional Battery Eliminator 2. Press to highlight following Auto Battery Caution Save To avoid damage to the calibrator, use only Fluke Model BE9005 Series Battery 3. Press or the softkey. Choices Eliminator, available from your Fluke 4. Press to highlight , then press representative. -
Page 34: Selecting The Display Language
Users Manual Where ac power is available, you can use the 6. Press to confirm your choice. The optional Fluke Model BE9005 Battery Eliminator to language you choose is the power-up default. conserve battery power. When the battery eliminator 7. Press to exit Setup mode. - Page 35 Documenting Process Calibrator Setting Up the Calibrator Proceed as follows to set up the time and date displays: 1. Press 2. Press the softkey. The display Next Page appears as follows: gj39s.eps 4. Press to move the cursor to the desired date format.
-
Page 36: Using The Backlight
Users Manual 7. Press or the softkey. Using the Backlight Choices 8. Enter your choice of timeout period in minutes Press to toggle the display backlight on and off. When the backlight is on, the symbol shows at the (accepted range: 1 to 120 minutes). top of the display. - Page 37 Documenting Process Calibrator Setting Up the Calibrator 4. Press or the softkey. The 8. Press the softkey. Choices Done display appears as follows: 9. Press the softkey or to exit Setup Done mode. gj40s.eps 5. The string is shown at the bottom of the boxed area.
-
Page 38: Using Measure Mode
Users Manual end of this manual. When you press the Range Using Measure Mode softkey, the range is locked. Press it again to cycle to and lock on the next higher range. Auto Range is Note reactivated when you select another measurement To achieve best noise rejection and highest function. - Page 39 Documenting Process Calibrator Using Measure Mode SOURCE MEAS 300V – Black SOURCE MEAS 300V Black gj10f.eps Figure 10. Electrical Measurement Connections...
-
Page 40: Testing Continuity
When measuring frequency, you are Many ranges and types of pressure modules are prompted to select a frequency range. If you available from Fluke. See “Accessories” near the expect the frequency you are measuring to back of this manual. Before you use a pressure... - Page 41 Documenting Process Calibrator Using Measure Mode Caution Gage To avoid mechanically damaging the Differential pressure module, never apply more than High 10 ft.-lb. of torque between the pressure 700 P 06 700 P 04 PRESSURE MODULE PRESSURE MODULE RANGE 100 PSIG 15 PSID/G RANGE 700 kPa...
- Page 42 Users Manual 1. Connect a pressure module to the calibrator as 5. If desired, you can change pressure display shown in Figure 12. The threads on the units to psi, mHg, inHg, mH O, inH pressure modules accept standard ¼ NPT pipe O@60 F, ftH O, bar, g/cm , or Pa.
- Page 43 Documenting Process Calibrator Using Measure Mode Isolation DOCUMENTING PROCESS CALIBRATOR Valve Gage Module ( ZERO) Differential Module Tank ot12c.eps Figure 12. Connections for Measuring Pressure...
-
Page 44: Measuring Temperature
Users Manual 3. Press . The display prompts you to select Measuring Temperature the thermocouple type. Using Thermocouples 4. Select the desired thermocouple type using the followed by The calibrator supports eleven standard thermocouples, each identified with an alpha 5. If necessary, you can change between °C °F character: E, N, J, K, T, B, R, S, C, L, or U. -
Page 45: Thermocouple Types Accepted
Documenting Process Calibrator Using Measure Mode Table 5. Thermocouple Types Accepted Positive Lead (H) Type Positive Lead Color Negative Lead Specified Range Material Material ( C) ANSI* IEC** Chromel Purple Violet Constantan -250 to 1000 Ni-Cr-Si Orange Pink Ni-Si-Mg -200 to 1300 Iron White Black... - Page 46 Users Manual SOURCE MEAS 300V Process Temperature Warning 30V maximum to TC Miniplug gj12f.eps Figure 13. Measuring Temperature with a Thermocouple...
-
Page 47: Using Resistance-Temperature Detectors (Rtds)
Documenting Process Calibrator Using Measure Mode three-terminal configuration. The calibrator accepts Using Resistance-Temperature Detectors RTD measurement inputs in two-, three-, or four-wire (RTDs) connections as shown in Figure 15. A four-wire The calibrator accepts RTD types shown in Table 6. configuration provides the highest measurement RTDs are characterized by their resistance at 0 °C precision, and two-wire provides the lowest... - Page 48 Users Manual To measure temperature using an RTD input, Caution proceed as follows: Do not force a dual banana plug between any two jacks in the horizontal 1. If necessary, press for MEASURE mode. orientation. Doing so will damage the 2.
- Page 49 Documenting Process Calibrator Using Measure Mode 8. If necessary, you can change between C or F temperature units in Setup mode as follows: a. Press WRONG b. Press the softkey twice. Next Page c. Use the keys to move the cursor to the parameter you which to change, then press or the...
- Page 50 Users Manual SOURCE MEAS 300V SOURCE MEAS 300V SOURCE MEAS 300V gj15f.eps Figure 15. Measuring Temperature with an RTD...
-
Page 51: Measurement Scale
Documenting Process Calibrator Using Measure Mode 9. Press the softkey. Measurement Scale Done Percent of scale remains in effect until you change to This feature lets you scale the measurements in accordance with a particular process instrument’s another measurement function or press the Scale response. -
Page 52: Square-Law Process Variables
Users Manual 9. Set to . Square-Law Process Variables Mode 10. Press When you select within scaling, the calibrator takes the square root of its input and displays the 11. Press the softkey. Done measurement in percent. For example, when connected to the output of a delta-pressure Square root percent of scale remains in effect until transmitter, the calibrator reading is proportional to... -
Page 53: Measuring Or Sourcing With Custom Units
Documenting Process Calibrator Using Measure Mode 4. Enter the 0% and 100% scale points for the Measuring or Sourcing with Custom output of your transfer function. Units 5. Enter the name of the custom units (up to four wWarning characters), for example (for pH), using the To avoid possible electric shock, when alphanumeric entry window, then press e. -
Page 54: Using The 700-Iv Current Shunt
The calibrator normally applies a software filter to need to use a current shunt and use the volts dampen measurements in all functions except measure function. The Fluke 700-IV current shunt is continuity. The specifications assume that damping is designed specifically for use with the 700 Series turned on. - Page 55 Documenting Process Calibrator Using Measure Mode Note If a measurement falls outside a random noise window, a new average is started. If damping is turned off, or until measurements are fully damped, the symbol is displayed.
-
Page 56: Using Source Mode
Users Manual Note Using Source Mode If you are sourcing frequency, respond to the The operating mode (i.e., MEASURE, SOURCE) is display prompt to select a zero-symmetric shown in a reverse-video bar on the display. If the sine or positive square wave. The amplitude calibrator is not in SOURCE mode, press until you specify is p-p amplitude. - Page 57 Documenting Process Calibrator Using Source Mode SOURCE MEAS 300V – Black Common SOURCE MEAS 300V – Black Common gj16f.eps Figure 16. Electrical Sourcing Connections...
-
Page 58: Simulating A 4 To 20 Ma Transmitter
Users Manual Simulating a 4 to 20 mA Transmitter You can configure the calibrator as a load on a current loop through the SOURCE mA function. When you press the key in SOURCE mode, the display prompts you to select Source mA Simulate . - Page 59 Documenting Process Calibrator Using Source Mode DOCUMENTING PROCESS CALIBRATOR MEAS SETUP SOURCE CLEAR (ZERO) ENTER Loop Black Power SOURCE MEAS 300V Supply – ot17c.eps Figure 17. Connections for Simulating a 4 to 20 mA Transmitter...
-
Page 60: Supplying Loop Power
Users Manual Connect the calibrator in series with the instrument Supplying Loop Power current loop as Figure 18 shows. Proceed as follows The calibrator supplies loop power at 28 V or 24 V dc to source loop power: through an internal series resistance of 250 . - Page 61 Documenting Process Calibrator Using Source Mode DOCUMENTING PROCESS CALIBRATOR MEAS SETUP SOURCE TEST DC PWR CLEAR – + – (ZERO) ENTER – SOURCE MEAS 300V Black ot18c.eps Figure 18. Connections for Supplying Loop Power...
-
Page 62: Sourcing Pressure
Many ranges and types of pressure modules are fittings or adapters. available from Fluke. See “Accessories” near the To avoid damaging the pressure module back of this manual. Before you use a pressure from overpressure, never apply pressure module, read its Instruction Sheet. - Page 63 Documenting Process Calibrator Using Source Mode 1. Connect a pressure module and pressure source base units (Pa, mHg, etc.). Change the pressure to the calibrator as Figure 19 shows. The threads display units as follows: on the pressure modules accept ¼ NPT fittings. a.
- Page 64 Users Manual Pressure Module DOCUMENTING PROCESS CALIBRATOR Hand Pump MEAS SETUP SOURCE CLEAR (ZERO) ENTER SOURCE MEAS 300V ot19c.eps Figure 19. Connections for Sourcing Pressure...
-
Page 65: Simulating Thermocouples
Documenting Process Calibrator Using Source Mode 5. Press the key followed by Simulating Thermocouples select (default), or , (for Linear T Linear mV Note calibrating a temperature transmitter that responds linearly to millivolt inputs). Refer to “Measuring Temperature” earlier in the manual for a table of data relating to 6. -
Page 66: Simulating Rtds
Users Manual Proceed as follows to simulate an RTD (Resistance- Simulating RTDs Temperature Detector): Note 1. If necessary, press for SOURCE mode. Refer to Table 6 for information about RTD (Resistance-Temperature Detector) types 2. Press until the select RTD type display is supported by the calibrator. - Page 67 Documenting Process Calibrator Using Source Mode DOCUMENTING PROCESS CALIBRATOR TEST DC PWR Color depends – on type of TC – MEAS SETUP SOURCE CLEAR (ZERO) ENTER SOURCE MEAS 300V TC Miniplug ot20c.eps Figure 20. Connections for Simulating a Thermocouple...
- Page 68 Users Manual SOURCE MEAS 300V SOURCE MEAS 300V ot21f.eps Figure 21. Connections for Simulating an RTD...
-
Page 69: Source Scale
Documenting Process Calibrator Using Source Mode Source Scale Percent of scale remains in effect until you change to another source function or press the softkey Scale This feature lets you scale the output in accordance and select another scale mode. with the input requirements of a particular process instrument’s response. -
Page 70: Stepping And Ramping The Output Value
Users Manual 9. Press the softkey. 1. Refer to the appropriate “Using Source Mode” Done subheading earlier in this manual (e.g., Square root percent of scale remains in effect until “Sourcing Electrical Parameters”) and connect you change to another source function or press the the calibrator to the circuit to be tested. -
Page 71: Using Auto Step
Documenting Process Calibrator Using Source Mode Using Auto Step 7. Select values for the following parameters as you are prompted by the display: To have the calibrator make a sequence of steps Starting point (in units or % of scale) automatically, either once through the sequence or Ending point repetitively, proceed as follows:... -
Page 72: Ramping The Output
Users Manual Ramping the Output Proceed as follows to ramp (i.e., sweep the source): Ramping sweeps the source up or down in value. 1. Refer to the appropriate heading earlier in this Use the ramp feature to check a limit switch or alarm, manual (e.g., “Sourcing Electrical Parameters”) and connect the calibrator to the circuit to be or any time you want a smoothly increasing or... - Page 73 Documenting Process Calibrator Using Source Mode 7. Press the softkey. The display changes to 10. Press the softkey. Note the Ramp Done RAMP the following: annunciator next to at the top of the SOURCE display. 11. Select a low-to-high ramp or a high-to-low ramp with the softkey.
- Page 74 Users Manual DOCUMENTING PROCESS CALIBRATOR Trip Relay Voltage Trip Detect Output – MEAS SETUP SOURCE CLEAR (ZERO) Input 4 – 20 mA ENTER – Black SOURCE MEAS 300V Black Source mA ot22c.eps Figure 22. Checking a Relay Output Trip Alarm...
-
Page 75: Simultaneous Measure/Source
Documenting Process Calibrator Simultaneous Measure/Source Table 7 shows the functions you can use Simultaneous Measure/Source simultaneously when Loop Power is disabled. Table Use the MEASURE/SOURCE mode to calibrate or 8 shows the functions you can use simultaneously emulate a process instrument. Press so that a when Loop Power is enabled. -
Page 76: Simultaneous Measure/Source Functions With Loop Power Disabled
Users Manual Table 7. Simultaneous MEASURE/SOURCE Functions with Loop Power Disabled Measure Function Source Function dc V Freq Pressure dc V ac V Frequency ( 20 Hz) Low Frequency (<20 Hz) Continuity 3W RTD 4W RTD Pressure... -
Page 77: Simultaneous Measure/Source Functions With Loop Power Enabled
Documenting Process Calibrator Simultaneous Measure/Source Table 8. Simultaneous MEASURE/SOURCE Functions with Loop Power Enabled Measure Function Source Function dc V Freq Pressure dc V ac V Frequency ( 20 Hz) Pressure... -
Page 78: Calibrating A Process Instrument
Users Manual In this case the calibrator is simulating the output of a Calibrating a Process Instrument thermocouple and measuring the resulting current from the transmitter. Other transmitters use this Note same method. Just go back to MEASUREMENT or To calibrate a HART-capable transmitter SOURCE mode and change the operating using the built-in HART interface, you use a parameters before you press... - Page 79 Documenting Process Calibrator Calibrating a Process Instrument 8. Press for MEASURE/SOURCE mode. The display changes to: gj44s.eps 10. Enter values for of 4.0 mA and 100% 20.0 mA, respectively. Set to 0.5% of Tolerance gj42s.eps span. (Use other values if necessary for your application.) 9.
- Page 80 Users Manual DOCUMENTING PROCESS CALIBRATOR Color depends TEST DC PWR on type of TC – – MEAS SETUP SOURCE CLEAR (ZERO) Original ENTER Circuit Wiring SOURCE MEAS 300V Power – Miniplug Supply Black ot23c.eps Figure 23. Calibrating a Thermocouple Temperature Transmitter...
- Page 81 Documenting Process Calibrator Calibrating a Process Instrument 11. If the process instrument needs more time to in percent of scale. Our example uses five points settle than the calibrator’s normal settling time (0%, 25%, 50%, 75%, and 100%), rising only. (about 2 seconds) at each new stimulus level, Rising is indicated by the up arrow on the enter that time in seconds for...
- Page 82 Users Manual 16. Press the softkey to accept the calibration measurement to stop changing, the Auto Test Done parameters. The display changes to: works correctly for instruments with built-in damping. The error of the expected measured value is shown in the top left of the measure window.
-
Page 83: Adjusting The Transmitter
Documenting Process Calibrator Calibrating a Process Instrument 19. In the results summary test, failures are Adjusting the Transmitter highlighted. An adjustment is required in this Proceed as follows to make the calibration example because three tests show failures. The adjustments to the transmitter. (Always refer to the failures were outside the ±0.5% tolerance that transmitter manufacturer’s instructions to locate the we selected. -
Page 84: As Left" Test Run
Users Manual 4. Adjust the transmitter output for 20 mA. 5. If the span was adjusted in step 4, you must go back and repeat steps 3 and 4 until no more adjustment is required. 6. Now check the transmitter at 50%. If it is within specification, your adjustment is complete. -
Page 85: Test Comments
Documenting Process Calibrator Calibrating a Process Instrument Measure/Source displays are in engineering Test Comments units. The calibrator runs tasks (custom procedures) that are developed using a host computer and compatible The measurement percentage is automatically application software. A task may display a list of corrected for the transmitter’s square-root proposed comments during execution. -
Page 86: Calibrating A Limit Switch
Users Manual Calibrating a Limit Switch The procedure to calibrate a limit switch also uses the As Found and As Left calibration templates. Switch B Select either the Open 1 Pt. Switch 2 Pt. Switch Switch B procedure in a menu after you press the Setpoint As Found Deadband... - Page 87 Documenting Process Calibrator Calibrating a Process Instrument The procedure for testing a pressure limit switch 7. Press to zero the pressure module. follows. The switch in this example sets at a high limit 8. Press of 10 psi. The set state is a closed switch contact. For pressure switches, you use the Manual Test 9.
- Page 88 Users Manual 16. Set by cycling through 26. Press the softkey. Trip Function Trip Cont Done the choices with the key. 27. Press the softkey to run the test again As Left 17. Press the softkey. with the same parameters. Results from the As Done Found and As Left tests are saved in the 18.
-
Page 89: Transmitter Mode
Documenting Process Calibrator Transmitter Mode To set up the calibrator to emulate a transmitter, Transmitter Mode proceed as follows: You can set up the calibrator so that a varying input 1. Disconnect the control bus wires from the (MEASURE) controls the output (SOURCE), like a transmitter output (loop current or dc V control transmitter. - Page 90 Users Manual 7. Press for SOURCE mode. 15. The calibrator is now in Transmitter mode. It is measuring the process input and sourcing the 8. Press the appropriate function key for the control control signal output proportional to the input. output (e.g., ).
-
Page 91: Memory Operations
Documenting Process Calibrator Memory Operations Memory Operations Saving Results As Found/As Left test results are automatically saved at the end of each test routine. Any other time during MEASURE, SOURCE, or MEASURE / SOURCE you can press the softkey to save the data on the Save display for later review. - Page 92 Users Manual gj50s.eps gj51s.eps Enter alphanumeric characters into the highlighted 1. Enter numbers using the numeric keypad, and field with the optional bar code wand or the calibrator letters by highlighting the desired character with keys. , , and keys followed by Enter a space character by pressing the Space To enter alphanumeric characters using the...
-
Page 93: Reviewing Memory
Documenting Process Calibrator Memory Operations Reviewing Memory Data Logging Press the softkey until You can record a series of measurements for later More Choices Review Memory appears, then press the softkey to uploading to a host computer running compatible Review Memory recall and view saved results. - Page 94 Users Manual Proceed as follows to log data: Readings/Minute Maximum Approximate Readings Duration 1. If necessary, press for MEASURE mode. 8000 133 hours 2. Press the softkey. More Choices 8000 66 hours 8000 26 hours 3. Press the softkey. 8000 13 hours 8000 6 hours...
- Page 95 Documenting Process Calibrator Memory Operations 8. After you enter your choice of duration, you can 10. Note the annunciator next to MEASURE see how much memory that duration would Press the softkey to start taking Start Logging consume. See the data.
-
Page 96: Recording Min And Max Measurements
Users Manual Recording Min and Max Measurements Running a Preloaded Task You can set the display to record and show the Press the softkey until the More Choices Tasks maximum and minimum readings. Min and Max softkey appear, then press to view the list of Tasks readings are always undamped, even if Dampen is... -
Page 97: Using The Built-In Calculator
Documenting Process Calibrator Using the Built-in Calculator Saving to and Recalling from the Using the Built-in Calculator Registers For solving mathematical equations that involve the When the calibrator is in calculator mode, the top half calibrator’s source or measured value, you can use of the display shows three register names and their the calibrator’s built-in calculator. -
Page 98: Using The Calculator To Set The Source Value
Users Manual Using the Calculator to Set the Source Quick Guide to Applications Value The following figures show test lead connections and When you store to , the calibrator presents SOURCE which calibrator function to use for many different you with a choice of unit multipliers when appropriate applications. - Page 99 Documenting Process Calibrator Quick Guide to Applications Measure V DOCUMENTING PROCESS CALIBRATOR DOCUMENTING PROCESS CALIBRATOR MEAS SETUP SOURCE MEAS SETUP SOURCE CLEAR (ZERO) CLEAR (ZERO) Circuit 0 to 1V dc ENTER Input ENTER SOURCE MEAS 300V Black SOURCE MEAS 300V Black ot26c.eps ot25c.eps...
- Page 100 Users Manual Measure DOCUMENTING PROCESS CALIBRATOR MEAS SETUP SOURCE CLEAR (ZERO) ENTER SOURCE MEAS 300V BLACK ot27c.eps Figure 27. Monitoring AC Line Voltage and Frequency...
- Page 101 Documenting Process Calibrator Quick Guide to Applications Measure Pressure DOCUMENTING PROCESS CALIBRATOR Source mA Loop Power Disabled S I G N A L – T E S T MEAS Pressure SETUP SOURCE Module CLEAR (ZERO) ENTER SOURCE MEAS 300V Black ot28c.eps Figure 28.
- Page 102 Users Manual Measure mA Loop Power Disabled DOCUMENTING PROCESS CALIBRATOR TEST DC PWR – – MEAS SETUP SOURCE CLEAR (ZERO) Original ENTER Circuit Wiring SOURCE MEAS 300V Power – Supply Black ot29c.eps Figure 29. Measuring the Output Current of a Transmitter...
- Page 103 Documenting Process Calibrator Quick Guide to Applications Source Measure Resistance Resistance DOCUMENTING PROCESS CALIBRATOR DOCUMENTING PROCESS CALIBRATOR MEAS SETUP SOURCE MEAS SETUP SOURCE CLEAR (ZERO) CLEAR (ZERO) ENTER ENTER SOURCE MEAS 300V Circuit SOURCE MEAS 300V Black Black ot30c.eps ot31c.eps Figure 30.
- Page 104 Users Manual Measure Measure Frequency Continuity DOCUMENTING PROCESS CALIBRATOR DOCUMENTING PROCESS CALIBRATOR MEAS SETUP MEAS SOURCE SETUP SOURCE CLEAR CLEAR (ZERO) (ZERO) ENTER ENTER SOURCE MEAS 300V SOURCE MEAS 300V Black Black ot32c.eps ot33c.eps Figure 32. Checking a Switch Figure 33. Checking a Tachometer...
- Page 105 Documenting Process Calibrator Quick Guide to Applications Measure mA Hand Pump Source Pressure DOCUMENTING PROCESS CALIBRATOR Loop Power Enabled 24V S I G N A L – T E S T MEAS SETUP SOURCE Pressure Module CLEAR (ZERO) ENTER SOURCE MEAS 300V Black...
- Page 106 Users Manual DOCUMENTING PROCESS CALIBRATOR Measure mA Output – Input 0 – 1mV, 0 – 10mV, 0– 100mV, 1 – 5V, 0 – 1V, 0 – 10V MEAS SETUP SOURCE Output CLEAR (ZERO) 4–20 mA Input ENTER – Black SOURCE MEAS 300V Black...
- Page 107 Documenting Process Calibrator Quick Guide to Applications Measure DOCUMENTING PROCESS CALIBRATOR Frequency Black MEAS SETUP SOURCE CLEAR ( ZERO) ENTER SOURCE MEAS 300V ot36c.eps Figure 36. Checking a Vortex Shedding Flowmeter...
-
Page 108: Communicating With A Pc
1000 charge/discharge cycles. To personal computer, Microsoft Windows, and Fluke order a replacement battery, order Model BP7235 DPC/TRACK software, or a qualified Fluke partner’s Nickel-Metal Hydride or Model BP7217 Nickel- software are required. A custom serial interface Cadmium Battery Pack. -
Page 109: Internal Lithium Backup Battery
You cannot access the lithium battery. Return the in the calibration screen. Calibration of the 744 calibrator to an authorized Fluke service center listed is to be done by qualified personnel. Refer to the 74X at the back of the manual if you need to replace the Series Calibration Manual (PN 602505). -
Page 110: Service Center Calibration Or Repair
A Fluke 744 calibrator covered by the warranty will when you turn it on. To see if the calibrator is be promptly repaired or replaced (at Fluke’s option) receiving power, cup your hands around the display and returned to you at no charge. -
Page 111: Replacement Parts
“Accessories,” later in this manual for model or part Replacement Parts numbers of standard and optional equipment. Table 9 lists the Fluke part number of each user- replaceable part for Model 744. See “Standard Equipment,” near the front of this manual, and Table 9. -
Page 112: Accessories
Pressure Modules, Fluke model numbers listed Accessories below. (Differential models also operate in gage The Fluke accessories listed below are compatible mode.) Contact your Fluke representative about with the 744 calibrator. For more information about new pressure modules not listed here. - Page 113 Documenting Process Calibrator Accessories Fluke-700PA3: 0 to 5 psi (absolute, wet) C781 Soft Carrying Case Fluke-700PA4: 0 to 15 psi (absolute, wet) C789 Soft Carrying Case Fluke-700PA5: 0 to 30 psi (absolute, wet) Fluke-700PA6: 0 to 100 psi (absolute, wet)
-
Page 114: Specifications
Users Manual 80T-150U Temperature Probe Measurement specifications are valid only when Damping is turned on. When damping is turned off, 80PK series thermocouples or when the annunciator is displayed, floor specifications are multiplied by 3. Floor specifications 80i-410 Clamp-on DC/AC Current Probe are the second part of the specifications, usually 80i-1010 Clamp-on DC/AC Current Probe expressed as "% of full scale."... -
Page 115: Dc Voltage Measurement
Documenting Process Calibrator Specifications DC Voltage Measurement Range Resolution % of Reading +% of Full Scale 1 Year 2 Year 110 mV 0.025% + 0.015% 0.05% + 0.015% 1.1 V 10 V 0.025% + 0.005% 0.05% + 0.005% 11 V 100 V 0.025% + 0.005% 0.05% + 0.005%... -
Page 116: Ac Voltage Measurement
Users Manual AC Voltage Measurement Frequency Range % of Reading + Number of Counts 1 Year 2 Year 20 Hz to 40 Hz 2% + 10 2% + 10 40 Hz to 500 Hz 0.5% + 5 0.5% + 5 500 Hz to 1 kHz 2% + 10 2% + 10... -
Page 117: Dc Current Measurement
Documenting Process Calibrator Specifications DC Current Measurement Range Resolution % of Reading +% of Full Scale 1 Year 2 Year 30 mA 0.01% + 0.015% 0.02% + 0.015% 110 mA 10 A 0.01% + 0.015% 0.02% + 0.015% Temperature Coefficient: (0.001% of rdg. + 0.002% f.s.)/ C in the ranges -10 to 18 C and 28 to 50 C Common Mode Error: 0.01% f.s./(Common Mode Volt) Maximum Input Voltage: 30 V dc Resistance Measurement... -
Page 118: Continuity Testing
Users Manual Continuity Testing Tone Resistance Continuous tone <25 May or may not get tone 25 to 400 No tone >400 Frequency Measurement Accuracy Ranges 1 Year 2 Year 1.00 Hz to 109.99 Hz 0.05 Hz 0.05 Hz 110.0 Hz to 1099.9 Hz 0.5 Hz 0.5 Hz 1.100 kHz to 10.999 kHz... -
Page 119: Dc Voltage Output
Documenting Process Calibrator Specifications DC Voltage Output Range Resolution % of Output + % of Full Scale 1 Year 2 Year 110 mV 0.01% + 0.005% 0.015% + 0.005% 1.1 V 10 V 0.01% + 0.005% 0.015% + 0.005% 15 V 100 V 0.01% + 0.005% 0.015% + 0.005%... -
Page 120: Dc Current Output
Users Manual DC Current Output Range/Mode Resolution % of Output + % of Full Scale 1 Year 2 Year 22 mA/ Source mA 0.01% + 0.015% 0.02% + 0.015% 22 mA/ Simulate Transmitter 0.02% + 0.03% 0.02% + 0.03% (Current Sink) Maximum Burden Voltage: 24 V Temperature Coefficient: (0.003% of output + 0.003% of f.s.)/ C in the ranges -10 to 18 C and 28 to 50 C Common Mode Error: 0.008% f.s/(Common Mode Volt) -
Page 121: Resistance Sourcing
Documenting Process Calibrator Specifications Resistance Sourcing Range Resolution % of Output + ohms 1 Year 2 Year 11.000 0.01% + 0.02 0.02% + 0.02 110.00 10 m 0.01% + 0.04 0.02% + 0.04 1.1000 k 100 m 0.02% + 0. 5 0.03% + 0.5 11.000 k 0.03% + 5... -
Page 122: Frequency Sourcing
Users Manual Frequency Sourcing Range Accuracy 1 and 2 Year 0.00 Hz to 10.99 Hz 0.01 Hz 11.00 Hz to 109.99 Hz 0.01 Hz 110.0 Hz to 1099.9 Hz 0.01 Hz 1.100 kHz to 21.999 kHz 0.002 kHz 22.000 kHz to 50.000 kHz 0.005 kHz Waveform Choices: Zero-symmetric sine or positive square wave, 50% duty cycle. -
Page 123: Temperature, Thermocouples
Documenting Process Calibrator Specifications Temperature, Thermocouples Measure °C Source °C Type Range C 1 Year 2 Year 1 Year 2 Year -250 to -200 -200 to -100 -200 to -100 600 to 1000 -200 to -100 -100 to 900 900 to 1300 -210 to -100 -100 to 800 800 to 1200... - Page 124 Users Manual Temperature, Thermocouples (cont) Measure °C Source °C Type Range C 1 Year 2 Year 1 Year 2 Year 600 to 800 800 to 1000 1000 to 1820 -20 to 0 0 to 100 100 to 1767 -20 to 0 0 to 200 200 to 1400 1400 to 1767...
- Page 125 Documenting Process Calibrator Specifications Temperature, Thermocouples (cont) Measure °C Source °C Type Range C 1 Year 2 Year 1 Year 2 Year -200 to 0 0 to 600 Sensor inaccuracies not included. Accuracy with external cold junction; for internal junction add 0.2 C Resolution: 0.1 C Temperature Scale: ITS-90 or IPTS-68, selectable Compensation: ITS-90 per NIST Monograph 175 for B,R,S,E,J,K,N,T;...
-
Page 126: Temperature, Resistance Temperature Detectors
Users Manual Temperature, Resistance Temperature Detectors Temperature, RTDs Measure °C Source °C Type ( ) Range °C 1 Year 2 Year 1 Year 2 Year Pt(3926) -200 to 0 0 to 630 Pt(385) -200 to 0 0 to 400 400 to 800 Ni(672) -200 to 260 Pt(385) - Page 127 Documenting Process Calibrator Specifications Temperature, Resistance Temperature Detectors (cont) Measure °C Source °C Type ( ) Range °C 1 Year 2 Year 1 Year 2 Year 1000 Pt(385) -200 to 0 0 to 400 400 to 630 Cu(427) -100 to 0 0 to 260 Pt(3916) -200 to -190...
-
Page 128: Loop Power Supply
Users Manual Loop Power Supply Setting 1 Year 2 Year 24 Volt 28 Volt Short circuit protected Maximum Current: 22 mA Maximum Input Voltage: 30 V dc Output Resistance: 250 nominal... -
Page 129: Top And Bottom Limits Of Ranges With Auto Range On
Documenting Process Calibrator Specifications Top and Bottom Limits of Ranges with Auto Range On Range, dc V Measure Top of Range Bottom of Range 110 mV ±110.000 mV 0.000 mV 1.1 V ±1.10000 V ±0.10000 V 11 V ±11.0000 V ±1.0000 V 110 V ±110.000 V... - Page 130 Users Manual Top and Bottom Limits of Ranges with Auto Range On (cont) Range, Current Measure 22 mA +22.000 mA 0.000 mA 110 mA +110.00 mA +30.00 mA Range, Current Source 22 mA +22.000 mA 0.000 mA Range, Frequency Measure 100 Hz 109.99 Hz 1.00 Hz...
-
Page 131: General Specifications
Documenting Process Calibrator Specifications General Specifications Display: 240 by 200 pixel graphic LCD, 70 x 58 mm. Power: Internal battery pack: NiMH, 7.2 V dc, 3500 mAh. Memory Backup: Lithium battery, 5 years typical lifetime. Dimensions: 130 x 236 x 61 mm (5.1 x 9.3 x 2.4 in.). Weight: 1.4 kg (3 lb. - Page 132 Users Manual RF Fields: Accuracy for all functions is not specified in RF fields >3 V/m Accuracy for thermocouple measurement is not specified in RF fields >1 V/m Accuracy for ohms/RTD source is not specified in RF fields >0.5 V/m Accuracy for mA dc measurement is not specified in RF fields >1.5 V/m Safety: Designed in accordance with CAT II 300 Volts Pollution Degree 2, IEC 1010-1,...
- Page 133 Documenting Process Calibrator Specifications 100 120 ˚ Temperature ( ˚ Temperature ( ˚ ˚ = Storage (-20 C — 60 ˚ ˚ = Normal Operation (-10 C — 50 C), humidity typical gj37f.eps Figure 37. LCD Operating Environment Specification...
- Page 134 Users Manual...
-
Page 135: Index
Index W, 7, 12, 20, 36, 43 Bail, 19 Communicating with a PC, 98 4 to 20 ma transmitter Bar code wand, 82 Connections simulating, 48 Battery for electrical measurement, 28 auto save timeout, 23 Continuity charge life, 22 testing, 30 —A—... - Page 136 Users Manual format, 24 Limit switch calibration, 76 —N— Display, 17 Log softkey, 83 Name field in setup, 26 Display language Logging data, 83 Ni-Cd battery, 22 selecting, 24 Loop power providing, 50 simulating, 48 —P— —F— Parts list, 101 Frequency —M—...
- Page 137 Index (continued) —S— Square root, delta-flow Trip detect during ramping, 62 calibration, 42 Troubleshooting, 99 Safety information, 7 Square-law transmitters, 59 Saving results, 81 Standard equipment, 3 —U— Scale Step size softkey, 60 softkey for measure, 41, 42 Stepping the output, 60 Units temperature, 34, 39 Strap, 19...
- Page 138 Users Manual...