
Related Manuals for VDO MS 5200


Summary of Contents for VDO MS 5200
- Page 1 PC 5200 Owner’s manual Mode d’emploi Bedienungsanleitung Gebruiksaanwijzing Istruzioni d’uso Instrucciones de manejo Bruksanvisning Betjeningsvejledning Käyttöohje www.vdodayton.com...
-
Page 2: Table Of Contents
Contents Contents General information ........2 Explanation of symbols . -
Page 3: General Information
General information Explanation of symbols The following symbols are used in this manual: This symbol is used to indicate safety instructions and warnings. These contain important information for the safe use of the unit. Failure to observe this information may result in material damage or personal injury. -
Page 4: For Your Safety
General information For your safety! The use of the navigation system by no means relieves the driver of his/her responsibilities. Always observe the applicable traffic regulations and take the current traffic conditions into consideration. You always have priority over the information provided by the navigation system if the actual traffic situation and the information from the navigation system conflict. -
Page 5: Functions Of Your Navigation System
General information Functions of your navigation system By buying this Multimedia System you have purchased a high-performance instrument which has been designed to assist drivers in daily traffic. Simply enter the destination prior to setting off, activate “Guidance” and you are ready to go. The navigation system will provide driving instructions in audible and visual form. -
Page 6: Maintenance And Care
General information ■ Start-up characteristics If the vehicle has been parked for some time, the satellites will have continued on their orbits. As a result, once the ignition has been switched on, it may take several minutes before a sufficient number of satellites are being received and the system can start analysing their signals. -
Page 7: Operation
Operation Remote controls Depending on the scope of supply, various remote controls might be used. Full functionality can only be ensured if the correct remote control is activated. ■ Activating the correct remote control ☞ Select “Settings –> Remote control” and activate the desired remote control by pressing the OK button. - Page 8 Operation RC 5400 1 VOICE / ALT-R . . . Press briefly: Calls up the current audible guidance message. Press and hold: Switches to the “Alternative Route” menu. 2 4, 6, 8, 2 ..Cursor buttons, move the cursor in the menus. 3 OK .
-
Page 9: Switching On / Off
Operation Switching on / off The navigation computer is switched on and off together with the ignition. ☞ Switch on the ignition. As soon as the navigation system is operational, an instruction about using the system appears in the display. ☞... -
Page 10: Inserting/Changing Sd Cards
Operation Inserting/changing SD cards ■ Inserting the card ☞ Insert the card into the SD card slot with the label facing up and the slanted corner on the right. ☞ Press the card into the slot until it engages. ■ Removing the card ☞... -
Page 11: Start Menu
Operation Start Menu The Start Menu appears after you have confirmed the user instruction. In the Start Menu, the following menu options are available: Navigation: ..Calls up the main navigation menu (e.g. for destination input, guidance, address book, etc.). -
Page 12: Navigation
Navigation Quick reference guide Below you will find a quick reference guide which describes the process for entering a new destination and starting guidance, in simple, brief steps. A detailed description of the individual navigation functions can be found after that. Entering a destination and navigating ☞... -
Page 13: Destination Input
Navigation Destination input The following types of destination input can be used: ❑ Direct address input via town/city or postcode (ZIP), road, house number or junction. ❑ Input of special destinations (hotels, restaurants, filling stations, public institutions, etc.). ❑ Adopting addresses stored in the address book. ❑... - Page 14 Navigation Selecting the town using the post code ☞ Under “City/ZIP:” enter the post code for the desired town. ☞ Then select “List” to obtain a display of all the corresponding parts of the town. ☞ Select the desired town from the list. ✎...
- Page 15 Navigation Loading destination from the address book If the desired destination address is already in the address book, or happens to be one of the last 20 destinations entered, the address can easily be used as a destination address: ☞ Select “Address book”...
- Page 16 Navigation Destination map The destination map can be used to enter a destination by means of: ❑ Transferring a destination using a cursor. ❑ Direct entry of the geographical position (GPS coordinates). ■ Cursor If the destination is not near to the vehicle location, then enter the destination as precisely as possible beforehand using the direct address input.
-
Page 17: Via Points
Navigation Via points If you wish to visit other locations en route to the entered destination address, these can be stored as via points. The navigation system then plans the route to include the via points in the given sequence before the destination address is reached. ✎... -
Page 18: Tours
Navigation Tours The Tours menu provides you with the option of driving to a series of various destinations one after the other without having to enter each destination individually. You only need to enter the individual stages of the tour once via the destination input or the address book and store this tour under a freely selectable name. - Page 19 Navigation Showing tour With this function it is possible to view the list of tour stages (intermediate destinations) for the selected tour. ☞ Select “Show list”. The list of intermediate destinations for the selected tour is displayed. ☞ If you select one of the tour stages from the list, the details of the address are displayed.
- Page 20 Navigation ■ Saving tour as ... Use this function if you have created a new tour or would like to save an existing tour under a different name. ☞ In the “Edit tour” menu select the option “Save as”. ☞ Using the keypad enter a name for the tour that is no more than 16 characters long.
-
Page 21: Guidance
Navigation Guidance When you have entered all of the available data for the destination address, you can start the guidance function. ✎ For guidance purposes, it is sufficient if you enter a town/city name. The navigation system then guides you to the town or city limit. ☞... - Page 22 Navigation Audible messages As soon as guidance is activated, acoustic routing information is provided in addition to the symbols on the guidance screens. ■ You didn’t hear the information? ☞ Press the VOICE button on the remote control. The last direction is repeated and/or updated driving directions are provided. ✎...
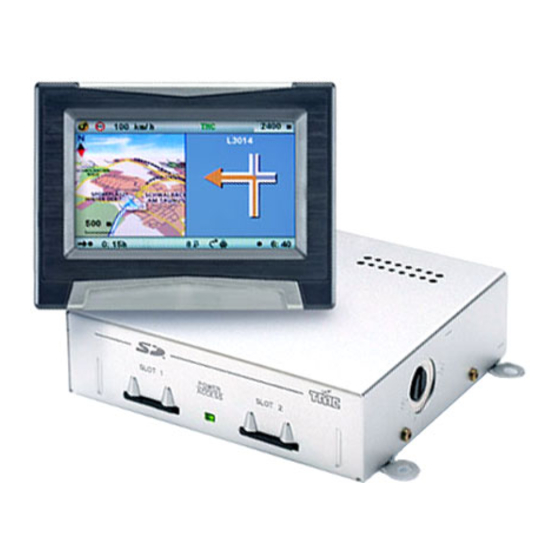
- Page 23 Navigation Symbol display The symbol display provides the following information: 1 Distance to destination or to next via point. 2 Directional arrow (linear distance) to destination or to next via point. 3 Menu title* 4 Distance to the next change of direction. 5 Name of the street to turn into (next change of direction).
- Page 24 Navigation Map display The map display shows the following information: 1 Selected scale. 2 Planned route (shown in white). 3 Compass: The black arrow points north. 4 Distance to the next change of direction. 5 Simplified diagram of the driving direction, the next junction or crossing. 6 Vehicle position;...
- Page 25 Navigation Split-screen display (combined display) The two split-screen displays combine the map display on the left side with the symbol or the trip-computer display on the right. ✎ The menu options for the split- screen display are the same as for the map display.
-
Page 26: Tmc Traffic Information
Navigation TMC traffic information Your navigation system receives traffic information via its integrated Dynamic TMC Receiver, which is then used for the dynamic route planning. You can also collect information about the current traffic situation, either as a text message or in the map display. To be able to use this TMC information, the following prerequisites must be fulfilled: ❑... - Page 27 Navigation Display of road obstructions ■ In the status line In the top right status line, the system displays whether there are any road obstructions on the planned route. “T” red: ..Road obstructions on the planned route that would cause a severe delay.
- Page 28 Navigation ■ View TMC messages in detail ☞ Press the OK button to open the pop-up menu. ☞ Select “Traffic view”. A cursor appears on the map as black brackets. ☞ Move the cursor to the desired TMC symbol with the cursor buttons and then press the OK button.
-
Page 29: Dynamic Route Planning
Navigation Dynamic route planning With the help of the TMC traffic information, the dynamic route planning integrates the entire traffic situation in an adjustable radius (traffic horizon) around the current position into its calculation of the route. If a traffic obstruction (e.g. stationary traffic) is reported via TMC for the planned route, the navigation system will analyse the information and calculate the anticipated delay. -
Page 30: The "Info" Menu
Navigation The “Info” menu The “Info” menu can be selected from the Start Menu and from all guidance screens. From a guidance screen: ☞ Press the OK button from one of the navigation screens. ☞ Select “Info”, press the OK button. ☞... -
Page 31: Address Book
Navigation Address book The navigation system provides the capability of storing at least 200 destination addresses in a personal address book. The address book is divided into the two categories “Private” and “Business”. You can also store an address for quick access (e.g. - Page 32 Navigation ■ Deleting addresses ☞ Select “Delete address” and confirm with the OK button. ☞ If you would like to delete a particular address, select “Specific address” and then the desired address book category. A list with the names of the stored addresses is displayed. ☞...
-
Page 33: Settings
Settings Adapting the navigation system You can change several settings to adapt the navigation system to meet your personal requirements. ☞ Select “Settings” in the Start Menu. The “Settings” menu appears. The following settings can be made: Map view Activating and changing settings for the automatic map scale (“Auto-scale”). When the function is active, the scale for the map display is automatically set to the specified value, depending on the current location of the car. - Page 34 Settings Message selection Selection of the type of TMC traffic messages that should be displayed by the navigation system and are to be taken into account for dynamic route planning. ☞ Select “Select all” or “Deselect all” if you would like to activate/deactivate all the message types simultaneously.
- Page 35 Settings Dynamic route You can set the following parameters for the dynamic route planning: ❑ Re-routing level: Use this setting to specify whether or not the navigation system should plan a detour in the event of traffic obstructions. Five levels are available. The lowest level (1) means that the direct route will go through the stationary traffic depending on the conditions and the anticipated delay.
- Page 36 Settings Remote control Settings for the support of various remote controls: ☞ Activate the remote control with which your system can be operated (e.g. if you also use a steering wheel remote control). ☞ Store the modified settings using “Return”. ☞...
- Page 37 Settings ■ Audible settings. Settings for the audible guidance messages: ❑ SDVC: Adjustment for speed-dependent volume increase. Small (1) to large (5) increase in volume on acceleration. For “0” there is no increase. ❑ Volume: Setting of the volume for the guidance messages. ❑...
- Page 38 Settings Info Points Selection and activation/deactivation of the messages concerning Info Points (e.g. tourist attractions, petrol stations, etc.). More information on this function can be found under “Info Points function” in the “Extras” section, page 38.
-
Page 39: Extras
Extras Info Points function Some databases support your navigation system’s Info Points function with a visual and audible indication of important points along your route. Different providers of travel and traffic information have optimised these specifically for navigation systems. ☞ Select “Info Points”... - Page 40 Extras ■ Search engine operation ☞ Press the 4 or 6 button to go from one option to another in the search screen. The option selected will have a dark background. ☞ Confirm the highlighted option to activate the relevant function. ☞...
-
Page 41: Appendix
Appendix TMC symbols This list provides an overview of all the TMC symbols used in the guidance and map displays. Symbol Meaning Symbol Meaning For small scales Accidents Road obstruction in the direction of Slow or queuing traffic > travel indicated Road obstruction in both directions Stationary traffic of travel... -
Page 42: Default Settings
Appendix Default settings If the “Settings–> System information –> Default settings” function is implemented, the following settings are reset to the factory values: Settings Default value Time zone Time format 24-hour format Date format day.month.year Measuring units km/m Audible info. Volume Middle setting SDVC...