Table of Contents
Advertisement
Quick Links
Download this manual
See also:
User Manual
Advertisement
Table of Contents

Related Manuals for 3Com OfficeConnect 3CRWDR200A-75


Summary of Contents for 3Com OfficeConnect 3CRWDR200A-75
- Page 1 OfficeConnect ® ADSL Wireless 108Mbps 11g Firewall Router User Guide Model WL-553 3CRWDR200A-75 3CRWDR200B-75 www.3Com.com Part Number: 10015251 Rev. AA Published June, 2006...
- Page 2 Software is delivered as “Commercial Computer Software” as defined in DFARS 252.227-7014 (June 1995) or as a “commercial item” as defined in FAR 2.101(a) and as such is provided with only such rights as are provided in 3Com’s standard commercial license for the Software. Technical data is provided with limited rights only as provided in DFAR 252.227-7015 (Nov 1995) or FAR 52.227-14 (June 1987), whichever is...
-
Page 3: Table Of Contents
ONTENTS BOUT UIDE Naming Convention Conventions Feedback about this User Guide Related Documentation NTRODUCING THE OUTER OfficeConnect ADSL Wireless 108Mbps 11g Firewall Router Firewall Router Advantages Package Contents Minimum System and Component Requirements Front Panel Rear Panel ARDWARE NSTALLATION Introduction... - Page 4 Windows 95/98/ME Macintosh Disabling PPPoE and PPTP Client Software Disabling Web Proxy UNNING THE ETUP IZARD Accessing the Wizard Password Time Zone ATM PVC Configuration IGMP Connection Mode LAN Settings Wireless Settings Summary OUTER ONFIGURATION Navigating Through the Router Configuration Pages...
- Page 5 Virtual Servers Special Applications Virtual DMZ Internet Access Policy Content Filter System Tools Restart Time Zone Configuration Upgrade Advanced Routing Static Route DDNS IPSec Proxy ARP Management Syslog SNMP Trusted Station Remote Management Diagnostics Device Info Summary Statistics Route Support/Feedback...
- Page 6 Running the Discovery Application Windows Installation (95/98/2000/Me/NT) IP A DDRESSING The Internet Protocol Suite Managing the Router over the Network IP Addresses and Subnet Masks How does a Device Obtain an IP Address and Subnet Mask? DHCP Addressing Static Addressing Auto-IP Addressing...
- Page 7 AFETY NFORMATION OFTWARE ICENSE GREEMENT ISP I NFORMATION LOSSARY ADSL W EGULATORY OTICES FOR THE IRELESS 108M IREWALL OUTER NDEX...
-
Page 9: Bout His Uide
ADSL Wireless 108Mbps 11g Firewall Router (3CRWDR200A-75 and 3CRWDR200B-75). This guide is intended for use by those responsible for installing and setting up network equipment; consequently, it assumes a basic working knowledge of LANs (Local Area Networks) and Internet Router systems. -
Page 10: Conventions
Return or Enter. Do not press Return or Enter when an instruction simply says “type.” Keyboard key names If you must press two or more keys simultaneously, the key names are linked with a plus sign (+). Example:... -
Page 11: Feedback About This User Guide
Feedback about this User Guide Your suggestions are very important to us. They will help make our Feedback about documentation more useful to you. Please e-mail comments about this this User Guide document to 3Com at: pddtechpubs_comments@3com.com Please include the following information when commenting:... - Page 12 BOUT UIDE...
-
Page 13: Introducing The Router
Now, you can network the computers in your office, connect them all to a single Internet outlet, and harness the combined power of all of your computers. - Page 14 When you use the Firewall Router in your network (Figure 2), it becomes your connection to the Internet. Connections can be made directly to the Router, or to an OfficeConnect Switch or Hub, expanding the number of computers you can have in your network.
-
Page 15: Firewall Router Advantages
Easy-to-use, Web-based setup and configuration Provides centralization of all network address settings (DHCP) Acts as a Virtual server to enable remote access to Web, FTP, and other services on your network Security — Firewall protection against Internet hacker attacks and... - Page 16 1: I HAPTER NTRODUCING THE OUTER One RJ 45 cable (typically an Ethernet cable) if your model is 3CRWDR200B-75 One Product Range Sheet One CD-ROM containing the Firewall Router Discovery program and this User Guide Installation Guide One Support and Safety Information Sheet...
-
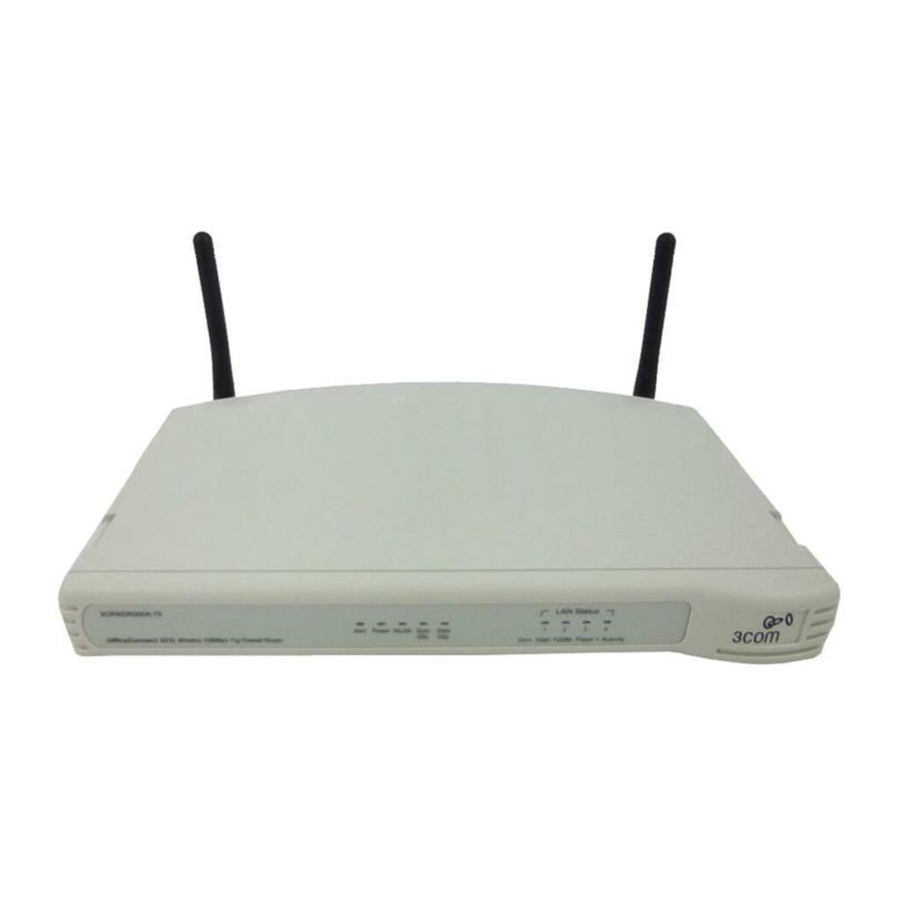
Page 17: Minimum System And Component Requirements
A Web browser that supports JavaScript, such as Netscape 4.7 or higher, Internet Explorer 5.0 or higher, or Mozilla 1.2.1 or higher. The front panel of the Router contains a series of indicator lights (LEDs) Front Panel that help describe the status of various networking and connection operations. - Page 18 Green (100 Mbps link) / yellow (10 Mbps link) If the LED is on, the link between the port and the next piece of network equipment is OK. If the LED is flashing, the link is OK and data is being...
-
Page 19: Rear Panel
If the LED is on, the link between the Router and the cable or DSL modem is OK. If the LED is flashing, the link is OK and data is being transmitted or received. If the LED is off, nothing is connected, the... - Page 20 9 Power Adapter OK LED Green Indicates that the power adapter is supplying power to the Router. If the LED is off, there may be a problem with the power adapter or adapter cable. 10 Reset Button Press this button for resetting your Router to factory default.
-
Page 21: Hardware Installation
Internet. is centrally located to the wireless computers that will connect to the Router. A suitable location might be on top of a high shelf or similar furniture to optimize wireless connections to computers in both horizontal and vertical directions, allowing wider coverage. -
Page 22: Using The Rubber Feet
Water or moisture cannot enter the case of the unit. Air flow around the unit and through the vents in the side of the case is not restricted. 3Com recommends you provide a minimum of 25 mm (1 in.) clearance. -
Page 23: Before You Install Your Router
Before you Install your Router You will need two suitable screws to wall mount the unit. To do this: 1 Ensure that the wall you use is smooth, flat, dry and sturdy and make two screw holes which are 150 mm (5.9 in.) apart. -
Page 24: Powering Up The Router
HAPTER ARDWARE NSTALLATION You should leave the Authentication Method as its default: Auto if your ISP doesn’t specify this parameter. If your ISP allocates fixed or static IP information, you need the following information: IP Address : ____.____.____.____ Subnet Mask : ____.____.____.____... -
Page 25: Connecting The Router
Cable/DSL port on the rear panel of the Router. Check that the DSL Sync status LED lights on the Router. 2 Connect your computer to one of the four LAN ports on the Router using a Category 5 twisted pair cable. Check that the corresponding LAN status LED on the Router lights. - Page 26 2: H HAPTER ARDWARE NSTALLATION To communicate wirelessly with your Router, your wireless NIC should be set as follows: Encryption — none Service Area Name/SSID — 3Com Channel — 11...
- Page 27 Router. Refer to Chapter 2 for details on how to do this. 2 Launch your Web browser on the computer. 3 Enter the following URL in the location or address field of your browser: (Figure 9). The Login screen displays. http://192.168.1.1...
- Page 28 Select the country you wish to configure the Firewall Router for, then click Apply. (Figure If your purchased your Firewall Router in the United States, you do not see this screen, as it is automatically set. Figure 11 Country Selection Screen...
-
Page 29: Windows 95/98/Me
Wizard. If your Router has not been configured before, the Wizard will launch automatically (refer to Figure 13). 7 Click Next. 8 You will be guided step by step through a basic setup procedure. Figure 12 Welcome Screen... -
Page 30: Disabling Pppoe And Pptp Client Software
Password When the Change Administration Password screen (Figure appears, type the Old Password, then a new password in both the New Password and Confirm Password boxes. 3Com recommends entering a new password when setting up the Firewall Router for the first time. The Firewall Router is shipped from the factory with a default password, admin. -
Page 31: Accessing The Wizard
Accessing the Wizard 2. Write the new password down and keep it in a safe place, so that you can change your settings in the future. Click Next to display the Time Zone setup screen (Figure 15). Figure 15 Time Zone Screen... - Page 32 CBR service. VBR (Variable Bit Rate) is subdivided into a real time (RT) class and non-real time (NRT) class. VBR (RT) is used for connections in which there is a fixed timing relationship between samples. VBR (NRT) is used for connections in which there is no fixed timing relationship between samples, but that still need a guaranteed QoS.
- Page 33 Next. PPPoE/PPPoA Mode Figure 17 PPPoE Screen To setup the Firewall Router for use with a PPP over Ethernet (PPPoE) or PPP over ATM (used mainly in UK) connection, use the following procedure: 1 Enter your PPP over Ethernet/ATM user name in the PPPoE/PPPoA User Name text box.
-
Page 34: Password
UNNING THE ETUP IZARD Do not enter anything in this box if your ISP does not require a service name. 4 Select PPP Authentication Method from the drop-down menu. 5 Dial on Demand: Check the box to make a connection while in demand. -
Page 35: Time Zone
4 Enter your primary DNS address in the Primary DNS Address text box. 5 Enter your secondary DNS address in the Secondary DNS Address text box. 6 Check all of your settings, and then click Next or back to go back to the pervious screen. -
Page 36: Igmp
IPoA Mode Figure 19 IPoA Mode Screen To setup the Firewall Router for use with a IPoA connection, use the following procedure: 1 Enter the IP Address for WAN interface. 2 Enter the Subnet Mask for WAN interface. - Page 37 Bridging Mode Figure 20 Bridging Mode Screen To set up the Firewall Router for use as a bridge in which the router is the bridge between WAN and LAN, use the following procedure: 1 Enter the name for the bridging service.
- Page 38 4 Configure the second IP Address and Subnet Mask for the LAN interface: Check this box to make another set of IP Address and Subnet Mask to connect to your router if they are not included in the range of DHCP server.
- Page 39 It is very important that you set up your wireless clients to use the same Service Area Name or SSID as the one you use on this screen. If your clients use a different Service Area Name then they will not be able to communicate with the Firewall Router.
- Page 40 4: R HAPTER UNNING THE ETUP IZARD channel you select as this may be useful if you experience problems with your clients. Figure 24 Configuration Summary Screen Summary When you complete the Setup Wizard, a configuration summary will display. 3Com recommends that you verify the configuration information of the Firewall Router and then print this page for your records.
-
Page 41: Lan Settings
If you have made changes to the LAN Settings or wireless configuration options, you may need to reconfigure the computer you are using in order to make contact with the Firewall Router again. Your Firewall Router is now configured and ready for use. - Page 42 4: R HAPTER UNNING THE ETUP IZARD...
-
Page 43: Setting U P Your Computers
If your computers are configured with fixed or static addresses and you do not wish to change this, then you should use the Discovery program on the Router CD-ROM to detect and configure your Router. -
Page 44: Summary
HAPTER ETTING OMPUTERS Figure 6 Local Area Properties Screen 6 Ensure that the options Obtain an IP Address automatically, and Obtain DNS server address automatically are both selected as shown Figure 7. Click OK. Figure 7 Internet Protocol (TCP/IP) Properties Screen... -
Page 45: Windows Xp
2 Double click on Network. Select the TCP/IP item for your network card and click on Properties. 3 In the TCP/IP dialog, select the IP Address tab, and ensure that Obtain IP address automatically is selected. Click OK. If you are using a Macintosh computer, use the following procedure to... - Page 46 Figure 8 Internet Properties Screen You may wish to remove the PPPoE client software from your computer to free resources, as it is not required for use with the Router. Ensure that you do not have a web proxy enabled on your computer.
-
Page 47: Router Configuration
IP address instead. When you have browsed to the Router, log in using your system password (default admin). At the left side of all screens is a main menu, as shown in Figure 26 Main Menu page 47. -
Page 48: Option Tabs
Getting Help On every screen, a Help button is available which provides access to the context-sensitive online help system. Click Help for further assistance and guidance relating to the current screen. -
Page 49: Notice Board
Welcome Screen Figure 26 Notice Board Screen Notice Board The Notice Board is used to display the firmware version and configuration warning messages. For example, you would be warned if you had disabled wireless networking or wireless encryption. Figure 27 Password Screen... -
Page 50: Wizard
3 Enter the new password again in the Confirm Password field 4 Click Save/Apply to save the new password The password is case sensitive. If you have forgotten your password you need to reset the Router. "Reset to Factory Default" on page Figure 28 Wizard Screen Wizard Click WIZARD... -
Page 51: Lan Settings
Select on the box to enable it. 4 Enable DHCP server on the LAN: Check this box to enable the DHCP service on the router. The Firewall Router contains a Dynamic Host Configuration (DHCP) server that can automatically configure the TCP/IP settings of every computer on your network. -
Page 52: Dhcp Lease Table
5: R HAPTER OUTER ONFIGURATION Subnet Mask to connect to your router if they are not included in the range of DHCP server. 7 Enter the Secondary IP Address and Subnet Mask. Figure 30 DHCP Lease Table Screen DHCP Lease Table The DHCP Lease table screen list the client’s name, MAC Address, IP... -
Page 53: Configuration
Select a number from the drop-down list to specify which Channel the Router will transmit and receive on. If another access point or Router nearby is using the same Channel as you, there will be a reduction in the performance of your network. If this seems to be the case, you should select a different channel number. - Page 54 Router as it allows any wireless client to see your wireless LAN. If you have a wireless client that can detect all the available SSIDs in your area, your client will not list the Router SSID unless this feature is enabled.
-
Page 55: Encryption
Wireless PC can eavesdrop on your network. 3Com recommends that you get the network working with encryption disabled first and then enable it as the last step. This will simplify setting up your network. -
Page 56: Configuring Wpa/Wpa2 Encryption
(This should only be used when a RADIUS server is connected to the Router). WPA provides a higher level of security, provided by its longer key and dynamic changes made to the key over time. 3Com recommends that you use WPA with any clients which support it. - Page 57 Wireless Settings Using the Radius Server Figure 33 WPA/WPA2 Encryption Screen - Radius Server To set up WPA/WPA2/Mixed WPA and WPA2 with Radius Server: 1 Select Encryption Method from the drop-down box. 2 Enter the frequency for key generating in seconds.
-
Page 58: Configuring Wep Encryption
To set up Pre-Shared Passphrase as the WPA Type: 1 Select Encryption Method from the drop-down box. Enter a phrase of between 8 and 63 characters in length in the Pre-Shared key field. This passphrase will be used to generate a 256 bit key dynamically. - Page 59 Router, Key 2 on the Wireless computer must match Key 2 on the Router and so on. 4 Select the Current WEP Key, which is the key the Router uses when it transmits. You can change the selected key periodically to increase the security of your network.
-
Page 60: Wmm
ONFIGURATION Some wireless adapters have only one key available on their WEP configuration page. If this is the case ensure it is the same as Key 1 on the Router and that it is selected as the Current WEP key. -
Page 61: Connection Control
CWMax: Maximum Contention Window. It should be small for high-priority traffic. AIFSN: Arbitrary Inter-Frame Space Number, Sometimes referred to as the Random Backoff wait. This value should also be smaller for higher-priority traffic. TXOPLimit: Transmit Opportunity Limit. Enter a number in millisecond. -
Page 62: Advanced Wireless Settings
HAPTER OUTER ONFIGURATION A higher level of security can be achieved for your wireless network if, in addition to using encryption, you specify that only certain wireless computers can connect to the Router. By default, any wireless computer that has the same Service Area Name/SSID, channel and encryption settings as the Router can connect to it. -
Page 63: Internet Settings
Fragment Threshold: defines a threshold above which the wireless packet will be split up, or fragmented. For a fragmented packet, if transmission of part of it were to be interfered with, only the portion that was successfully transmitted would need to be re-sent. Throughput will generally be lower for fragmented packets, since the fixed packet overhead consumes a higher portion of the RF bandwidth. -
Page 64: Firewall
Add a new WAN configuration: please refer to Chapter 4 “Accessing the Wizard” On the main frame of the Firewall setup screen is a menu with six tabs: Firewall Virtual Servers, Special Applications, DMZ, SPI, Internet Access Policy and Content Filter. -
Page 65: Special Applications
5 Click Add to return to the Virtual Server configuration page to enter more entries. The is a total of 32 services can be defined in the Virtual Server. Figure 40 Special Applications Screen Special Applications Select Special Apps tab to display NAT-Port Triggering Setup screen. -
Page 66: Virtual Dmz
To configure special applications: 1Click Add open the Virtual Server Settings page. 2Select a service from the drop-down list or type in your desired services. 3The commonly used port with the associated service will be entered in the table automatically. You may change them manually. -
Page 67: Spi
Denial of Service (DoS) attacks are aimed at devices and networks with a connection to the Internet. The goal is not to steal information, but to disable a device or network so users no longer have access to network resources. - Page 68 (DOS) features to further guard your networks from internet attacks. Web Filters: Check on the box to filter out the internet activities/programs from the following: Proxy, Java, ActiveX, and Cookies. Click on Save to save your changes or Cancel to cancel your changes.
-
Page 69: Internet Access Policy
24-hour clock format. For example, to allow access Monday through Friday between 9 am and 5 pm, check the boxes for Mon, Tue, Wed, Thu and Fri, and select... - Page 70 7 Select on an internet service/application to blocked the service/port number. 8 Type in the Website Accessing by URL Address with the URL that you want to block access from. 9 Type in the Website Blocking by Keyword with the keywords on the URL.
-
Page 71: Content Filter
You can subscribe to the 3Com Content Filter Service, which enables you to block or allow the URLs of a number of pre-defined categories. The Router comes with a 14-day free trial of the 3Com Content Filter Service. To activate the 14-day free trial of the service, you must first register your Router at www.3com.com. -
Page 72: System Tools
2 Check the Enable Content Filter check box. 3 Select the Content Filter Server that you require from the drop-down list. If you select custom entry, enter the server IP address in the text box. 4 Select the Server Timeout value in milliseconds. The default is 3000 milliseconds (3 seconds). -
Page 73: Time Zone
Figure 46 Time Zone Screen Time Zone Check the Automatically synchronize with internet time servers to read the correct time from NTP servers on the Internet and sets its system clock automatically. You may enter two NTP servers according to your priority. -
Page 74: Configuration
The password will remain unchanged. Reset to Factory Default If you want to reset the settings on your Router to those that were loaded at the factory, click RESET. You will lose all your configuration changes. The Router LAN IP address will revert to 192.168.1.1 and so are the wireless settings, and the DHCP server on the LAN will be enabled. -
Page 75: Upgrade
Once you have done this, select Browse to tell your web browser where this file is on your computer, and then click Apply. The file will be copied to the Router, and once this has completed, the Router will restart. -
Page 76: Routing
Figure 49 The Routing-Default Gateway screen Routing Check the box Enable Automatic Assigned Default Gateway to automatically assign a gateway to the router. Or you may enter the Default Gateway IP Address in the field provided and select on its associated interface. -
Page 77: Rip
Network Address - the network address of the route. If network address and subnet mask are both set to 0.0.0.0, this is the default route. Subnet Mask - the subnet mask of the route. If network address and subnet mask are both set to 0.0.0.0, this is the default route. - Page 78 RIP enabled devices. If you select Silent, the Router only receives RIP update messages. 2 Select either 1 (for RIPv1) or 2 (for RIPv2) from the Version drop-down list. 3Com recommends that you use RIPv1 if there is any RIP enabled device on your network that does not support RIPv2.
-
Page 79: Dns
Advanced Figure 52 The DNS Screen The DNS Screen lets you specify your Domain Name Service (DNS) server’s information. You may check the Enable Automatic Assigned DNS for automatically assigned DNS or you may manually specify your DNS server’s IP Address. - Page 80 2 In the Username text box, enter the account name. 3 In the Password text box, enter the account password. 4 In the Refresh Time box, enter how often you want the service to automatically refresh, in days. The default is three days.
-
Page 81: Dsl
Figure 54 The DSL Setting Screen The DSL Screen lets you configure your DSL connections. Check the boxed for the type of DSL connection that you are using. Select the type of phone line you are using. Also Check the compatibility type. -
Page 82: Proxy Arp
Click on Add New IPsec to add new IPSec configurations. Select on the drop- down menu and enter the values in the text boxes for settings in your IPSec. Figure 56 The Proxy ARP Screen... -
Page 83: Alg
Advanced 4 In IP Range From, type the starting IP address of the IP address range that your ISP assigned to you. 5 In To, type the ending IP address of the IP address range. Figure 57 The ALG Screen An Application Layer Gateway (ALG) is a SIP Back to Back User agent (B2BUA). -
Page 84: Management
To send the device logs to a syslog server: 1 Click on Configure syslogs. 2 Click on Enable. 3 Select on the drop-down menu for a list of available types of logging activities. 4 Select on the Display Level for a list of available types of logging... -
Page 85: Snmp
Management 5 Select on the Mode for logging mode: Local, Remote, or Both. For the remote logging, enter the remote server’s IP address and Port number for receiving the logs. Figure 59 The SNMP Screen SNMP Simple Network Management Protocol (SNMP) is the protocol used for exchanging management information between network devices. -
Page 86: Trusted Station
Figure 61 The Remote Management Screen Remote Management It is possible to administer the Router remotely. Select one of the following options for remote administration: Disable Remote Administration - This option is set as default. -
Page 87: Diagnostics
Diagnostics Enable administration from a single Internet Host - Only the specified Host IP Address can manage the Router. Any other users will be rejected. Enable administration from a whole subnet - This option allows a number of users within the specified Host Network Address and Subnet Mask to administer the Router. -
Page 88: Device Info
Device Info Figure 63 Summary Screen Summary The Summary screen is used to display the information of your LAN status. Figure 64 WAN Status Screen The WAN Status Screen is used to display the information of your DSL Connection Status. -
Page 89: Statistics
Device Info Figure 65 Statistics Screen Statistics The Statistics Screen is used to display the information of your LAN/WAN/ATM/ADSL Connection Statistics. Click on the button for each connection device for more detailed information. Figure 66 Route Screen Route The Route Screen is used to display the routing status/information between your LAN and WAN. -
Page 90: Arp
5: R HAPTER OUTER ONFIGURATION Figure 67 ARP Screen The ARP screen is used to display the Proxy ARP status. Refer to “Proxy ARP” in this section for more information. Selecting Support/Feedback from the main menu displays the Support Support/Feedback... -
Page 91: Support
Internet links that provide information and support concerning the Router (Figure 68). Figure 69 Feedback Screen Feedback Selecting the Feedback option displays the Feedback screen and allows you to provide feedback to 3Com on the operation of your... - Page 92 5: R HAPTER OUTER ONFIGURATION Router (Figure 69). This screen should not be used to obtain technical support.
-
Page 93: Troubleshooting
Configuration Confirm that the physical connection between your computer and the Router is OK, and that the LAN Status LEDs on the Router and NIC are illuminated and indicating the same speed (10Mbps or 100Mbps). Some NICs do not have status LEDs, in which case a diagnostic program may be available that can give you this information. -
Page 94: Connecting To The Internet
Router. From the Start menu, choose Run and then enter winipcfg. Check that the computer has an IP address of the form 192.168.1.xxx (where xxx is in the range 2-254), the subnet mask is 255.255.255.0, and the default Router is 192.168.1.1 (the address of the Router). -
Page 95: Forgotten Password And Reset To Factory Defaults
Router. 3 Using a straight through Ethernet cable, connect the Ethernet Cable/DSL port on the rear of the Router to any one of the LAN ports. 4 Re-apply power to the Router. The Alert LED will flash as the Router starts up, and after approximately 30 seconds will start to flash more slowly (typically 2 seconds on, 2 seconds off). -
Page 96: Wireless Networking
Access Point that is designed to operate in Infrastructure mode. Ad Hoc mode is not supported by the Router. If you have a wired and a wireless NIC in the same computer, ensure that the wired NIC is disabled. Check the status of the Router Wireless LED, it should be lit if wireless is enabled and will flash when there is wireless activity. - Page 97 As the signal quality weakens then the speed falls back to a lower speed. The speeds supported by 802.11g are 54 Mbps, 48 Mbps, 36 Mbps, 24 Mbps, 18 Mbps, 12 Mbps, and 6 Mbps. The speeds supported by 802.11b are 11 Mbps, 5.5 Mbps, 2 Mbps and 1 Mbps.
-
Page 98: Replacement Power Adapters
“Replacement Power Adapters” below. If the Power Adapter OK LED is lit but the Power LED is unlit then there may be a fault with your unit. Contact 3Com Technical Support. Check that you are using the correct power adapter for your Router. -
Page 99: Alert Led
Router will enter a “recovery” state; DHCP is disabled, and the LAN IP address is set to 192.168.1.1. Follow the instructions below to upload a new copy of the system software to a Router unit in this state. -
Page 100: Frequently Asked Questions
Subnet mask: 255.255.255.0 Default Router address: 192.168.1.1 3 Restart the computer, and re-apply power to the Router. 4 Using the Web browser on the computer, enter the following URL in the location bar: http://192.168.1.1. This will connect you to the Microcode Recovery utility in the Router. - Page 101 The Router supports VPN passthrough, which allows VPN clients on the LAN to communicate with VPN hosts on the Internet. It is also possible to set up VPN hosts on your LAN that clients elsewhere on the Internet can connect to, but this is not a recommended configuration.
- Page 102 6: T HAPTER ROUBLESHOOTING...
-
Page 103: Sing He Com Iscovery Tool
A menu will appear; select Router Discovery. Discovery will find the Router even if it is unconfigured or misconfigured. Figure 70 Discovery Welcome Screen 2 When the Welcome screen is displayed click on Next and wait until the application discovers the Routers connected to your LAN. - Page 104 Figure 72 shows an example Discovered Devices screen. Highlight the Cable/DSL Router by clicking on it, and press Next. Figure 72 Discovery Finish Screen 4 Click on Finish to launch a web browser and display the login page for the Router.
-
Page 105: Ip Addressing
Protocol Suite Transmission Control Protocol/Internet Protocol (TCP/IP) is probably the most widely known and is a combination of two of the protocols (IP and TCP) working together. TCP/IP is an internationally adopted and supported networking standard that provides connectivity between equipment from many vendors over a wide variety of networking technologies. - Page 106 B: IP A PPENDIX DDRESSING For your network to work correctly, all devices on the network must have: The same sub-network address. The same subnet mask. The only value that will be different is the specific host device number. This value must always be unique.
-
Page 107: How Does A Device Obtain An Ip Address And Subnet Mask
PC 4 192.168.002.230 255.255.0.0 Router 192.168.002.72 255.255.0.0 There are three different ways to obtain an IP address and the subnet How does a Device mask. These are: Obtain an IP Address and Dynamic Host Configuration Protocol (DHCP) Addressing Subnet Mask? -
Page 108: Auto-Ip Addressing
Network devices use automatic IP addressing if they are configured to Auto-IP Addressing acquire an address using DHCP but are unable to contact a DHCP server. Automatic IP addressing is a scheme where devices allocate themselves an IP address at random from the industry standard subnet of 169.254.x.x (with a subnet mask of 255.255.0.0). - Page 109 WARNING: The Router generates and uses radio frequency (rf) energy. In some environments, the use of rf energy is not permitted. The user should seek local advice on whether or not rf energy is permitted within the area of intended use.
- Page 110 AFETY NFORMATION WARNING: Disconnect the power adapter before moving the unit. WARNING: RJ-45 ports. These are shielded RJ-45 data sockets. They cannot be used as telephone sockets. Only connect RJ-45 data connectors to these sockets. Wichtige Sicherheitshinweise VORSICHT: Warnhinweise enthalten Anweisungen, die Sie zu Ihrer eigenen Sicherheit befolgen müssen.
- Page 111 VORSICHT: Es sind keine von dem Benutzer zu ersetzende oder zu wartende Teile in dem Gerät vorhanden. Wenn Sie ein Problem mit dem Router haben, das nicht mittels der Fehleranalyse in dieser Anleitung behoben werden kann, setzen Sie sich mit Ihrem Lieferanten in Verbindung.
- Page 112 AVERTISSEMENT: Il n’y a pas de parties remplaceables par les utilisateurs ou entretenues par les utilisateurs à l’intérieur du moyeu. Si vous avez un problème physique avec le moyeu qui ne peut pas être résolu avec les actions de la résolution des problèmes dans ce guide, contacter votre fournisseur.
- Page 113 ASSIGNMENT; NO REVERSE ENGINEERING: You may transfer the Software, Documentation and the licenses granted herein to another party in the same country in which you obtained the Software and Documentation if the other party agrees in writing to accept and be bound by the terms and conditions of this Agreement.
- Page 114 The Software is delivered as ìCommercial Computer Softwareî as defined in DFARS 252.227-7014 (June 1995) or as a commercial item as defined in FAR 2.101(a) and as such is provided with only such rights as are provided in this Agreement, which is 3Com’s standard commercial license for the Software.
- Page 115 Covad, Mindspring, Sympatico need to enter the user name and DSL, USwest, Owest, SNet password that your ISP provided to you in the PPPoE page of the Router. Leave the service name blank unless your ISP requires it. PPTP Cable or DSL, always on. Some...
- Page 116 Cable Modem, Always on, ISP Cox Cable, Sprint, US Cable, assigns specific IP information Cable-Cable (Cable) which needs to be entered on the “Fixed IP” page of the Router. *Bell includes Bell Advantage, Bell Canada, Bell South, PacBell and Southwestern Bell.
- Page 117 The IEEE specification for wireless Ethernet which allows speeds of up 802.11g to 54 Mbps. The standard provides for 6, 12, 24, 36, 48 and 54 Mbps data rates. The rates will switch automatically depending on range and environment.
- Page 118 EIA/TIA-586 standard. Category 5 can be used in Ethernet (10BASE-T) and Fast Ethernet networks (100BASE-TX) and can transmit data up to speeds of 100 Mbps. Category 5 cabling is better to use for network cabling than Category 3, because it supports both Ethernet (10 Mbps) and Fast Ethernet (100 Mbps) speeds.
- Page 119 These assignments are made by the DHCP server software that runs on Windows NT Server, and Windows 95 and Windows 98 will call the server to obtain the address. Windows 98 will allocate itself an address if no DHCP server can be found.
- Page 120 Infrastructure mode is the wireless configuration supported by the Infrastructure mode Router. You will need to ensure all of your clients are set up to use infrastructure mode in order for them to communicate with the Access Point built into your Router. (see also Ad Hoc mode) Internet Protocol.
- Page 121 MAC Address address. A layer 2 address associated with a particular network device. Most devices that connect to a LAN have a MAC address assigned to them as they are used to identify other devices in a network. MAC addresses are 6 bytes long.
- Page 122 Permanent means that the circuit is preprogrammed by the carrier as a path through the network. It does not need to be set up to torn down for each session. Routing Information Protocol. RIP allows an administrator to set up routing information on one RIP enabled device, and have that routing information replicated to all RIP enabled devices on the network.
- Page 123 A URL Filter is a feature of a firewall that allows it to stop its clients URL Filter form browsing inappropriate Web sites. Virtual Local Are Network. It states in 802.1q, the VLAN features frame VLAN format extensions to support Virtual Local Area Network tagging.
- Page 124 Wireless Fidelity. This is the certification granted by WECA to products Wi-Fi that meet their interoperability criteria. (see also 802.11b, WECA) The term used to describe a desktop or mobile PC that is wirelessly Wireless Client connected to your wireless network...
- Page 125 LOSSARY Wi-Fi Protected Access. A dynamically changing encryption mechanism for wireless networking. Encryption strength is 256 bit.
- Page 126 LOSSARY...
- Page 127 Canada, Mexico, Taiwan, United States 1-14 Japan(11b) * The channels available for use in France depend on the region in which you are located. The 3Com ADSL Wireless 108Mbps 11g Firewall Router (WL-553) must be installed and used in strict accordance with the manufacturer’s instructions as described in the user documentation that comes with the product.
- Page 128 (approximately 8 in.). The installer of this radio equipment must ensure that the antenna is located or pointed such that it does not emit RF field in excess of Health Canada limits for the general population; consult Safety Code 6, obtainable from Health Canada’s website www.hc-sc.gc.ca/rpb.
- Page 129 CH1~CH11 for 2.4 GHz by specified firmware controlled in U.S.A. US Federal Communications Commission (FCC) EMC Compliance This equipment has been tested and found to comply with the limits for a Class B digital device, pursuant to Part 15 of the FCC Rules. These limits are designed to provide reasonable protection against harmful interference in a residential installation.
- Page 130 Repairs to certified equipment should be coordinated by a representative designated by the supplier. Any repairs or alterations made by the user to this equipment, or equipment malfunctions, may give the telecommunications company cause to request the user to disconnect the equipment.
- Page 131 L ‘ utilisation de ce dispositif est autorisée seulement aux conditions suivantes: (1) il ne doit pas produire de brouillage et (2) l’ utilisateur du dispositif doit étre prêt à accepter tout brouillage radioélectrique reçu, même si ce brouillage est susceptible de compromettre le...
- Page 132 Pour empecher que cet appareil cause du brouillage au service faisant l'objet d'une licence, il doit etre utilize a l'interieur et devrait etre place loin des fenetres afin de Fournier un ecram de blindage maximal. Si le matriel (ou son antenne d'emission) est installe a l'exterieur, il doit faire l'objet d'une licence.
- Page 133 Intended use: ADSL 108Mbps 802.11g/b Firewall Router For connection to ADSL networks NOTE: To ensure product operation is in compliance with local regulations, select the country in which the product is installed. Refer to 3Com OfficeConnect ADSL Wireless 108Mbps 11g Firewall Router ®...
- Page 134 Ar šo 3Com Corporation deklar, ka RLAN device atbilst Direktvas 1999/5/EK btiskajm prasbm un citiem ar to saisttajiem noteikumiem. A copy of the signed Declaration of Conformity can be downloaded from the Product Support web page for the 3Com OfficeConnect® ADSL Wireless 108Mbps 11g Firewall Router at http://www.3com.com.
- Page 135 Este equipamento opera em caráter secundário, isto é, no tem direito a proteço contra interferncia prejudicial, mesmo de estaçes do mesmo tipo, e no causar interferncia a sistema operando em caráter primário.
- Page 137 72 restore 72 Network content filtering 69 addresses 103 Conventions Networking notice icons, About This Guide 8 wireless 94 text, About This Guide 8 Country Selection 30 wireless 15 Nitro Mode 53 DDNS 77, 78 DHCP 40, 49, 86, 105...
- Page 138 Static Addressing 105 static route 74 Subnet Mask 39, 103 Summary 42 Support Information 88 Support Links 89 TCP/IP 25, 27, 40, 49, 103 Time Zone 33, 71 Unit Configuration 86 Upgrade 73 URL Filter 68 Virtual Servers 62 VLAN 36...
- Page 140 3Com Corporation, Corporate Headquarters, Copyright © 2006 3Com Corporation. All rights reserved. 350 Campus Drive, Marlborough, MA 3Com and OfficeConnect are registered trademarks of USA 01752-3064. 3Com Corporation. All other company and product names may be trademarks of their respective To learn more about 3Com products and services, companies.