3Com OfficeConnect User Manual
Hide thumbs
Also See for OfficeConnect:
- User manual (110 pages) ,
- Getting started manual (25 pages) ,
- Datasheet (6 pages)
Table of Contents
Advertisement
Advertisement
Table of Contents

Related Manuals for 3Com OfficeConnect


Summary of Contents for 3Com OfficeConnect
- Page 2 LICENSE.TXT or products. !LICENSE.TXT. If you are unable to locate a copy, please contact 3Com and a copy will be Ensuring that all products can be recycled, reused and disposed of safely.
-
Page 3: Table Of Contents
Windows 2000, XP, 2003 Server Naming Convention Windows 95, 98 Conventions Macintosh OS 8.5, 9.x Disabling PPPoE and PPTP Client Software Introducing the OfficeConnect Secure Router Disabling Web Proxy OfficeConnect Secure Router Secure Router Advantages Running the Setup Wizard Package Contents... - Page 4 Network Settings Accessing the System Tools Connection to ISP Restart LAN Settings Time Zone DHCP Clients List Diagnostics Tools Advanced Networking Loading and Saving the Router Configuration Setting up NAT Upgrading the Firmware of your Router Static Routing Viewing Status and Logs Dynamic Routing Obtaining Support and Feedback for your Router Dynamic DNS...
- Page 5 Access Software Downloads Static Addressing Contact Us Auto-IP Addressing Telephone Technical Support and Repair Private IP Addresses End User Software Licence Agreement Technical Specifications 3Com Corporation END USER SOFTWARE LICENSE AGREEMENT Interfaces Operating Temperature ISP Information Power Information Regarding Popular ISPs Humidity...
-
Page 7: About This Guide
Table 2 list conventions that are used throughout this Internet security systems. guide. If a release note is shipped with this OfficeConnect Secure Router Table 1 Notice Icons and contains information that differs from the information in this Icon Notice Type Description guide, follow the information in the release note. -
Page 8: Feedback About This User Guide
Feedback about this User Guide Your suggestions are very important to us. They will help make our documentation more useful to you. Please e-mail comments about this document to 3Com at: pddtechpubs_comments@3com.com Please include the following information when commenting: Document title... -
Page 9: Introducing The Officeconnect Secure Router
3Com has changed all this, bringing networks to the small office. The products that compose the OfficeConnect line give you, the small office user, the same power, flexibility, and protection that has been available only to large corporations. Now, you can... -
Page 10: Secure Router Advantages
Secure Router Advantages becomes your connection to the Internet. Connections can be made directly to the Router, or through an OfficeConnect Hub or The advantages of using the Secure Router include: Switch, expanding the number of computers you can have in Provides firewall protection against Internet hacker attacks. -
Page 11: Package Contents
Package Contents Minimum System and Component Requirements The OfficeConnect Secure Router kit includes the following items: Your OfficeConnect Secure Router requires that the computer(s) and components in your network be configured with at least the One OfficeConnect Secure Router following:... -
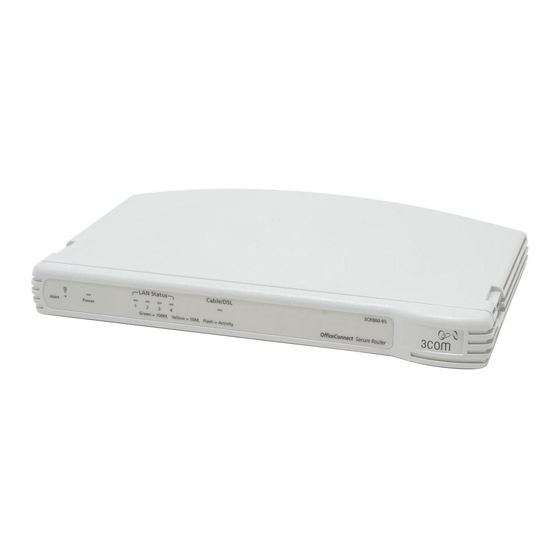
Page 12: Front Panel
3CR860-95 3CR870-95 LAN Status Cable/DSL 2 Power LED (Green) Alert OfficeConnect VPN Firewall Secure Router OfficeConnect Indicates that the Router is powered on. 1 Alert LED (Orange) 3 Four LAN Status LEDs Indicates a number of different conditions, as described below. -
Page 13: Rear Panel
4 Cable/DSL Status LED Rear Panel Green (100 Mbps link) / Yellow (10 Mbps link) The rear panel (Figure 4) of the Router contains four LAN ports, one Ethernet Cable/DSL port, and a power adapter socket. Indicates a number of different conditions, as described below. Figure 4 Secure Router - Rear Panel The link between the Router and the cable or DSL modem is OK. -
Page 15: Installing The Router
LAN ports on the rear panel. OfficeConnect units. Only stick the feet to the marked areas at each corner of the underside of your Routerl. -
Page 16: Before You Install Your Router
Push the clip down gently to secure it, ensuring the fastening Before you Install your Router pieces snap into the slots on the unit. To fit another unit: Before you can configure the Router you need to know the IP information allocation method used by your ISP. -
Page 17: Powering Up The Router
Password, and VPN Server address (usually your modem). You will Cable/DSL Modem be asked for the IP Allocation Mode when you run the Setup Wizard. Powering Up the Router OfficeConnect OfficeConnect Plug the power adapter into the power adapter socket located VPN Firewall Secure Router Ethernet... - Page 18 Connect the power adaptor to the Router and wait for the Alert LED to stop flashing. Check that the Cable/DSL Status LED is illuminated. Switch on your computer. Once your computer is ready to use, check that the LAN Port Status LED on the Router is illuminated. You have now completed the hardware installation of your Router.
-
Page 19: Setting Up Your Computers
A screen similar to Figure 7 should be displayed. Select Internet The OfficeConnect Secure Router has the ability to dynamically Protocol (TCP/IP) and click on Properties. allocate network addresses to the computers on your network, using DHCP. However, your computers need to be configured Figure 7 Local Area Connection Properties correctly for this to take place. -
Page 20: Windows 95
Figure 8 Internet Protocol Properties In the TCP/IP control panel, set Configure: to “Using DHCP Server.” Close the TCP/IP dialog box, and save your changes. Restart your computer. Disabling PPPoE and PPTP Client Software If you have PPPoE or PPTP client software installed on your computer, you will need to disable it. -
Page 21: Disabling Web Proxy
Figure 9 Internet Properties You may wish to remove the PPPoE client software from your computer to free resources, as it is not required for use with the Router. Disabling Web Proxy Ensure that you do not have a web proxy enabled on your computer. -
Page 23: Running The Setup Wizard
IP address of the unit you should substitute this for the default address within the URL. Figure 10 Web Browser Location Field (Factory Default) If the password is correct, the OfficeConnect Secure Router Welcome screen, shown in Figure 12, will appear. -
Page 24: Setting The Password
New Password and Confirm Password fields. The default password for the Router is ‘admin’. It is case sensitive and must be entered as the Old Password the first time you configure the Router. 3Com recommends that you change the password from its default value. -
Page 25: Setting The Time Zone
Figure 14 Change Administration Password Screen To set the Router to World Time (UTC): Select (GMT) Greenwich Mean Time from the drop-down menu. Ensure that the Enable Daylight Saving box is cleared. Click Next to continue. Figure 15 Time Zone Screen Choose a password that you can remember but that others are unlikely to guess. -
Page 26: Auto-Configuration Settings
Auto-Configuration Settings Internet Settings If the Router is able to detect a PPPoE or DHCP server on its The Internet Settings window allows you to set up the Router for Ethernet Cable/DSL port then it will offer you the option of the type of Internet connection you have. - Page 27 Static IP Mode Dynamic IP Address Mode To setup the Router for use with a static IP address connection, To setup the Router for use with a dynamic IP address use the following procedure: connection: Figure 18 Static IP Mode Screen Figure 19 Hostname Screen If your ISP requires the addresses of a Primary and Secondary Enter your IP Address in the IP Address text box.
- Page 28 Figure 20 Clone MAC Address Screen PPPoE Mode To setup the Router for use with a PPP over Ethernet (PPPoE) connection, use the following procedure: Figure 21 PPPoE Screen If your ISP requires an assigned MAC address, select the appropriate radio button: Yes, please clone the MAC address from the PC I’m currently using if the computer you are using now is the one that was Enter your PPP over Ethernet user name in the PPPoE User Name...
- Page 29 If your ISP requires the addresses of a Primary and Secondary Figure 22 PPTP Screen DNS Server then enter them in the fields labelled Primary DNS Address and Secondary DNS Address. If your ISP requires you to supply a host name enter it in the Host Name box, otherwise leave the box blank.
-
Page 30: Choosing Your Lan Settings
Router terminates the Internet 3Com recommends that you use the default IP address and connection. By default the value will be forever. subnet mask unless you already have a network that uses different values. Check all your settings, and then click Next. -
Page 31: Viewing The Summary
Router and click Finish to save your settings and restart the Router. Figure 25 Configuration Summary Screen 3Com recommends that you activate the DHCP server and leave it at the default values unless you already have a DHCP Server on your network. - Page 32 If want to make changes, click the Back button until you reach the screen which contains the settings you want to change and follow the instructions from that point. Your Router is now configured. You can start using your Router straight away or further configure your Router (see “Router Configuration”...
-
Page 33: Router Configuration
System Tools — allows the administrator to perform maintenance activities on the Router. Figure 26 OfficeConnect Secure Router Screen Layout Status and Logs — displays the current status and activity logs of the Router. -
Page 34: Welcome Screen
Getting Help Figure 27 Notice Board Screen On every screen, a Help button is available that provides access to the context-sensitive online help system. Click this button for further assistance and guidance relating to the current screen. Welcome Screen The Welcome section allows you to view the Notice board and to change your Password. -
Page 35: Changing The Administration Password
Changing the Administration Password Setup Wizard You should change the password to prevent unauthorized access Figure 29 Wizard Screen to the Administration System. Figure 28 Password Screen Click the WIZARD... button to launch the configuration wizard. Refer to “Running the Setup Wizard” page 23 for information on how to run the wizard. -
Page 36: Connection To Isp
Connection to ISP Select the addressing method that your ISP uses to allocate your Router’s Internet IP address. Choose from the options in the IP This option, shown in Figure 30, allows you to change the Allocation Mode drop-down box and the screen will refresh with method your Router uses to connect to your ISP. - Page 37 Static IP Address (DSL or Cable) Username The ISP provides the IP addressing information for you to Password enter manually. To configure the Router you will need to VPN server address (usually your modem). know the following: Configuring a Static IP Address IP address If your ISP has allocated you one or more static addresses you Subnet Mask...
- Page 38 The following settings are required to set up Static IP address Configuring a Dynamic IP Address connection. Enter the values provided by your ISP: If your ISP has allocated you a dynamic address using DHCP you will have selected Dynamic IP address (automatically allocated) as IP Address —...
- Page 39 Subnet Mask — The subnet for the address is automatically Configuring a PPPoE connection configured but is not displayed. If your ISP has allocated you a dynamic address using PPPoE you ISP Gateway Address — The Gateway address from your ISP will have selected PPPoE (PPP over Ethernet) as your IP Allocation to the Internet is automatically configured but is not Mode.
- Page 40 PPPoE Password — The password you use to access your ISP. Configuring a PPTP connection PPPoE Service Name — Your ISP may require you to specify a If your ISP has allocated you a dynamic address using PPTP you service name for your connection. will have selected PPTP (used by some European providers) as your IP Allocation Mode.
-
Page 41: Lan Settings
PPTP User Name - The user name you use to access your ISP. Figure 35 Unit Configuration Screen PPTP Password - The password you use to access your ISP. Primary DNS Address — If your ISP requires the address of a Primary DNS Server then enter it in the field labelled Primary DNS Address. -
Page 42: Dhcp Clients List
Windows PCs that obtain an address from its DHCP server. the Subnet Mask of your network is 255.255.255.0 then your If you have a 3Com NBX Call Processor on your network enter its network can have a maximum of 254 addresses from IP address in the 3Com NBX Call Processor box. - Page 43 Figure 36 DHCP Clients Screen If you have spare or expired IP addresses in the pool you will not need to release addresses. The IP Address, Host Name and MAC Address indicate the address that has been allocated. They identify the machine by name and by the unique number (MAC Address) of the machine’s network card.
-
Page 44: Advanced Networking
Figure 38 One-to-Many and One-to-One NAT Advanced Networking One-to-Many NAT Setting up NAT The Router is able to perform Network Address Translation (NAT) in one of two modes as shown in Figure 172.16.57.52 One-to-many NAT — The Router shows only one address to the Internet. - Page 45 Setting up One-to-Many NAT Setting up One-to-One NAT The following criteria must be met to be able to use One-to-One Figure 39 Network Address Translation Screen NAT: You must have a static Internet IP address for every computer on your network plus one for the Router itself. The addresses must be in one continuous block in the same subnet You must have selected Static IP Address as your IP Allocation...
-
Page 46: Static Routing
Figure 41 Static Routing Screen field. 3Com recommends that you set your DHCP pool to the same as the range of LAN addresses used as your LAN pool. Enter the number of addresses in the range into the Pool Size field. -
Page 47: Dynamic Routing
Dynamic Routing Figure 42 Dynamic Routing Screen The Router provides support for RIPv1, RIPv2 or both for each interface, for sending and receiving data, LAN routes are sent on the LAN subnet, and WAN routes are sent on the WAN subnet. From the Dynamic Routing screen you can enable the Router to automatically adjust to physical changes in the networks layout. -
Page 48: Dynamic Dns
Dynamic DNS Click Apply to save your changes. The Router provides a list of dynamic DNS providers for you to choose from. Dynamic DNS is disabled by default. Configuring the Router On the main frame of the Firewall setup screen is a menu with Figure 43 Dynamic DNS Screen four tabs: Virtual Servers, PC Privileges, Special Applications, and Advanced. - Page 49 Creating a Virtual DMZ To configure a virtual server: Click New on the right side of the Virtual Servers screen to open A virtual DMZ (De-Militarized Zone) Host is a computer on your the Virtual Server Settings dialogue box. (Figure 45).
-
Page 50: Pc Privileges
Figure 46 Custom Setup Screen The Router’s DHCP server has been enhanced to support PC Privileges. If you want to control access to the Internet on a user by user basis then you should either use the Router’s DHCP server or static addressing. Figure 47 PC Privileges Screen Select either All WAN PCs can access this server, or Authorized Remote IP Address(es). - Page 51 Figure 48 All PCs Setup Screen Enter the IP address of the computer in the PC’s IP Address text box. Check the box of a service to authorize it. Clear the box to deny the service. See Figure Figure 49 PC Privileges Setup Screen Either: Enter the additional services that you wish to allow in the except (specify ports) box and set the drop down box to...
-
Page 52: Special Applications
Example: Special Applications Allowing only web and E-mail access. Select Special Applications tab to display the Authorized To allow web and E-mail access and block all other services Application setup screen. See Figure 50 below. across the Router’s firewall: Figure 50 Special Applications Screen Ensure that the Control PC Access to the Internet radio button is selected. - Page 53 So that these special applications can work properly and are not Adding and Editing Special Applications blocked, the firewall needs to be told about them. In each Click on the New button to create a new special application or instance there will be an outgoing trigger which tells the on the name of a special application to edit the settings for that Router’’s firewall that the application has started and to allow the application.
- Page 54 Application Setup Screen gains the extra fields needed to an address different to the one you use to start the special describe a custom special application. These are shown in application then you must ensure that the Multiple Hosts Figure 52 below.
-
Page 55: Advanced
This feature is enabled by clicking on the check box so that a tick can be seen and then selecting Apply. 3Com recommends that you leave Allow PING from the Internet disabled as this provides greater security. Disable SPI Firewall — The firewall feature detects attack patterns used by hackers on the Internet and once detected will block their access to your network. -
Page 56: Content Filtering
Allow/Block Lists Content Filtering Select Enable Content Filtering on the Filter Settings screen and Select Content Filtering to display the Content Filtering Settings check the required content filter mode. Select the Allow/Block screen. See Figure 54 below. When the Content Filter Mode is set Lists tab to display the Allow/Block List screen. -
Page 57: Filter Policy
Figure 56 Content Filtering Edit List Screen Figure 57 Filter Policy Settings Screen To set up a New Filter Policy: Filter Policy Click New to open the Filter Poilcy Settings screen (Figure 58). Select the Filter Policy tab to display the Filter Policy screen. See Enter the PC’s IP address. -
Page 58: Configuring Vpns
L2TP over IPSec Enabled — L2TP over IPSec is a combination Configuring VPNs of two protocols. A user is authenticated (using L2TP) and encrypts data (using IPSec). See “L2TP Configuration” Virtual private networks (VPN) provide an encrypted connection page 59. L2TP does not support gateway to gateway (or tunnel) between networks or between a network and a user connections and is only suitable for connecting remote users over a public network (such as the Internet). - Page 59 3DES and AES are not shipped with the Router as standard due items: to international restrictions on encryption. If your country permits their use they can be downloaded from the 3Com web site at In the IPSec Configuration field, enter This Router’s ID as an http://www.3com.com/ Internet IP address, the DNS address of the unit or the name of the Router that you are configuring.
-
Page 60: Viewing Vpn Connections
The connections made by L2TP over IPSec will appear to come If both PPTP and L2TP over IPSec modes are selected, then the from these addresses. The addresses must be in a continuous Address Pool is the same for both clients.. range. - Page 61 For each connection configured for the Router, a row is added to Adding and Editing VPN Connections the table. Each row contains the following items: This screen also allows you to add new IPSec, L2TP over IPSec Delete button — deletes the VPN connection on that row. and PPTP connections and to edit existing ones.
- Page 62 3DES and AES are not shipped with the Router as standard due can be up to 64 characters in length. to international restrictions on encryption. If your country permits their use they can be downloaded from the 3Com web site at http://www.3com.com/ Exchange keys using — choose the encryption method used to exchange shared keys.
- Page 63 Gateway as a Connection Type, enter the following values: Remote IPSec Server ID — The ID of the remote server. In the case of another 3Com Secure Router this is the This Router's ID field on the VPN Mode page.
- Page 64 IKE keep-alive on the 'dynamic' end of the tunnel). to international restrictions on encryption. If your country permits their use they can be downloaded from the 3Com web site at Example: Setting up an IPSec connection between two Secure http://www.3com.com/...
- Page 65 Using drop-down box. The remote Secure Router used in this example could be any Set Renegotiate After (seconds) to 600. other IPSec-terminating VPN enabled device, e.g. a 3Com SuperStack 3 Firewall. Ensure that the Use Perfect Forward Secrecy box is checked Leave the Use IKE Keep-Alive box unchecked Check that IPSec is selected as the Tunnel Type.
-
Page 66: Editing Ipsec Routes
Click Apply to save your changes or Close to return without Click Apply to save your changes or Close to return without saving. When you have created a user account the user will need saving. to know in order to enable connection. Editing IPSec Routes PPTP Connections The IPSec Routes tab is only displayed when IPSec Enabled is... -
Page 67: Accessing The System Tools
Figure 65 IPSec Routes Accessing the System Tools The System Tools menu includes four administration items: Restart, Time Zone, Diagnostics Tools, Configuration, and Upgrade. See Figure Restart Pressing the Restart the Gateway button has the same effect as power cycling the unit. No configuration information will be lost but the log files will be erased. -
Page 68: Time Zone
Any network users who are currently accessing the Internet will The Router reads the correct time from NTP servers on the have their access interrupted whilst the restart takes place, and Internet and sets its system clock accordingly. The Daylight they may need to reboot their computers when the restart has Savings option automatically adjusts the clock to daylight savings completed and the Router is operational again. -
Page 69: Loading And Saving The Router Configuration
Upgrading the Firmware of your Router The Upgrade facility allows you to install on the Router any new releases of system software that 3Com may make available. 3DES and AES encryption are not shipped with the Router as standard due to international restrictions on encryption. If your country permits their use they can be downloaded from the 3Com web site at http://www.3com.com/... -
Page 70: Viewing Status And Logs
Router will restart. Although the upgrade process Log Settings — to choose whether to store the log on the Router has been designed to preserve your configuration settings, 3Com or to send to the remote user or both and to choose to to recommends that you make a backup of the configuration enable or disable some log entries. - Page 71 LAN subnet and a syslog server must be installed on the remote Figure 73 Routing Table screen server. Logs — to view both the normal events, and security threats logged by the Router Figure 72 Status Screen Figure 74 Usage Monitor Screen You may be asked to refer to the information on the Status screen if you contact your supplier for technical support.
-
Page 72: Obtaining Support And Feedback For Your Router
Router. (Figure Figure 76 Support Screen The feedback links screen, which contains an Internet link to the 3Com website so that you can provide feedback on the product. (Figure 3Com is always looking for product improvements. If you... - Page 73 Provide Feedback button on the Support/Feed- back screen which will connect you to 3Com's website. Figure 77 Feedback Screen...
-
Page 75: Troubleshooting
ROUBLESHOOTING Ensure that you have configured your computer as described Basic Connection Checks “Setting Up Your Computers” page 19. Restart your computer while it is connected to the Router to ensure that Check that the Router is connected to your computers and to your computer receives an IP address. -
Page 76: Connecting To The Internet
Connecting to the Internet Forgotten Password If you can browse to the Router configuration screens but cannot If you can browse to the Router configuration screen but cannot access sites on the Internet, check the following: log on because you do not know or have forgotten the password, follow the steps below to reset the Router to it’s Confirm that the physical connection between the Router and factory default configuration. -
Page 77: Alert Led
Ensure that one of your computers has a copy of the new system software checks the hardware for proper operation. The software image file stored on its hard disk. If not contact 3Com Alert LED may continue to flash for one minute or longer, by visiting: depending on your network configuration. -
Page 78: Frequently Asked Questions
If the Router does not resume normal operation following the Where can I download software upgrades for the Router? upload, it may be faulty. Contact your supplier for advice. Upgrades to the Secure Router software are posted on the 3Com support web site, accessible by visiting: Frequently Asked Questions http://www.3com.com... -
Page 79: Using Discovery
Discovery will find the Router even if it is unconfigured or Running the Discovery Application misconfigured. 3Com provides a user-friendly Discovery application for detecting Figure 78 Discovery Welcome Screen the OfficeConnect Secure Router on the network. If your computers are configured with static addresses (also... - Page 80 When the Welcome screen is displayed click on Next and wait Figure 79 shows an example Discovered Devices screen. Highlight until the application discovers the Routers connected to your the Secure Router by clicking on it, and press Next. LAN. Figure 80 Discovery Finish Screen Figure 79 Discovered Router Click on Finish to launch a web browser and display the login...
-
Page 81: Ip Addressing
IP A DDRESSING The only value that will be different is the specific host device The Internet Protocol Suite number. This value must always be unique. The Internet protocol suite consists of a well-defined set of An example IP address is ‘192.168.100.8’. However, the size of communications protocols and several standard application the network determines the structure of this IP Address. -
Page 82: Dhcp Addressing
Type Two How does a Device Obtain an IP Address and In larger networks, where there are more devices, the IP address Subnet Mask? of ‘192.168.100.8’ is, again, split into two parts but is structured differently: There are three different ways to obtain an IP address and the subnet mask. -
Page 83: Auto-Ip Addressing
192.168.0.0 – 192.168.255.255 The Router has a default subnet of 192.168.1.0 – 192.168.1.255. 3Com recommends that you use this subnet for the LAN addresses of your first Device and subsequent ranges (192.168.2.0 – 192.168.2.255) for the LAN range of other... -
Page 85: Technical Specifications
ECHNICAL PECIFICATIONS This section lists the technical specifications for the OfficeConnect Standards Secure Router. Interfaces Functional:ISO 8802/3 IEEE 802.3 Cable or DSL modem connection - one 10/100 Mbps Ethernet Safety:UL 60950, EN 60950 port (10BASE-T/100BASE-TX) with Auto-MDI/MDIX. CSA 22.2 #60950... -
Page 86: System Requirements
System Requirements Operating Systems The Secure Router will support the following Operating Systems: Windows 95, 98, Me Windows NT 4.0 Windows 2000 Windows XP Windows 2003 Server Mac OS 8.5 or higher Unix Ethernet Performance The Secure Router complies with the IEEE 802.3i, u and x specifications. -
Page 87: Important Safety Information
WARNING: This unit operates under SELV (Safety Extra VORSICHT: Stapeln Sie das Geräts nur mit anderen Low Voltage) conditions according to IEC 60950. The OfficeConnect Gerätes zusammen. conditions are only maintained if the equipment to which VORSICHT: Aufgrund von internationalen it is connected also operates under SELV conditions. -
Page 88: Consignes Importantes De Sécurit
Teile in dem Gerät vorhanden. Wenn Sie AVERTISSEMENT: L'appareil ne doit être empilé qu'avec ein Problem mit dem Router haben, das nicht mittels der d'autres produits OfficeConnect. Fehleranalyse in dieser Anleitung behoben werden kann, setzen Sie sich mit Ihrem Lieferanten in Verbindung. - Page 89 que si l'équipement auquel il est raccordé fonctionne également dans des conditions conformes à cette norme. AVERTISSEMENT: Il n'y a pas d'élément remplaçable ou réparable par l'utilisateur à l'intérieur de l'appareil. Si vous rencontrez avec cet appareil un problème ne pouvant être résolu par les actions de résolution de problèmes présentés dans ce manuel, veuillez contacter votre fournisseur.
-
Page 91: Troubleshoot Online
RODUCT Register Your Product to Gain Service Benefits Troubleshoot Online To take advantage of warranty and other service benefits, you You will find support tools posted on the 3Com web site at must first register your product at http://www.3com.com/ http://eSupport.3com.com/. -
Page 92: Contact Us
You can also obtain support in this region using the following e-mail: apr_technical_support@3com.com To send a product directly to 3Com for repair, you must first Or request a repair authorization number (RMA) by fax using obtain a return authorization number (RMA). Products sent to... - Page 93 From the Caribbean, Central and South America, call: From the following countries, you may use the numbers shown: Antigua 1 800 988 2112 Argentina 0 810 444 3COM Austria 01 7956 7124 Aruba 1 800 998 2112 Belgium 070 700 770...
- Page 94 Country Telephone Number You can also obtain support in this region using the following: Spanish speakers, enter the URL: http://lat.3com.com/lat/support/form.html Portuguese speakers, enter the URL: http://lat.3com.com/br/support/form.html English speakers in Latin America should send e-mail to: lat_support_anc@3com.com US and Canada Telephone Technical Support and Repair...
-
Page 95: End User Software License Agreement
TRADE SECRETS; TITLE: You acknowledge and agree that the structure, sequence and Software or Documentation. organization of the Software are the valuable trade secrets of 3Com and its suppliers. You Subject to the restrictions set forth herein, the Software is licensed to be used on any agree to hold such trade secrets in confidence. - Page 96 Should you have any questions concerning this Agreement or if you desire to contact 3Com for any reason, please contact the 3Com subsidiary serving your country, or write: 3Com Corporation, 350 Campus Drive, Marlborough, MA 01752-3064.
-
Page 97: Information Regarding Popular Isps
ISP I NFORMATION Information Regarding Popular ISPs Internet Characteristics Popular ISPs Internet Characteristics Popular ISPs Connection Connection Types Types Dynamic IP Cable modem ISP, MediaOne, PPTP Cable or DSL, always on. KPN (Netherlands), non-hostname based. Need RoadRunner, Optimum Some European ISPs require Austria Telecom (Clone MAC) to clone MAC in the DHCP... -
Page 99: Glossary
The term used to described the desktop PC that is connected to Auto-negotiation your network. Some devices in the OfficeConnect range support auto-negotiation. Auto-negotiation is where two devices sharing Data Encryption Standard. DES is one of the encryption a link, automatically configure to use the best common speed. - Page 100 Domain Name System. DNS allows Internet host computers to A system that allows packets to be transmitted and received at have a domain name (such as 3com.com) and one or more IP the same time and, in effect, doubles the potential throughput of addresses (such as 192.34.45.8).
- Page 101 IEEE Institute of Electrical and Electronics Engineers. This Internet Service Provider. An ISP is a business that provides American organization was founded in 1963 and sets standards connectivity to the Internet for individuals and other businesses for computers and communications. or organizations.
- Page 102 PPPoE Network Address Translation. NAT enables all the computers Point-to-Point Protocol over Ethernet. Point-to-Point Protocol on your network to share one IP address. The NAT capability of is a method of secure data transmission originally created for the Router allows you to access the Internet from any computer dial-up connections;...
- Page 103 TCP/IP Stateful Packet Inspection. This feature requires the Router to Transmission Control Protocol/Internet Protocol. This is the remember what outgoing requests have been sent and only name for two of the most well-known protocols developed for allow responses to those requests back through the Router. This the interconnection of networks.
-
Page 105: Index
NDEX Numbers 100BASE-TX 99 cable specifications 86 10BASE-T 99 cable/DSL Ethernet port 13 3DES cable/DSL modem defined 99 connecting to 17 upgrading to 69 cable/DSL status LED 13 category 3 cables 99 category 5 cables 99 changing the admin password 35 client 99 access rights 50 configuring computers 19... - Page 106 diagram feedback 8 front panel 12 filter policy 57 rear panel 13 finding the Router 79 sample network 9 firewall 9 digital subscriber line 100 defined 100 disabling IPSec 61 disabling 55 disabling PPPoE client software 20 settings 48 disabling the firewall 55 firmware disabling web proxies 21 upgrading 69...
- Page 107 Internet Settings loading Router configuration 69 PPTP 40 local area network 101 Internet settings login screen 23 blocking access 50 logs configuring 36 viewing 70 DHCP 38 PPPoE 39 static address 37 wizard 26 MAC address 101 inventory 11 Macintosh OS 8.5/9.x IP address 81 setting up 20 allocation methods 16, 36...
- Page 108 one-to-many NAT users 58 configuring 45 private IP addresses 83 one-to-one NAT privileges configuring 45 setting 50 protocol defined 102 package contents 11 password rear panel diagram 13 changing 35 remote network address 63 system 23 remote User ID 62 wizard 24 restarting the Router 67 PC privileges...
- Page 109 settings Triple DES 99 advanced 55 tunnel shared key 62, 63, 65, 66 setup wizard 23 shared key 62, 63, 65, 66 sharing broadband 9 special applications 52 upgrading firmware 69 adding 53 usage monitor 70 custom 53 User ID 62 stacking clip UTC (world time) 25 using 15...
- Page 110 wizard auto-configuration 26 defined 103 DHCP 30 Internet settings 26 LAN settings 30 launching manually 24 setup 23 summary 31 world time (UTC) 25...
- Page 111 EGULATORY OTICES FCC Statement CE Statement (Europe) This equipment has been tested and found to comply with the limits for a Class B digital This product complies with the European Low Voltage Directive 73/23/EEC and EMC device, pursuant to Part 15 of the FCC Rules, and the Canadian Department of Directive 89/336/EEC as amended by European Directive 93/68/EEC.
- Page 112 DUA08609-5AAA01 Published September 2003...