Spartherm ZERO CLEARANCE FIREPLACE-700 Installation And Operating Instructions Manual
Hide thumbs
Also See for ZERO CLEARANCE FIREPLACE-700:
- Installation and operating instructions manual (30 pages) ,
- Installation and operating instructions manual (17 pages)
Table of Contents
Advertisement
Quick Links
Installation and Operating Instructions
ZERO CLEARANCE FIREPLACE
ZERO CLEARANCE FIREPLACE-600
ZERO CLEARANCE FIREPLACE-700
Save this manual and keep it in a safe place that it is easy to refer to it.
The Spartherm Zero Clearnace fireplaces have been tested and certified by CSA based on thefollowing standards:
UL 127 / ULC S610. EPA : U.S.ENVIRONMENTAL PROTECTION
AGENCY Certified to comply with 2020 emissionstandards using cord wood.
Spartherm Feuerungstechnik GmbH
Maschweg 38 · 49324 Melle
Phone +49 5422 94 41-0
www.spartherm.com
Advertisement
Table of Contents

Related Manuals for Spartherm ZERO CLEARANCE FIREPLACE-700


Summary of Contents for Spartherm ZERO CLEARANCE FIREPLACE-700
- Page 1 Installation and Operating Instructions The Spartherm Zero Clearnace fireplaces have been tested and certified by CSA based on thefollowing standards: ZERO CLEARANCE FIREPLACE UL 127 / ULC S610. EPA : U.S.ENVIRONMENTAL PROTECTION AGENCY Certified to comply with 2020 emissionstandards using cord wood.
- Page 2 CORD WOOD. Zero clearance fire- papers, and books, away from your appliance. burning appliances from an adequate air supply. place-600 1.67 g/hr Zero clearance fireplace-700 Only use newspaper, dry kindling and all-natural or • Make sure not to create negative pressure in the 1.14 g/hr...
-
Page 3: Table Of Contents
TABLE OF CONTENTS 6. Maintenance 1. Installation overview 6.1 Ash removal procedures 2. Introduction 6.2 Creosote formation and removal 2.1 Example of identification plate 6.3 Runaway or chimney fire 2.2 Dimensions 6.4 Chimney cleaning 2.3 Specification 6.5 Glass replacement 2.4 General instructions 6.6 Care of glass 2.5 General Information 6.7 Cleaning the glass ceramic sheet... -
Page 4: Installation Overview
1. INSTALLATION OVERVIEW SPECIFICATIONS ZERO CLEARANCE FIREPLACE-600/ ZERO CLEARANCE FIREPLACE-700 : Spartherm Zero Clearance Fireplace Zero Clearance Zero Clearance Fireplace-600 Fireplace-700 Weight of fireplace 265 lbs (120 kg) 298 lbs (135 kg) Fireplace exterior: Width/depth/ 25 5/16" / 19" / 23 5/16"... -
Page 5: Introduction
The Spartherm zero clearance fireplaces have been • Young children should be carefully supervised when • If the appliance is not properly installed, a house tested and certified by CSA based on the following they are in the same room as the appliance. -
Page 6: Example Of Identification Plate
Particulate emission standards using cord wood Particulate emission standards using cord wood Particulate emission standards using cord wood Model: Spartherm Cassette 600 Zero Clearance Model: Spartherm Cassette 600 Zero Clearance Model: Spartherm Cassette 700 Zero Clearance Model: Spartherm Cassette 700 Zero Clearance... -
Page 7: Dimensions
2.2 DIMENSIONS ZC FIREPLACE-600 ZC FIREPLACE-700 19" / 483 mm 20" / 508 mm 25 5/16" / 643 mm 29" / 737 mm 23 5/16" / 592 mm 25 5/16" / 643 mm 6" / 152 mm 6" / 152 mm 18 3/8"... -
Page 8: Specification
2.3 SPECIFICATION moisture in the steel and refractory bricks. The ini- Expansion / contraction noises during heating up and tial heat output will be reduced while the moisture cooling down cycles are normal and to be expected. Conversion Factors is being drawn from the appliance and it will be Fire chamber Minimum Power Maximum power... -
Page 9: Air System
2.6 AIR SYSTEM 2.6.1 CONNECTION DIRECTLY TO THE UNIT The ZC Fireplaces-600/700 do require a combustion air outside connection. To connect the separate combustion air directly to the unit you need to have the right separate combustion air connector Ø 5". Fix the connector directly to the unit. 600 and 700 - backside air intake backside air take Grills... -
Page 10: Installation Planning
3. INSTALLATION PLANNING CLOSURE VALVE PLEASE NOTE: COMBUSTION AIR INTAKE REQUIREMENTS. 3.1 MINIMUM CLEARANCES TO 1 5/8“ SPACER AT THE BACK COMBUSTIBLES It is recommended that the 5" Combustion air intake It is mandatory to install a closure valve to prevent DO NOT PLACE ANY COMBUSTIBLE MATERIALS (FUR- WARNING duct is installed in a correct manner. -
Page 11: Placement From Combustible Materials
3.1.1 PLACEMENT FROM COMBUSTIBLE MATERIALS PLEASE NOTE- 1/2" SPACERS ON THE SIDES AND 1 Distance to furniture 5/8" AT THE BACK. The recommend minimum distance from stove to fur- 1 5/8“ SPACER AT THE BACK PLEASE KEEP THE SPACES CLEAR OF INSTALLATION niture is 48 inches. -
Page 12: Placement From Combustible Materials
3.1.2 PLACEMENT FROM COMBUSTIBLE MATERIALS 3.2 FLANGES AND ANCHOR PLATE ZC FIREPLACE-600 NOTE! The anchor plate is not included with the unit. Use only an chimney certified as UL 103HT or ULC 25 9/16" / 649 mm S-629. The dimensions and positioning of the different air inlet and outlet are available in the table in chapter „dimensions“. - Page 13 ZC FIREPLACE-700 29 5/8"/ 752 mm 1/2" / 13 mm 1 5/8" / 41 mm 9 1/4" or 4 1/2" with R value 2,957 in Canada or 6 1/2" with R value 2,957 in USA...
-
Page 14: Installation
4.1.1 ZC FIREPLACE-600 4. INSTALLATION 4.1 HEARTH EXTENSION WARNING Install the hearth extension only as illustrated! A 16" / 406mm (USA) and 18" / 457mm (Canada) minimum hearth extension in front of the stove made of non com- bustible material is required. In front of the unit, the hearth extension must extend 6" on each side, 8" in Canada The non combustible material that is used must be UL 1618 ember protection or in Canada CSA-B365. -
Page 15: Distance Combustible Mantle
The hearth requirements are summed up in the following table: 4.2 DISTANCE COMBUSTIBLE MANTLE Floor protection reqiurements MANTLE MINIMUM CLEARANCES zero clearance fireplace 600 zero clearance fireplace 700 Distance from top of glass to mantle 21" = or 4 1/2" -with R value 2,957 (Canada) / 6 1/2" - with R vlaue 2,957 (USA 9 1/4"... -
Page 16: Chimney Installation
4.3 CHIMNEY INSTALLATION by having the chimney supported by the supports. The maximum chimney length that should be supported by the fireplace is 9 ft. (2.75 m) for 2“ This fireplace is designed and approved for installation solid-pack chimney and 12 ft. (3.7 m) for 1“ sol- with the following id-pack Chimney. -
Page 17: Chimney Installation Instructions
The table below shows the minimum height requirements, fireplace included, according to the number of elbows: 4.3.3 CHIMNEY INSTALLATION INSTRUCTIONS 1. Cut and frame the holes in the ceiling, floor and roof where the chimney will pass and install radiation shields chimney number of elbows minimum height... -
Page 18: Examples Of Typical Installations
4.3.4 EX AMPLES OF T YPICAL INSTALLATIONS rain cap rain cap storm collar storm collar flashing flashing attic attic radiation shield attic attic radiation shield chimney section elbow 1st floor radiant shield 1st floor chimney section radiation shield fireplace basement wall radiation shield elbow basement... -
Page 19: Operation
ADJUSTING THE COMBUSTION AIR. START UP AND RE-FUELING. ALWAYS WEAR get smaller and lazier because less oxygen is getting Spartherm Inserts are equipped with an air con- GLOVES TO PREVENT INJURY. DO NOT LEAVE THE into the combustion chamber. The flames, however, are trol System that is easy and effective to use. - Page 20 Caution: A - Air supply open: Never close the air lever of the air control com- (when lighting the fire or pletely or before the fire has started to burn adding new wood). The efficiently as it will create smoke and the fire would be control lever is pushed inefficient and the energy from the wood is wasted.The completely to the right.
-
Page 21: Fire Extinguishers / Smoke Detectors
5.1 FIRE EXTINGUISHERS / SMOKE setting. The whiteness of the bricks and the cleanli- Firewood should be split, stacked in a manner that air 5.3 LIGHTING A FIRE ness of the glass are good indicators of your operating can get to all parts of it and covered in early spring to DETECTORS efficiency. -
Page 22: Flash Fire
open the cover flap)! 6. Never use methylated spirits, petrol, oil or other 5.3.1 FLASH FIRE 5.3.3 SMOKING 3. Adjust the combustion air regulator to the far right, easily combustible liquids. and open the firebox door (swing open). 7. Light the fire using the firelighter cubes and, if A flash fire is a small fire burned quickly when you A properly installed appliance should not smoke. -
Page 23: Ash Removal Procedures
6.1 ASH REMOVAL PROCEDURES 6.3 RUNAWAY OR CHIMNEY FIRE 6.4 CHIMNEY CLEANING 6.5 GLASS REPLACEMENT Both the chimney and the appliance must be inspected WARNING WARNING WARNING and cleaned at least once a year. For serious wood burners, chimney cleaning must be IMPROPER DISPOSAL OF ASHES RESULTS IN FIRES. -
Page 24: Cleaning The Glass Ceramic Sheet
PARTS SPECIFICALLY APPROVED WITH THIS WARNING APPLIANCE MAY RESULT IN PROPERTY DAMAGE OR PERSONAL INJURY. All Spartherm inserts are supplied with Robax glass in the door. Robax is a ceramic glass. Do not use substitute glass and order replacement glass from Spartherm through your dealer. -
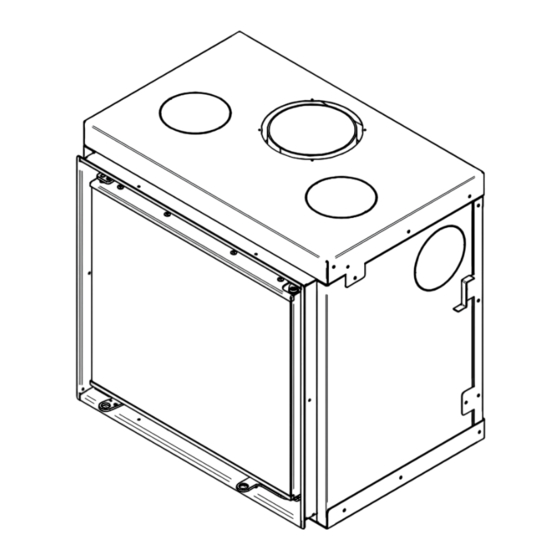
Page 25: Exploded View
Appliance emits • Paint curing. See “GENERAL INSTRUCTIONS” odour. section. Spartherm Feuerungstechnik GmbH gives a 5-year Stove doesn’t • Wood is too wet. warranty on: burn hot • Insufficient draft? Add more pipe. Basic body wood insert enough. -
Page 26: Requirement Of Effectiveness For The Warranty
We particu- larly advise you to have your wood insert/ If such proof is not produced Spartherm Feuerung- stove serviced regularly by a stove fitter. stechnik GmbH shall not be obliged to honour the warranty. -
Page 27: Service History
10. SERVICE HISTORY Appliance Service History This heater must be serviced annually depending on usage. Date Dealer Name Service Technician Name Service Performed Special Concerns... - Page 28 SPARTHERM THE GLOBAL BRAND FOR YOUR LIVING ROOM Your specialist dealer Spartherm Feuerungstechnik GmbH · Maschweg 38 · 49324 Melle Phone +49 5422 94 41-0 · www.spartherm.com...