Oregon Scientific BAR339PA - Radio-Controlled Projection Clock Manual
- User manual (2 pages) ,
- User manual (2 pages)
Advertisement
INTRODUCTION
Please keep this manual for instructions and information you should know about.
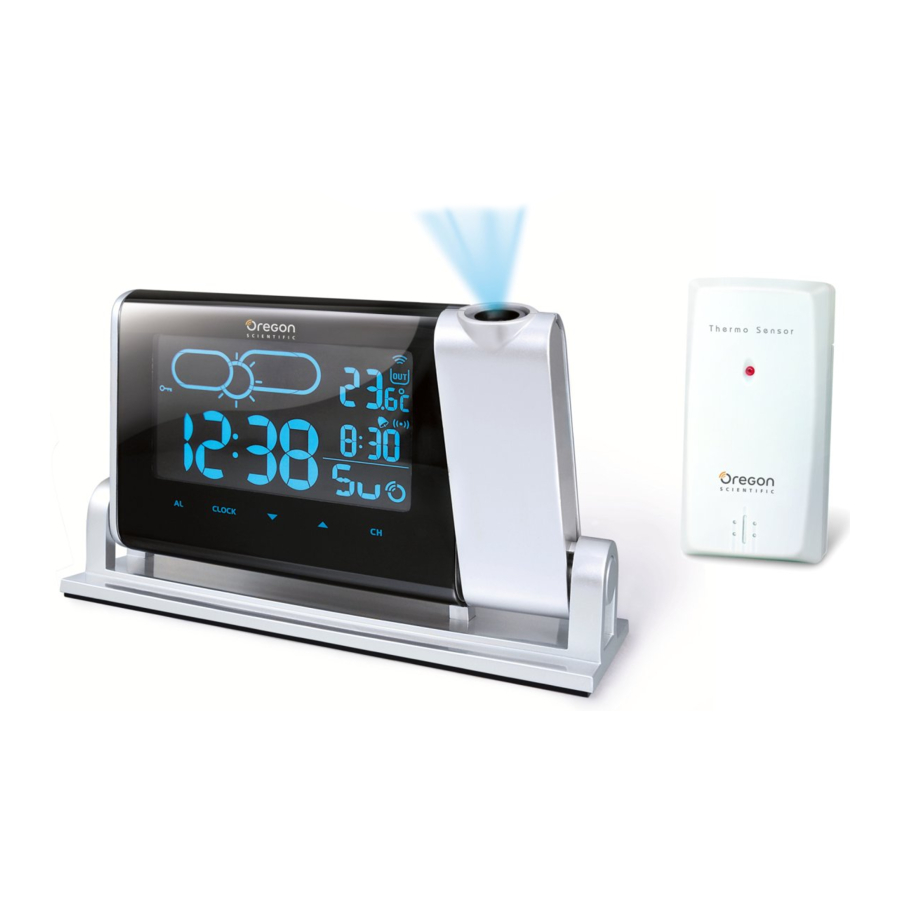
CLOCK OVERVIEW
FRONT VIEW

- SNOOZE: Snooze alarm; activate backlight; rotate dual line projection display by 180°
- ALARM: View alarm status; set alarm
- CLOCK: Change display; set clock
![]() : Toggle setting options; activate / deactivate clock reception
: Toggle setting options; activate / deactivate clock reception- TEMP: Toggle in / out temperature display
- Projector
 : Toggle setting options; activate / deactivate clock reception
BACK VIEW

- FOCUS: Focus the projected image
- RESET: Reset settings to default
- °C / °F: Select temperature unit
- Battery compartment
- Light sensor
- MEM: View current, maximum and minimum temperature
- PROJECTION: ON / OFF switch
- LIGHT: Backlight ON / OFF switch
- DEMO WEATHER FORECAST: Select between demo mode and weather forecast mode
- Adapter socket
REMOTE SENSOR

- LED status indicator
- Wall mount hole
- Battery compartment
- RESET hole: Reset unit to default settings
- CHANNEL button: Select channel 1
GETTING STARTED
POWER SUPPLY
Batteries serve as a back-up power supply. For continuous use of projector and backlight, install adapter. The socket-outlet shall be installed near the equipment and shall be easily accessible.
NOTE  will appear when power supply is not connected.
To insert batteries:
- Remove the battery compartment and insert batteries, matching polarities.
- Press RESET after each battery change.
 LOCATION LOCATION | MEANING |
| Clock / alarm area | Main unit batteries low |
| Outdoor / indoor temperature area | Sensor batteries low |
REMOTE SENSOR
To set up the sensor:

- Open the battery compartment, and insert batteries, matching polarities.
- Place the sensor within 30 m (98 ft) of the main unit using the table stand or wall mount.
The transmission range may vary depending on many factors. You may need to experiment with various locations to get the best results.
NOTE We recommend that you use alkaline batteries with this product for longer usage and consumer grade lithium batteries in temperatures below freezing.
SENSOR DATA TRANSMISSION
Outdoor sensor:
The main unit will automatically search for the outdoor sensor. The sensor reception icon in the remote sensor area shows the status:
| ICON | DESCRIPTION |
 | Main unit is searching for sensor(s) |
 | A channel has been found |
 | The sensor cannot be found. |
NOTE If the sensor is not found, check the batteries, obstructions, and remote unit location.
For best results:
- Place the sensor out of direct sunlight and moisture.
- Position the sensor facing main unit, minimizing obstructions.
- Place the sensor in a location with a clear view to the sky, away from metallic or electronic objects.
- Position the sensor close to the main unit during cold winter months.
CLOCK
CLOCK RECEPTION
This product is designed to synchronize its clock automatically with a clock signal.
To enable / disable signal reception:
Touch and hold  to enable, or
  to disable signal signal reception.
NOTE Reception takes 2-10 minutes. If the signal is weak, it can take up to 24 hours to get a valid signal.
Clock signal reception indicator:
| STRONG SIGNAL | WEAK SIGNAL | NO SIGNAL |
 |  |  |
MANUALLY SET CLOCK
- Touch and hold CLOCK for 2 seconds.
- Touch
![]() or
or ![]() to change the settings.
to change the settings. - Touch CLOCK to confi rm.
- The setting order is: time zone offset, 12/24-hr format, hour, minute, year, day / month format, month, day and language.
NOTE Time zone offset sets the clock +/- 23 hours from the received clock signal time.
NOTE The language options are (E) English, (D) German, (F) French, (I) Italian, and (S) Spanish.
To select display mode:
Touch CLOCK to choose between clock with seconds and clock with weekday.
ALARM
To set the alarm:
- Touch and hold ALARM for 2 seconds to enter alarm-setting mode.
- Touch
![]() to set hour / minute.
to set hour / minute. - Touch ALARM to confi rm.
![]() indicates alarm is ON.
indicates alarm is ON.
 indicates alarm is ON.
To toggle alarms ON / OFF:
- Touch ALARM to display alarm time.
- Touch ALARM again to turn alarm ON / OFF.
To silence the alarms:
- Touch SNOOZE to silence it for 8 minutes
OR - Touch any other key to turn the alarm off and activate it again after 24 hours.
WEATHER FORCAST
It will forecast the next 12 to 24 hours of weather within a 30-50 km (19-31 mile) radius using different color icons.
| ICON | COLOR | DESCRIPTION |
 | Red / Orange | Sunny |
 | Pink | Partially Cloudy |
 | Turquoise | Cloudy |
 | Purple | Rainy |
 | Green | Snowy |
TEMPERATURE
To toggle temperature unit:
Press °C / °F.
To toggle between outdoor / indoor sensor readings:
Touch TEMP.  indicates indoor and outdoor temperature.
To auto-scan between sensors:
Touch and hold TEMP for 2 seconds to display the sensor's data for 5 seconds.
To deactivate auto-scan function touch TEMP.
To toggle between current, minimum and maximum temperature records for outdoor / indoor:
Press MEM repeatedly.
To clear the records:
Press and hold MEM for 2 seconds.
PROJECTOR AND BACKLIGHT
To activate Projection function:
- Slide PROJECTION switch to ON to illuminate projection continuously.
To activate Backlight function:
- Slide LIGHT switch to ON to illuminate backlight continuously.
OR - Touch SNOOZE to turn on projector and backlight for 5 seconds.
- Touch repeatedly to fl ip dual line projection image by 180 degrees.
NOTE If projection is illuminated, do not look directly into the projector.

NOTE To save battery life, the projector and backlight will only operate continuously when adapter is installed. The light sensor will turn off the projector automatically when it detects external light sources.
COLOR
The color function lights up the LCD screen. There are 2 different types of display:
- WEATHER FORECAST: The color changes according to the different weather forecast. (As shown in Weather forecast).
- DEMO: The color gradually changes between the colors (rainbow display).
To activate / deactivate the weather forecast or rainbow display, slide the relevant switch to one of the following options:
- WEATHER FORECAST: Color changing weather forecast.
- DEMO: For gradual changes between the colors.
KEY LOCK
Auto key lock will activate if no key is pressed for 1 minute.  indicates key lock is engaged, touch any key to unlock.
RESET
Press RESET to return to the default settings.
PRECAUTIONS
- Do not subject the unit to excessive force, shock, dust, temperature or humidity.
- Do not cover the ventilation holes with any items such as newspapers, curtains etc.
- Do not immerse the unit in water. If you spill liquid over it, dry it immediately with a soft, lint-free cloth. • Do not clean the unit with abrasive or corrosive materials.
- Do not tamper with the unit's internal components. This invalidates the warranty.
- Only use fresh batteries. Do not mix new and old batteries.
- Images shown in this manual may differ from the actual display.
- When disposing of this product, ensure it is collected separately for special treatment.
- Placement of this product on certain types of wood may result in damage to its fi nish for which Oregon Scientifi c will not be responsible. Consult the furniture manufacture's care instructions for information.
- The contents of this manual may not be reproduced without the permission of the manufacturer.
- Do not dispose old batteries as unsorted municipal waste. Collection of such waste separately for special treatment is necessary.
- Please note that some units are equipped with a battery safety strip. Remove the strip from the battery compartment before fi rst use.
NOTE The technical specifi cations for this product and the contents of the user manual are subject to change without notice.
SPECIFICATIONS
| TYPE | DESCRIPTION |
| MAIN UNIT | |
| L x W x H | 177 x 56 x 112 mm (6.97 x 2.21 x 4.41 in) |
| Weight | 340 g (12.0 oz) without battery |
| Temperature Unit | °C / °F |
| Temperature range | -5°C to 50°C (23°F to 122°F) |
| Resolution | 0.1°C (0.2°F) |
| Signal frequency | 433 MHz |
| Power | 3 x UM-3 (AA) 1.5 V batteries / 4.5V AC / DC adapter |
| REMOTE UNIT (THN132N / THN132NH) | |
| L x W x H | 92 x 60 x 20 mm (3.6 x 2.4 x 0.8 in) |
| Weight | 62 g (2.2 oz) |
| Transmission range | 30 m (98 ft) unobstructed |
| Temperature range | -30°C to 60°C |
| (-22°F to 140°F) | |
| Power | 1 x UM-3 (AA) 1.5 V battery |

Documents / ResourcesDownload manual
Here you can download full pdf version of manual, it may contain additional safety instructions, warranty information, FCC rules, etc.
Download Oregon Scientific BAR339PA - Radio-Controlled Projection Clock Manual
Advertisement
Thank you! Your question has been received!


Need Assistance?
Do you have a question about the BAR339PA that isn't answered in the manual? Leave your question here.