Daikin Altherma EDLQ05CAV3 Installation Manual
Hide thumbs
Also See for Altherma EDLQ05CAV3:
- User reference manual (28 pages) ,
- Installation manual (28 pages)

Related Manuals for Daikin Altherma EDLQ05CAV3


Summary of Contents for Daikin Altherma EDLQ05CAV3
- Page 1 Installation manual Daikin Altherma low temperature monobloc EBLQ05CAV3 EBLQ07CAV3 Installation manual EDLQ05CAV3 English Daikin Altherma low temperature monobloc EDLQ07CAV3...
- Page 2 3P403988-1A...
-
Page 3: Table Of Contents
Basic configuration ..............12 Latest revisions of the supplied documentation may be available on 5.2.1 Quick wizard: Language / time and date..... 12 the regional Daikin website or via your dealer. 5.2.2 Quick wizard: Standard..........13 5.2.3 Quick wizard: Options ..........13 The original documentation is written in English. -
Page 4: Preparation
See the installer reference guide for more information. Minimum required flow rate >250 05+07 models 12 l/min See the recommended procedure as described in "6.2 Checklist (mm) (mm) during commissioning" on page 18. Air outlet Air inlet Installation manual EBLQ+EDLQ05+07CAV3 Daikin Altherma low temperature monobloc 4P403578-1C – 2016.02... -
Page 5: Preparing Electrical Wiring
(a). If the coating on the fastening area is stripped off, the nuts rust easily. 4.1.1 To open the outdoor unit DANGER: RISK OF ELECTROCUTION DANGER: RISK OF BURNING EBLQ+EDLQ05+07CAV3 Installation manual Daikin Altherma low temperature monobloc 4P403578-1C – 2016.02... -
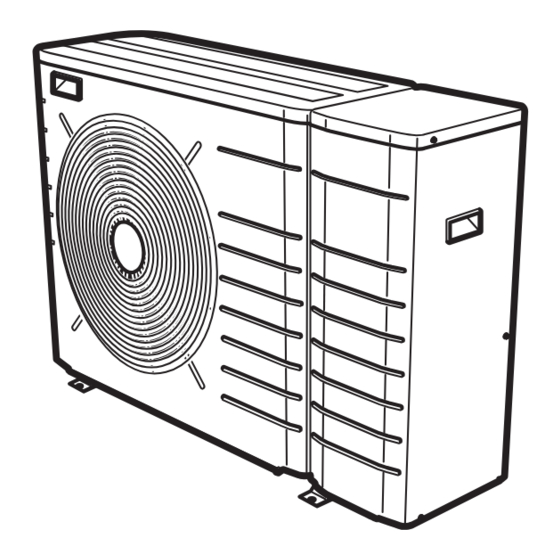
Page 6: To Install The Outdoor Unit
It is possible to install the unit on brackets to the wall: 4.2.2 To install the outdoor unit CAUTION Do NOT remove the protective cardboard before the unit is installed properly. Installation manual EBLQ+EDLQ05+07CAV3 Daikin Altherma low temperature monobloc 4P403578-1C – 2016.02... -
Page 7: To Provide Drainage
3 Insert a rubber sheet between the cables and the outdoor unit to prevent the cable from scratching the paint (field supply). 4 Attach the cable’s ends. Tighten those ends. Protective cardboard Instruction sheet EBLQ+EDLQ05+07CAV3 Installation manual Daikin Altherma low temperature monobloc 4P403578-1C – 2016.02... -
Page 8: Connecting The Water Piping
▪ Protection against bursting: the glycol will prevent the piping from bursting, but NOT the liquid inside the piping from freezing. ▪ Protection against freezing: the glycol will prevent the liquid inside the piping from freezing. Installation manual EBLQ+EDLQ05+07CAV3 Daikin Altherma low temperature monobloc 4P403578-1C – 2016.02... -
Page 9: To Fill The Water Circuit
8 Close the drain and fill valve. Routing Possible cables (depends on the installed options) ▪ User interface Low voltage ▪ Interconnection cable to control box EKCB07CAV3 ▪ Remote outdoor sensor (option) EBLQ+EDLQ05+07CAV3 Installation manual Daikin Altherma low temperature monobloc 4P403578-1C – 2016.02... -
Page 10: To Connect The Main Power Supply
The PCB is mounted in the faceplate of the user interface. Be careful NOT to damage it. 1 2 3 Fix the wallplate of the user interface to the wall. Connect as shown in 4A, 4B, 4C or 4D. Installation manual EBLQ+EDLQ05+07CAV3 Daikin Altherma low temperature monobloc 4P403578-1C – 2016.02... -
Page 11: To Connect The Shut-Off Valve
If you do NOT configure the system correctly, it might NOT work as expected. The configuration influences the following: ▪ The calculations of the software EBLQ+EDLQ05+07CAV3 Installation manual Daikin Altherma low temperature monobloc 4P403578-1C – 2016.02... -
Page 12: To Access The Most Used Commands
Result: The user permission level switches to End user. The user interface will return to the default home screen. To modify an overview setting Example: Modify [1‑01] from 15 to 20. Installation manual EBLQ+EDLQ05+07CAV3 Daikin Altherma low temperature monobloc 4P403578-1C – 2016.02... -
Page 13: Quick Wizard: Standard
Disinfection 4 (3PN,(1/2)) 5 (3PN,(1/1+2)) Code Description [A.2.2.E.4] [E-05] DHW operation: Can the system prepare domestic hot water? ▪ 0 (No): NOT installed ▪ 1 (Yes): Installed Outdoor unit EBLQ+EDLQ05+07CAV3 Installation manual Daikin Altherma low temperature monobloc 4P403578-1C – 2016.02... -
Page 14: Quick Wizard: Capacities (Energy Metering)
▪ 0 (No): NOT installed leaving water temperature control) ▪ 1: Installed (0.1 pulse/kWh) ▪ 2: Installed (1 pulse/kWh) ▪ 3: Installed (10 pulse/kWh) ▪ 4: Installed (100 pulse/kWh) ▪ 5: Installed (1000 pulse/kWh) Installation manual EBLQ+EDLQ05+07CAV3 Daikin Altherma low temperature monobloc 4P403578-1C – 2016.02... - Page 15 By setting the weather‑dependent curve to a higher position, it cannot drop below the minimum setpoint. Refer to the illustration below. EBLQ+EDLQ05+07CAV3 Installation manual Daikin Altherma low temperature monobloc 4P403578-1C – 2016.02...
-
Page 16: Domestic Hot Water Control
5.2.7 Contact/helpdesk number system by adjusting the unit capacity during the heat up/cool down cycle. Code Description [6.3.2] Number that users can call in case of problems. Installation manual EBLQ+EDLQ05+07CAV3 Daikin Altherma low temperature monobloc 4P403578-1C – 2016.02... -
Page 17: Menu Structure: Overview Installer Settings
Amp. limits for DI UFH screed dryout kW limits for DI Air purge Priority Actuator test run INFORMATION Depending on the selected installer settings, settings will be visible/invisible. EBLQ+EDLQ05+07CAV3 Installation manual Daikin Altherma low temperature monobloc 4P403578-1C – 2016.02... -
Page 18: Commissioning
The correct pipe size is installed and the pipes are properly insulated. There are no water leaks inside the outdoor unit. The shut-off valves are properly installed and fully open. The pressure relief valve purges water when opened. Installation manual EBLQ+EDLQ05+07CAV3 Daikin Altherma low temperature monobloc 4P403578-1C – 2016.02... -
Page 19: To Perform A Test Run
3 Go to [A.7.4]: > Installer settings > Commissioning > ▪ [4‑08]=0 Actuator test run. ▪ [4‑01]≠1 4 Select an actuator and press . Example: Pump. 5 Select OK and press EBLQ+EDLQ05+07CAV3 Installation manual Daikin Altherma low temperature monobloc 4P403578-1C – 2016.02... -
Page 20: Hand-Over To The User
4 Select Lock or Unlock, and press To activate or deactivate button lock 1 Press to go to one of the home pages. 2 Press for more than 5 seconds. Installation manual EBLQ+EDLQ05+07CAV3 Daikin Altherma low temperature monobloc 4P403578-1C – 2016.02... -
Page 21: Technical Data
Position in switch box (hydro switch box) Position in control box PCB3 Position in option box Position in compressor switch box PCB1 Position in backup heater kit X14M PCB2 X15M EBLQ+EDLQ05+07CAV3 Installation manual Daikin Altherma low temperature monobloc 4P403578-1C – 2016.02... - Page 22 1 2 3 4 5 1 2 3 4 1 2 3 4 5 6 1 2 3 4 X11A S1PH -t° -t° -t° S1NPH P> compressor switch box 4D094176-1C_Page 5 Installation manual EBLQ+EDLQ05+07CAV3 Daikin Altherma low temperature monobloc 4P403578-1C – 2016.02...
- Page 23 1 2 3 4 5 1 2 3 4 1 2 3 4 5 6 1 2 3 4 X11A S1PH -t° -t° -t° S1NPH P> M1C MS compressor switch box 4D094176-1C_Page 6 EBLQ+EDLQ05+07CAV3 Installation manual Daikin Altherma low temperature monobloc 4P403578-1C – 2016.02...
- Page 24 1 2 3 4 5 X21A X22A -t° -t° external outdoor ambient sensor option -t° -t° X20A X28A X16A X25A X31A X26A X45A 1 2 3 4 Hydro switch box 4D094176-1C_Page 7 Installation manual EBLQ+EDLQ05+07CAV3 Daikin Altherma low temperature monobloc 4P403578-1C – 2016.02...
- Page 25 3N ~ 400 V 6 kW or 9 kW 1N~ , 230 V , 3 kW or 6 kW BUH option (only for *3V) BUH option (*9W) 4D094176-1C_Page 9 EBLQ+EDLQ05+07CAV3 Installation manual Daikin Altherma low temperature monobloc 4P403578-1C – 2016.02...
- Page 26 Overcurrent fuse booster heater Compressor motor F1T, F2T Thermal fuse backup heater Fan motor F1U (A4P) Fuse T 2 A 250 V Main supply pump F2U (A4P) Fuse T 2 A 250 V for 3‑way valve Installation manual EBLQ+EDLQ05+07CAV3 Daikin Altherma low temperature monobloc 4P403578-1C – 2016.02...
- Page 27 External indoor ambient thermistor Flow switch Option Preferential kWh rate power supply contact Not mounted in switch box Surge arrestor Wiring depending on model S1NPH Pressure sensor S1P~S4P Digital power limitation inputs EBLQ+EDLQ05+07CAV3 Installation manual Daikin Altherma low temperature monobloc 4P403578-1C – 2016.02...
- Page 28 3 core Control box power supply: 230 V + earth X1M: L-N-PE X1M: L-N-PE 2 core 230 V External indoor thermistor X2M: 1a-2a Power supply signal Only for KRCS01-1 4D09752-1C Installation manual EBLQ+EDLQ05+07CAV3 Daikin Altherma low temperature monobloc 4P403578-1C – 2016.02...
- Page 32 4P403578-1C 2016.02...