Garmin GHP 10V Marine Autopilot System Owner's Manual
Hide thumbs
Also See for GHP 10V Marine Autopilot System:
- Installation instructions manual (48 pages) ,
- Installation instructions manual (20 pages) ,
- Installation instructions manual (20 pages)
Table of Contents
Advertisement
Quick Links
Advertisement
Table of Contents

Related Manuals for Garmin GHP 10V Marine Autopilot System


Summary of Contents for Garmin GHP 10V Marine Autopilot System
- Page 1 GHC 10 owner’s manual...
- Page 2 All rights reserved. Except as expressly provided herein, no part of this manual may be reproduced, copied, transmitted, disseminated, downloaded or stored in any storage medium, for any purpose without the express prior written consent of Garmin. Garmin hereby grants permission to download a single copy of this manual onto a hard drive or other electronic storage medium to be viewed and to print one copy of this manual or of any revision hereto, provided that such electronic or printed copy of this manual must contain the complete text of this copyright notice and provided further that any unauthorized commercial distribution of this manual or any revision hereto is strictly prohibited.
-
Page 3: Tips And Shortcuts
Introduction WarnIngs ‹ You are responsible for the safe and prudent operation of your vessel. The GHP™ 10/10V/12 is a tool that will enhance your capability to operate your boat. It does not relieve you from the responsibility of safely operating your boat. -
Page 4: Table Of Contents
Table of Contents Table of Contents Powerboat autopilot Operation ... Introduction ... Powerboat Tips ... Tips and Shortcuts ...i Dynamic Menu Option ... Manual Conventions ...i Heading Hold ... Heading Adjustment ... getting started ... Heading Adjustment with the Front Panel ... Turning On the Autopilot ... -
Page 5: Getting Started
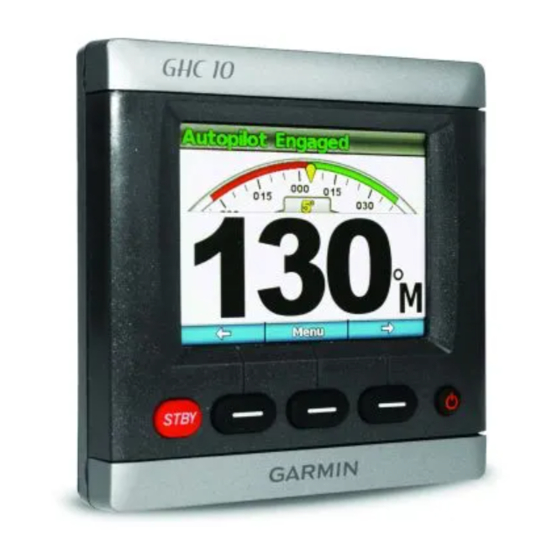
getting started Front Panel ➊ ➋ Item Description Standby ➀ Soft keys ➁ Power key ➂ GHC 10 Owner’s Manual Turning On the autopilot Select Turning Off the autopilot Hold NoTe: If more than one GHC 10 device is wired to turn on the autopilot, you must turn off all of the wired GHC 10 devices to turn off the autopilot. -
Page 6: About The Heading Screen
Getting Started about the Heading screen The heading screen displays the status of the autopilot and the heading. You can use the soft keys to engage the autopilot and manually adjust the heading from the heading screen. When you turn on the autopilot, the system starts in standby mode, and displays the heading screen on the GHC 10. -
Page 7: Powerboat Autopilot Operation
Powerboat autopilot Operation Powerboat Tips Dynamic Menu Option The first option in the menu accessed by selecting Menu from the heading screen changes based on the following conditions: • If the autopilot is not steering a pattern, select the option to go to the engagement screen of the pattern last used. -
Page 8: Direction Control
Powerboat Autopilot Operation adjusting the step steering Increments 1. From the heading screen, select Menu > Steering Mode > Step Turn Size. 2. Select to set the step turn size. 3. Select Done. steering with the soft Keys With the autopilot engaged, you can manually adjust the heading from the heading screen. -
Page 9: Steering Patterns
steering Patterns CaUTIOn ‹ You are responsible for the safe operation of your boat. Do not begin a pattern until you are certain that the water is clear of obstacles. The autopilot can steer the boat in preset patterns for fishing, and it can also perform other specialty maneuvers such as U-turns and man-overboard retrieval. -
Page 10: Circles Pattern
Powerboat Autopilot Operation Circles Pattern The circles pattern steers the boat in a continuous circle, in a specified direction, and at a specified time interval. setting Up the Circles Pattern You can adjust the time the autopilot takes to complete the circle. The default value creates a circle that takes 5 minutes to complete. -
Page 11: U-Turn Pattern
U-Turn Pattern The u-turn pattern turns the boat around 180° and maintains the new heading. There are no settings to adjust for the u-turn pattern. Following the U-Turn Pattern 1. From the heading screen, select Menu > Pattern Steering > U-Turn. 2. -
Page 12: Cancelling A Steering Pattern
Powerboat Autopilot Operation The autopilot follows the man overboard pattern, and the heading screen shows the direction of the turn ➀. TIP: To quickly resume a pattern after you make a heading adjustment with the helm or the soft keys (page 3), select the center soft key twice. -
Page 13: Route To
route To The autopilot steers the boat according to a route defined on your chartplotter. Your GHC 10 must be connected to a NMEA 2000 or NMEA 0183 compatible chartplotter to use route to. Following the route To Pattern Before you can begin using route to, you must define a route on your chartplotter. -
Page 14: Cloverleaf Pattern
Powerboat Autopilot Operation Cloverleaf Pattern The cloverleaf pattern steers the boat to repeatedly pass over an active waypoint. When you begin the cloverleaf pattern, the autopilot drives the boat toward the active waypoint and begins the cloverleaf pattern. setting up the Cloverleaf Pattern You can adjust the distance from the waypoint at which the autopilot turns your boat for another pass over the waypoint. -
Page 15: Cancelling A Gps Steering Pattern
Following the search Pattern 1. From the heading screen, select Menu > GPS Steering > Search > engage. 2. Select an option: • Select to begin a starboard turn. • Select to begin a port turn. The autopilot follows the search pattern around the active waypoint, and the heading screen shows the spacing of the search pattern ➀. -
Page 16: Sailboat Autopilot Operation
Sailboat Autopilot Operation sailboat autopilot Operation CaUTIOn ‹ When engaged, the autopilot controls only the rudder. You and your crew remain responsible for the sails while the autopilot is engaged. In addition to heading hold, you can use the autopilot to maintain a wind hold. -
Page 17: Wind Hold
Wind Hold You can set the autopilot to maintain a specific bearing relative to the current wind angle. Your device must be connected to a NMEA 2000 or NMEA 0183 compatible wind sensor to perform a wind hold or a wind-based tack or gybe. -
Page 18: Wind Hold Adjustment
Sailboat Autopilot Operation Wind Hold adjustment You can adjust the wind hold angle using the soft keys on the autopilot when wind hold is engaged. adjusting the Wind Hold angle with the autopilot You can adjust the wind hold angle using step steering on the autopilot. Select to adjust the wind hold angle in increments of 1°. -
Page 19: Route To
To CaUTIOn ‹ Garmin recommends using route to only under motor power. Using route to while under sail can cause an unexpected gybe, risking damage to your sailboat. Unattended sails and rigging can be damaged or cause injury to any crew or passengers during an unexpected gybe maneuver. -
Page 20: Settings
Settings settings You can customize system, remote control, and user settings. system settings From the heading screen, select Menu > Setup > System. • Units—set the units of measure used to represent values displayed on the GHC 10. ◦ System Units—units used for every measurement displayed by the GHC 10. -
Page 21: Configuring The Ghc 10 Remote
Configuring the gHC 10 remote 1. From the Heading screen, select Menu > Setup > Remote. 2. Select an option: • Button 1 Action—set the function performed by the first button on the remote. • Button 2 Action—set the function performed by the second button on the remote. -
Page 22: Power Mode
Settings • Wind Hold Type—(sailboats only) autopilot steers to apparent wind or true wind when wind hold is engaged. For both true and apparent wind, wind angle is calculated in reference to the bow of the boat, and is represented in degrees to port or starboard. NoTe: The option to switch between wind-hold types is only available if your boat is equipped with both a wind sensor and a water speed sensor. -
Page 23: Appendix
SOFTWARE LICENSE AGREEMENT. PLEASE READ THIS AGREEMENT CAREFULLY. Garmin Ltd. and its subsidiaries (“Garmin”) grant you a limited license to use the software embedded in this device (the “Software”) in binary executable form in the normal operation of the product. Title, ownership rights, and intellectual property rights in and to the Software remain in Garmin and/or its third-party providers. -
Page 24: Error And Warning Messages
Appendix Error and Warning Messages Error Message No rudder position feedback sensor detected Rudder position data is invalid. Autopilot is not receiving navigation data. Autopilot placed in heading hold. Connection with autopilot lost Lost wind data Low GHC supply voltage Rudder sensor is not calibrated. -
Page 25: Index
Index Economy Error Messages Alarms Alerts Garmin Product Support Appendix Autopilot Steering Heading Hold Cancelling Powerboat GPS Pattern Steering Sailboat Pattern Steering Heading Screen Auto Power Screen Circles Man Overboard Cloverleaf Messages Configuring Error/Warning Remote Connecting Remote Network Sharing North... - Page 28 For the latest free software updates (excluding map data) throughout the life of your garmin products, go to the garmin Web site at www.garmin.com. © 2011 Garmin Ltd. or its subsidiaries Garmin International, Inc. 1200 East 151 Street, Olathe, Kansas 66062, USA Garmin (Europe) Ltd.