
Related Manuals for Dell PowerEdge C6600


Summary of Contents for Dell PowerEdge C6600
- Page 1 PowerEdge C6600 Installation and Service Manual Regulatory Model: E81S Regulatory Type: E81S001 February 2023 Rev. A00...
- Page 2 A WARNING indicates a potential for property damage, personal injury, or death. © 2023 Dell Inc. or its subsidiaries. All rights reserved. Dell Technologies, Dell, and other trademarks are trademarks of Dell Inc. or its subsidiaries. Other trademarks may be trademarks of their respective owners.
-
Page 3: Table Of Contents
Contents Chapter 1: About this document....................6 Chapter 2: PowerEdge C6600 system overview................7 Front view of the system..............................7 Left control panel view..............................9 Right control panel view.............................10 Rear view of the system..............................11 Inside the system ................................13 Power supply unit indicator codes..........................15 Drive indicator codes.................................17... - Page 4 Midplane....................................47 Removing the right midplane............................ 47 Installing the right midplane............................49 Removing the left midplane............................50 Installing the left midplane............................52 Power supply unit................................53 Removing a power supply unit..........................53 Installing a power supply unit........................... 54 Power distribution board..............................55 Removing the power distribution board........................
- Page 5 Chapter 5: Getting help......................100 Recycling or End-of-Life service information......................100 Contacting Dell Technologies............................100 Accessing system information by using QRL......................101 Quick Resource Locator for PowerEdge C6600 system.................. 101 Receiving automated support with Secure Connect Gateway (SCG)..............101 Chapter 6: Documentation resources..................102 Contents...
-
Page 6: Chapter 1: About This Document
About this document This document provides an overview about the system, information about installing and replacing components, diagnostic tools, and guidelines to be followed while installing certain components. About this document... -
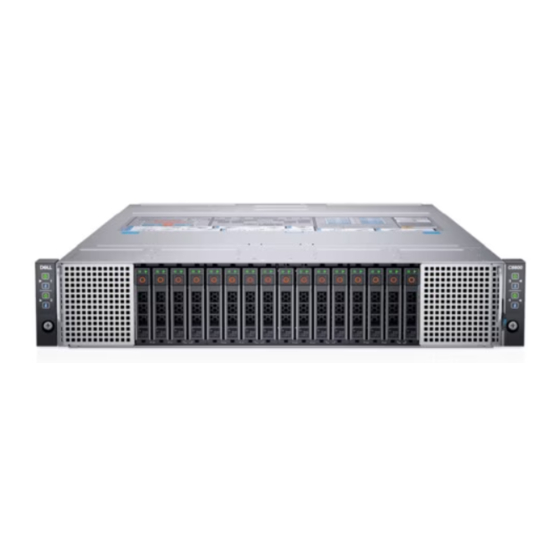
Page 7: Chapter 2: Poweredge C6600 System Overview
PowerEdge C6600 system overview The PowerEdge C6600 system is a ultra-dense 2U enclosure that can support up to four independent two-socket (2S) C6620 sleds and supports: ● Two redundant AC or DC power supply units ● Up to 16 x 2.5-inch SAS/SATA/NVMe (HDD/SSD) drives ●... - Page 8 Contains the power button and system ID indicator for Sled 1 and Sled 2. Drive bay Drive bays for E3.s drives Right control panel Contains the power button and system ID indicator for Sled 3 and Sled 4. PowerEdge C6600 system overview...
-
Page 9: Left Control Panel View
Indicates the status of the system for Sled 2. Press the system ID ID indicator (Sled 2) button: ● To locate a particular sled within the enclosure. ● To turn the system ID on or off. PowerEdge C6600 system overview... -
Page 10: Right Control Panel View
Indicates the status of the system for Sled 4. Press the system ID ID indicator (Sled 4) button: ● To locate a particular sled within the enclosure. ● To turn the system ID on or off. PowerEdge C6600 system overview... -
Page 11: Rear View Of The System
Sled 3 Indicates Sled 3. Power supply unit 1 Indicates the PSU 1. Sled 1 Indicates Sled 1. Sled 2 Indicates Sled 2. Power supply unit 2 Indicates the PSU 2. Sled 4 Indicates Sled 4. PowerEdge C6600 system overview... - Page 12 Sled 3 Indicates Sled 3. Power supply unit 1 Indicates the PSU 1. Sled 1 Indicates Sled 1. Sled 2 Indicates Sled 2. Power supply unit 2 Indicates the PSU 2. Sled 4 Indicates Sled 4. PowerEdge C6600 system overview...
-
Page 13: Inside The System
Inside the system Figure 8. Inside the system for diskless configuration 1. 80 mm fan cage 2. Left midplane 3. Chassis management board 4. Power distribution board (PDB) 5. Power supply unit (PSU) 6. Right midplane PowerEdge C6600 system overview... - Page 14 2. Left midplane 3. 60 mm cooling fan 4. Examax connector 5. 40 mm cooling fan 6. Chassis management board 7. Power distribution board (PDB) 8. Power supply unit (PSU) 9. Right midplane 10. Examax connector 11. Backplane PowerEdge C6600 system overview...
-
Page 15: Power Supply Unit Indicator Codes
2800 W PSUs use the C22 inlet socket and C21 power cord. NOTE: 2400 W PSUs use the C20 inlet socket and C19 power cord. NOTE: 1800 W PSUs use the C16 inlet socket and C15 power cord. PowerEdge C6600 system overview... - Page 16 CAUTION: The 3200 W PSU operation input voltage is 277 V AC. The 3200 W PSU will not power on with 240 V or 120 V AC. PowerEdge C6600 system overview...
-
Page 17: Drive Indicator Codes
If the drive is in the Advanced Host Controller Interface (AHCI) mode, the status LED indicator does not power on. NOTE: Drive status indicator behavior is managed by Storage Spaces Direct. Not all drive status indicators may be used. PowerEdge C6600 system overview... -
Page 18: Locating The Express Service Code And Service Tag
The information tag is located on the front of the enclosure that includes system information such as the Service Tag, Express Service Code, Manufacture date, QRL label, and so on. Figure 13. Locating the Service Tag of your system 1. Information tag (top view) 2. QR code label 3. Express Service Tag label PowerEdge C6600 system overview... -
Page 19: System Information Label
System information label Sled service information Figure 14. Sled service information PowerEdge C6600 system overview... - Page 20 Cable routing Figure 15. Cable routing PowerEdge C6600 system overview...
- Page 21 Enclosure service information Figure 16. Enclosure service information PowerEdge C6600 system overview...
- Page 22 Midplane bracket and 2.5-inch drive cage Figure 17. Midplane bracket and 2.5-inch drive cage Sled removal Figure 18. Sled removal Fans and EXAMAX brackets Figure 19. Fans and EXAMAX brackets PowerEdge C6600 system overview...
-
Page 23: Chapter 3: Installing And Removing System Components
Damage due to servicing that is not authorized by Dell is not covered by your warranty. Read and follow the safety instructions that are shipped with your product. -
Page 24: Before Working Inside Your System
2. Disconnect the system from the electrical outlet and disconnect the peripherals. 3. If applicable, remove the system from the rack. For more information, see the Rail Installation Guide relevant to your rail solutions at www.dell.com/poweredgemanuals. 4. Remove the system cover. -
Page 25: C6600 Chassis
CAUTION: Ensure that the chassis does not have a mixed architecture of PowerEdge C6420, PowerEdge C6525 and PowerEdge C6600 sled configurations. Mixing of sleds are not supported. When chassis or sled mismatch is detected, follow the procedures below: Table 11. Actions taken when chassis or sled mismatch is detected... -
Page 26: Installing A Sled
Figure 20. Sled Installation Guidelines Installing a sled Prerequisites 1. Follow the safety guidelines listed in Safety instructions. 2. Follow the procedure listed in Before working inside your system. Steps 1. Release the sled handle by pressing the blue latch to disengage it from the metal hook. 2. - Page 27 Figure 21. Installing a sled 4. Insert the sled into the enclosure until the edge of the sled handle touches the edge of the enclosure chassis. CAUTION: To avoid any damage to the pins on the sled, do not force the sled into the enclosure. Follow the two-position insertion and gently slide the sled into the enclosure.
-
Page 28: Removing A Sled
5. Push inward on the handle until it rotates and locks the sled into place. 6. To install a sled blank, slide it into the enclosure until the retention latch locks it into place. Figure 23. Installing a sled blank Removing a sled Prerequisites 1. - Page 29 Figure 24. Removing a sled 4. To release the sled blank, press the retention latch on the sled to release the sled. 5. Slide the sled blank out of the enclosure. Figure 25. Removing a sled blank Installing and removing system components...
-
Page 30: System Cover
Next steps Replace the sled. NOTE: If the sled is not being replaced immediately, a sled blank must be installed to ensure proper cooling of the system. System cover Removing the system cover Prerequisites 1. Follow the safety guidelines listed in Safety instructions. -
Page 31: Installing The System Cover
Installing the system cover Prerequisites 1. Follow the safety guidelines listed in Safety instructions. 2. Follow the procedure listed in Before working inside your system. 3. Ensure that all internal cables are connected and routed properly, and no tools or extra parts are left inside the system. Steps Align the tabs on the system cover with the guide slots on the system and slide the system cover toward the front of the chassis until it locks into place. -
Page 32: Installing The Mid Top Cover
2. Slide and lift the mid top cover from the system. Figure 28. Removing the mid top cover Next steps Replace the mid top cover. Installing the mid top cover Prerequisites 1. Follow the safety guidelines listed in Safety instructions. 2. -
Page 33: Cooling Fans
Figure 29. Installing the mid top cover Next steps Follow the procedure listed in After working inside your system. Cooling fans Removing a 80 mm fan Prerequisites WARNING: Do not attempt to operate the system without the 80 mm fans. WARNING: The 80 mm fan spins for some time after the system is powered off. -
Page 34: Installing A 80 Mm Fan
Figure 30. Removing a 80 mm fan Next steps Replace a 80 mm fan. 2. For more information about the 80 mm fan status, see the management software. Installing a 80 mm fan Prerequisites 1. Follow the safety guidelines listed in Safety instructions. -
Page 35: Removing The Diskless 80 Mm Fan Cage
Figure 31. Installing a 80 mm fan Next steps 1. Follow the procedure listed in After working inside your system. 2. Check the management software to see if the fan is rotating at the optimal speed. Removing the diskless 80 mm fan cage Prerequisites 1. -
Page 36: Installing The Diskless 80 Mm Fan Cage
Figure 32. Removing the diskless 80 mm fan cage Next steps Replace the diskless 80 mm fan cage. Installing the diskless 80 mm fan cage Prerequisites 1. Follow the safety guidelines listed in Safety instructions. 2. Follow the procedure listed in Before working inside your system. -
Page 37: Removing The 60 Mm Cooling Fan Cage
Figure 33. Installing the diskless 80 mm fan cage Next steps Follow the procedure listed in After working inside your system. Removing the 60 mm cooling fan cage Prerequisites WARNING: Do not attempt to operate the system without the cooling fans. WARNING: The cooling fan spins for some time after the system is powered down. -
Page 38: Installing The 60 Mm Cooling Fan Cage
Figure 34. Removing the 60 mm cooling fan cage Next steps Install the cooling fan cage. Installing the 60 mm cooling fan cage Prerequisites WARNING: Do not attempt to operate the system without the cooling fans. NOTE: Observe the routing of the cables when removing them from the system. Route these cables properly when you replace them to prevent the cables from being pinched or crimped. -
Page 39: Removing A 60 Mm Cooling Fan
Figure 35. Installing the 60 mm cooling fan cage Next steps 1. Install the system coverInstall the mid top cover. 2. Install the mid top coverInstall the system cover. 3. Follow the procedure listed in After working inside your system. 4. -
Page 40: Installing A 60 Mm Cooling Fan
Figure 36. Removing a 60 mm cooling fan Next steps Install a cooling fan. 2. For more information about the fan status, see the management software. Installing a 60 mm cooling fan Prerequisites 1. Follow the safety guidelines listed in Safety instructions. -
Page 41: Removing The 40 Mm Fan Cage
Figure 37. Installing a 60 mm cooling fan Next steps Install the 60 mm cooling fan cage. 2. Follow the procedure listed in After working inside your system. 3. Check the management software to see if the fan is rotating at the optimal speed. Removing the 40 mm fan cage Prerequisites WARNING:... -
Page 42: Installing The 40 Mm Fan Cage
Figure 38. Removing the 40 mm fan cage Next steps Installing the 40 mm fan cage. Installing the 40 mm fan cage Prerequisites WARNING: Do not attempt to operate the system without the cooling fans. NOTE: Observe the routing of the cables when removing them from the system. Route these cables properly when you replace them to prevent the cables from being pinched or crimped. -
Page 43: Removing The 40 Mm Fan Cage Holder
Figure 39. Installing the 40 mm fan cage Next steps Install the system cover. 2. Follow the procedure listed in After working inside your system. 3. Check the management software to see if all the fans are rotating at the optimal speed. Removing the 40 mm fan cage holder Prerequisites 1. -
Page 44: Installing The 40 Mm Fan Cage Holder
Figure 40. Removing the 40 mm fan cage holder Next steps Installing the 40 mm fan cage holder. Installing the 40 mm fan cage holder Prerequisites 1. Follow the safety guidelines listed in Safety instructions. 2. Follow the procedures listed in Before working inside your system. -
Page 45: Thermal Sensor Board
Figure 41. Installation of the 40 mm fan cage holder Next steps Install the 40 mm fan cage. Install the system cover. 3. Follow the procedure listed in After working inside your system. 4. Check the management software to see if all the fans are rotating at the optimal speed. Thermal sensor board This is a service technician replaceable part only. -
Page 46: Installing The Thermal Sensor Board
3. Disengage the sensor board from the fan cage and lift the board from the cage. Figure 42. Removing the thermal sensor board Next steps Replace the thermal sensor board. Installing the thermal sensor board Prerequisites NOTE: Observe the routing of the cables on the chassis as you remove them from the system. 1. -
Page 47: Midplane
Figure 43. Installing the thermal sensor board Next steps Install the diskless 80 mm fan cage. Install all the 80 mm fans. Install the mid top cover. Install the system cover. 5. Follow the procedure listed in After working inside your system. - Page 48 Figure 44. Removing the right midplane 4. Using the Phillips 2 screwdriver, remove the screws securing the right signal cables to the midplane. Figure 45. Removing the right midplane power cables Installing and removing system components...
-
Page 49: Installing The Right Midplane
Next steps Replace the right midplane. Installing the right midplane Prerequisites NOTE: You must route the cables properly on the chassis to prevent them from being pinched or crimped. 1. Follow the safety guidelines listed in Safety instructions. 2. Follow the procedure listed in Before working inside your system. -
Page 50: Removing The Left Midplane
Figure 47. Installing the right midplane Next steps 1. Reconnect all the disconnected cables. Install the sleds into the enclosure. 3. Follow the procedure listed in After working inside your system. Removing the left midplane Prerequisites NOTE: Observe the routing of the cables on the chassis as you remove them from the system. Route these cables properly when you replace them to prevent the cables from being pinched or crimped. - Page 51 Figure 48. Removing the left midplane 4. Using the Phillips 2 screwdriver, remove the screws securing the left power cables to the midplane. Figure 49. Removing the left midplane power cables Installing and removing system components...
-
Page 52: Installing The Left Midplane
Next steps Replace the left midplane Installing the left midplane Prerequisites NOTE: You must route the cables properly on the chassis to prevent them from being pinched or crimped. 1. Follow the safety guidelines listed in Safety instructions. 2. Follow the procedure listed in Before working inside your system. -
Page 53: Power Supply Unit
While replacing the hot swappable PSU, after next server boot; the new PSU automatically updates to the same firmware and configuration of the replaced one. For updating to the latest firmware and changing the configuration, see the Lifecycle Controller User's Guide at https://www.dell.com/idracmanuals. Removing a power supply unit Prerequisites 1. -
Page 54: Installing A Power Supply Unit
Figure 52. Removing a power supply unit Next steps Replace the PSU. Installing a power supply unit Prerequisites 1. Follow the safety guidelines listed in Safety instructions. 2. For systems that support redundant PSU, ensure that both the PSUs are of the same type and have the same maximum output power. -
Page 55: Power Distribution Board
1. If you have unlatched the cable management arm, relatch it. For information about the cable management arm, see the system’s rack documentation at https://www.dell.com/poweredgemanuals. 2. Connect the power cable to the PSU, and plug the cable into a power outlet. - Page 56 Steps 1. Using the Phillips 2 screwdriver, remove the screws securing the midplane power cables to the PDB. Figure 54. Removing the midplane power cables from the PDB 2. Using the Phillips 2 screwdriver, remove the screws securing the PDB to the chassis. 3.
-
Page 57: Installing The Power Distribution Board
Figure 55. Removing the PDB Next steps Replace the PDB. Installing the power distribution board Prerequisites WARNING: Allow the power distribution board (PDB) to discharge after you power off the system. Handle the PDB by the edges and avoid touching the contact surfaces of the connectors. 1. - Page 58 Figure 56. Installing the PDB 3. Using the Phillips 2 screwdriver, tighten the screws to secure the midplane power cable to the PDB. Figure 57. Installing the midplane power cables to the PDB Installing and removing system components...
-
Page 59: Chassis Management Board
Next steps Replace the power supply units. 2. Follow the procedure listed in After working inside your system Chassis management board This is a service technician replaceable part only. Removing the chassis management board Prerequisites 1. Follow the safety guidelines listed in Safety instructions. -
Page 60: Installing The Chassis Management Board
Figure 59. Removing the chassis management board Next steps Replace the chassis management board. Installing the chassis management board Prerequisites 1. Follow the safety guidelines listed in Safety instructions. 2. Follow the procedure listed in Before working inside your system. Remove the power supply units. - Page 61 Figure 60. Installing the chassis management board 4. Using the Phillips 2 screwdriver, tighten the screws to secure the midplane power cable to the chassis management board. Figure 61. Installing the midplane power cables from the chassis management board Next steps 1.
-
Page 62: Control Panel
Install the power interposer board. Install the power supply units. 4. Follow the procedure listed in After working inside your system. Control panel This is a service technician replaceable part only. Removing the left control panel Prerequisites NOTE: Observe the routing of the cables on the system as you remove them. You must route these cables properly when you replace them to prevent the cables from being pinched or crimped. -
Page 63: Installing The Left Control Panel
Next steps Replace the left control panel. Installing the left control panel Prerequisites NOTE: Observe the routing of the cables on the chassis as you remove them from the system. NOTE: Additional tape maybe required to secure the cables. 1. Follow the safety guidelines listed in Safety instructions. -
Page 64: Removing The Right Control Panel
Figure 64. Installing the left control panel assembly Next steps 1. Reconnect the left control panel cable to the midplane. Install the diskless 80 mm fan cage. Install all 80 mm fans. Install the mid top cover. 5. Follow the procedure listed in After working inside your system. -
Page 65: Installing The Right Control Panel
Figure 65. Removing the right control panel assembly Next steps Replace the right control panel. Installing the right control panel Prerequisites NOTE: Observe the routing of the cables on the chassis as you remove them from the system. NOTE: Additional tape maybe required to secure the cables. 1. -
Page 66: Drives
Figure 66. Installing the right control panel assembly Next steps 1. Reconnect the right control panel cable to the midplane. Install the diskless 80 mm fan cage. Install all 80 mm fans. Install the mid top cover. 5. Follow the procedure listed in After working inside your system. -
Page 67: Removing An E3.S Drive Blank
Figure 67. Removing a drive blank Figure 68. Removing a SSD drive blank Next steps Replace the drive blank. Removing an E3.s drive blank Prerequisites 1. Follow the safety guidelines listed in the Safety instructions. CAUTION: To maintain proper system cooling, drive blanks must be installed in all empty drive slots. Steps Press the release button at the bottom, and slide the drive blank out of the drive slot. -
Page 68: Installing A Drive Blank
Figure 69. Removing an E3.s drive blank Next steps Replace the E3.s drive blank. Installing a drive blank Prerequisites 1. Follow the safety guidelines listed in the Safety instructions. Steps Insert the drive blank into the drive slot until the release button clicks into place. Figure 70. -
Page 69: Installing An E3.S Drive Blank
Figure 71. removing a SSD drive blank Installing an E3.s drive blank Prerequisites 1. Follow the safety guidelines listed in the Safety instructions. Steps Insert the drive blank into the drive slot until the release button clicks into place. Figure 72. Installing the E3.s drive blank Removing the drive carrier Prerequisites 1. -
Page 70: Removing The E3.S Drive Carrier
CAUTION: Before attempting to remove or install a drive while the system is running, see the documentation for the storage controller card to ensure that the host adapter is configured correctly to support drive removal and insertion. CAUTION: To prevent data loss, ensure that your operating system supports drive installation. For more information about the drives installation or uninstallation requirements, see the operating system's user guide. -
Page 71: Installing The Drive Carrier
Figure 74. Removing the E3.s drive carrier Next steps Installing the E3.s drive carrier. Installing the drive carrier Prerequisites CAUTION: Before removing or installing a drive while the system is running, see the documentation for the storage controller card to ensure that the host adapter is configured correctly to support drive removal and insertion. -
Page 72: Installing The E3.S Drive Carrier
Figure 75. Installing a drive carrier Installing the E3.s drive carrier Prerequisites CAUTION: Before removing or installing a drive while the system is running, see the documentation for the storage controller card to ensure that the host adapter is configured correctly to support drive removal and insertion. -
Page 73: Removing The Drive From The Drive Carrier
Figure 76. Installing the E3.s drive carrier Removing the drive from the drive carrier Prerequisites 1. Follow the safety guidelines listed in the Safety instructions. Steps 1. Using a Phillips 1 screwdriver, remove the screws from the slide rails on the drive carrier. NOTE: If the hard drive or SSD carrier has Torx screw, use Torx 6 (for 2.5-inch drive) screwdriver to remove the drive. -
Page 74: Removing The E3.S Drive From The Drive Carrier
Figure 77. Removing the drive from the drive carrier Next steps Install the drive into the drive carrier Removing the E3.s drive from the drive carrier Prerequisites 1. Follow the safety guidelines listed in the Safety instructions. 2. Using the management software, prepare the drive for removal. If the drive is online, the green activity or fault indicator blinks while the drive is powering off. -
Page 75: Installing The Drive Into The Drive Carrier
2. Slide the drive out from the drive carrier. Figure 78. Removing the E3.s drive from the drive carrier Next steps Installing an E3.s drive in to the drive carrier. Installing the drive into the drive carrier Prerequisites 1. Follow the safety guidelines listed in the Safety instructions. -
Page 76: Installing The E3.S Drive Into The Drive Carrier
Figure 79. Installing a drive into the drive carrier Next steps Install the drive carrier. Installing the E3.s drive into the drive carrier Prerequisites 1. Follow the safety guidelines listed in the Safety instructions. Remove the E3.s drive blank. Steps 1. -
Page 77: Examax Connector
Figure 80. Installing the E3.s drive into the drive carrier Next steps Install the drive carrier. Examax connector Removing the left examax connector Prerequisites 1. Follow the safety guidelines listed in Safety instructions. 2. Follow the procedure listed in Before working inside your system. -
Page 78: Installing The Left Examax Connector
Figure 81. Removing the left examax connector Next steps Install the left examax connector. Installing the left examax connector Prerequisites 1. Follow the safety guidelines listed in Safety instructions. 2. Follow the procedure listed in Before working inside your system. . Remove all the sleds from the enclosure. -
Page 79: Removing The Right Examax Connector
Figure 82. Installing the left examax connector Next steps Install the 60 mm cooling fan cage. 2. Follow the procedure listed in After working inside your system. Removing the right examax connector Prerequisites 1. Follow the safety guidelines listed in Safety instructions. - Page 80 Figure 83. Removing the right examax connector Next steps Install the right examax connector. Prerequisites 1. Follow the safety guidelines listed in Safety instructions. 2. Follow the procedure listed in Before working inside your system. . Remove all the sleds from the enclosure.
-
Page 81: Drive Cage
Figure 84. Installing the left examax connector Next steps Install the 60 mm cooling fan cage. 2. Follow the procedure listed in After working inside your system. Drive cage This is a service technician replaceable part only. Removing the drive cage Prerequisites CAUTION: To prevent damage to the drives and backplane, you must remove the drives from the system before... -
Page 82: Installing The Drive Cage
Steps 1. Using the Phillips 1 screwdriver, remove the screws that secure the drive cage to the chassis. 2. Slide the drive cage to the unlock position. 3. Lift the drive cage away from the enclosure. Figure 85. Removing the drive cage Next steps Install the drive cage. -
Page 83: Drive Backplane
Figure 86. Installing the drive cage Next steps 1. If applicable, reconnect all the cables that were disconnected from the linking board and chassis management board. Install all the removed drives. Install the mid top cover. Install the system cover. 5. - Page 84 Figure 87. 16 x 2.5-inch NVMe hard drive backplane 1. Backplane signal cable connector 2. Backplane signal cable to sled 4 3. Backplane signal cable to sled 4 4. Backplane signal cable to sled 3 5. Backplane signal cable to sled 3 6.
- Page 85 Figure 89. 8 x E3.s SSD backplane 1. Test connector 2. Backplane signal cable 3. Test connector 4. Backplane signal cable to sled 1 5. Backplane power connector 6. Backplane signal cable to sled 2 7. Backplane signal cable to sled 3 8.
- Page 86 Table 12. Cabling the 8 x E3.s backplane with E3.s drives (continued) From Examax (Examax connector) BP_DST_PA3, BP_DST_A4 (backplane signal connector 3 and Figure 91. Cabling the 16 x 2.5-inch backplane with NVMe drives Table 13. Cabling the 16 x 2.5-inch backplane with NVMe drives From Examax (Examax connector) BP_DST_PB1, BP_DST_PB1, BP_DST_PB2, BP_DST_PB2...
- Page 87 Figure 92. Cabling the 16 x 2.5-inch backplane with SAS/SATA drives Table 14. Cabling the 16 x 2.5-inch backplane with SAS/SATA drives From Examax (Examax connector) BP_DST_SA1, BP_DST_SA2 (backplane signal connector 1 and 2) CM_BP_PWR1 (chassis manager board power connector) BP_PWR_1(backplane power connector) CM_SIG (chassis manager board signal connector) BP_SIG1 (backplane signal connector)
-
Page 88: Removing The Backplane
Figure 94. Sled to drive mapping for 8 x E3.s drive configuration 1. Drives 0–1 mapped to sled 1 2. Drives 2-3 mapped to sled 2 3. Drives 4-5 mapped to sled 3 4. Drives 6-7 mapped to sled 4 NOTE: The warranty of the drives are linked to the Service Tag of the corresponding sled. -
Page 89: Installing The Backplane
Figure 95. Removing the backplane Next steps Install the backplane. Installing the backplane Prerequisites CAUTION: You must note the slot number of each drive and temporarily label them before removal so that you can replace them in the same slots. NOTE: Observe the routing of the cables on the chassis as you remove them from the system. - Page 90 Figure 96. Installing the backplane Next steps 1. Reconnect all the disconnected cables. Install the drive cage into the enclosure. 3. Follow the procedure listed in After working inside your system. Installing and removing system components...
-
Page 91: Chapter 4: Technical Specifications
System weight • Drives • PSU specifications • Environmental specifications Chassis dimensions Figure 97. Chassis dimensions Table 15. PowerEdge C6600 chassis dimensions Drives Diskless/ 489.0 mm 448.0 mm 86.8 mm 42.0 mm (1.65 inches) 763.2 mm 799.97 mm (31.49 inches) - 8 drives/ (19.25... -
Page 92: System Weight
● 16 x 2.5-inch hot-swappable SAS/SATA/NVMe drives. ● 8 x E3.s NVMe SSD drives. NOTE: For more information about how to hot swap NVMe PCIe SSD U.2 device, see the Dell Express Flash NVMe PCIe SSD User's Guide at https://www.dell.com/support >Browse all Products >... -
Page 93: Environmental Specifications
NOTE: When selecting or upgrading the system configuration, to ensure optimum power utilization, verify the system power consumption with the Enterprise Infrastructure Planning Tool available at Dell.com/calc. Environmental specifications NOTE: For additional information about environmental certifications, refer to the Product Environmental Datasheet located with the Documentation on www.dell.com/support/home. -
Page 94: Thermal Air Restrictions
Thermal air restrictions ASHRAE A3/A4 configuration restrictions ● NVMe SSD and E3.s are not supported ● A2 GPU is not supported. ● 128 GB and 256 GB DIMM is not supported ● CPU TDP restrictions: ○ Air cooled 2.5-inch chassis: ■... - Page 95 Table 25. 2.5-inch chassis, air cooled, 2P (2 processors) (continued) Processor Core count Model CPU1 heat sink CPU2 heat All storage sink configuration 8470N 300 W 8460Y+ 300 W 8452Y 300 W 6454S 270 W 8454H 270 W 6430 270 W 8444H 270 W 8450H...
- Page 96 Table 27. NVME chassis, air cooled, 2P Processor Core count Model CPU1 heat sink CPU2 heat All storage sink configuration 8470Q 350 W 8480+ 350 W 8470 350 W 8468 350 W 8458P 350 W 8468V 330 W 8468H 330 W 8460H 330 W 8470N...
- Page 97 Table 28. NVME chassis, air cooled, 1P (continued) Processor Core count Model CPU1 heat sink CPU2 heat All storage sink configuration 8444H 270 W T0FVH (Extended) 6414U 250 W T0FVH (Extended) 8450H 250 W T0FVH (Extended) Temperature restrictions for no backplane board and E3.s chassis Table 29.
- Page 98 Table 30. No backplane chassis and E3.s chassis, air cooled, 1P (continued) Processor Core count Model CPU1 heat sink CPU2 heat All storage sink configuration 8468 350 W T0FVH (Extended) 8458P 350 W V3P2V (General) 8468V 330 W V3P2V (General) 8468H 330 W V3P2V...
- Page 99 Table 31. All chassis, liquid cooled (no A2 GPU card) (continued) Processor Core count Model CPU1 heat sink CPU2 heat All storage sink configuration 8468H 330 W Cold plate Cold plate 8460H 330 W Cold plate Cold plate 8470N 300 W Cold plate Cold plate 8460Y+...
-
Page 100: Chapter 5: Getting Help
Dell contact information on your purchase invoice, packing slip, bill or Dell product catalog. The availability of services varies depending on the country and product, and some services may not be available in your area. To contact Dell for sales, technical... -
Page 101: Accessing System Information By Using Qrl
Dell. This information is used by Dell Technical Support to troubleshoot the issue. ● Proactive contact — A Dell Technical Support agent contacts you about the support case and helps you resolve the issue. -
Page 102: Chapter 6: Documentation Resources
This section provides information about the documentation resources for your system. To view the document that is listed in the documentation resources table: ● From the Dell support site: 1. Click the documentation link that is provided in the Location column in the table. - Page 103 Methods to download firmware and drivers section in this document. Managing your system For information about systems management www.dell.com/poweredgemanuals software offered by Dell, see the Dell OpenManage Systems Management Overview Guide. For information about setting up, using, www.dell.com/openmanagemanuals >...