Advertisement
Quick Links
inStallation inStrUCtionS
Split SYStEm UnCaSED rEplaCEmEnt inDoor CoilS
important SaFEtY inFormation
please read all instructions before servicing this
equipment. Pay attention to all safety warnings and any
other special notes highlighted in the manual. Safety
markings are used frequently throughout this manual to
designate a degree or level of seriousness and should not
be ignored. WarninG indicates a potentially hazardous
situation that if not avoided, could result in personal injury
or death. CaUtion indicates a potentially hazardous
situation that if not avoided, may result in minor or moderate
injury or property damage.
WarninG:
propoSition 65 WarninG: this product
contains chemicals known to the state of
California to cause cancer, birth defects or other
reproductive harm.
WarninG:
read the installation instructions supplied
with the furnace / air handler. always observe
all safety requirements outlined in this manual
and on the furnace/air handler markings before
installing the coil.
WarninG:
improper installation, service, adjustment,
or maintenance may cause explosion, fire,
electrical shock or other hazardous conditions
which may result in personal injury or property
damage. Unless otherwise noted in these
instructions, only factory authorized kits or
accessories may be used with this product.
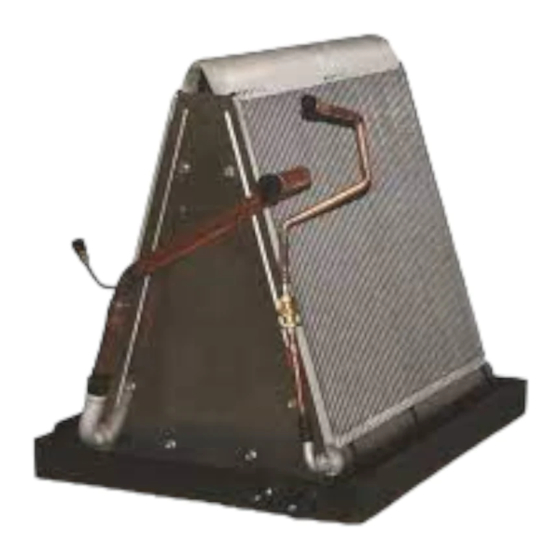
GEnEral inFormation
These uncased replacement coils are designed for upflow,
downflow, or horizontal applications.
• Check the coils orifice size and confirm that it's suitable
for application with the intended outdoor unit. Depending
on application, additional installer supplied orifice or
TXV may be required.
• Verify that the air delivery of the furnace/air handler is
adequate to handle the static pressure drop of the coil,
filter, and duct work.
• If precise forming of refrigerant lines is required, a
copper tubing bender is recommended. Avoid sharp
bends and contact of the refrigerant lines with metal
surfaces.
• Refrigerant lines should be wrapped with pressure
sensitive neoprene or other suitable material where
they pass against sharply edged sheet metal.
• Horizontal installations require a horizontal drain pan
kit to be installed. See Table 1 (page 3) for part number.
Advertisement

Related Manuals for Nordyne REPLCOIL01M


Summary of Contents for Nordyne REPLCOIL01M
- Page 1 inStallation inStrUCtionS Split SYStEm UnCaSED rEplaCEmEnt inDoor CoilS important SaFEtY inFormation WarninG: please read all instructions before servicing this improper installation, service, adjustment, equipment. Pay attention to all safety warnings and any or maintenance may cause explosion, fire, other special notes highlighted in the manual. Safety electrical shock or other hazardous conditions markings are used frequently throughout this manual to designate a degree or level of seriousness and should not...
-
Page 2: Coil Installation
Shut off all electrical power to the furnace and part oriFiCE moDEl WiDtH nUmbEr SizE outdoor condensing unit before performing any 921482 REPLCOIL01M 0.067 maintenance or service on the system. Electric 921483 REPLCOIL02M 0.067 furnaces may be connected to more than one 921484 REPLCOIL03M 0.080... - Page 3 3. Check the actual size of the new orifice. The size is installing a tXV Kit A separate TXV kit and C5 replacement tube kit are stamped on its side. Do not use pin gauges to measure required. See Tables 5 - 7 (pages 6 - 8). the orifice diameter.
- Page 4 12. Connect the equalization line from the TXV to the 1/4 3. Wrap a wet rag around the Quick Connect and braze port located on the suction line. the connections from the kit onto the coil. 4. Verify that the couplings at the ends of the lineset still CaUtion: have their knives intact.
- Page 5 7. Using a permanent marker or scribe, mark a line Downturn lengthwise from the female coupling nut to the female 1. Determine the appropriate connection kit by referring to Table 3 (page 6). coupling body. 2. Cut off 2.5 inches off the coil suction and liquid line 8.
- Page 6 5. C5 replacement tube Kit pn’s air HanDlEr air HanDlEr rEplaCEmEnt rEplaCEmEnt rEplaCEmEnt tUbE Kit, moDEl Coil SKU Coil moDEl Coil SKU SinGlE B4VM-X24K-A 919626D REPLCOIL01M 921482 920668A 920770D 921732 B4VM-X30K-A REPLCOIL01M 921482 920669A 920772D 919510D 921732 B5BM-X24K-A 904303D...
- Page 7 Coil rEplaCEmEnt rEplaCEmEnt tUbE Kit, tXV Kit Qa / Da Kit moDEl Coil moDEl Coil SKU SinGlE C3BA-024U-A 917143D REPLCOIL06 921324 C3BA-036U-A 917083D REPLCOIL01M 921482 921732 C5BA-024U-A REPLCOIL01M 921482 919131D 921732 C5BA-025U-A REPLCOIL01M 921482 919132D 921732 C5BA-030U-A REPLCOIL01M 921482 919133D...
- Page 8 Coil Coil rEplaCEmEnt rEplaCEmEnt tUbE Kit, tXV Kit Qa / Da Kit moDEl Coil moDEl Coil SKU SinGlE C4BA-X36U-B REPLCOIL03M 921484 920670A 921734 917190D C5BA-042U-B 919138D REPLCOIL03M 921484 921734 C5BA-048U-B REPLCOIL03M 921484 921734 919139D C5BA-T42U-B 919174D REPLCOIL03M 921484 920665A 921734 C5BA-T48U-B REPLCOIL03M 921484...