
Related Manuals for Clarity C600


Summary of Contents for Clarity C600
- Page 1 2.4 GHz Cordless Telephone with Caller ID Featuring Clarity Power ¤ Clarity C600 User Guide Technology “ Ñ Ç...
-
Page 2: Table Of Contents
Set Up Mode ..... 12 Clarity Power Technology ... 14 Boost Clarity Power On/Off . -
Page 3: Safety Instructions
Important Safety Instructions When using your telephone equipment, basic safety precautions should always be followed to reduce the risk of fire, electric shock and injury to persons including the following: 1. Read and understand all instructions. 2. Follow all warnings and instructions marked on the telephone. -
Page 4: Safety Instructions For Batteries
Important Safety Instructions instructions.Adjust only those controls that are covered by the operating instructions. Improper adjustment may require extensive work by a qualified technician to restore the telephone to normal operation. E. If the telephone has been dropped or the case has been damaged. If the telephone exhibits a distinct change in performance. -
Page 5: Features
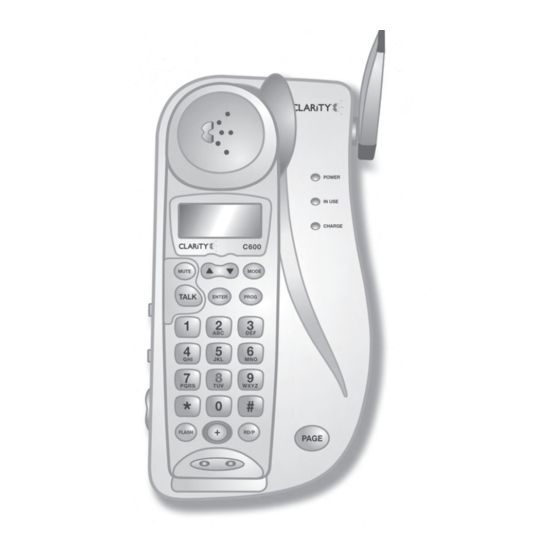
Handset 1. 2.5 mm Headset Jack 2. Key Pad 3. Handset Charging Contacts 4. DEL/Channel Button (DEL/CH) 5. Talk Button (TALK) 6. Mode Button (MODE) 7. Flash Button (FLASH) 8. Mute Button (MUTE) 9. Redial/Pause Button (RD/P) 10. Temporary Tone Button (*) Features 11. - Page 6 Telephone Base 1. Charging Contacts 2. Base Antenna/Visual Ringer 3. Power LED 4. In Use LED 5. Charge LED 6. Page Button (PAGE) Features...
- Page 7 Base Side/End/Bottom 1. Ringer Off/On 2. Ring Style 3. Volume Up/Down 4. Pulse/Tone Features 5. BOOST On/Off 6. AC (Electrical) Adapter Jack 7. Telephone Line Jack CAUTION LOUD VOLUME...
-
Page 8: Getting Started
AC power before you disconnect it from the phone. INSTALLATION Connecting Your Telephone Carefully remove your cordless telephone from its box. If there is any visible damage, do not attempt to operate this equipment. Return it to the place of purchase. -
Page 9: Wall Mounting Instructions
5. Align the mounting bracket on the back of the base so that the black rubber feet are towards the bottom of the phone. Insert the bracket s tabs into the slots and secure the bracket by sliding it upward. 6. -
Page 10: Battery Installation
12 hours before you use the phone for the first time. BATTERY INSTALLATION The C600 uses a 3.6Volt 600mAh NiMH rechargeable 3 cell (AAA Type) battery that is included with your unit. Installing and Connecting Battery... -
Page 11: Headset Jack
Ordering a Headset: In the event you wish to purchase a headset for your C600, please contact Plantronics at 1-800-544-4660 for location near you. We recommend using the Plantronics M110 or M130 headset. -
Page 12: Feature Set Up
CALLER ID DISPLAY Set-up Mode C600 handset goes into setup mode automatic when battery is connected. Or press and hold MODE button for 3 seconds to enter setup mode. If there is no input within 30 seconds, the language will be set to the last selected one and go back to standby mode. - Page 13 Setting LDS CODE 1. After setting Area Code 2, press UP( button to set LDS Code. 2. The LCD display will show LDS CODE with X digit blinking. 3. Enter the LDS number using the numeric keys on the handset. 4.
-
Page 14: Clarity Power Technology
BOOST Clarity Power On/Off The C600 has a button that controls the loudness of the receiver. Once the BOOST button is pressed, an extra level of amplification is added over the entire range of the volume control. -
Page 15: Boost On/Off
Power button in order to gain the extra level of amplification. If the phone hangs up, the Clarity Power will reset to OFF. During a call, the BOOST Clarity Power button can toggle the Clarity Power function on or off accord- ing to the user s needs. -
Page 16: Telephone Operations
If the handset is in the cradle with AutoConnect mode OFF, lift the handset.The handset will be in standby mode. Press TALK button to receive the call. Refer to BOOST Clarity Power and Volume Control for information on adjusting volume controls on Pages 13-19. Last Number Redial:... -
Page 17: Temporary Tone
Channel Operation The C600 cordless telephone automatically searches and selects the clearest of 40 chan- nels when it is being used. If interference devel- ops on the line, pressing this button will move to another channel. -
Page 18: Memory Storage
Reset by placing the handset on the base for 5-10 seconds. If that does not work, unplug the AC adapter from the wall outlet. Disconnect the handset battery for 5-10 seconds, and then reconnect. Place hand-set back on the base and then reinsert the AC adapter. -
Page 19: Dialing A Phonebook Entry
Dialing a Phonebook Entry 1. Locate the phonebook record you wish to call. 2. Press TALK or ENTER button to dial the displayed number. Deleting a Stored Number 1. Unit must be in standby mode and display is showing a phonebook record. 2. -
Page 20: Adding The Emergency Number
Press DEL/CH key to move the cursor back to character C.Then press any other numeric key to change this character. 10. Press ENTER to finish.The modified characters and numbers will replace the original phone record. 11. The display will show NUMBER STORED. -
Page 21: Caller Id Operations
INDICATOR (VMWI) NOTE: This is a service that is provided through your local telephone company. If the C600 finds that there is voice message to be retrieved, it will turn on the Message Waiting Indicator (the ENTER key). To retrieve the voice message, press the ENTER key while the indicator is on.The hand-... -
Page 22: Saving Caller Id Information
the last Caller ID information. Press UP ( ) or DOWN ( Caller ID content. Press DOWN ( the caller ID information from the most recent record. Or, press the UP ( ) button to scroll the Caller ID information from the oldest record. -
Page 23: Callback From Caller Id Information
INFORMATION To callback from incoming call information, the base T/P switch should be set at T. While reviewing the incoming call list, press ENTER and the UP( ) or DOWN ( will format the number with the following dialing variations: 7 digits without a 1 prefix: If the area code of the Caller ID number match- es to the setting of the stored area code, the... -
Page 24: Delete Caller Id Information
2. Pressing the TALK or ENTER key again will dial out 4134567890. 3. Pressing the UP( ) key will show blinking 1-4134567890. Press TALK or ENTER key will dial out 14134567890. 4. Press UP ( ) key will show blinking 413-456-7890 again. -
Page 25: Maintenance And Care
Maintenance and Care The C600 has been designed to give you years of dependable service with a minimum of care. To ensure the utmost in performance, follow these guidelines in caring for the unit: 1. Avoid dropping or knocking the unit. -
Page 26: Troubleshooting
The unit will not operate/no dial tone: ¥ Verify the TALK Button is lit. ¥ Verify the AC Adapter is securely plugged into AC outlet, the base and the telephone. ¥ Verify the telephone line cord is securely plugged into the wall jack and the telephone. - Page 27 Phone Will Not Hold Charge: ¥ Make sure the charging contacts on the handset and base are free of dust and dirt. Clean the contacts with a soft cloth. ¥ Make sure CHARGE LED on the base is lit when handset is in the cradle. ¥...
-
Page 28: Regulatory Compliance
If trouble is experienced with this telephone equipment, for repair or warranty information, please contact Clarity, 1-800-552-3368. If the equipment is causing harm to the telephone net- work, the telephone company may request that you disconnect the equipment until the problem is resolved. - Page 29 Regulatory Compliance i) If your home has specially wired alarm equip- ment connected to the telephone line, ensure the installation of this telephone equipment does not disable your alarm equipment. If you have questions about what will disable alarm equip- ment, consult your telephone company or a qualified installer.
- Page 30 Industry Canada Technical Specifications This product meets the applicable Industry Canada technical specifications. Before installing this equipment, users should ensure that it is permissible to be connected to the facilities of the local telecommunications company.The equipment must also be installed using an acceptable method of connection.
-
Page 31: Warranty And Service
Limited Warranty Clarity, a division of Plantronics, Inc. ( Clarity ) warrants to the original consumer purchaser that, except for limitations and exclusions set forth below, this product shall be free from defects in... - Page 32 ©2004 Clarity, a Division of Plantronics, Inc. All rights reserved. Clarity, Clarity Power and Amplifying Your Life are trademarks or registered trademarks of Plantronics, Inc.