
Related Manuals for NARGESA PP200CNC


Summary of Contents for NARGESA PP200CNC
- Page 1 HORIZONTAL PRESS BRAKE PP200CNC NS: 2022-531 INSTRUCTIONS BOOK PRADA NARGESA, S.L Ctra. de Garrigàs a Sant Miquel s/n · 17476 Palau de Santa Eulàlia (Girona) SPAIN Tel. +34 972568085 · nargesa@nargesa.com · www.nargesa.com...
- Page 2 Thank you for choosing our machines www.nargesa.com...
-
Page 3: Table Of Contents
INDEX 1. CHARACTERISTICS OF THE MACHINE ................3 1.1. Machine identification ....................3 1.2. General dimensions ....................3 1.3. Machine description ....................3 1.4. Identification of components ..................4 1.5. General characteristics ....................5 1.6. Identification of protective panels ................5 2. -
Page 4: Characteristics Of The Machine
Figure 1. External Dimensions of the Horizontal Press Brake 1.3. Machine description The versatility of the Horizontal Press Brake NARGESA PP200CNC allows us to carry out a large number of forging parts and operations depending on the need. This machine curves, cuts, shapes etc... depending on the type of accessory used. -
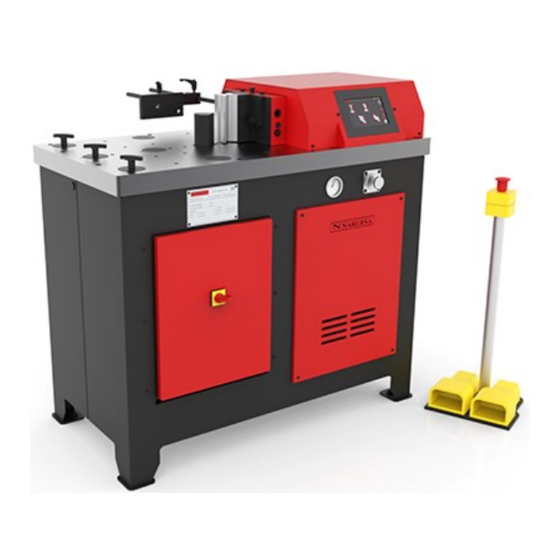
Page 5: Identification Of Components
HORIZONTAL PRESS BRAKE PP200CNC 1.4. Identification of Components Headstock Buffer Upper panel Stabilising rivets Control panel CNC Workbench Pressure regulator Pressure gauge Side panel Electrical panel Nameplate Pedals Shelving Figure 2. Names and positions of components Figure 3. Nameplate - 4 -... -
Page 6: General Characteristics
1.5. General characteristics Electric motor 2.2 Kw / 3CV at 1400 r.p.m. 230/400V Three-Phase 50/60 Hz Electrical power 230V Single-Phase 50/60 Hz Intensity 9/5 A Hydraulic pressure 215 Kg/cm Hydraulic pump 7.5 litres/minute Tank 27 litres Maximum displacement 250 mm Working strength 20.000 Kg (200 KN) Dimensions... -
Page 7: Transport And Storage
HORIZONTAL PRESS BRAKE PP200CNC 2. TRANSPORT AND STORAGE 2.1. Transport The machine must be transported in an upright position using a forklift or a pallet jack fixed to the base of the machine (pre-designed for this purpose). Please take into account the risk of the machine tipping over. -
Page 8: Maintenance And Cleaning
3.2. Cleaning The daily usage of the Horizontal Press Brake NARGESA PP200CNC can generate metallic waste such as (slag, shavings, etc.) which can damage the running of the machine. We recommend that the machine be cleaned, especially the work area, at the end of each day. -
Page 9: Installation And Start Up
4. INSTALLATION AND START UP 4.1. Placement The Horizontal Press Brake NARGESA PP200CNC should be placed on a flat, level surface. It is possible to secure it to the floor using the pre-made holes on the base of the machine for this purpose. -
Page 10: Acceptable External Conditions
The humidity can fluctuate between 30% and 90% without condensation. 4.4. Electrical connection The Horizontal Press Brake NARGESA PP200CNC is designed to be connected to a three-phase power supply of 230/400 volts at 50/60Hz. Once connected ensure that the electric motor is turning in the correct direction (the direction indicated on the sticker placed on the motor) if this is not so, one of the phases must be relocated. -
Page 11: Start Menu
HORIZONTAL PRESS BRAKE PP200CNC 5. START MENU To supply power to the machine, we must put the Start Switch in the “Connected” position. The initial interface or Start Menu shows up on the screen: At this moment the machine is in Standby, that is to say, the machine is ON, but it remains in StandBy... -
Page 12: Punching
6. PUNCHING The following screen shows up when acceding to the Punching function: To perform the punching function we must enter the following parameters in the CNC. In order to do this, we will press each of the following icons to select each parameter: We press the key to select the punch and the die from the library We note that the CNC automatically selects one or the other based on our choice. - Page 13 HORIZONTAL PRESS BRAKE PP200CNC We press the key to select the material We press the key to insert the material thickness in millimeters or inches, depending on the settings: Once we enter the numerical value, we press the key to validate.
- Page 14 Once we complete these parameters, we press the button to start the machine. We will introduce the material in the punching area and press the pedal to carry out the operation. If you look at the vertical menu at the right side of the screen, you’ll see the icon is selected.
-
Page 15: Folding
HORIZONTAL PRESS BRAKE PP200CNC 7. FOLDING When accessing the Folding function, this screen shows up: To perform the bending function we must enter the following parameters in the CNC. We’ll press the to select the punch from the library: We press the key... - Page 16 We press the key to indicate the folding angle: Once we enter the numerical value, we press the key to validate. Then we indicate the position of the punch by pressing the following image, to indicate that: The punch is in position 1 The punch is in position 2 We press the key to select the material from the library:...
- Page 17 HORIZONTAL PRESS BRAKE PP200CNC We press the key to introduce the material thickness: We press the key to validate the information. Finally, we will use the progress bar or the numerical field that is located at the bottom of it to regulate the end of the stroke of the punch.
- Page 18 Once these parameters are completed, we will press the button to start running the machine. Introduciremos el material en la zona de plegado y presionaremos el pedal para realizar la operación. Folding correction If we need a correction in the folding angle, we must stop the folding process and indicate the necessary correction.
- Page 19 HORIZONTAL PRESS BRAKE PP200CNC Saving Programs Now we’re going to explain the following screen area (to the top): The purpose of this area is to be able to do multiple bends on the same part. In other words, suppose you want to make a part with two bends, a 90º...
- Page 20 The answer is no as you can save all the data to produce your part, later upload it and continue making the same type of parts. To do so, just press the “[*]” text that appears at the top left of the screen. When you do so, a screen will appear to insert the name under which you want to save this program.
- Page 21 HORIZONTAL PRESS BRAKE PP200CNC Now, press the following icon to go to the program management screen: You can do the following operations using this interface: New program Upload or edit a program Copy a program Rename a program Delete a program Folder mode The operations you can do only require the operator press the corresponding icon.
-
Page 22: Shearing
8. SHEARING When accessing the function SHEARING, this screen shows up: To carry out the Shearing function, we must enter the following parameters in the CNC. Press the key to select the material: - 21 -... - Page 23 HORIZONTAL PRESS BRAKE PP200CNC Press the key to insert the material thickness in millimeters or inches depending on the settings: Once we introduce the numerical value, we press the key to validate it. Finally, we will use the progress bar or the numerical field at the bottom of it to regulate the end of the blade.
-
Page 24: Manual Positioning Mode
9. MANUAL POSITIONING MODE Upon accessing “Manual positioning mode”, this screen appears: To carry out any function in Manual Mode, we must enter the following parameters in the CNC. We press the key to introduce the starting dimension of the piston: After we have introduced the numerical value, we press the key to confirm - 23 -... - Page 25 HORIZONTAL PRESS BRAKE PP200CNC Press the key to introduce the final piston dimension: Once we have introduced the numerical value, we press the key to validate. In the same way, we can regulate these two dimensions with the progress bars.
-
Page 26: Menu
IP address is 10.10.51.110, and is already set at the factory. Moreover, this opens up the possibility of allowing remote servicing of the machine. This service allows Nargesa, as the manufacturer of the Press, to connect remotely to the machine to solve technical incidents and carry out remote training for the end user. -
Page 27: Importing/Exporting Parameters, Materials And Programs
HORIZONTAL PRESS BRAKE PP200CNC 10.2. Importing/exporting parameters, materials and programs All Press setup parameters, as well as defined materials and created programs, can be imported and exported for backup purposes. To access the window shown in the previous picture, we must press the key. Once we accede the menu, we must press the key . -
Page 28: Touch Screen Calibration
10.3. Touch screen calibration The touch screen leaves the factory correctly calibrated for its use. However, it may be necessary to calibrate it if the user notes that it does not respond accurately to the actions he commands. To proceed properly, you must first press the key to accede the menus window. -
Page 29: Tool Management
HORIZONTAL PRESS BRAKE PP200CNC 10.4 Tool Management The flat press is supplied with a complete library of all the tools you can work with. However, at times, the user may need a specific tool for a specific job that isn’t in the original library. Under these circumstances, contact us so we can manufacture that tool or you can create it yourself. -
Page 30: Punching Tools
10.4.1 Punching Tools Upon accessing the punching tool screen, you’ll see the following interface which corresponds to the mate- rials defined for this work mode. The following operations are possible if you press the icons in the horizontal menu at the bottom of the screen: Create new material Edit existing material... - Page 31 HORIZONTAL PRESS BRAKE PP200CNC Now, you’re going to create the actual tool. To do so, press the icon at the right of the horizontal me- nu on the bottom. Having done this, the punch-die window appears for punching. Just like with the material management screen, the bottom icons are the ones used to do the operations. In any case, the features of each one of the icons in the bottom menu will not be repeated here as they always do the same actions (new part, part edition, part deletion, etc.).
-
Page 32: Bending Tools
10.4.2 Bending Tools Just as occurred with the punching tools, upon accessing the bending tool screen, the first thing you’ll see are the materials defined for this work mode. If necessary, you can create, edit or delete materials using this interface. These operations (as explained above) are done using the icons in the horizontal menu at the bottom. - Page 33 HORIZONTAL PRESS BRAKE PP200CNC Once inside this window, you can create, change or delete thicknesses by pressing the text on the horizon- tal line at the height of the thickness. Plus, you can define a correction for each angle for each thickness. This means these corrections will be applied generally when choosing a specific thickness and angle for the bending feature.
- Page 34 Following the same process already explained a number of times, you can create, change and delete pun- ches. The data physically defining a punch is shown below. Remember that this data is for a punch that exists in the library. If you need to create a new tool, you must enter the data defining the real situation. Having reached this point and to sum up, you access the materials screen upon entering and you can ma- nage the bending punches by pressing the icon.
- Page 35 HORIZONTAL PRESS BRAKE PP200CNC Just like always, the menu at the bottom is where you can manage the tasks (creation, edition and dele- tion). The data physically defining a die is as follows: Again, if you need to create your own tool, in this case a die, enter the correct data defining that task in the actual situation and not the values shown here.
-
Page 36: Cutting Tools
10.4.3 Cutting Tools Upon accessing the cutting tools screen, you’ll see the following: To be more exact, you could say no tool in particular is defined for the cutting mode. You just define the characteristics defining the specific materials you’re using. In the end, this data defines the cutting behavior and not anything others. -
Page 37: Adjustment Of The Working Strenght
The Horizontal Press Brake NARGESA PP200CNC supplies 20,000Kg of strength. This amount of power may be excessive depending on the type of work to be carried out. The PP200CNC incorporates a pressure regulatory system to allow us to decrease the strength of the machine. -
Page 38: Fault Finding
12. FAULT FINDING 12.1. Electrical faults Due to the daily usage of the Horizontal Press Brake NARGESA PP200CNC faults may arise. The follo- wing list of occurrences and their remedies should help you identify and solve most problems. Problem Cause... -
Page 39: Caution
- Use officially approved protective glasses and boots. - Firmly hold the material during manipulation. - Do not work the machine without the protective panels in place. NARGESA SL does not take responsibility for any accidents caused by the negligence of the operator. - 38 -... -
Page 40: Tooling
14. TOOLING Folding die at 161 mm. · V16, 22 35 50 mm. PP200CNC Folding or bending die up to 161mm with 4 openings (16, 22, 35, 50mm) and a punch of 80º. This multi-V die allows 1mm up to 8mm sheet to be folded. The... - Page 41 Weight 5, 6, 8, 10,12, 14, 16, 18 mm 600 mm 20,5 Kg Bending tool for big radius PP200CNC ► Reference: 140-16-01-00006 Die to form curves in flat bars, pipes, bars or profiles at big radius. It’s perfect for bending small series or special parts without requiring a specific custom mold.
- Page 42 Baluster forming die 08 ► Reference: 140-16-01-00008 Die to form cold forging balusters for grills, gates, fences, handrails, etc... For other shapes or capacities, request the manufacturer. Max. width Thickness Die length Weight 20 mm 4, 5, 6, 8 mm 650 mm 19,5 Kg Baluster forming die 09...
- Page 43 Min. capacity Weight Square 14 mm 2x40 mm metal sheet 18 Kg Flat bar cutting tooling 100x10 mm. PP200CNC ► Reference: 140-16-01-00014 Flat bar and metal sheet cutting die up to 100mm through a maximum thickness of 10mm in mild steel.
- Page 44 Reducing clamp holder PP200CNC Reference: 140-16-01-RE002 Accessory to set the Reducing Clamps of different diameters. This accessory is used in all tube sizes, that is to say, it is not necessary to buy more than one since it is adaptable to all diameters.
- Page 45 HORIZONTAL PRESS BRAKE PP200CNC Diameter expansion tools PP200CNC Clamp Holder to Expand Tube PP200CNC Refference: 140-16-01-EX001 This accessory is adapted to the Tooling to shape pipe ends, to perform the operation of expanding the ends of the tubes. This accessory is used in all tube sizes, that is to say, it is not necessary to buy more than one since it is adaptable to all diameters.
- Page 46 Die to straighten out profiles PP200CNC ► Reference: 140-16-01-00017 Tool used to bend straight profiles or parts. It is adjustable to different capacities according to the Maximum capacity Weight H 150 mm 72 Kg Baluster forming die 20 ► Reference: 140-16-01-00020 Die to form cold forging balusters for grills, gates, fences, handrails, etc...
- Page 47 HORIZONTAL PRESS BRAKE PP200CNC Clamp forming die PP200CNC ► Reference: 140-16-01-00024 Die to form all kinds of clamps. This tooling is manufactured according to the user’s needs thus it is required to have a technical drawing or a sample Maximum capacity...
- Page 48 Forming die adaptor ► Reference: 140-16-01-00029 It is an exchangeable fitting device for the forming dies, suitable for each of the different baluster forming tools. It is advisable to get one in order to work with the specified dies. Weight: 3,1 Kg Punch Promecam PS.135.85.R08 ►...
- Page 49 Reference: 140-16-01-00038 Folding length: 161 mm Weight: 4,4 Kg Dies to fold thick metal sheet PP200CNC ► Promecam dies of diferent openings to fold sheets, flat bars or thicker plate sections up to 15mm. in order to fold even thicker sizes, ask the manufacture.
- Page 50 Punches and dies ► Standard round punches ► 1Type Available sizes in mm Ø 3/3'5/4/4'5/5/5'5/6/6'5/7/7'5/8/8'5 28 mm 58 mm 31,5 mm 9mm up to 28mm from 0'5 in 0'5mm 29/30/31/32/33/34/35/36/37/38/39/40mm 40 mm 64 mm 43,5 mm 41/42/43mm 50 mm 58 mm 54 mm For different sizes, please ask the manufacturer.
- Page 51 HORIZONTAL PRESS BRAKE PP200CNC Standard oval punches ► Type Available sizes in mm Ø 7x10/7x15/7x20/9x13/9x19/11x17/11x23/13x18 28 mm 58 mm 31,5 mm 13x22/13x27/15x20/15x24/15x27/17x22/17x26 19x26/21x27mm 13x31/15x31/17x31/17x40/19x31 40 mm 64 mm 43,5 mm 19x40/21x31/21x40mm For different sizes, please ask the manufacturer Standard round dies ►...
- Page 52 Standard rectangular dies ► Type Available sizes in mm 7x10/7x15/9x13/9x19/11x17/11x23/13x19/13x25/ 46 mm 28,5 mm 15x21mm 15x27/17x25/19x30/20x34mm 60 mm 32 mm For different sizes, please ask the manufacturers. Oval dies ► Type Available sizes in mm 7x10/7x15/7x20/9x13/9x19/11x17/11x23/13x18/13x22/13x27 46 mm 28,5 mm 15x20/15x24/15x27/17x22/17x26/19x26/21x27mm 13x31/15x31/17x31/17x40/19x31/19x40/21x31/21x40mm 60 mm...
- Page 53 HORIZONTAL PRESS BRAKE PP200CNC Flat bar round end tooling R1 ► Refference Model Width size Required fitting MOR1-35A From 20 to 35mm TAP28 / TAP40 MOR1-35B From 20 to 35mm TAP28 / TAP40 MOR1-35C From 20 to 35mm TAP28 / TAP40...
- Page 54 Corner rounding tooling ► Refference Available sizes in mm Required fitting MRE28 Radius from 3 to 16mm TAP 28 CAB 46 MRE40 Radius from 16,5 to 26mm TAP 40 CAB 60 MRE50 Radius from 26,5 to 32mm TAP 50 CAB 78 For different sizes please ask the manufacturer Fitting nuts for punches ►...
-
Page 55: Technical Annex
Technical annex Horizontal Press Brake PP200CNC... - Page 56 INDEX List of parts ......................5 Electric box …………………………………...………………........ 12 Electric map · THREEPHASE MACHINE ……..........18 Electric map · SINGLEPHASE MACHINE ……..........25 Hydraulic map …....................26 Technical features - Tooling ……………...……..…………………..…………….. 28 Folding die al 161mm …….……………….………………………………… 29 Rong forming die ………………….…………...…………………………….
- Page 57 HORIZONTAL PRESS BRAKE PP200CNC A1. List of parts - 5 -...
- Page 58 - A6 -...
- Page 59 HORIZONTAL PRESS BRAKE PP200CNC - A7 -...
- Page 60 - A8 -...
- Page 61 HORIZONTAL PRESS BRAKE PP200CNC - A9 -...
- Page 62 - 10 -...
- Page 63 HORIZONTAL PRESS BRAKE PP200CNC - A11 -...
- Page 64 A2. Electric box - 12 -...
- Page 65 HORIZONTAL PRESS BRAKE PP200CNC - 13 -...
- Page 66 - 14 -...
- Page 67 HORIZONTAL PRESS BRAKE PP200CNC - 15 -...
- Page 68 - 16 -...
- Page 69 HORIZONTAL PRESS BRAKE PP200CNC - 17 -...
- Page 70 A3. Esquema eléctrico · MAQUINA TRIFASICA - A18 -...
- Page 71 HORIZONTAL PRESS BRAKE PP200CNC - A19 -...
- Page 72 - A20 -...
- Page 73 HORIZONTAL PRESS BRAKE PP200CNC - 21 -...
- Page 74 - 22 -...
- Page 75 HORIZONTAL PRESS BRAKE PP200CNC - 23 -...
- Page 76 - 24 -...
- Page 77 HORIZONTAL PRESS BRAKE PP200CNC A4. Electric map · SINGLEPHASE MACHINE - 25 -...
- Page 78 A5. Hydraulic map 1. Filtro 2. Bomba hidráulica 3. Motor Eléctrico 4. Limitadora de presión 5. Electroválvula principal 6. Limitadora de presión regulable - 26 -...
-
Page 80: Technical Features - Tooling
Technical features - Tooling Folding die at 161 mm. V16, 22, 35, 50 mm. Ring forming die REF: 140-16-01-00003 Twisted bars forming die REF: 140-16-01-00013 Promecampunch holder REF: 140-16-01-00023 Bar clamps forming die REF: 140-16-01-00028... - Page 81 HORIZONTAL PRESS BRAKE PP200CNC Folding die at 161 mm. V16, 22, 35, 50 mm. Description Folding or bending die up to 161mm with 4 openings (16, 22, 35, 50mm) and a punch of 88º. This multi-V die allows 1mm up to 8mm sheet to be folded. The 70mm outer die¡ameter punch allows to make comple- tely closed shapes to a minimum of 75mm inner wing.
- Page 82 Ring forming die Description Die to form rings or English banister railing, used as ornamental piece in forging railings, gates, fences... for bars bonding. For other sizes and applications consult the manufacturer. Max. width Thickness Outer sizes Weight 50 mm 6 mm 90 mm 9.3 Kg...
- Page 83 HORIZONTAL PRESS BRAKE PP200CNC Twisted bars forming die Description Die to bend metal plate, flat bar or square bar to obtain a nice braid twisted effect. It’s very used to make fences and grills For flat bars from to 6, 12 and 14mm. (For different sizes, please ask the manufacturer) Max.
- Page 84 Promecampunch holder Description Punch holder for all kind of punches for Promecam bending or folding press. Max. Folding lenght 150 mm Weight 14Kg Compatible with any Promecam punch Parts list Element Description Quant. PUNZON 120 PUNZON PROMECAM 10_00 88 835 125-16-01-00021 Portapunzones Promecam 020-D913-M10X10...
- Page 85 HORIZONTAL PRESS BRAKE PP200CNC Bar clamps forming die Description Matriz para fabricar las grapas utilizadas para unir diferentes barrotes de forja sin necesidad de soldadura. Max. capacity 25x5 mm Weight 9 Kg Parts list - A33 -...
- Page 86 Element Description Quant. 020-D985-M12 Tuerca Autoblocante DIN 985 M12 125-16-01-00144 Varilla Roscada Muelle 125-16-01-00143 Soporte Trasero Muelle 125-16-01-00146 Centraje Muelle 125-16-01-00145 Muelle Compresion Di20xDe26 Paso 9mm 9 Espiras Finales Planos 1 125-16-01-00136 Arandela Muelle 125-16-01-00135 Eje Extractor 125-16-01-00132 Placa Base Util 020-D125B-M16 Arandela Biselada DIN125B Para M16 020-D933-M16X30...
- Page 87 OUR RANGE OF MACHINERY IRON WORKERS SECTION BENDING NON-MANDREL HORIZONTAL PRESS MACHINES PIPE BENDER BRAKE TWISTING/SCROLL HYDRAULIC PRESS HYDRAULIC SHEAR BENDING MACHINES BRAKES MACHINES IRON EMBOSSING END WROUGHT IRON GAS FORGES MACHINES MACHINES BROACHING POWER HAMMERS PRESSES FOR LOCKS MACHINES...