Table of Contents

Related Manuals for Geemarc ClearSound CC40


Summary of Contents for Geemarc ClearSound CC40
-
Page 1: User Guide
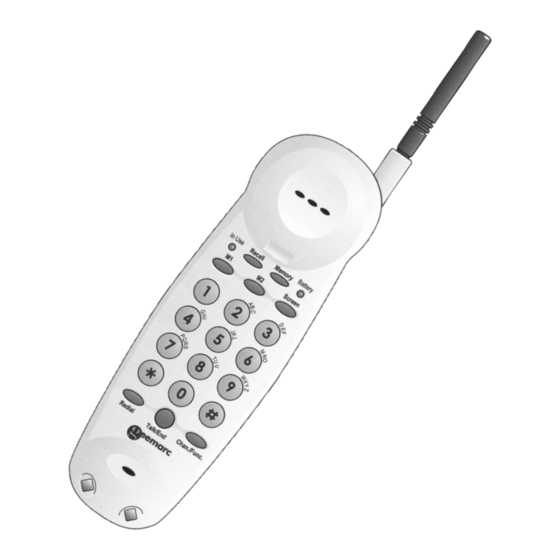
User Guide CC40 This equipment is not designed for making Compact Cordless Telephone emergency telephone calls when the power fails. Alternative arrangements should be with Digital Answering Machine made for access to emergency services. - Page 2 OGM1 On/Off Switch Recall In Use Light Direct Memory Locations Redial Talk/End Microphone CC40 OGM1 Button Memory Skip Button Battery Low Light OGM2 Screen Button Button Repeat Button Play/Stop Button Chan/Func Power Light Charging Contacts In Use Light Hi/Lo Ringer...
-
Page 3: Table Of Contents
Charging the handset Setting the switches Fitting a battery Setting the clock Setting the answering machine volume Outgoing messages Fitting the handset aerial Plugging into the telephone socket Telephone Basic use Memory Button functions Separate handset battery charger Charging the handset... - Page 4 Congratulations on choosing a CC40 cordless telephone. As an option, you may add up to two extra handsets to your CC40 so calls can be taken by any handset and transferred between handsets (although it is not possible to speak between handsets).
- Page 5 Thunderstorms Unplug your CC40 from the telephone socket during thunderstorms: if lightning strikes your phone line, it could damage the machine. Your guarantee does not cover lightning damage. To set up follow steps 1-8 Don’t use or attempt to set up the telephone until you’ve charged the handset battery for 24 hours.
-
Page 6: Outgoing Messages
(NB If you plan to switch the power to the machine off for lengthy periods, disconnect the machine from the telephone socket and remove the battery. You’ll have to set the clock and record any personal outgoing messages after re-fitting the battery and switching the machine on again). - Page 7 STEP 5 : Set the clock The machine speaks. If you set the clock, the machine will announce the time and day that each message was left. When playing back messages, you can as an option switch this day/time stamping off. What you need to know before you start Don’t leave more than 15 seconds between button presses.
-
Page 8: Separate Handset Battery Charger
SETTING UP Separate handset battery charger A separate handset battery charger may be supplied with your telephone, or alternatively, is available as an option. This lets you keep the handset charged away from the base unit. The charger is designed for indoor use only. -
Page 9: Telephone Memory
Off, so that it will not take calls, press the ON/OFF button - the Answer light will go out. TELEPHONE Telephone Memory You can store up to 12 numbers of up to 20 digits in each memory. There are two ‘instant’ memories (buttons M1 and M2) plus 10 other indirect (buttons 0-9). - Page 10 For some PABXs or networks, press Redial where you need to store a pause in the memory. Recall, These are for special telephone services. For details, call your telephone company. and # also have a secondary function in operating the answering machine from the handset.
-
Page 11: Paging The Handset
Fully extend the handset and base unit aerials. Do not install the base unit close to other electrical equipment or fluorescent lights. Try moving the base unit to another room (if you have a telephone socket). During a call (you may hear beeps) Move nearer the base unit. -
Page 12: Basic Use
ANSWERING MACHINE - BASIC USE To set either OGM1 or OGM2 Hold down On/Off for 2 seconds until you hear a beep. If the Answer light is on, OGM1 is set. If the Answer light is flashing, OGM2 is set. (OGM2 doesn’t normally let the caller leave a message). -
Page 13: Monitoring Calls
‘end of call’ signals after playing back messages. This can be quite normal but if it is a cause for concern, please contact your local telephone service provider who may be able to make an adjustment to your particular telephone line. - Page 14 ANSWERING MACHINE - REMOTE ACCESS Ringing from outside and operating the machine remotely With remote access you can: listen to (and erase) messages and memos listen to OGMs and record new ones leave a message in a specific mailbox switch the machine to answer on or off set OGM1 or OGM2 You need to use: a phone with Tone dialling;...
- Page 15 ANSWERING MACHINE - REMOTE ACCESS To listen to your messages 1 Dial your number. 2 During the OGM press ( ), you'll hear 2 beeps. 3 Enter your 3 digit security code. You will hear 2 beeps. Within 6 seconds:- Press 7 to hear all messages.
- Page 16 ANSWERING MACHINE - REMOTE ACCESS To switch the machine on or off 1 Dial your number. If the machine’s off, it’ll answer after 15 rings. 2 *During the OGM, press ( ). You’ll hear 3 beeps. 3 Enter your security code. You’ll hear 2 beeps.
-
Page 17: Interference
Is the base unit plugged in and switched on with the Power light Is the base unit plugged into the telephone socket? Is the handset charged? See pages 2 and 7. Have you got too much telephone equipment in your home? See page 1. Having checked these points, move to check 2. -
Page 18: Security Code
NOTE: Should you lose incoming messages and clock announcements due to a power failure and the back-up battery is not fitted or has run down, disconnect from the telephone line, and carry out Step 4 on page 3 followed by steps 5, 6 and 8. - Page 19 When installing the apparatus, ensure that the mains power socket is readily accessible. The interconnection point between the AC adapter output lead and the telephone base unit adapter socket together with the battery connector contacts, carry Safety Extra Low Voltages (SELV) and Telecommunication Network Voltages (TNV).
-
Page 20: Approval
The apparatus has been approved for the use of the following facilities: Use as a cordless telephone. Use of up to 3 handsets. Simple telephone operation with ability to make calls to the 999 and 112 emergency services. Base unit ringer hi/low setting. - Page 21 If the machine’s off it’ll answer after 15 rings. 2 During the OGM press ( ). You’ll hear 2 beeps. 3 Enter your security code. You’ll hear 2 beeps. 4 Within 6 seconds, press 0 to switch on or 8 8 to switch off. RC/CC40 Issue 2 04/00...
- Page 22 HANDSET BATTERIES HANDSET & POD COMBINATION FOR WHICH COLOUR? WHITE FOR WHICH MODEL? CC10 PRICES CORRECT AT TIME OF PUBLICATION. GEEMARC RESERVE THE RIGHT TO INCREASE PRICES WITHOUT NOTIFICATION. NAME ADDRESS POSTCODE TEL NO CHEQUE OR POSTAL ORDER AMOUNT £...
-
Page 23: Wall Mounting
70 mm WT/CC40 Issue 2. 04/00... - Page 24 TEL: 01707 384438 FAX: 01707 372529...