Table of Contents
Advertisement
Advertisement
Table of Contents

Related Manuals for Geemarc AMPLIVOICE50


Summary of Contents for Geemarc AMPLIVOICE50
-
Page 2: Table Of Contents
CONTENTS INTRODUCTION Important safety instructions Unpacking the AmpliVOICE50 3 DESCRIPTION General Description LCD Screen Description Menu Navigation INSTALLATION Setting Up Wall Mounting SETTINGS Language Setting Screen Contrast Setting Time Setting Voice Function Setting Flash (Recall) Setting Dialling Mode (Tone/Pulse) Setting... -
Page 3: Introduction
Its is important that you read the instructions below in order to use your Geemarc telephone to its full potential. Keep this user guide in a safe place for future reference. This guide explains how to use the following telephone:AmpliVOICE50 *To use the caller display facility, you must subscribe to your network provider’s caller display service. -
Page 4: Description
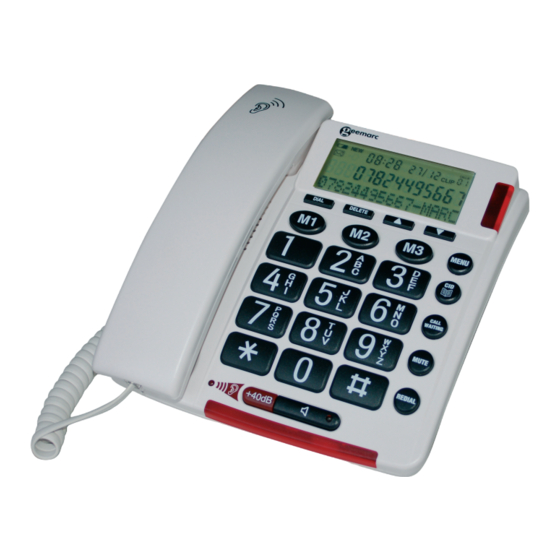
DESCRIPTION General Description... - Page 5 Menu button Phonebook, Exit, Caller ID Recall Mute Redial, Insert a pause Handsfree LED, telephone is ringing Earpiece amplifier button LED, receiver volume Control knob for receiver volume (hidden) Ringer volume slide control Tone slide control Speakerphone volume slide control...
-
Page 6: Lcd Screen Description
To access settings, press MENU. To exit the menu, press CID. To skip back a level within the menu, press DELETE The telephone will automatically return to standby mode from any menu if no button is pressed for 20 seconds. -
Page 7: Installation
Connect the line cord to the socket located at rear of telephone then con- nect the plug into the wall socket *. Connect the power supply to the socket located at rear of the telephone then plug into a 13amp wall socket. - Page 8 INSTALLATION Note: Mains power is required to power the multifunction features of the telephone. Fit 4 x AA sized batteries in order to save and use stored numbers in case of mains power failure. Without mains or battery power, the telephone can still be used to answer calls or to manually dial out calls but all the multifunction features will not be available.
-
Page 9: Wall Mounting
Drill a hole and insert a screw leav- ing about 5 mm of the screw projecting from the wall. Guide the mounting hole (4) in the mounting bracket (2) over the screw and slide the telephone downwards. -
Page 10: Settings
Language Setting You can choose between 4 different languages including English and French. Each language has voice announcements available in that language. Use ▲ or ▼ to select LANGUAGE Use ▲ or ▼ to select the desired language Screen Contrast Setting Your screen has a backlight which automatically switches off after 15 seconds of inactivity. -
Page 11: Time Setting
Time Setting If you subscribe to a Caller Display service, the date and time will be set whenever you receive a call. However, if you do not subscribe to this service, you will need to set the date and time manually. The HOUR digit will flash. -
Page 12: Voice Function Setting
CALL WAITING might disconnect the current call. Dialling Mode (Tone/Pulse) Settings In the US, all telephone exchanges now use Tone dialing. If your phone does not dial out, it is probably being used from an older private switchboard (PBX). In this case, the Tone/Pulse setting must be changed to Pulse. -
Page 13: Ringer Volume Setting
Use ▲ or ▼ to select the desired method, TONE or PULSE 40/60 Ringer Volume Setting A switch located on the right side of the AmpliVOICE50 unit allows the ringer to be switched to LOW, MEDIUM or HIGH. Making a Call When you hear the dialling tone, dial the number on the keypad. -
Page 14: Making A Call - Hands Free
It is therefore essential that there are no loud noises, e.g. music, in the immediate vicinity of the telephone, as this will disrupt the hands free function. -
Page 15: Receiving A Call
USING THE TELEPHONE Receiving a Call When an incoming call is received, the telephone rings and the LCD display backlight lights up. If the caller can be identified (due to subscription to a Caller Display service), the caller’s telephone number will be displayed. -
Page 16: Mute Function
AmpliVOICE50 unit Tone Control Setting During a call, in handsfree mode, you can adjust the tone to a desirable level. Simply use the slide control located on the right of the AmpliVOICE50 unit. Tone Note: Tone adjustment is not possible when the receiver volume is set to its minimum level. -
Page 17: Call Timer
Your handset automatically times the duration of every external call. The time is shown during the call and for a few seconds after the call has ended. Hearing Aid Use This telephone is hearing aid compatible. Select the T mode on your hear- ing aid to enable this feature. -
Page 18: Caller Display
OUT OF AREA will be displayed on the LCD display. If a telephone number has not been seen previously, NEW will be displayed on the LCD display. If several calls have been received from a particular number, REPEAT will be displayed. -
Page 19: View Caller Display List
Use ▲ or ▼ to scroll through the caller display list Notes: At the end of the caller display list the LCD display will display END OF LIST. If there are no caller display telephone numbers in the caller display list, NO CALLS is displayed... -
Page 20: Delete An Entry From The Caller Display List
Press DELETE, DELETE? will be shown on the LCD display Press and hold DELETE until the telephone number disappears Delete All Entries from the Caller Display List Use ▲ and ▼ to scroll through the caller display list until you find the... -
Page 21: Phone Book
Telephone numbers and associated names can be stored in the phone book. The phone book can contain 30 telephone numbers (maximum of 22 digits) with names (maximum of 16 letters). If you subscribe to a caller ID service the name in the phone book will be shown for incoming calls. -
Page 22: Store/Change A Name Recording
PHONE BOOK Some telephone systems require a pause to be inserted when dialling a number. To insert a dialling pause (of 3 seconds) between digits when storing a telephone number, press REDIAL until P appears in the LCD display. Store/Change a Name Recording Press MENU Use ▲... -
Page 23: Delete A Name Recording
Use ▲ or ▼ to select NAME RECORDING Press DIAL to select Use ▲ or ▼ to select the desired telephone number to be deleted Press DELETE while the recording is played back Press CID when you are ready to exit... -
Page 24: Modify A Phone Book Entry
Delete a Phone Book Entry Locate the required telephone number as shown in one of the above methods (see View Phone Book Entries) Press DELETE, DELETE? will be shown on the LCD display... -
Page 25: Delete All Phone Book Entries
PHONE BOOK Delete all Phone Book Entries Locate any telephone number as shown in one of the above methods (see View Phone Book Entries) Press and hold DELETE, DELETE ALL? will be shown on the LCD display Press and hold DELETE until EMPTY shows... -
Page 26: Quick Dial
M1, M2 and M3 can also be used as quick dial locations Storing a Quick Dial Number Use ▲ or ▼ to select STORE NUMBER Enter the telephone number to be stored Select the speed dial location (M1, M2 or M3) by pressing Dialling a Quick Dial Number... -
Page 27: Troubleshooting
Make sure that the power adaptor is plugged in correctly and is not damaged AmpliVOICE50 does not ring • Make sure that the telephone line cord is plugged in correctly and is not damaged • Connect another telephone to the telephone PTT socket or move your... -
Page 28: Safety Information
Never dispose of batteries in a fire. There is a serious risk of explosion and/ or the release of toxic chemicals. Cleaning Clean the telephone with a soft cloth. Keep the base and handset charging contacts clean. Never use polishes or cleaning agents - they could damage the finish or the electrics inside. -
Page 29: Regulatory Compliance
- The REN is useful to determine the quantity of devices you may connect to your telephone line and still have all of those devices ring when your tele- phone number is called. In most, but not all areas, the sum of the REN’s of all devices connected to one line should not exceed five (5.0). - Page 30 TV or VCR; and, if interference is experienced, moving the cordless telephone farther away from the TV or VCR will often reduce or eliminate the interference. However, there is no guarantee that interference will not occur in a particular installation.
-
Page 31: Guarantee
Warranty service is available only with proof of purchase Simply send the AmpliVOICE50 (postpaid) and a copy of your sales slip as proof of purchase to: Sonic Alert Inc., 1050 E. Maple Road, Troy MI 48083...