Table of Contents
Advertisement
Quick Links
Advertisement
Table of Contents

Related Manuals for Synology DiskStation DS214 Plus


Summary of Contents for Synology DiskStation DS214 Plus
- Page 1 Synology DiskStation DS214+ Quick Installation Guide Synology_QIG_DS214+_20130828...
-
Page 2: Table Of Contents
Table of Contents Chapter 1: Before You Start Package Contents ................................3 Synology DiskStation at a Glance ............................ 4 Safety Instructions ................................5 Chapter 2: Hardware Setup Tools and Parts for Drive Installation ..........................6 Install Drives ..................................6 Start Up Your DiskStation ..............................9 Chapter 3: Install DSM on DiskStation Install DSM with Web Assistant ............................ -
Page 3: Package Contents
Before You Start Chapter 1: Thank you for purchasing this Synology product! Before setting up your new DiskStation, please check the package contents to verify that you have received the items below. Also, make sure to read the safety instructions carefully to avoid harming yourself or damaging your DiskStation. -
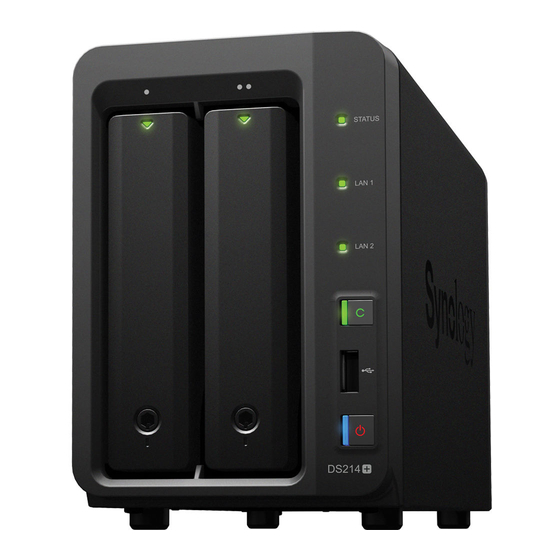
Page 4: Synology Diskstation At A Glance
Synology DiskStation at a Glance Item Location Description Install drives (hard disk drives or solid state drives) here. Drive Tray Displays the status of installed drives. For more information, see "Appendix B: Disk Indicator LED Indicator Table". Insert included keys here to lock and unlock the drive trays. -
Page 5: Safety Instructions
Safety Instructions Keep away from direct sunlight and from chemicals. Make sure the environment does not experience abrupt changes in temperature or humidity. Place the product right side up at all times. Do not place near any liquids. Before cleaning, unplug the power cord. Wipe with damp paper towels. Do not use chemical or aerosol cleaners. -
Page 6: Chapter 2: Hardware Setup
Tools and Parts for Drive Installation A screwdriver (only for 2.5 drives) At least one 3.5” or 2.5” SATA drive (please visit www.synology.com for compatible drive models) Warning: If you install a drive that contains data, the system will format the drive and erase all existing data. Please back up any important data before installation. - Page 7 3 Load drives in the drive trays. For 3.5” drives: Remove the fastening panels from the sides of the drive tray. Place the drive in the drive tray. Then insert the fastening panels to secure the drive in place. ...
- Page 8 7 Drives are numbered as shown below: Note: If you want to create a RAID volume, we recommended that all installed drives are of the same size to make the best use of drive capacity 8 Chapter 2: Hardware Setup...
-
Page 9: Start Up Your Diskstation
Start Up Your DiskStation 1 Use the LAN cable to connect the DiskStation to your switch, router, or hub. 2 Connect the AC adapter to the power port of the DiskStation. Connect one end of the AC power cord to the AC power adapter, and the other to the power outlet. -
Page 10: Chapter 3: Install Dsm On Diskstation
C h a p t e r Install DSM on DiskStation Chapter 3: After hardware setup is finished, please install DiskStation Manager (DSM) – Synology’s browser-based operating system – on your DiskStation. Install DSM with Web Assistant Your DiskStation comes with a built-in tool called... -
Page 11: Appendix A: Specifications
‧External: EXT4, EXT3, FAT, NTFS, HFS+ (Read-only) ‧Basic ‧JBOD ‧RAID 0 ‧RAID 1 Supported RAID Types ‧ Synology Hybrid RAID (1-Disk Fault Tolerance) ‧FCC Class B ‧CE Class B ‧ Agency Certifications BSMI Class B HDD Hibernation Scheduled Power On/Off Wake on LAN ‧English ‧Deutsch ‧Français ‧Italiano ‧Español ‧Dansk ‧Norsk ‧Svensk... -
Page 12: Appendix B: Led Indicator Table
Blinking Network active (on upper side of jack) No network Green Static Network connected Rear LAN (on lower side of jack) No network Note: Model specifications are subject to change without notice. Please refer to www.synology.com for the latest information. - Page 13 IMPORTANT–READ CAREFULLY: THIS END USER LICENSE AGREEMENT ("EULA") IS A LEGAL AGREEMENT BETWEEN YOU (EITHER AN INDIVIDUAL OR A SINGLE ENTITY) AND SYNOLOGY, INC. AND ITS AFFILIATES, INCLUDING SYNOLOGY AMERICAN CORP AND SYNOLOGY UK LTD., (COLLECTIVELY, "SYNOLOGY") FOR ANY SYNOLOGY SOFTWARE, TOGETHER WITH ANY OTHER ASSOCIATED FIRMWARE, MEDIA, PRINTED MATERIALS AND "ONLINE"...
- Page 14 Section 16. Termination. Without prejudice to any other threatened breach of any provision of this EULA relating to rights, Synology may terminate this EULA if you do not abide Synology's intellectual property rights. by the terms and conditions contained herein. In such event, you must cease use of the Software and destroy all copies of Section 20.
- Page 15 THIS LIMITED WARRANTY ("WARRANTY") APPLIES TO THE PRODUCTS (AS DEFINED BELOW) OF SYNOLOGY, INC. AND ITS AFFILIATES, INCLUDING SYNOLOGY AMERICA CORP AND SYNOLOGY UK LTD., (COLLECTIVELY, "SYNOLOGY"). YOU ACCEPT AND AGREE TO BE BOUND BY THE TERMS OF THIS WARRANTY BY OPENING THE PACKAGE CONTAINING AND/OR USING THE PRODUCT.
- Page 16 DAMAGES. the Product specifications; (b) has been repaired, modified or altered by anyone other than Synology or its agent or Limitation of Liability. SYNOLOGY'S AND ITS designee; (c) has been in any way misused, abused, or SUPPLIERS' LIABILITY ARISING OUT OF OR RELATING damaged;...
- Page 17 Customers residing within the and the arbitration proceedings shall be conducted in United States and Synology will be resolved exclusively and English or, if both parties so agree, in Mandarin Chinese. finally by arbitration under the current commercial rules of...