Siemens SIVACON S 8PQ Series Operating Instructions Manual
Hide thumbs
Also See for SIVACON S 8PQ Series:
- Operating instructions manual (40 pages) ,
- Operating instructions manual (11 pages)
Table of Contents
Advertisement
Quick Links
s
SIVACON S
8PQ...
Betriebsanleitung
Operating Instructions
İşletme kılavuzu
Instruções de Serviço
DE
GEFAHR
EN
DANGER
FR
DANGER
ES
PELIGRO
IT
PERICOLO
PT
PERIGO
TR
TEHLİKE
РУ
ОПАСНО
ZAGROŻE-
РL
NIE
中文
危 险
Instructions de service
Руководство по эксплуатации
Gefährliche Spannung. Lebensgefahr oder schwere Verletzungsgefahr.
Vor Beginn der Arbeiten Anlage und Gerät spannungsfrei schalten. Die Installations- und War-
tungsarbeiten an diesem Gerät dürfen nur von einer autorisierten Elektrofachkraft ausgeführt werden.
Hazardous voltage. Will cause death or serious injury.
Turn off and lock out all power supplying this device before working on this device. Installation and
maintenance work on this device may only be carried out by an authorized electrician.
Tension électrique. Danger de mort ou risque de blessures graves.
Mettre hors tension avant d'intervenir sur l'appareil. Les travaux d'installation et d'entretien de cet appareil
doivent uniquement être réalisés par une personne qualifiée en électricité.
Tensión peligrosa. Puede causar la muerte o lesiones graves.
Desconectar la alimentación eléctrica antes de trabajar en el equipo. Las tareas de instalación y
mantenimiento de este equipo solo puede llevarlas a cabo un un electricista autorizado.
Tensione pericolosa. Può provocare morte o lesioni gravi.
Scollegare l'alimentazione prima di eseguire interventi sull'apparecchiatura. L'installazione e la
manutenzione di questo apparecchio devono essere effettuati solo da un elettrotecnico autoriz- zato.
Tensão perigosa.Perigo de morte ou ferimentos graves.
Desligue a alimentação elétrica e proteja contra o religamento, antes de iniciar o trabalho no equi- pamento.
Os trabalhos de instalação e manutenção neste equipamento somente podem ser real- izados for eletricistas
autorizados.
Tehlikeli gerilim. Ölüm tehlikesi veya ağır yaralanma tehlikesi.
Çalışmalara başlamadan önce, sistemin ve cihazın gerilim beslemesini kapatınız. Bu cihazın mon- tajı ve
bakımı yalnız yetkili bir elektrik teknisyeni tarafından yapılmalıdır.
Опасное напряжение. Опасность для жизни или возможность тяжелых травм.
Перед началом работ отключить подачу питания к установке и к устройству. Работы по монтажу и
техническому обслуживанию данного устройства должны производиться упол- номоченным
специалистом по электротехнике.
Niebezpieczne napięcie. Niebezpieczeństwo poważnych obrażeń lub utraty życia.
Przed rozpoczęciem prac wyłączyć zasilanie instalacji i urządzenia energią elektryczną. Prace insta-
lacyjne i konserwacyjne na tym urządzeniu może przeprowadzać wyłącznie posiadający odpow- iednie
kwalifikacje elektryk.
危 险电压 。可能 导 致生命危 险 或重 伤 危 险 。
操作 设备时 必 须 确保切断 电 源。 该设备 的安装和 维护 工作 仅 能由具 备专业资 格的 电 工完成。
IEC 61439 -1/2
Instructivo
Istruzioni operative
使用 说 明
Instrukcja obsługi
Advertisement
Table of Contents

Related Manuals for Siemens SIVACON S 8PQ Series


Summary of Contents for Siemens SIVACON S 8PQ Series
- Page 1 SIVACON S 8PQ... IEC 61439 -1/2 Betriebsanleitung Operating Instructions Instructions de service Instructivo Istruzioni operative İşletme kılavuzu Руководство по эксплуатации 使用 说 明 Instruções de Serviço Instrukcja obsługi Gefährliche Spannung. Lebensgefahr oder schwere Verletzungsgefahr. GEFAHR Vor Beginn der Arbeiten Anlage und Gerät spannungsfrei schalten. Die Installations- und War- tungsarbeiten an diesem Gerät dürfen nur von einer autorisierten Elektrofachkraft ausgeführt werden.
- Page 2 Veszélyes feszültség. Életveszély vagy súlyos sérülésveszély. VESZÉLY A munkák megkezdése előtt végezze el a berendezés vagy készülék feszültség-mentesítését. Ezen az eszközön a telepítéssel és a karbantartással kapcsolatos feladatokat kizárólag megfelelő felha- talmazással rendelkező villamossági szakember végezheti. Technical Support: Internet: http://www.siemens.com/lowvoltage/technical-support...
-
Page 3: Table Of Contents
SIVACON 通过了型式试验的低压开关设备 S8 — 抽屉式分线柜 Design-verified S8 low-voltage switchboard — Cubicles with Feeders in Withdrawable Design 操作说明 / Operating Instructions 订货号/ Order No.: 8PQ9800-8AA72 English 中文版 安装、操作或者维护设备之前必须阅读并且理解本说 Read and understand these instructions before installing, operating or maintaining the equipment 明 书 。 危险... - Page 4 Access to main busbar joint for main busbar at rear 主母线位置后端主母线系统入口 Electrical connections 电气连接 2.2.1 2.2.1 Cable compartment, front access 电缆间前置连接 2.2.1.1 2.2.1.1 Cable connection, main circuit, miniature withdrawable units 小型抽屉模块的主电路电缆连接 2.2.1.2 2.2.1.2 Cable connection, main circuit, standard withdrawable units 标准抽屉模块的主电路电缆连接...
-
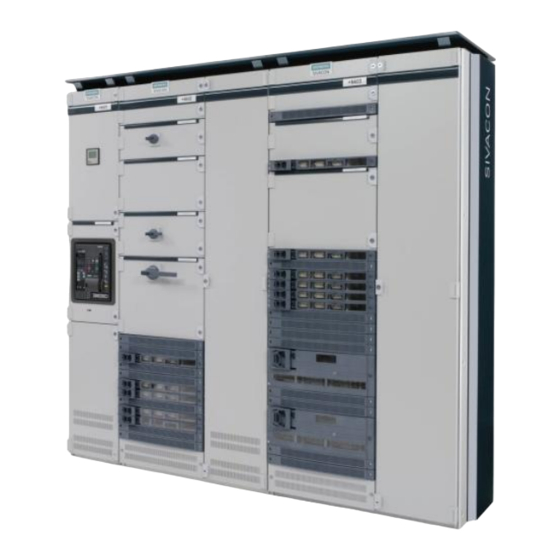
Page 5: Mcc 机柜说明
1 MCC 1 Description of the MCC cubicle 机柜说明 1.1. 1.1 Cubicle arrangement 机柜结构 1.1.1 1.1.1. Description of the cubicle arrangement 机柜结构说明 横向布线室 Transverse wiring compartment 具有小型抽屉模块的抽格 Compartment with miniature withdrawable units 空抽格 Empty compartment 具有标准抽屉模块的抽格 Compartment with standard withdrawable unit 电缆连接室... -
Page 6: Installation Location Indication
1.1.3 1.1.3 Installation location indication 安装地点标识 Installation grid 安装光栅 The 100 mm main grid applies to the entire board height. The only 主光栅 100 mm,分布在整个设备高度上。例外:顶部空间 “A” 高 exceptions are the headroom “A“ with a height of 225 mm and the 度为... - Page 7 The millimetre grid always starts at the bottom end of the board. 毫米光栅始终从设备底端开始。 Within a row, the grid numbering ranges from 1 to 4. 一排内的光栅分别用 1 至 4 四个数字表示。 安装地点标识: +NA01.BB002 +NA01 Installation location indication: +NA01.BB002 SIEMENS SIEMENS SIVACON SIVACON 2200 2200 主光栅: 100 mm 2000 2000 Main grid: 100 mm 辅助光栅: 50 mm...
-
Page 8: Maximum Cubicle Weights
1.2 Maximum cubicle weights 最大机柜重量 Cubicle weights without widthdrawable units and devices. 不含抽屉模块和设备在内的机柜重量。 [mm] 机柜宽度 高度 Height Cubicle width [mm] [mm] 1200 2000 260kg 300kg 2200 280kg 320kg 1.3 Vertical distribution busbar 垂直的柜内母线 1.3.1 1.3.1 Design 结构 L1 L2 L3 N 插接式母线槽... -
Page 9: Rated Currents For The Distribution Bars
1.3.3 1.3.3 Rated currents for distribution bars 柜内母线的额定电流 额定电流 I 横截面 取决于环境温度 Cross-section Rated current I depending on the ambient temperature [A] 20° 25° 30° 35° 40° 45° 50° / Cubicle, unventilated 机柜不通风 / Mounting rail 异型汇流排 400 mm 1000 650 mm 1100 1070... -
Page 10: Functionality And Design Of Withdrawable Units
1.4. Functionality and design of withdrawable units 抽屉模块的功能原理和结构 1.4.1 1.4.1 Sizes of the withdrawable units 抽屉模块规格 Normal withdrawable units: 标准抽屉模块: The width of the standard withdrawable unit is 507 mm. The basic 标准抽屉模块宽度为 507 mm。在基本结构基础上补充了一个 设 design is supplemented by a mounting plate for the equipment. The 备安装板。抽屉模块的抽格高度存在以下数值:100、... -
Page 11: Possible Positions Of Withdrawable Units
小型抽屉模块, PROFINET 版本: Miniature withdrawable units, PROFINET version Caution! 注意 Withdrawable units with PROFINET plugs (RJ45) may only be 带有 PROFINET 插头 (RJ45) 的抽屉模块只能与 PROFINET contacted in withdrawable unit compartments fitted for PROFINET. 版本已拆除的抽屉模块抽格连接。 1.4.2 1.4.2 Possible positions of withdrawable units 抽屉模块的位置... - Page 12 Test position: 测试位置: The main circuit is disconnected, the control circuit closed. 主电路分断,控制电路闭合 In the window with the position indicator, a blue area with "TEST" is 在测试位置时,带有位置指示器的窗口中显示一个带印刷字 样 displayed in the disconnected position. “TEST” 的蓝色框。 主电路 出线触头 Outgoing contact 主电路 进线触头 Main circuit Input contact Main circuit...
- Page 13 Connected position: 工作位置: Main and control circuit are closed. 主电路和控制电路闭合。 In the window with the position indicator, a red area with "I" is dis- 在工作位置时,带有位置指示器的窗口中显示一个带印刷字 样 “I” 的红色框。 played in the connected position. 主电路 出线触头 Outgoing contact 主电路 进线触头 Main circuit Input contact Main circuit 控制电路插头...
-
Page 14: Standard Withdrawable Units
1.4.3 1.4.3 Standard withdrawable units 标准抽屉模块 1.4.3.1 1.4.3.1 Compartment design for standard withdrawable unit 标准抽屉模块的抽格结构 L1 L2 L3 N 插接式母线槽 Plug-in bus duct 用于分断触头的开口 Openings for contacts 抽格底部 Compartment bottom 1.4.3.2 1.4.3.2 Design of standard withdrawable units 标准抽屉模块的结构 控制线插头 Control plug (N) L3 L2 L1 进线触头系统... -
Page 15: Miniature Withdrawable Units
1.4.4 1.4.4 Miniature withdrawable units 小型抽屉模块 1.4.4.1 1.4.4.1 Compartment design for miniature withdrawable units 小型抽屉模块的抽格结构 用于分断触头的开口 ½ 小型抽屉模块适配器 模块的抽格 分隔板 Openings for contacts Miniature withdrawable unit adapter Compartment for ½-module Separation plate 1.4.4.2 1.4.4.2 Design of miniature withdrawable units 小型抽屉模块的结构 主电路插头... -
Page 16: Technical Data
1.5 Technical data 技术参数 Rating plates 功率铭牌 • • Every component has a rating plate. 。 每台设备均带有一个功率铭牌 • Each functional unit is labeled with plate: • identification 每个功能单元均通过一个标志牌标识: plate 标志牌 dentification Space for customer specific identifier or identification code of 用户专用标识或产品规格标识缩写... -
Page 17: Mounting
2 Installation 安装 Danger 危险 Hazardous voltage! 危险电压 Touching the live parts results in death or severe 接触导电零件可能导致死亡或者严重的身体 personal injury. Only qualified personnel may 伤害。 operate the system; they must be familiar with the 仅允许经过培训、熟读本说明书并且重视警 instructions and, in particular, observe the warning 告提示的人员操作设备。... -
Page 18: 主母线位置后端主母线系统入口
2.1 Access to main busbar joint for main busbar at rear 主母线位置后端主母线系统入口 电缆连接室 Cable connection compartment 用于建立主母线系统的进入口 Openings for access for main busbar combination The manufacture of the main busbar combination is described in the 在操作说明书 8PQ9800-8AA63 章节 3 中有关于建立主母线 系统 Operating Instructions 8PQ9800-8AA63, section 3. -
Page 19: 电气连接
2.2 Electrical Connections 电气连接 2.2.1 2.2.1 Cable compartment, front access 电缆间前置连接 2.2.1.1 2.2.1.1 Cable connection, main circuit, miniature 小型抽屉模块的主电路电缆连接 withdrawable units Feed cables for main circuits into the cable compartment and 将主电路电缆引入到电缆束中,并用卡夹固定在位于电缆间 fasten with clips to cable brackets on the right in the cable com- 右部的电缆支撑轨上... - Page 20 The cable connection of PE- conductor to the vertical PE-bar is PE 导体通过通用导体接线端子或线鼻与垂直的 PE 母线进行 电 carried out with universal-conductor-terminals or cable lugs. The 缆连接。N 导体 (针对 3 针抽屉模块)通过线鼻与电缆连 接室 N-conductor (if 3-pole withdrawable units) must be connected to 内垂直的 N 母线进行电缆连接 (可能的连接横截面和拧 紧力 the vertical N-bar in the cable connection compartment (possible 矩...
- Page 21 Table with terminal assignment for cable connection 电缆连接的端子分配表格 极数 (导体) 抽格内出线端触头分 配 电缆连接室内的端子分配 电缆连接室内的端子分配 额定电流 No. of poles (con- Assignment of contacts in Rated current [A] (右侧接口) (后端接口) ductor) the compartment, outgoing Assignment of terminals in Assignment of terminals in cable connection compartment side cable connection compartment...
-
Page 22: 连接横截面
2.2.1.3 2.2.1.3 Cable cross-sections 连接横截面 [Nm] 连接点 螺栓连接的 规格 最大允许的电缆截面积或线鼻 拧紧力矩 Connection Size of screwed (DIN 46235) [mm Tightening torque points joints Max. permitted cable cross-section or cable lug* [Nm] (DIN 46235) [mm £ 35A min. max. 小型抽屉模块的抽格 Compartment for miniature withdrawable units £... -
Page 23: 采用螺旋连接的控制接线盒
打开端子 夹紧位置 Opening the clamp Clamp locations Clamping cross-section per connection point 每个连接点的端子横截面 单芯线 0,35 – 2,5 mm solid 活动的 0,35 – 2,5 mm flexible 带有电缆芯线端套的细 导线 (长度 10 mm) 0,25 – 2,5 mm Finely stranded with end sleeve (length 10mm) 2.2.2.2 2.2.2.2 Control terminal block with screw terminal 采用螺旋连接的控制接线盒... -
Page 24: 交货时的开关位置
3 Operation 运行 Danger 危险 High Voltage! 危险电压! Touching the live parts results in death or severe 接触导电零件可能导致死亡或者严重的身 personal injury. 体 伤害。仅允许经过培训、熟读本说明书 Only qualified personnel may operate the switch- 并且 重视警告提示的人员操作设备。.. gear; they must be familiar with the instructions and in particular follow the warning notices. Warning 警告... -
Page 25: 过电流保护装置的设置
3.1.3 3.1.3 Configuring the overcurrent protection devices 过电流保护装置的设置 Warning 警告 The system can only be operated by skilled person- 仅允许熟悉开关设备并且了解所有操作规定 和 nel who know the system and know all the operating 安全规范的专业人员操作开关设备。 instructions and safety directives. Notice 注意 As it is not possible to cover all special designs in 由于无法在本操作说明中处理所有特殊装备,因... - Page 26 · Configuration of the overcurrent protection at the circuit breaker: · 在 KE (小型抽屉模块)内的断路器上设定过电流保护装 置: Here, the configuration of the overcurrent protection can be carried 在此可通过两种方式设定过电流保护装置。 out in two types. On the one hand, the configuration can be made with a small and 其一,可直接通过底面防护盖罩...
-
Page 27: 抽屉模块的操作
3.2 Operation the withdrawable units 抽屉模块的操作 3.2.1 3.2.1 Setting withdrawable units from the disconnected to 将抽屉模块从分断位置切换至工作位置 connected position Warning 警告 Operating the withdrawable units is only permitted 仅允许在抽格门关闭时操作抽屉模块 when the compartment door is closed. · Lock the compartment door · 锁闭抽格门... -
Page 28: 将抽屉模块从工作位置切换至分断位置
3.2.2 3.2.2 Setting withdrawable units from the connected to discon- 将抽屉模块从工作位置切换至分断位置 nected position Warning 警告 Operating the withdrawable units is only permitted 仅允许在抽格门关闭时操作抽屉模块。 when the compartment door is closed Warning 警告 If the withdrawable unit is in the connected position, 如果抽屉模块处于工作位置,则即便主开... -
Page 29: 标准抽屉模块的操作
3.2.5 3.2.5 Handling standard withdrawable units 标准抽屉模块的操作 Take-out of the withdrawable unit from the compartment 从抽格中抽出抽屉模块 · · Switch off the main switch 从抽格中抽出抽屉模块 · · Bring the isolating contacts into the disconnected position (see 关闭主开关 section 3.2.2) · Open the compartment door ·... -
Page 30: 小型抽屉模块的操作
3.2.6 3.2.6 Handling miniature withdrawable units 小型抽屉模块的操作 Taking out the withdrawable unit from the compartment 从抽格中抽出抽屉模块 · Switch off the main switch · 关闭主开关 · Bring the isolated contacts into the disconnected position · 将分断触头置于分断位置 · · Open the compartment door 打开抽格门... -
Page 31: 抽屉模块可上锁
抽格编码装 抽屉模块编 抽格编码装 抽屉模块编 抽格编码装 抽屉模块编 抽格编码装 抽屉模块编 置 码装置 置 码装置 置 码装置 置 码装置 Coding Coding Coding Coding Coding Coding Coding Coding compartment withdrawable compartment withdrawable compartment withdrawable compartment withdrawable unit unit unit unit 11-H 10-A 11-G 10-B 11-F 10-C 11-E... -
Page 32: 标准抽屉模块抽格可上锁
3.2.9 3.2.9 Locking capability of compartment for standard with- 标准抽屉模块抽格可上锁 drawable unit The placement of a withdrawable unit in compartments can be pre- 在使用镫形直径 6mm 的挂锁时,将无法进行抽格的装配。这 时 vented using a padlock with a bracket diameter of 6 mm. The lock can 将利用抽屉架左侧的指定凹槽安装挂锁。之后,抽格将无... - Page 33 4 Care 保养 Warning 警告 当电气开关器件和开关设备工作时,这些设 备 During operation of electrical equipment and switchgear, certain parts are live and hazardous 的一些部件必然处在危险电压之下,机械 部件 voltages therefore present. Mechanical parts can 可能会快速运动,也可能因受到遥控而 运动。 move very fast, even if remote controlled. 如果违反安全规定和警告指示,可能会出现 严 Non-observance of the safety instructions and 重的身体伤害和财产损失。...
- Page 34 4.2.2 4.2.2 Greasing 润滑 Grease the main contacts and movable mechanical parts with 使用 Klüberelctric KR 44-102 (Klüber Lubrication Deutschland KG 公司 - Klüberelctric 44-102 (Klüber Lubrication http://www.klueber.com)润滑主触 头和活动的机械部件 (维修周期 http://www.klueber.com) (maintenance intervals see operating In- 参见操作说明书 8PQ9800- 8AA65 章节 2.2)。 对于标准抽屉模 struction 8PQ9800-8AA65 section 2.2).
-
Page 35: 低压高分断能力熔断体的更换
4.3 Repair 修理 8PQ9800-8AA65 The maintenance has to be carried out according to the operating 第 2 章所述进行维护。还要 注 按照操作说明书 instructions 8PQ9800-8AA65, section 2. Additionally the following 意以下提示。 notes have to be observed. The equipment operating instructions must be observed when creat- 恢复设备标准功能时须遵循其操作说明书。... -
Page 36: 更换设备
Warning 警告 Use only LV HRC fuse links with identical data as 仅可使用与订单文件中所述技术参数一样的 低压 given in the order documents (see equipment parts 高分断能力熔断体 (参见设备清单)。 list). Caution 小心 Always replace all three LV HRC fuse links with new 应同时更换所有三个低压高分断能力熔断体,即 ones simultaneously, even if not all of them have 使没有... -
Page 37: 更换抽屉模块
4.4 Retrofit 改装 4.4.1 4.4.1 Renewing withdrawable units 更换抽屉模块 Replacing withdrawable units is done as described in sections 3.2.5 按照章节 3.2.5 和 3.2.6 所述进行抽屉模块的更换。 and 3.2.6. Removable functional units can be replaced by identical reserve 可以将可取出的功能单元替换成同样的备用单元。 如果功能 单 units. The interchangeability of the functional units is possible by 元的铭牌上有相同的代码,并且保护设备上的设置相同,... -
Page 38: 标准抽屉模块抽格中的百叶板
4.4.2.1 4.4.2.1 Upgrade compartment with shutter 抽格加装百叶板 4.4.2.1.1 4.4.2.1.1 Shutter in compartment for normal withdrawable unit 标准抽屉模块抽格中的百叶板 For the lowest 50 mm-segment of the vertical busbar cover you 针对柜内母线防护盖罩底部 50 mm 段,必须拆下百叶板 的 5 must break off the 5 little edges (a) of the shutter to allow the 个小角钢... -
Page 39: 小型抽屉模块抽格中的百叶板
4.4.2.1.2 4.4.2.1.2 Shutter in compartment for miniature withdrawable unit 小型抽屉模块抽格中的百叶板 · · 抽格内直至顶部的所有 50-mm 段覆盖百叶板,其角钢 (a) All 50 mm-segments except the upper segment must be covered with a shutter containing all breakable edges (a). See fig. A + B 必须存在。参见 “ 标准抽屉模块抽格中的百叶板 ” 图 A+B from "shutter in compartment for normal withdrawable unit"... -
Page 40: 标准抽屉模块的抽格改装,从前面接入设备
4.4.2.3 4.4.2.3 Compartment modification for standard withdrawable 标准抽屉模块的抽格改装, 从前面接入设备 unit, front connection Fitting and removing terminals and partitions 安装和拆卸接线端子和隔板 Removal: 拆卸 : · · Before removal, the corresponding withdrawable unit must be 在拆卸之前,须将相应的抽屉模块从抽格内取出,并断开 removed from the compartment as well as clamping main and 主导线和控制线。... -
Page 41: 标准抽屉模块的抽格,从后面接入设备
4.4.2.4 4.4.2.4 Compartment for standard withdrawable unit 标准抽屉模块的抽格,从后面接入设备 for rear connection Fitting and removing terminals and partitions 安装和拆卸接线端子和隔板 Removal: 拆卸: · · Before removal, the corresponding withdrawable unit must be 在拆卸之前,须将相应的抽屉模块从抽格内取出,并断开 removed from the compartment as well as clamping main and 主导线和控制线。... -
Page 42: 拆卸和安装抽屉架
4.4.2.5 4.4.2.5 Fitting and removing compartment bottom 拆卸和安装抽屉架 · · 在此之前必须将接线端子 / 出线柜外壳和位于抽屉架下方 的 The terminal/outgoing feeder housing and a miniature withdrawable unit adapter (below the compartment bottom) 小型抽屉模块适配器拆除。 must be removed beforehand · · (8PQ5001-7AA56) Shutter-fastener and parts of additional internal separation 安全门紧固件和附加内部分隔... -
Page 43: 小型抽屉模块的抽格,从前面接入设备
4.4.2.6 4.4.2.6 Compartment for miniature withdrawable units,front 小型抽屉模块的抽格,从前面接入设备 connection 4.4.2.6.1 拆卸小型抽屉模块的抽格 4.4.2.6.1 Dismounting miniature withdrawable unit compartment 1. Dismounting the center separating plates (1-3 units) 拆卸中间的隔板 (1-3 件) A) From the right, apply an approx. 9 mm wide screwdriver below in 在隔板右侧将宽度约为... - Page 44 2. Dismantling the left separating plate 拆卸左侧隔板 A) From the right, apply an approx. 9 mm wide screwdriver below in 在隔板右侧将宽度约为 9mm 的螺丝刀从隔板后端矩形切 the back rectangle cut-out (a) in the separating plate. 口 (a) 下方插入 B) By turning the screwdriver, press up until the nib (b) beside the 通过扭转螺丝刀向上提压,直至切口旁边的凸缘...
- Page 45 3. Dismounting the right compartment separating sheet 拆卸右侧抽格隔板 A) Loosen one screw (at height of 200 two screws) at the front on the 将中间柄前端的一个螺栓 (高度为 200 时,两个螺栓) cross brace. 松开。 B) In the cable connection compartment, snap the control current 在电缆连接室内,通过从后面用手...
- Page 46 8PQ9800-8AA72...
- Page 47 4. Dismounting the adapter plate 拆卸转接板 At the IP54 degree of protection, the side blinds must be removed. 对于防护等级 IP54,须移除侧面的挡板。 A) Keep holding the adapter plate with the left hand and then swivel 用左手抓住转接板,然后将前端向下转动 (约 20° - at the front toward the bottom. (approx. 20° - 30°). 30°)。...
-
Page 48: 安装小型抽屉模块的抽格
4.4.2.6.2 4.4.2.6.2 Mounting miniature withdrawable unit compartments 安装小型抽屉模块的抽格 1. Installing the adapter plate 装入转接板 At the IP54 degree of protection, the side blinds must be removed. 对于防护等级 IP54,须移除侧面的挡板。 A) Feed the adapter plate lengthwise with the terminal block and 接线盒和接线端子 (a) 朝内将转接板向前推入抽格,放 在抽 connecting terminals (a) at the head into the compartment and 屉架上。... - Page 49 E) Now press the control cables, with your right hand from the cable 这时从电缆间侧用右手将控制线向后紧紧压在转接板上 connection compartment, back to the adapter plate (arrow 1). (箭头 1)。 用左手将转接板左侧压向机架横梁,后端向 Press the left adapter plate side with your left hand to the frame 上顶压上端抽屉架。 在此过程中,转接板保持向前倾 斜。 arbor and at the rear up to the upper compartment bottom.
- Page 50 2. Mounting the center separating plate 安装中间的隔板 The following steps are also shown on the drawing 8PQ5000-0AA45. 图纸 8PQ5000-0AA45 同样描述以下步骤 A) Insert the separating plate, without the rectangle cut-out below A) 将隔板 (底部中间无矩形切口)倾斜 (约 -40°)从下 方插入 middle, from below at an angle (approx. -40°) into the smaller of the (两个槽口中)较小的槽口。...
- Page 51 4. Mounting the right compartment separating plate 安装右侧抽格隔板 A) Before holding the adapter plate firmly (arrow 1 in B) make sure 在抓紧转接板 (B 中箭头 1)之前须注意,转接板凸缘 应 that the nib of the adapter plate is still in the opening and therefore 仍位于开口内,以确保转接板在上端抽屉架上的水平定...
-
Page 52: 小型抽屉模块的抽格,从后面接入设备
4.4.2.7 4.4.2.7 Compartment for miniature withdrawable units, for rear 小型抽屉模块的抽格,从后面接入设备 connection 4.4.2.7.1 4.4.2.7.1 Dismounting miniature withdrawable unit compartment 拆卸小型抽屉模块的抽格 1. Dismantling the center separating plates (1-3 units) 拆卸中间的隔板 (1-3 件) A) From the right, apply an approx. 9 mm wide screwdriver below in 在隔板右侧将宽度约为... - Page 53 2. Dismounting the left separating plate 拆卸左侧隔板 A) From the right, apply an approx. 9 mm wide screwdriver below in 在隔板右侧将宽度约为 9mm 的螺丝刀从隔板后端矩形切 口 the back rectangle cut-out (a) in the separating plate. (a) 下方插入 B) By turning the screwdriver, press up until the nib (b) beside the 通过扭转螺丝刀向上提压,直至切口旁边的凸缘...
- Page 54 3. Dismounting the rear compartment separating sheet 拆卸后端抽格隔板 A) Dismantle the connection terminals (c) from the mounting rail in 在机柜后侧电缆连接室内,拆卸导轨上的接线端子 (c)。 the cable connection compartment on the cubicle rear side. B) Snap-off the control-circuit terminal block (a) in from the mounting 然后通过使用细螺丝刀将...
- Page 55 4. Dismounting the right compartment separating sheet 拆卸右侧抽格隔板 A) Loosen two screws (at the height 150 one screw) on the cubicle 这时在机柜正面的右侧隔板上松开中间柄前端的两个螺栓 front side at the front on the cross brace. (高度为 150 时,一个螺栓)。 B) From the left, with an approx. 9 mm wide screwdriver, apply first 在隔板左侧将宽度约为...
- Page 56 5. Dismounting the adapter plate 拆卸转接板 At the IP54 degree of protection, the side blinds must be removed. 对于防护等级 IP54,须移除侧面的挡板。 A) Keep holding the adapter plate with the left hand and bend the 用左手抓住转接板,右手用力将控制电缆 (f) 向左下方弯 control cable (f) by hand with force downwards. 曲。...
-
Page 57: 安装小型抽屉模块的抽格
4.4.2.7.2 安装小型抽屉模块的抽格 4.4.2.7.2 Mounting miniature withdrawable unit compartments 1. Installing the adapter plate 装入转接板 At the IP54 degree of protection, the side blinds must be removed. 对于防护等级 IP54,须移除侧面的挡板。 A) Before the installation of the adapter plate, fix loose a cable tie 在安装转接板之前,在距离转接板约... - Page 58 E) With short horizontal swivel movements of the adapter plate, and 通过快速水平转动转接板,同时向后推压,触头插在柜 内 pressing back at the same time, stick the contacts onto the distri- 母线上。 同时将控制线小心地转过中间柄 (g)。 在终 端位置 bution busbars. Move the control cable carefully past the cross 将转接板底部后侧肋架...
- Page 59 3. Mounting the left separating plate 安装左侧隔板 A) Insert the separating plate, with the rectangle cut-out below mid- 将隔板 (底部中间带有矩形切口 (d))倾斜 (约 40°) 从下 dle (d), from below at an angle (approx. 40°) into the outermost 方插入左边最外侧槽口。 在此过程中,隔板后边缘 必须位 left groove. The rear edge of the separating plate must be in the 于...
- Page 60 C) With your left hand and a little force, press the plate below to the 左手在隔板中间稍微用力将其底部向右按压,直至隔板 中 right until the nib in the middle of the plate snaps into the corre- 间的凸缘卡入抽屉架底部相应的开口 (a)。 在此过程 中须注 sponding openings (a) in the compartment bottom below. Take 意控制线不得卡在隔板和支承横梁之间。...
-
Page 61: 将小型抽屉模块改装为其它抽屉模块规格
版本为主。 other language! Technical Support: Internet: www.siemens.com/lowvoltage/technical-support / Order No.: 8PQ9800-8AA72 保留技术变更的权利。妥善保管,以备后用。 订货号 Ó Siemens AG 2015 Subject to change without prior notice. Store for use at a later date.