Table of Contents
Advertisement
Quick Links
Advertisement
Table of Contents

Related Manuals for Roland AeroCaster VRC-01


Summary of Contents for Roland AeroCaster VRC-01
- Page 1 AeroCaster VRC-01 Owner’s Manual...
-
Page 2: Table Of Contents
Connecting Headphones or a Headset ......17 USB Type-C Port) ..............29 Connecting a Microphone ..........18 Using with the AeroCaster LIVE App with a Roland Video Switcher ................30 Connecting to Monitor Speakers ........20 Using as a Computer Audio Interface ........ 31 Connecting to an Audio Player........... - Page 3 AeroCaster VRC-01 Owner’s Manual AeroCaster VRC-01 Owner’s Manual Before using this unit, carefully read “USING THE UNIT SAFELY” and “IMPORTANT NOTES” (the leaflet “Read Me First”). After reading, keep the document(s) where it will be available for immediate reference. © 2022 Roland Corporation...
-
Page 4: Panel Descriptions
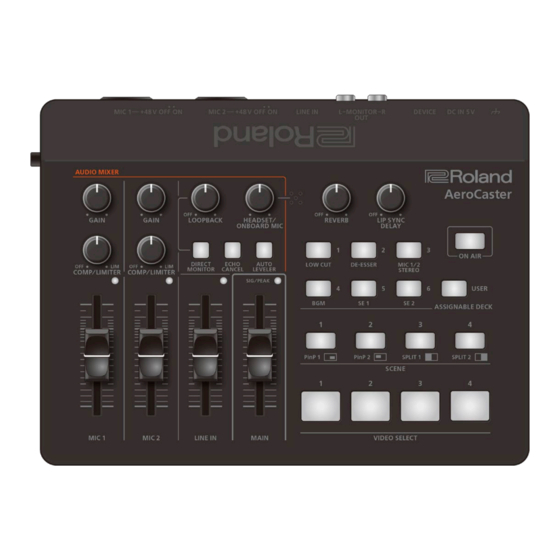
Panel Descriptions Panel Descriptions This section explains the names of the components of the VRC-01 and how each one works. â Top Panel(P.4) â Rear Panel(P.7) â Side Panel(P.9) Top Panel MIC [GAIN] knob (MIC 1, 2) [COMP/LIMITER] knob (MIC 1, 2) Adjusts the baseline level from which the compressor operates for the MIC 1 and MIC 2 inputs. - Page 5 Panel Descriptions [LOOPBACK] knob When the knob is turned clockwise, the loopback function turns on, and you can adjust the volume of the computer audio that’s input from the DEVICE port. The loopback function turns off when the knob is turned all the way counterclockwise. The direct monitor function is automatically turned on when loopback is on.
- Page 6 Panel Descriptions ASSIGNABLE DECK [1]–[6] buttons Button Explanation Turns the low cut on/off. [1] (LOW CUT) This applies to audio from the MIC 1, 2 jacks, the onboard mic and the headset mic. Low cut: Cuts off unneeded low-band audio. Turns the de-esser on/off.
-
Page 7: Rear Panel
Panel Descriptions Rear Panel Ground terminal Connect this to an external earth or ground if necessary. DC IN 5V port (USB Type-C) Use the included USB Type-C to USB Type-A cable to connect a USB AC adaptor (commercially available). The use of a USB AC adaptor with an output of at least 5 V/1.0 A is recommended. POWER indicator Lights when power is supplied from the DC IN 5V port or the DEVICE port. - Page 8 Panel Descriptions [MIC 1 +48V] switch Switches the phantom power for the MIC 1 connector on/off. This should be switched on if you connect a condenser mic that needs phantom power. Be sure to turn phantom power off if it’s not necessary. This is because dynamic mics, audio playback and other devices may malfunction when supplied with phantom power.
-
Page 9: Side Panel
Panel Descriptions Side Panel [PHONES/HEADSET] knob Adjusts the volume of the headphones or headset. PHONES/HEADSET jack (stereo mini type) Connect your headphones or headset here. Headphones: use a 3.5 mm stereo mini plug Headset: use a 3.5 mm CTIA-type mini plug (four-pole) -
Page 10: Connecting The Equipment
Connecting the Equipment Connecting the Equipment This section explains how to connect external devices to the VRC-01. â Connect the Included USB Cable(P.10) â Powering the Unit (Turning on the Power)(P.11) â Connecting to an iPad with a Lightning Port(P.13) â... -
Page 11: Powering The Unit (Turning On The Power)
Connecting the Equipment Powering the Unit (Turning on the Power) * Before turning the unit on/off, always be sure to turn the volume down. Even with the volume turned down, you might hear some sound when switching the unit on/off. However, this is normal and does not indicate a malfunction. When using a USB AC adaptor * Use a commercially available USB AC adaptor. - Page 12 Connecting the Equipment When using a mobile battery You can use a mobile battery (commercially available) to power this unit instead of a USB AC adaptor. Use the included USB Type-C to USB Type-A cable to connect the mobile battery (commercially available) to the DC IN 5V port.
-
Page 13: Connecting To An Ipad With A Lightning Port
Connecting the Equipment Connecting to an iPad with a Lightning Port Be sure to follow the steps below to connect. If you turn on the devices in the wrong order, you risk causing malfunction or equipment failure. Turn on the power of the VRC-01 by following the steps in “Powering the Unit (Turning on the Power)(P.11)”. - Page 14 Connecting the Equipment Connect the iPad to the USB AC adaptor (commercially available) as shown in the illustration. Make sure that the power of the VRC-01 is on when you connect your iPad. Once the iPad is correctly connected, the DEVICE indicator slowly blinks. Launch the AeroCaster LIVE app.
-
Page 15: Connecting To An Ipad With A Usb Type-C Port
Connecting the Equipment Connecting to an iPad with a USB Type-C Port Use a commercially available USB Type-C to USB Type-C cable to connect to an iPad that has a USB Type-C port. You can make the VRC-01 operate on bus power when connected to the USB Type-C port on the iPad. Required items USB Type-C to USB Type-C cable * Do not use a USB cable that is designed only for charging. -
Page 16: Using An Ipad (With Usb Type-C Port) While Charging
Connecting the Equipment Using an iPad (with USB Type-C port) While Charging You can connect your iPad to a commercially available USB AC adaptor to use the iPad while it is charging. Required items Apple USB Type-C Digital AV Multiport Adapter USB Type-C to USB Type-A cable * Do not use a USB cable that is designed only for charging a device. -
Page 17: Connecting Headphones Or A Headset
Connecting the Equipment Connecting Headphones or a Headset Connect a pair of headphones or a headset to the PHONES/HEADSET jack. Headphones: use a 3.5 mm stereo mini plug Headset: use a 3.5 mm CTIA-type stereo mini plug (four-pole) Use the [PHONES/HEADSET] knob to adjust the volume of the headphones or headset. The onboard mic is disabled while a headset is connected. -
Page 18: Connecting A Microphone
Connecting the Equipment Connecting a Microphone Dynamic microphone Check whether the [MIC 1 +48V] or [MIC 2 +48V] switch is off. Connect a dynamic mic to the MIC 1 connector (XLR, TRS) or MIC 2 connector (XLR, TRS). Condenser mic... - Page 19 Connecting the Equipment Connect a condenser mic that supports phantom power to the MIC 1 (XLR) or MIC 2 (XLR) connector. Turn the [MIC 1 +48V] switch or [MIC 2 +48V] switch on. This supplies phantom power to the condenser mic. Headset mic, onboard mic The headset mic and onboard mic cannot be used at the same time.
-
Page 20: Connecting To Monitor Speakers
Connecting the Equipment Connecting to Monitor Speakers * To prevent malfunction and equipment failure, always turn down the volume, and turn off all the units before making any connections. Use a pair of commercially available RCA stereo cables to connect your monitor speakers to the MONITOR OUT L/R jacks (RCA phono). -
Page 21: Connecting To An Audio Player
Connecting the Equipment Connecting to an Audio Player * To prevent malfunction and equipment failure, always turn down the volume, and turn off all the units before making any connections. Use a commercially available audio cable to connect an audio device (such as an audio player) to the LINE IN jack (3.5 mm stereo mini phone). -
Page 22: Audio Operations
Audio Operations Audio Operations This section explains about the audio-related operations for this unit. â Adjusting the Input Gain (Sensitivity)(P.22) â Adjusting the Volume Balance(P.24) â Removing Noise from an Audio Signal (Noise Gate)(P.25) Adjusting the Input Gain (Sensitivity) Adjust the input gain of MIC 1 or MIC 2 so that the audio input is at an appropriate level. Move the [MIC 1] or [MIC 2] fader to a position near the thick lines on the level scale. - Page 23 Audio Operations Stereo link function You can link MIC 1 and MIC 2 to create a stereo (L/R) input. Press the [USER] button to make it go dark. Press the ASSIGNABLE DECK [3] (MIC 1/2 STEREO) button to turn stereo link on (the button lights up). The MIC 1 and MIC 2 signals are panned to the left and right respectively.
-
Page 24: Adjusting The Volume Balance
Audio Operations Adjusting the Volume Balance Here’s how to adjust the volume balance of each input and the overall volume. Move the [MAIN] fader to a position near the thick lines on the level scale. Adjust the volume balance with the [MIC 1], [MIC 2] and [LINE IN] faders. For example, if you’re using MIC 2 for the moderator/MC’s mic, raise the volume of MIC 2 and lower the volumes for MIC 1 and LINE IN. -
Page 25: Removing Noise From An Audio Signal (Noise Gate)
Audio Operations Removing Noise from an Audio Signal (Noise Gate) A noise gate is used to remove the sound of hissing noises that you may hear during silence. Follow the steps below to switch the noise gate on/off. When you launch the VRC-01, the noise gate is always set to “on”, regardless of the noise gate’s on/off settings. You can press the ASSIGNABLE DECK [1] button to switch the noise gate on/off while long-pressing the [USER] button. -
Page 26: Using The Vrc-01 As A Usb Audio Interface
Using the VRC-01 as a USB Audio Interface Using the VRC-01 as a USB Audio Interface By connecting the VRC-01 to a computer via USB, you can use the unit as a USB audio interface. By connecting a mic to the VRC-01, you can use the mic’s audio for a Web meeting app, or record vocals by means of DAW software. - Page 27 Using the VRC-01 as a USB Audio Interface Use a USB Type-C to USB Type-A cable (the included cable or a commercially available product) to connect the DC IN 5V port to a USB AC adaptor (commercially available). Connect the USB AC adaptor to a power outlet.
-
Page 28: Example: Connecting The Vrc-01 To An External Device
Using with the AeroCaster LIVE App (Using an iPad with a Lightning Port)(P.28) â Using with the AeroCaster LIVE App (Using an iPad with an USB Type-C Port)(P.29) â Using with the AeroCaster LIVE App with a Roland Video Switcher(P.30) â Using as a Computer Audio Interface(P.31) â... -
Page 29: Using With The Aerocaster Live App (Using An Ipad With An Usb Type-C Port)
Example: Connecting the VRC-01 to an External Device Using with the AeroCaster LIVE App (Using an iPad with an USB Type-C Port) For compatibility with the latest platforms, click here. -
Page 30: Using With The Aerocaster Live App With A Roland Video Switcher
Using with the AeroCaster LIVE App with a Roland Video Switcher You can expand the video switcher camera inputs by using the AeroCaster LIVE app along with a Roland video switcher. * Only iPad models that feature a USB Type-C port can be used. -
Page 31: Using As A Computer Audio Interface
Example: Connecting the VRC-01 to an External Device Using as a Computer Audio Interface You can use the loopback feature when connected to a computer. Turn the [LOOPBACK] knob clockwise as necessary and adjust the input level from the computer. * You can power the VRC-01 via bus power. -
Page 32: Using As A Standalone Mixer
Using as a Standalone Mixer Here’s how to expand the audio inputs of your V-02HD or other Roland video switcher. By using the loopback function, you can mix the audio input to the VRC-01 (from a mic or audio device) and the audio of your computer, and send the resulting audio to a video switcher. -
Page 33: Main Specifications
Main Specifications Main Specifications MIC 1, 2 jacks Combo type (XLR, 1/4-inch TRS phone), balanced, phantom power (DC 48 V, 4 mA Max) LINE IN jack Stereo miniature type Connectors MONITOR OUT jack RCA phono type PHONES/HEADSET jack Stereo miniature type (stereo, CTIA-type) DC IN 5V port USB Type-C ®... - Page 34 Main Specifications AeroCaster VRC-01 Owner’s Manual © 2022 Roland Corporation...