Table of Contents
Advertisement
Quick Links
Advertisement
Table of Contents

Related Manuals for Garmin DESCENT G1 Series


Summary of Contents for Garmin DESCENT G1 Series
- Page 1 DESCENT G1 SERIES ™ Owner’s Manual...
- Page 2 © 2022 Garmin Ltd. or its subsidiaries All rights reserved. Under the copyright laws, this manual may not be copied, in whole or in part, without the written consent of Garmin. Garmin reserves the right to change or improve its products and to make changes in the content of this manual without obligation to notify any person or organization of such changes or improvements. Go to www.garmin.com...
-
Page 3: Table Of Contents
Table of Contents Tips for Wearing the Device with an Exposure Suit........36 Dive Alerts..........37 Introduction........1 Dive Terminology........39 Getting Started........1 Device Overview........2 Activities and Apps......39 Using the Watch........3 Starting an Activity........ 40 Tips for Recording Activities.... 40 Clocks.......... - Page 4 Using Virtual Partner®......84 Paying for a Purchase Using Your Setting a Training Target...... 85 Watch........... 117 Racing a Previous Activity....86 Adding a Card to Your Garmin Pay Wallet........... 118 History........... 86 Changing Your Garmin Pay Passcode........119 Using History......... 87 Multisport History......87...
- Page 5 Phone Apps and Computer Applications........143 Pulse Oximeter........123 Garmin Connect......144 Getting Pulse Oximeter Readings.. 124 Using the Garmin Connect App.. 145 Setting the Pulse Oximeter Mode.. 124 Using Garmin Connect on Your Tips for Erratic Pulse Oximeter Computer........146 Data..........
- Page 6 Courses..........166 Troubleshooting......189 Creating and Following a Course on Your Device........167 Product Updates......... 189 Creating a Course on Garmin Getting More Information....190 Connect..........167 My device is in the wrong language...190 Sending a Course to Your Is my phone compatible with my Device...........
- Page 7 Wheel Size and Circumference..217 Symbol Definitions......219 Table of Contents...
-
Page 9: Introduction
2 Follow the on-screen instructions to complete the initial setup. During the initial setup, you can pair your smartphone with your watch to receive notifications, set up your Garmin Pay wallet, and more (Pairing Your Phone with Your Watch, page 139). -
Page 10: Device Overview
Title Device Overview (Descent G1) Identifier GUID-F473FABC-5D21-4F2C-8328-457333B68C3E Language EN-US Description Version Revision Changes Save as from fenix 6. Different hold functions. Status Released Last Modified 29/09/2021 16:27:07 Author cozmyer Device Overview LIGHT • Press to turn the backlight on and off. •... -
Page 11: Using The Watch
• Press to choose an option in a menu. • Press to view the menu during a dive. • Hold to view the clock menu. NOTE: While diving, hold functions are disabled. BACK • Press to return to the previous screen. •... -
Page 12: Clocks
Title Clocks Identifier GUID-78FE6EF5-ADA1-4B21-9861-40107E30886E Language EN-US Description Version Revision Changes New Clocks menu for MARQ, fenix 6 Status Released Last Modified 26/02/2019 12:52:39 Author gerson Clocks Title Setting an Alarm (Instinct) Identifier GUID-830F7BD7-E27E-410E-A69E-96EFD4BED988 Language EN-US Description Version Revision Changes Update for change to maximum number of alarms Status Released Last Modified... -
Page 13: Starting The Countdown Timer
Title Starting the Countdown Timer Identifier GUID-CC7A19C6-407F-44A1-803C-C2747FA1361F Language EN-US Description Version Revision Changes Update select to press with hard keys for consistency, update Restart string to Auto Restart, add Save option. Status Released Last Modified 17/06/2020 12:03:13 Author pruekatie Starting the Countdown Timer 1 From any screen, hold START. -
Page 14: Deleting A Timer
Title Deleting a Timer Identifier GUID-1875EF45-2C9A-4E39-A804-5D5938B162B6 Language EN-US Description Version Revision Changes Save as from MARQ/fenix 6. Status Released Last Modified 17/06/2020 11:22:34 Author pruekatie Deleting a Timer 1 From any screen, hold START. 2 Select Timers. 3 Select a timer. 4 Press UP. -
Page 15: Using The Stopwatch
Title Using the Stopwatch Identifier GUID-96244242-0974-4BD5-9DCE-3B1489940F08 Language EN-US Description Version Revision Changes Update select to press with hard keys for consistency. Status Released Last Modified 17/06/2020 11:25:22 Author pruekatie Using the Stopwatch 1 From any screen, hold START. 2 Select Stopwatch. 3 Press START to start the timer. -
Page 16: Adding Alternate Time Zones
Title Adding Alternate Time Zones Identifier GUID-5A15CA9F-3F8A-4EB4-ADF6-DC29AB3373B1 Language EN-US Description Version Revision Changes Widget to glance Status Released Last Modified 20/01/2022 17:55:59 Author tillmonmartha Adding Alternate Time Zones You can display the current time of day in additional time zones on the alternate time zones glance. You can add up to three alternate time zones. -
Page 17: Diving
Title Diving Identifier GUID-FF7B29B4-4E81-41C3-A42C-D28C88E516CF Language EN-US Description Version Revision Changes Status Released Last Modified 21/09/2017 12:01:00 Author cozmyer Diving Title ISPI_Warning_Dive Identifier GUID-F4F90D7B-97DB-456F-8774-936A3A97E6E2 Language EN-US Description Version Revision Changes Adding 40% O2 note to QSM/OM. Status Released Last Modified 24/03/2020 07:56:24 Author gerson Dive Warnings... -
Page 18: Dive Modes
• Do not dive with a gas if you have not personally verified its contents and input the analyzed value to the device. Failure to verify tank contents and input the appropriate gas values to the device will result in incorrect dive planning information and could result in serious injury or death. -
Page 19: Using The Pool Dive Mode
Title Using the Pool Dive Mode Identifier GUID-2B16A10D-7213-43E3-8C8B-A57C12AF89B8 Language EN-US Description Version Revision Changes Status Released Last Modified 31/10/2018 14:57:23 Author cozmyer Using the Pool Dive Mode When the device is in pool dive mode, the tissue load and decompression lockout features function normally, but dives are not saved to the dive log. -
Page 20: Dive Setup
HRM-Tri device, that stores heart rate ™ ™ data with the dive. You can view chest heart rate monitor data in the Garmin Dive app after you complete the ™ dive. Double Tap to Scroll: Allows you to double tap the device to scroll through the dive data screens. If you notice accidental scrolling, you can use the Sensitivity option to adjust the responsiveness. -
Page 21: Setting Up Your Breathing Gases
Title Setting Up Your Breathing Gases Identifier GUID-11057310-4E1D-4116-9BFB-EE5A57442196 Language EN-US Description Version Revision Changes Broke this info out of the Dive Setup topic. Status Released Last Modified 21/07/2020 16:25:20 Author cozmyer Setting Up Your Breathing Gases You can enter up to twelve gases for each gas dive mode. Decompression calculations include your decompression gases, but do not include your backup gases. -
Page 22: Setting Po2 Thresholds
Title Setting PO2 Thresholds Identifier GUID-26B379F1-DFB8-488C-956F-0FA0E9CDD39B Language EN-US Description Version Revision Changes Status Released Last Modified 21/07/2020 16:26:03 Author cozmyer Setting PO2 Thresholds You can configure the partial pressure of oxygen (PO2) thresholds, in bars, for decompression, warning, and critical alerts. 1 Hold MENU. -
Page 23: Setting Ccr Setpoints
Title Setting CCR Setpoints Identifier GUID-186BE525-8FDC-405E-B3DA-CFDCC9B69939 Language EN-US Description Version Revision Changes Added the last step to set depth. Status Released Last Modified 27/04/2021 15:01:54 Author cozmyer Setting CCR Setpoints You can configure the high and low partial pressure of oxygen (PO2) setpoints for closed-circuit rebreather (CCR) dives. -
Page 24: Fly Time
Title No-Fly Time Identifier GUID-96AE8D7C-9677-47EF-89CF-CEB040B8F497 Language EN-US Description Version Revision Changes Major updates to the no-fly timer. Status Released Last Modified 10/02/2022 13:09:53 Author cozmyer No-Fly Time After a dive, you may need to wait several hours before it is safe to fly on an airplane. To indicate your remaining no-fly time, appears on the default watch face. -
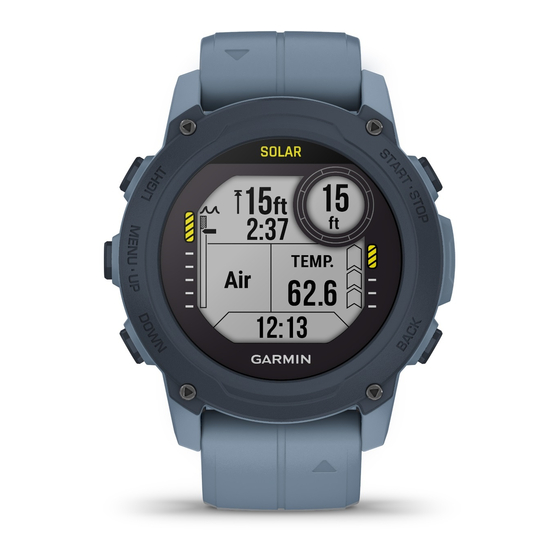
Page 25: Single-Gas And Multi-Gas Data Screens
Title Single-Gas and Multi-Gas Data Screens (Descent G1) Identifier GUID-ABED36DD-AC1A-4517-BB8A-DCE5CFA338A5 Language EN-US Description Version Revision Changes Save as from the Mk2 topic. Status Released Last Modified 10/02/2022 13:07:05 Author cozmyer Single-Gas and Multi-Gas Data Screens Primary data screen: Displays the main dive data, including your breathing gas, partial pressure of oxygen (PO2) level, and rate of ascent. - Page 26 and alternating: Too high. Ascent is greater than 10.1 m (33 ft.) per minute. Dive compass: Allows you to view the compass and set a directional heading to aid with underwater navigation (Navigating with the Dive Compass, page 27). Customizable data screen: Displays additional dive data and physiological information. You can edit the gauges and two of the data fields (Customizing the Data Screens, page 68).
-
Page 27: Ccr Data Screens
Title CCR Data Screens (Descent G1) Identifier GUID-B9AB63D0-E9AE-4B99-92C4-0C950E285E09 Language EN-US Description Version Revision Changes Save as from Mk2 topic. Status Released Last Modified 10/02/2022 13:07:02 Author cozmyer CCR Data Screens Primary data screen: Displays the main dive data, including your breathing gas, partial pressure of oxygen (PO2) level, and rate of ascent. - Page 28 and alternating: Too high. Ascent is greater than 10.1 m (33 ft.) per minute. Dive compass: Allows you to view the compass and set a directional heading to aid with underwater navigation (Navigating with the Dive Compass, page 27). Customizable data screen: Displays additional dive data and physiological information. You can edit the gauges and two of the data fields (Customizing the Data Screens, page 68).
-
Page 29: Gauge Data Screens
Title Gauge Data Screens (Descent G1) Identifier GUID-7547CCC6-75A7-4D2E-B926-18C79CACE947 Language EN-US Description Version Revision Changes Save as from Mk2. Status Released Last Modified 10/02/2022 13:07:04 Author cozmyer Gauge Data Screens Dive stopwatch: Displays the bottom time stopwatch, average depth, maximum depth, and rate of ascent (Using the Gauge Dive Stopwatch, page 28). -
Page 30: Apnea Data Screens
Title Apnea Data Screens (Descent G1) Identifier GUID-5AE08711-5D97-4F87-A10F-7230808F79C7 Language EN-US Description Version Revision Changes Save as from Mk2, but splitting into two topics. Status Released Last Modified 10/02/2022 13:06:59 Author cozmyer Apnea Data Screens In-dive screen: Displays the information about the current dive, including the elapsed time, current and maximum depth, heart rate data, and rate of ascent or descent. - Page 31 Surface interval screen: Displays the current surface interval time, heart rate, and last dive information. You can edit the data fields. The number of completed dives. Time and temperature screen: Displays the temperature, time of day, and battery level. You can edit the data fields.
-
Page 32: Apnea Hunt Data Screens
Title Apnea Hunt Data Screens (Descent G1) Identifier GUID-588D0121-5B64-441D-AE66-2031B6ED7C45 Language EN-US Description Version Revision Changes Save as from Descent Mk2. Split apnea and apnea hunt into two topics. Status Released Last Modified 10/02/2022 13:07:01 Author cozmyer Apnea Hunt Data Screens In-dive screen: Displays the information about the current dive, including the elapsed time, current and maximum depth, heart rate data, and rate ascent or descent. - Page 33 Surface interval screen: Displays the current surface interval time, as well as the elapsed time, maximum depth, and temperature for your last apnea dive. You can edit the data fields. The number of completed dives. Time of day screen: Displays the time of day, speed over ground (SOG), and battery level. You can edit the data fields.
-
Page 34: Going Diving
Title Going Diving Identifier GUID-F5BB5FFC-1071-4C7B-9968-2B2D985C4574 Language EN-US Description Version Revision Changes Changed title and moved task result info into steps. Status Released Last Modified 10/02/2022 13:11:47 Author cozmyer Going Diving 1 From the watch face, press START. 2 Select a dive mode (Dive Modes, page 10). -
Page 35: Navigating With The Dive Compass
Title Navigating with the Dive Compass Identifier GUID-8B118BD5-91E0-402A-8B57-784C0CF0A8FA Language EN-US Description Version Revision Changes Added conditions for screen color. Status Released Last Modified 10/02/2022 13:02:07 Author cozmyer Navigating with the Dive Compass 1 During a Single-Gas, Multi-Gas, CCR, or Gauge dive, scroll to the dive compass. The compass indicates your directional heading 2 Press START to set the heading. -
Page 36: Using The Gauge Dive Stopwatch
Title Using the Gauge Dive Stopwatch Identifier GUID-7DB86CEA-90D0-4B86-B7C2-379362C9362B Language EN-US Description Version Revision Changes Added gauge to the title since there are multiple dive stopwatches now. Status Released Last Modified 10/02/2022 13:01:50 Author cozmyer Using the Gauge Dive Stopwatch TIP: You can add a simplified stopwatch screen to any of the gas dive modes (Customizing the Data Screens, page 68). -
Page 37: Using The Basic Dive Stopwatch
Title Using the Basic Dive Stopwatch Identifier GUID-9F9DD4BE-4689-4250-8161-78DB3917CD43 Language EN-US Description Version Revision Changes Save as from the gauge dive stopwatch topic. Status Released Last Modified 10/02/2022 13:03:44 Author cozmyer Using the Basic Dive Stopwatch 1 Select an option: • Add the Stopwatch Timer data screen to the Single-Gas, Multi-Gas, CCR, or Gauge dive mode. •... -
Page 38: Switching Between Cc And Oc Diving For A Bailout Procedure
Title Switching Between CC and OC Diving Identifier GUID-6AE780B7-9BAF-4F81-8DFB-63AA4C6C66C5 Language EN-US Description Version Revision Changes Added conditions for color vs. b/w screens. Status Released Last Modified 10/02/2022 13:02:39 Author cozmyer Switching Between CC and OC Diving for a Bailout Procedure During a closed-circuit rebreather (CCR) dive, you can switch between closed-circuit (CC) and open-circuit (OC) diving while you perform a bailout procedure. -
Page 39: Performing A Safety Stop
Title Performing a Safety Stop Identifier GUID-D532E9AC-F226-4AD8-AE17-4A90EDF68F0B Language EN-US Description Version Revision Changes Removed inline icon. Not applicable to b/w screen, and not completely necessary with the rest of the description. Status Released Last Modified 10/02/2022 13:03:32 Author cozmyer Performing a Safety Stop You should perform a safety stop during every dive to help reduce the risk of decompression sickness. -
Page 40: Performing A Decompression Stop
Title Performing a Decompression Stop Identifier GUID-1EB51E61-61EE-44BB-B17A-5EBE9251DF80 Language EN-US Description Version Revision Changes Removed inline icons. Not applicable to b/w screen, and not completely necessary with the rest of the description. Status Released Last Modified 10/02/2022 13:03:20 Author cozmyer Performing a Decompression Stop You should always perform all the required decompression stops during a dive to help reduce the risk of decompression sickness. -
Page 41: Viewing The Surface Interval Glance
Title Viewing the Surface Interval Glance Identifier GUID-5B6754B2-AC50-4686-AD61-8BCC57AE2D55 Language EN-US Description Version Revision Changes Updated to add no-fly information to the glance. Status Released Last Modified 10/02/2022 13:03:11 Author cozmyer Viewing the Surface Interval Glance 1 From the watch face, press UP or DOWN to view the surface interval glance. 2 Press START to view your oxygen toxicity units (OTU) and central nervous system (CNS) percentage. -
Page 42: Dive Planning
Title Dive Planning Identifier GUID-03287881-01B2-43F4-9443-C53D8C660A72 Language EN-US Description Version Revision Changes Status Released Last Modified 17/11/2017 16:31:31 Author cozmyer Dive Planning You can plan for future dives using your device. The device can calculate no-decompression limit (NDL) times or create decompression plans. When planning a dive, the device uses your residual tissue load from recent dives in the calculations. -
Page 43: Creating A Decompression Plan
Title Creating a Decompression Plan Identifier GUID-7187F580-420E-457F-9C59-85F3D5AEB67B Language EN-US Description Version Revision Changes Added last deco stop option. Status Released Last Modified 10/02/2022 13:00:19 Author cozmyer Creating a Decompression Plan You can create open-circuit decompression plans and save them for future dives. 1 Press START. -
Page 44: Altitude Diving
Title Altitude Diving Identifier GUID-1F916AD6-A339-4CE9-81F8-87E8E196941C Language EN-US Description Version Revision Changes Status Released Last Modified 21/07/2020 16:38:31 Author cozmyer Altitude Diving At higher altitudes, the atmospheric pressure is lower, and your body contains a larger amount of nitrogen than it would at the start of a dive at sea level. The device accounts for altitude changes automatically using the barometric pressure sensor. -
Page 45: Dive Alerts
Title Dive Alerts Identifier GUID-80F7A2DF-6152-44DE-991E-F8B94A097A82 Language EN-US Description Version Revision Changes Added conditions for color vs. b/w screens. Status Released Last Modified 10/02/2022 13:12:27 Author cozmyer Dive Alerts Alert Message Cause Watch Action The decompression stop depth and None You completed the decompression stop. time flash for five seconds. - Page 46 None seconds. the number of seconds. Do not dive. Failed to read The watch has invalid or missing depth Do not start a dive. Call Garmin ® depth sensor. sensor data before you start a dive activity. Product Support. The watch has invalid or missing depth...
-
Page 47: Dive Terminology
™ You can also add Connect IQ activities and apps to your watch using the Connect IQ app (Connect IQ Features, ™ page 147). For more information about activity tracking and fitness metric accuracy, go to garmin.com/ataccuracy. Activities and Apps... -
Page 48: Starting An Activity
Title Starting an Activity Identifier GUID-90B3EF66-C7DC-4BB5-A1A3-C07E1E9E7A57 Language EN-US Description A generic version of "Going for a Hike" or "Going for a Run." Covers the same information, but applies more broadly to the varied activities of fenix 2. Version Revision Changes Device to watch. -
Page 49: Stopping An Activity
Title Stopping an Activity (fenix 5) Identifier GUID-996CC115-E86F-4FA9-8C13-1405A9A7485F Language EN-US Description Version Revision Changes Added a recovery HR option. Status Released Last Modified 01/02/2021 10:20:50 Author cozmyer Stopping an Activity 1 Press STOP. 2 Select an option: • To resume your activity, select Resume. •... -
Page 50: Running
Title Running Identifier GUID-5A5AC2C5-B5AE-4C00-806E-8AD475F6FB0C Language EN-US Description Chapter topic. Can contain concept info if appropriate. Version Revision Changes Status Released Last Modified 22/04/2017 22:48:21 Author gerson Running Title Going for a Virtual Run Identifier GUID-9F45EF2C-D6D5-4583-B4C6-A386743B650A Language EN-US Description Version 1.1.1 Revision Changes Branch for fenix that uses "press."... -
Page 51: Calibrating The Treadmill Distance
Title Calibrating the Treadmill Distance Identifier GUID-86541696-B60E-44BC-9A46-4349C86A1CD8 Language EN-US Description Version Revision Changes Update select to press with hard keys for consistency. Status Released Last Modified 20/05/2020 15:57:32 Author pruekatie Calibrating the Treadmill Distance To record more accurate distances for your treadmill runs, you can calibrate the treadmill distance after you run at least 1.5 km (1 mi.) on a treadmill. -
Page 52: Swim Terminology
Stroke type identification is available only for pool swimming. Your stroke type is identified at the end of a length. Stroke types appear in your swimming history and in your Garmin Connect account. You can also select stroke type as a custom data field (Customizing the Data Screens, page 68). -
Page 53: Tips For Swimming Activities
Title Tips for Swimming Activities Identifier GUID-F8057807-FC5A-45D1-BDA7-C62721206E00 Language EN-US Description Version Revision Changes Changing select to press for hard keys Status Released Last Modified 06/08/2019 12:13:40 Author gerson Tips for Swimming Activities • Before starting a pool swimming activity, follow the on-screen instructions to select your pool size or enter a custom size. -
Page 54: Auto Rest
Title Auto Rest Identifier GUID-70DA63E3-4008-4406-B3E2-E914BE082BFA Language EN-US Description Version Revision Changes Updates from Anne (feature now off by default). Status Released Last Modified 21/08/2019 10:45:42 Author mcdanielm Auto Rest The auto rest feature is available only for pool swimming. Your device automatically detects when you are resting, and the rest screen appears. -
Page 55: Multisport
Title Multisport Identifier GUID-05226345-0236-472A-AA19-D6E428604A52 Language EN-US Description Version Revision Changes Removed total distance as per Jira 36358 Status Released Last Modified 08/10/2020 08:27:39 Author wiederan Multisport Triathletes, duathletes, and other multisport competitors can take advantage of the multisport activities, such as Triathlon or Swimrun. -
Page 56: Creating A Multisport Activity
Title Creating a Multisport Activity Identifier GUID-89CDBACD-34A6-40E4-BE62-50BE269E9A64 Language EN-US Description Version Revision Changes Using step conref for first step (consistency, changing select to press for hard keys) Status Released Last Modified 06/08/2019 12:13:40 Author gerson Creating a Multisport Activity 1 From the watch face, press START. 2 Select Add >... -
Page 57: Recording A Strength Training Activity
Title Recording a Strength Training Activity (fenix 5) Identifier GUID-573EC4B6-D45B-46E7-BE37-FB542CBB4FC1 Language EN-US Description Version Revision Changes Step conref for starting an activity, changing select to press, breaking hard key press and screen selection into two steps Status Released Last Modified 04/12/2019 14:33:21 Author gerson... -
Page 58: Recording A Hiit Activity
Title Recording a HIIT Activity Identifier GUID-130DBE4C-91D2-43D1-A6B4-1DEF7958903F Language EN-US Description Version Revision Changes Add "From the watch face" to Step 1. Status Released Last Modified 10/02/2022 10:10:29 Author pruekatie Recording a HIIT Activity You can use specialized timers to record a high-intensity interval training (HIIT) activity. 1 From the watch face, press START. -
Page 59: Using An Ant+ Indoor Trainer
Title Using an ANT+ Indoor Trainer Identifier GUID-5956B2AD-038A-4998-860B-032081F18F61 Language EN-US Description Version 1.1.1 Revision Changes Branched for Outdoor. Adding additional steps for selecting smart trainer options. Flipped follow course/follow workout options to match device order, per SME feedback. Status Released Last Modified 08/10/2020 08:28:04 Author... -
Page 60: Climbing Sports
Title Climbing Sports Identifier GUID-6BC50348-E3CA-433D-9505-AACECF018958 Language EN-US Description Version Revision Changes Status Released Last Modified 19/06/2020 09:22:57 Author cozmyer Climbing Sports Title Recording an Indoor Climbing Activity (fenix 6) Identifier GUID-D67857E8-04FB-44CA-9D58-B77AB8D50F83 Language EN-US Description Version Revision Changes LAP button push required to start new route. Status Released Last Modified... -
Page 61: Recording A Bouldering Activity
Title Recording a Bouldering Activity (fenix 6) Identifier GUID-584D4C5D-8E09-4EB4-89FA-7FCA1B7F0B7A Language EN-US Description Version Revision Changes Status Released Last Modified 19/06/2020 09:23:24 Author cozmyer Recording a Bouldering Activity You can record routes during a bouldering activity. A route is a climbing path along a boulder or small rock formation. -
Page 62: Starting An Expedition
Title Starting an Expedition Identifier GUID-7B792EB8-0CC4-44E2-87E8-DED033CA8223 Language EN-US Description Version Revision Changes No English Changes. Versioned to fix DA. Status Released Last Modified 07/03/2022 11:00:57 Author pullins Starting an Expedition You can use the Expedition app to prolong the battery life while recording a multi-day activity. 1 From the watch face, press START. -
Page 63: Viewing Track Points
Title Viewing Track Points Identifier GUID-D4FB5428-4BA4-4CA5-A64C-3E12483BF5E1 Language EN-US Description Version Revision Changes Changing select to press for hard keys Status Released Last Modified 06/08/2019 12:13:40 Author gerson Viewing Track Points 1 During an expedition, press UP or DOWN to view the map page. 2 Press START. -
Page 64: Going Fishing
Title Going Fishing Identifier GUID-A6881EE1-DB08-4922-925F-C7526EFAE8A2 Language EN-US Description Save as from quatix. No English change. Versioned to HR. Version Revision Changes Status Released Last Modified 07/03/2022 10:44:19 Author pruekatie Going Fishing You can keep track of your daily fish count, count down your competition time, or set an interval timer to keep track of your fishing pace. -
Page 65: Skiing
Title Skiing Identifier GUID-A0593325-AE5F-41AA-888A-137DAA071967 Language EN-US Description Chapter topic. Version Revision Changes Status Released Last Modified 22/04/2017 22:48:46 Author gerson Skiing Title Viewing Your Ski Runs Identifier GUID-A4400F3B-E55E-4CCF-A1E7-BAC62C26DAAF Language EN-US Description Describes how to view ski runs from your current skiing activity. Version Revision Changes... -
Page 66: Recording A Backcountry Skiing Activity
Title Recording a Backcountry Skiing Activity Identifier GUID-DA1C794E-E736-486A-B989-139E0554CA2E Language EN-US Description Version Revision Changes Fixed typo in the title. Status Released Last Modified 26/02/2020 10:07:14 Author burzinskititu Recording a Backcountry Skiing Activity The backcountry skiing activity lets you manually switch between climbing and descending tracking modes so you can accurately track your statistics. -
Page 67: Golfing
20/01/2022 18:04:09 Author tillmonmartha Playing Golf Before you play a course for the first time, you must download it from the Garmin Connect app (Garmin Connect, page 144). Courses downloaded from the Garmin Connect app are updated automatically. Before you play golf, you should charge the watch (Charging the Watch, page 180). -
Page 68: Golf Menu
Move Flag: Allows you to move the pin location to get a more precise distance measurement (Moving the Flag, page 62). Measure Shot: Shows the distance of your previous shot recorded with the Garmin AutoShot feature (Viewing ™ Measured Shots, page 63). -
Page 69: Viewing Hazards
Title Viewing Hazards (Instinct 2) Identifier GUID-4557FC31-A316-47CA-87DB-C73A079A748D Language EN-US Description Version Revision Changes Save as from fenix 6 Status Released Last Modified 20/01/2022 18:01:26 Author tillmonmartha Viewing Hazards You can view distances to hazards along the fairway for par 4 and 5 holes. Hazards that affect shot selection are displayed individually or in groups to help you determine the distance to layup or carry. -
Page 70: Moving The Flag
Title Moving the Flag Identifier GUID-6F0DED41-AC66-49BD-867C-DE0E857E2E45 Language EN-US Description Version Revision Changes Added touch and keyed conditions. Status Released Last Modified 22/12/2021 14:18:50 Author cozmyer Moving the Flag You can take a closer look at the green and move the pin location. 1 From the hole information screen, press START. -
Page 71: Viewing Measured Shots
Title Viewing Measured Shots Identifier GUID-36C094EA-AFF5-4A82-BBEC-E91C445DCF86 Language EN-US Description Version Revision Changes Added "Previous Shots" string. Status Released Last Modified 27/04/2020 12:35:54 Author burzinskititu Viewing Measured Shots Before the device can automatically detect and measure shots, you must enable scoring. Your device features automatic shot detection and recording. - Page 72 Title Keeping Score Identifier GUID-EF10C0FC-366E-419F-BE6C-E4A16E5C5D8C Language EN-US Description Version Revision Changes Changing select to press for hard keys Status Released Last Modified 06/08/2019 12:13:40 Author gerson Keeping Score 1 From the hole information screen, press START. 2 Select Scorecard. The scorecard appears when you are on the green. 3 Press UP or DOWN to scroll through the holes.
- Page 73 Title Recording Statistics (fenix 6) Identifier GUID-B7060DB3-2333-4E0E-8798-570390667402 Language EN-US Description Version Revision Changes Clarify per FQC JIRA 36628. Roll up on next ECO (not a driver). Status Released Last Modified 08/10/2020 08:27:51 Author gerson Recording Statistics Before you can record statistics, you must enable statistics tracking (Enabling Statistics Tracking, page 64).
- Page 74 Title Viewing Tide Information (Instinct Solar Surf) Identifier GUID-3DB3FF64-F943-4D96-8334-C9C7764FE85E Language EN-US Description Version Revision Changes Adding a conditioned note that this is not available for all product types; device to watch; smartphone to phone Status Released Last Modified 24/01/2022 15:19:25 Author tillmonmartha Viewing Tide Information...
- Page 75 Title Customizing Activities and Apps Identifier GUID-25FA2988-33F2-4FC9-92FA-E457CBDB9E72 Language EN-US Description Version Revision Changes Status Released Last Modified 22/12/2021 13:46:13 Author cozmyer Customizing Activities and Apps You can customize the activities and apps list, data screens, data fields, and other settings. Title Adding or Removing a Favorite Activity Identifier...
- Page 76 Title Changing the Order of an App in the List Identifier GUID-2B7CD712-3EAA-4A09-B289-CA9BB278DEBD Language EN-US Description Version Revision Changes Changing to press for hard keys Status Released Last Modified 06/08/2019 12:13:40 Author gerson Changing the Order of an Activity in the Apps List 1 Hold MENU.
- Page 77 Title Adding a Map to an Activity (outdoor watch) Identifier GUID-A877CC78-A0E1-4836-84E2-6A7366C8F705 Language EN-US Description Version Revision Changes Removed Settings menu. MARQ/fenix 6 going forward. Use previous version to support older products. Status Released Last Modified 26/02/2019 12:52:39 Author gerson Adding a Map to an Activity You can add the map to the data screens loop for an activity.
- Page 78 Title Activities and App Settings Identifier GUID-4EE5B773-E8A3-4C61-8D64-432B575963D8 Language EN-US Description Version Revision Changes Remove touchscreen reference. Changed device to watch. Status Released Last Modified 10/02/2022 12:45:31 Author cozmyer Activities and App Settings These settings allow you to customize each preloaded activity app based on your needs. For example, you can customize data pages and enable alerts and training features.
- Page 79 25 minutes of inactivity. The extended mode can result in shorter battery life between charges. Record Activity: Enables activity FIT file recording for golf activities. FIT files record fitness information that is tailored for Garmin Connect. Recording Interval: Sets the frequency for recording track points during an expedition. By default, GPS track points are recorded once an hour, and they are not recorded after sunset.
- Page 80 Title Activity Alerts (outdoor watch) Identifier GUID-E9B4413D-28EB-4054-8622-5CCD3F4571D2 Language EN-US Description Version Revision Changes Updated title Status Released Last Modified 22/12/2021 14:13:37 Author cozmyer Activity Alerts You can set alerts for each activity, which can help you to train toward specific goals, to increase your awareness of your environment, and to navigate to your destination.
- Page 81 Title Setting an Alert (outdoor watch) Identifier GUID-D68697C7-D321-4B42-8A52-5C9D257B58CE Language EN-US Description Version Revision Changes No English change. Versioned to fix PT-BR. Status Released Last Modified 20/05/2021 13:43:40 Author pullins Setting an Alert 1 Hold MENU. 2 Select Activities & Apps. 3 Select an activity.
- Page 82 Title Enabling Auto Climb Identifier GUID-E93B3A01-9EA5-40AD-B2E3-F70B1FACE4B6 Language EN-US Description Version Revision Changes Removed Settings menu. MARQ/fenix 6 going forward. Use previous version to support older products. Status Released Last Modified 26/02/2019 12:52:39 Author gerson Enabling Auto Climb You can use the auto climb feature to detect elevation changes automatically. You can use it during activities such as climbing, hiking, running, or biking.
- Page 83 Last Modified 20/01/2022 17:57:22 Author cozmyer Changing the GPS Setting For more information about GPS, go to www.garmin.com/aboutGPS. 1 Hold MENU. 2 Select Activities & Apps. 3 Select an activity. NOTE: This feature is not available for all activities. 4 Select the activity settings.
- Page 84 Your device includes several preloaded workouts for multiple activities. You can create and find more workouts using Garmin Connect, or select a training plan that has built-in workouts and transfer them to your device. You can schedule workouts using Garmin Connect. You can plan workouts in advance and store them on your device.
- Page 85 Last Modified 21/04/2020 16:14:30 Author mcdanielm Following a Workout From Garmin Connect Before you can download a workout from Garmin Connect, you must have a Garmin Connect account (Garmin Connect, page 144). 1 Select an option: • Open the Garmin Connect app.
- Page 86 Title Following a Daily Suggested Workout Identifier GUID-1F857C7A-31A2-46AF-A639-2C3F5ECC3AF1 Language EN-US Description Version Revision Changes Missing step to select start/stop button to view menu options. Status Released Last Modified 22/02/2022 13:19:08 Author gerson Following a Daily Suggested Workout Before the device can suggest a daily workout, you must have a training status and VO2 max. estimate (Training Status, page 106).
- Page 87 Title Customizing an Interval Workout Identifier GUID-20F63B41-1586-4BD0-84B4-1F4A61EA2F84 Language EN-US Description Version Revision Changes Using step conref for step 1. changing to press for hard keys. The SK has a spacing issue. Status Released Last Modified 11/03/2021 11:09:09 Author gerson Creating an Interval Workout 1 From the watch face, press START.
- Page 88 The training calendar on your watch is an extension of the training calendar or schedule you set up in your Garmin Connect account. After you have added a few workouts to the Garmin Connect calendar, you can send them to your device. All scheduled workouts sent to the device appear in the calendar glance. When you select a day in the calendar, you can view or do the workout.
- Page 89 You can also create a pace band for a known course to optimize your pace effort based on elevation changes. You can create a PacePro plan using the Garmin Connect app. You can preview the splits and elevation plot before you run the course.
- Page 90 22/12/2021 13:43:12 Author cozmyer Downloading a PacePro Plan from Garmin Connect Before you can download a PacePro plan from Garmin Connect, you must have a Garmin Connect account (Garmin Connect, page 144). 1 Select an option: • Open the Garmin Connect app, and select •...
- Page 91 07/03/2022 09:26:46 Author cozmyer Starting a PacePro Plan Before you can start a PacePro plan, you must download a plan from your Garmin Connect account. 1 From the watch face, press START. 2 Select an outdoor running activity. 3 Hold MENU.
- Page 92 TIP: You can hold MENU, and select Stop PacePro > to stop the PacePro plan. The activity timer continues running. Title Using Virtual Partner (Outdoor Watch) Identifier GUID-80AA39BE-7DDD-4CEE-B7DA-7F679286EA1A Language EN-US Description Based on Forerunner 620 topic, updated for fenix 2 UI. Version Revision Changes...
- Page 93 Title Setting a Training Target Identifier GUID-C3DF6A79-08C1-419E-9027-9245A6CA8628 Language EN-US Description Version Revision Changes Added cancelling as a tip and removed it as a nested task below this one. Status Released Last Modified 22/12/2021 13:43:11 Author cozmyer Setting a Training Target The training target feature works with the Virtual Partner feature so you can train toward a set distance, distance and time, distance and pace, or distance and speed goal.
- Page 94 5 Select an option: • Select From History to select a previously recorded activity from your device. • Select Downloaded to select an activity you downloaded from your Garmin Connect account. 6 Select the activity. The Virtual Partner screen appears indicating your estimated finish time.
- Page 95 Title Using History (Outdoor) Identifier GUID-1CBCC4BA-CC63-41EE-A8CB-9463CC4660ED Language EN-US Description Base on GUID-271B1E41-1F86-4E91-BE6C-D975F8DB3EE9, and update for fenix 2 UI. Version Revision Changes Updated terminology for widget and device Status Released Last Modified 22/02/2022 12:03:59 Author cozmyer Using History History contains previous activities you have saved on your watch. 1 From the watch face, hold MENU.
- Page 96 Title Viewing Your Time in Each Heart Rate Zone Identifier GUID-198B5E12-3A62-4467-A724-88D0103AE92D Language EN-US Description Version Revision Changes Updated options/layout for 2019 watches going forward. Applies to MARQ/fenix 6/Forerunner 945. Use previous version for older products. Removed outdated prereq. Status Released Last Modified 22/02/2022 11:16:22 Author...
- Page 97 Title Viewing Your Personal Records Identifier GUID-6FA88D99-2430-4C76-BD01-575596D73EC8 Language EN-US Description Version Revision Changes Fixing first step for consistency. Status Released Last Modified 26/02/2019 12:52:39 Author mcdanielm Viewing Your Personal Records 1 From the watch face, hold MENU. 2 Select History > Records. 3 Select a sport.
- Page 98 Title Clearing Personal Records Identifier GUID-FFCF2C10-6DB3-419E-B228-7B8AC430505C Language EN-US Description Version Revision Changes Combined clearing one record with clearing all records. Status Released Last Modified 20/12/2021 11:43:56 Author cozmyer Clearing Personal Records 1 From the watch face, hold MENU. 2 Select History > Records. 3 Select a sport.
- Page 99 Title Using the Odometer (fenix6) Identifier GUID-7D1F164F-415F-4E6A-BD9C-D64974380EC7 Language EN-US Description Version Revision Changes Update select to press with hard keys for consistency. Status Released Last Modified 17/06/2020 12:04:25 Author pruekatie Using the Odometer The odometer automatically records the total distance traveled, elevation gained, and time in activities. 1 From the watch face, hold MENU.
- Page 100 Title Appearance Identifier GUID-9B690310-0734-43F7-816F-218B3A179C3C Language EN-US Description Version Revision Changes Status Released Last Modified 22/12/2021 13:20:43 Author cozmyer Appearance You can customize the appearance of the watch face and the quick access features in the glance loop and controls menu. Title Watch Face Settings (outdoor watch) Identifier...
- Page 101 Title Customizing the Watch Face (Instinct) Identifier GUID-7CD73B1B-5800-45EF-86C1-B619FFE40AC5 Language EN-US Description Version Revision Changes Update select to press with hard keys for consistency. Status Released Last Modified 17/06/2020 11:22:12 Author pruekatie Customizing the Watch Face You can customize the watch face information and appearance. 1 From the watch face, hold MENU.
- Page 102 Displays scheduled workouts when you select a Garmin coach adaptive training plan in Garmin coach your Garmin Connect account. The plan adjusts to your current level of fitness, coaching and schedule preferences, and race date. Starts a Health Snapshot activity on your watch that records several key health metrics while you hold still for two minutes.
- Page 103 Name Description Displays your current heart rate in beats per minute (bpm) and a graph of your average Heart rate resting heart rate (RHR). Tracks your time spent participating in moderate to vigorous activities, your weekly Intensity minutes intensity minutes goal, and progress toward your goal. Allows you to send messages on your paired inReach device (Using the inReach Remote, inReach...
- Page 104 Name Description Weather Displays the current temperature and weather forecast. Displays laser location information when you have a compatible Xero device paired with Xero device ® your Descent watch (Xero Laser Location Settings, page 137). Title Viewing the Glance Loop (fenix 7) Identifier GUID-EC6FD9D1-76D1-4EA1-BABF-0800945E0230 Language...
- Page 105 51 to 75 is high reserve energy, and 76 to 100 is very high reserve energy. You can sync your watch with your Garmin Connect account to view your most up-to-date Body Battery level, long-term trends, and additional details (Tips for Improved Body Battery Data, page 98).
- Page 106 Cycling performance measurements require a heart rate monitor and a power meter. These estimates are provided and supported by Firstbeat Analytics . For more information, go to garmin.com ™ /performance-data/running. NOTE: The estimates may seem inaccurate at first. The watch requires you to complete a few activities to learn about your performance.
- Page 107 VO2 max. estimate. On the watch, your VO2 max. estimate appears as a number and description. On your Garmin Connect account, you can view additional details about your VO2 max. estimate.
- Page 108 The watch analyzes several weeks of your training data to refine the race time estimates. TIP: If you have more than one Garmin device, you can enable the Physio TrueUp feature, which allows your ™...
- Page 109 Title Performance Condition Identifier GUID-901ACCFC-FB0D-414E-B80C-54970AF4E357 Language EN-US Description Version Revision Changes No English change. Versioned to fix IT. Status Released Last Modified 07/08/2020 09:37:33 Author pullins Performance Condition As you complete your activity, such as running or cycling, the performance condition feature analyzes your pace, heart rate, and heart rate variability to make a real-time assessment of your ability to perform compared to your average fitness level.
- Page 110 Title Getting Your FTP Estimate (Instinct) Identifier GUID-4250B4E0-62F7-41B5-99FE-70070C110B47 Language EN-US Description Version Revision Changes save as from fenix 7 Status Released Last Modified 20/01/2022 18:05:35 Author tillmonmartha Getting Your FTP Estimate Before you can get your functional threshold power (FTP) estimate, you must pair a chest heart rate monitor and power meter with your watch (Pairing Your Wireless Sensors, page 131), and you must get your VO2 max.
- Page 111 Title Conducting an FTP Test Identifier GUID-C8DAC4B1-3159-4E8C-ADD9-6FA012EBA697 Language EN-US Description Version Revision Changes Updates from Joe H and Kerri Status Released Last Modified 22/04/2017 22:46:07 Author wiederan Conducting an FTP Test Before you can conduct a test to determine your functional threshold power (FTP), you must pair a chest heart rate monitor and a power meter with your device (Pairing Your Wireless Sensors, page 131), and you must get...
- Page 112 Title Lactate Threshold Identifier GUID-3ED97FFE-025E-47EA-9C70-DD86156617BD Language EN-US Description Version Revision Changes Adding Auto Detection text similar to Max. HR topic Status Released Last Modified 22/12/2021 14:13:40 Author cozmyer Lactate Threshold Lactate threshold is the exercise intensity at which lactate (lactic acid) starts to accumulate in the bloodstream. In running, it is the estimated level of effort or pace.
- Page 113 Performing a Guided Test to Determine Your Lactate Threshold This feature requires a Garmin chest heart rate monitor. Before you can perform the guided test, you must put on a heart rate monitor and pair it with your device (Pairing Your Wireless Sensors, page 131).
- Page 114 Cycling performance measurements require a heart rate monitor and a power meter. These estimates are provided and supported by Firstbeat Analytics. For more information, go to garmin.com /performance-data/running. NOTE: The estimates may seem inaccurate at first. The watch requires you to complete a few activities to learn about your performance.
- Page 115 Title Training Status Levels Identifier GUID-6F81BF5B-B49A-4506-95E2-0F4A04D8B319 Language EN-US Description Version Revision Changes 2019 watches (MARQ, fenix 6, Forerunner 945) separate the training status and performance stats widgets into 2. Retitled this topic since it's only about training status. It should be used as a sub-topic under the new high-level description Training Status topic Status Released...
- Page 116 Title Tips for Getting Your Training Status Identifier GUID-CF3B3A75-7707-49EC-9177-ABC1B772A787 Language EN-US Description Version Revision Changes Add xref to turning off VO2 max recording. Status Released Last Modified 01/02/2021 10:20:18 Author pruekatie Tips for Getting Your Training Status The training status feature depends on updated assessments of your fitness level, including at least two VO2 max.
- Page 117 Title Training Load Identifier GUID-AEDB0872-C5A1-4378-86D5-2239734B59E8 Language EN-US Description Version Revision Changes Defined EPOC acronym. Status Released Last Modified 17/11/2017 16:22:12 Author cozmyer Training Load Training load is a measurement of your training volume over the last seven days. It is the sum of your excess post-exercise oxygen consumption (EPOC) measurements for the last seven days.
- Page 118 (Training Load Focus, page 109). Each feedback phrase, for example, "Highly Impacting VO2 Max." has a corresponding description in your Garmin Connect activity details. Aerobic Training Effect uses your heart rate to measure how the accumulated intensity of an exercise affects your aerobic fitness and indicates if the workout had a maintaining or improving effect on your fitness level.
- Page 119 Recovery Time You can use your Garmin device with wrist-based heart rate or a compatible chest heart rate monitor to display how much time remains before you are fully recovered and ready for the next hard workout. NOTE: The recovery time recommendation uses your VO2 max. estimate and may seem inaccurate at first. The device requires you to complete a few activities to learn about your performance.
- Page 120 1 When you want to pause your training status, select an option: • From the training status glance, hold MENU, and select Options > Pause Training Status. • From your Garmin Connect settings, select Performance Stats > Training Status > > Pause Training Status.
- Page 121 Title Controls Identifier GUID-700E76C4-F7E2-4984-8199-D59D6A31DFB9 Language EN-US Description Version Revision Changes Adding conditioned note to night vision and stealth mode controls Status Released Last Modified 22/02/2022 13:11:33 Author tillmonmartha Controls The controls menu lets you quickly access watch features and options. You can add, reorder, and remove the options in the controls menu (Customizing the Controls Menu, page 115).
- Page 122 Select to sync your watch with your paired phone. Timers Select to set a countdown timer (Starting the Countdown Timer, page Select to open your Garmin Pay wallet and pay for purchases with your watch Wallet (Garmin Pay, page 116).
- Page 123 Title Customizing the Controls Menu Identifier GUID-3A355D29-6245-4C45-A727-4CE60B3F9313 Language EN-US Description Version Revision Changes Adding Appearance to menu path Status Released Last Modified 20/01/2022 18:07:12 Author tillmonmartha Customizing the Controls Menu You can add, remove, and change the order of the shortcut menu options in the controls menu (Controls, page 113).
- Page 124 Garmin Pay The Garmin Pay feature allows you to use your watch to pay for purchases in participating locations using credit or debit cards from a participating financial institution. NOTE: This feature is not available for all product models.
- Page 125 Garmin Connect app. Your most recently used payment card appears. 4 If you have added multiple cards to your Garmin Pay wallet, select DOWN to change to another card (optional). 5 Within 60 seconds, hold your watch near the payment reader, with the watch facing the reader.
- Page 126 Author pullins Adding a Card to Your Garmin Pay Wallet You can add up to 10 credit or debit cards to your Garmin Pay wallet. 1 From the Garmin Connect app, select 2 Select Garmin Pay > > Add Card.
- Page 127 Changing Your Garmin Pay Passcode You must know your current passcode to change it. If you forget your passcode, you must reset the Garmin Pay feature for your Descent G1 watch, create a new passcode, and reenter your card information.
- Page 128 Tips for Erratic Pulse Oximeter Data, page 125 for more information about the pulse oximeter sensor. • For more information about accuracy, go to garmin.com/ataccuracy. • For more information about watch wear and care, go to www.garmin.com/fitandcare. Sensors and Accessories...
- Page 129 Title Tips for Erratic Heart Rate Data (WHRM) Identifier GUID-08BC6CE7-EB8F-4392-9B7D-714B54D19499 Language EN-US Description Version Revision Changes Device to watch Status Released Last Modified 20/12/2021 11:55:20 Author tillmonmartha Tips for Erratic Heart Rate Data If the heart rate data is erratic or does not appear, you can try these tips. •...
- Page 130 Title Setting an Abnormal Heart Rate Alert Identifier GUID-F00E423A-165E-4557-91EE-DC2EDF737E79 Language EN-US Description Version Revision Changes Save as from Forerunner topic. Switch from using the widget to the sensors settings. Status Released Last Modified 22/12/2021 13:34:43 Author cozmyer Setting an Abnormal Heart Rate Alert CAUTION This feature only alerts you when your heart rate exceeds or drops below a certain number of beats per minute, as selected by the user, after a period of inactivity.
- Page 131 Identifier GUID-D8D363C2-0690-48D4-95E2-A3557E7D53C2 Language EN-US Description Version Revision Changes Made the first step a choice list. Added link to activty settings. Removed specifics to Garmin devices since you can broadcast over BT. Status Released Last Modified 22/12/2021 14:25:16 Author cozmyer Broadcasting Heart Rate Data You can broadcast your heart rate data from your watch and view it on paired devices.
- Page 132 Title Getting Pulse Oximeter Readings Identifier GUID-1589E4DE-1170-4568-892E-661E3E892616 Language EN-US Description Version Revision Changes widget to glance; device to watch Status Released Last Modified 20/01/2022 18:05:57 Author tillmonmartha Getting Pulse Oximeter Readings You can manually begin a pulse oximeter reading by viewing the pulse oximeter glance. The glance displays your most recent blood oxygen saturation percentage.
- Page 133 Title Tips for Erratic Pulse Oximeter Data Identifier GUID-B7A60F69-6ADF-4B11-A42B-A9922E466AEE Language EN-US Description Version Revision Changes Updating device to watch. Made nylon band text more generic becuase many watches can't use UltraFit bands Status Released Last Modified 20/12/2021 11:55:22 Author tillmonmartha Tips for Erratic Pulse Oximeter Data If the pulse oximeter data is erratic or does not appear, you can try these tips.
- Page 134 Title Compass Settings (Outdoor watch) Identifier GUID-6D64DCD4-8FA6-44D9-A863-B7A634CE0821 Language EN-US Description Version Revision Changes Removed Settings menu. MARQ/fenix 6 going forward. Use previous version to support older products. Status Released Last Modified 26/02/2019 12:52:39 Author gerson Compass Settings Hold MENU, and select Sensors & Accessories > Compass. Calibrate: Allows you to manually calibrate the compass sensor (Calibrating the Compass Manually, page 126).
- Page 135 Title Setting the North Reference Identifier GUID-AAF67F7E-C05F-43EF-9E6E-894E4545416F Language EN-US Description Version Revision Changes Removed Settings menu. MARQ/fenix 6 going forward. Use previous version to support older products. Status Released Last Modified 26/02/2019 12:52:39 Author gerson Setting the North Reference You can set the directional reference used in calculating heading information. 1 Hold MENU.
- Page 136 Title Altimeter Settings (Outdoor Watch) Identifier GUID-2DF9C415-2A35-48CE-B20B-013DAA3358A5 Language EN-US Description Version Revision Changes Added sensor mode from barometer settings topic. Status Released Last Modified 22/02/2022 13:08:51 Author cozmyer Altimeter Settings Hold MENU, and select Sensors & Accessories > Altimeter. Calibrate: Allows you to manually calibrate the altimeter sensor. Auto Cal.: Allows the altimeter to self-calibrate each time you use satellite systems.
- Page 137 Title Barometer Settings Identifier GUID-CDC9DDEE-C576-4E1D-B007-BC737686793A Language EN-US Description Version Revision Changes Watch mode changed to sensor mode. Status Released Last Modified 22/02/2022 13:10:24 Author cozmyer Barometer Settings Hold MENU, and select Sensors & Accessories > Barometer. Calibrate: Allows you to manually calibrate the barometer sensor. Plot: Sets the time scale for the chart in the barometer glance.
- Page 138 (Customizing the Data Screens, page 68). If your watch was packaged with a sensor, they are already paired. For information about specific Garmin sensor compatibility, purchasing, or to view the owner's manual, go to buy.garmin.com for that sensor. Sensor Type...
- Page 139 The first time you connect a wireless sensor to your watch using ANT+ or Bluetooth technology, you must pair the watch and sensor. If the sensor has both ANT+ and Bluetooth technology, Garmin recommends that you pair using ANT+ technology. After they are paired, the watch connects to the sensor automatically when you start an activity and the sensor is active and within range.
- Page 140 Title Running Dynamics Identifier GUID-62A09512-518A-424A-8491-FE2B80CD2091 Language EN-US Description Version Revision Changes Updating bundled accessory condition to include HRM-Pro. Status Released Last Modified 11/09/2020 13:54:04 Author burzinskititu Running Dynamics You can use your compatible Descent device paired with the HRM-Pro accessory or other running dynamics accessory to provide real-time feedback about your running form.
- Page 141 Title Training with Running Dynamics (outdoor watch) Identifier GUID-B748FD83-268D-4777-9414-AEC70FC6DA30 Language EN-US Description Checked in from Forerunner. Replace Forerunner name with ph_product_series variable. Update strings and paths based on the UX documents. Version Revision Changes Removed Settings menu. MARQ/fenix 6 going forward. Use previous version to support older products. Since none of the outdoor watches are bundled with HRM straps any more, removed info about bundled devices.
- Page 142 Last Modified 01/10/2019 15:19:23 Author cozmyer inReach Remote The inReach remote function allows you to control your inReach device using your Descent device. Go to buy.garmin.com to purchase a compatible inReach device. Title Using the inReach Remote Identifier GUID-43AD8C5A-49D3-4CFD-8698-B76EB4827C14 Language...
- Page 143 Title VIRB Remote (Generic) Identifier GUID-9145B9DA-70E7-42BE-A2E5-67228DEC6BC4 Language EN-US Description Concept that describes the VIRB Remote feature generically so that it works for all markets. Version Revision Changes Removed the second sentence. There are no longer any VIRB models for sale on the website. Status Released Last Modified...
- Page 144 Title Controlling a VIRB Action Camera During an Activity Identifier GUID-8F112A68-B0C3-4C1D-BD7D-93647AEB1658 Language EN-US Description Version Revision Changes SW reduced visibility to non-mainstream accessories by moving them out of the widget loop. Widget is added automatically after pairing through Sensor menu. Status Released Last Modified...
- Page 145 Title XERO Laser Location Settings Identifier GUID-D44E8F72-8661-4D13-9872-0EA0CDAF5879 Language EN-US Description Version Revision Changes Renamed the topic to match the device strings. Updated settings and setting names. Status Released Last Modified 17/10/2019 10:11:25 Author mall Xero Laser Location Settings Before you can customize laser location settings, you must pair a compatible Xero device (Pairing Your Wireless Sensors, page 131).
- Page 146 Title Panning and Zooming the Map (fenix 3) Identifier GUID-C404537E-A4F1-419D-84FB-995BAF3C9591 Language EN-US Description Version Revision Changes Changing to press for hard keys Status Released Last Modified 06/08/2019 12:13:40 Author gerson Panning and Zooming the Map 1 While navigating, press UP or DOWN to view the map. 2 Hold MENU.
- Page 147 4 Select an option to add your watch to your account: • If this is the first time you are pairing a device with the Garmin Dive app, follow the on-screen instructions. • If you already paired another device with the Garmin Dive app, select Add > Devices, and follow the on- screen instructions.
- Page 148 Title Enabling Bluetooth Notifications Identifier GUID-599D739A-21A7-4EF2-98F4-29258D407B47 Language EN-US Description Version 2.1.2 Revision Changes Removing settings menu, removed timeout, and added signature Status Released Last Modified 20/01/2022 18:06:44 Author tillmonmartha Enabling Bluetooth Notifications Before you can enable notifications, you must pair the Descent device with a compatible mobile device (Pairing Your Phone with Your Watch, page 139).
- Page 149 When you receive a text message notification on your watch, you can send a quick reply by selecting from a list of messages. You can customize messages in the Garmin Connect app. NOTE: This feature sends text messages using your phone. Regular text message limits and charges from your carrier and phone plan may apply.
- Page 150 , go to the iOS ® notifications settings to select the items to show on the watch. • If you are using an Android phone, from the Garmin Connect app, select Settings > Notifications. Title Turning Off the Bluetooth Phone Connection...
- Page 151 Top level topic for compatible apps and applications. Status Released Last Modified 22/12/2021 13:40:26 Author cozmyer Phone Apps and Computer Applications You can connect your watch to multiple Garmin phone apps and computer applications using the same Garmin account. Phone Connectivity Features...
- Page 152 Garmin Connect You can connect with your friends on Garmin Connect. Garmin Connect gives you the tools to track, analyze, share, and encourage each other. Record the events of your active lifestyle including runs, walks, rides, swims, hikes, triathlons, and more. To sign up for a free account, you can download the app from the app store on your phone (garmin.com/connectapp), or go to connect.garmin.com.
- Page 153 Updating the Software Using the Garmin Connect App Before you can update your watch software using the Garmin Connect app, you must have a Garmin Connect account, and you must pair the watch with a compatible phone (Pairing Your Phone with Your Watch, page 139).
- Page 154 Garmin Express application to upload your activity data to your Garmin Connect account and to send data, such as workouts or training plans, from the Garmin Connect website to your watch. You can also install software updates and manage your Connect IQ apps.
- Page 155 Connect IQ Features You can add Connect IQ features to your watch from Garmin and other providers using the Connect IQ app (garmin.com/connectiqapp). You can customize your watch with watch faces, device apps, and data fields. NOTE: For your safety, Connect IQ features are not available while diving. This ensures that all dive capabilities function as designed.
- Page 156 Garmin Dive App The Garmin Dive app allows you to upload your dive logs from your compatible Garmin device. You can add more detailed information about your dives, including environmental conditions, photos, notes, and dive buddies. You can use the map to browse for new dive locations, and view the location details and photos shared by other users.
- Page 157 Garmin Explore ™ The Garmin Explore website and mobile app allow you to plan trips and use cloud storage for your waypoints, routes, and tracks. They offer advanced planning both online and offline, allowing you to share and sync data with your compatible Garmin device.
- Page 158 Title Setting Up Your User Profile Identifier GUID-E821D062-929F-4D8C-BB89-DC077D082F8F Language EN-US Description Version Revision Changes Removed Settings menu. Applies to 2019 watches going forward: MARQ/fenix 6/Forerunner 945. Use previous versions for older products. Also removed Fitness menu, since that is no longer implemented on the D2 line.
- Page 159 Title Fitness Goals Identifier GUID-712C9267-F751-4E95-9D3B-C955EE14C845 Language EN-US Description Version Revision Changes Joe H. requested that we delete the injury bullet. Status Released Last Modified 13/09/2017 07:57:46 Author wiederan Fitness Goals Knowing your heart rate zones can help you measure and improve your fitness by understanding and applying these principles.
- Page 160 You can also set each heart rate zone and enter your resting heart rate manually. You can manually adjust your zones on the watch or using your Garmin Connect account. 1 Hold MENU.
- Page 161 • Run often with the wrist or chest heart rate monitor. • Try a few heart rate training plans, available from your Garmin Connect account. • View your heart rate trends and time in zones using your Garmin Connect account. Title...
- Page 162 If you know your functional threshold power (FTP) value, you can enter it and allow the software to calculate your power zones automatically. You can manually adjust your zones on the device or using your Garmin Connect account. 1 Hold MENU.
- Page 163 The safety and tracking features are supplemental features and should not be relied on as a primary method to obtain emergency assistance. The Garmin Connect app does not contact emergency services on your behalf. The Descent G1 watch has safety and tracking features that must be set up with the Garmin Connect app. NOTICE To use these features, the Descent G1 watch must be connected to the Garmin Connect app using Bluetooth technology.
- Page 164 Author gerson Adding Contacts You can add up to 50 contacts to the Garmin Connect app. Contact emails can be used with the LiveTrack feature. Three of these contacts can be used as emergency contacts (Adding Emergency Contacts, page 155).
- Page 165 Garmin Move IQ feature automatically detects the event and displays it in your timeline. The Garmin Move IQ events show activity type and duration, but they do not appear in your activities list or newsfeed. For more detail and accuracy, you can record a timed activity on your device.
- Page 166 Your device creates a daily step goal automatically, based on your previous activity levels. As you move during the day, the device shows your progress toward your daily goal. If you choose not to use the auto goal feature, you can set a personalized step goal on your Garmin Connect account.
- Page 167 Title Intensity Minutes Identifier GUID-63522E07-AD5E-4D2D-B680-3129A2300238 Language EN-US Description Version Revision Changes Device to watch Status Released Last Modified 20/12/2021 11:50:24 Author tillmonmartha Intensity Minutes To improve your health, organizations such as the World Health Organization recommend at least 150 minutes per week of moderate intensity activity, such as brisk walking, or 75 minutes per week of vigorous intensity activity, such as running.
- Page 168 While you are sleeping, the watch automatically detects your sleep and monitors your movement during your normal sleep hours. You can set your normal sleep hours in the user settings on your Garmin Connect account. Sleep statistics include total hours of sleep, sleep stages, sleep movement, and sleep score. You can view your sleep statistics on your Garmin Connect account.
- Page 169 Title Navigation Identifier GUID-D69B4122-8872-4120-9442-8A53F3498ED2 Language EN-US Description Version Revision Changes Status Released Last Modified 14/03/2019 10:40:11 Author petersenj Navigation Title Viewing and Editing Your Saved Locations Identifier GUID-EEE85A13-3075-4075-ABDE-297B6158B1F2 Language EN-US Description Version Revision Changes Added viewing to the task and swapped the context for a note and xref. Status Released Last Modified...
- Page 170 Title Navigating to a Destination (fenix 5) Identifier GUID-048A8325-1592-4E95-82AC-9FD82EF40CE5 Language EN-US Description Version Revision Changes Changing from Navigate app to Navigation option within activities, for consistency Status Released Last Modified 06/08/2019 12:13:40 Author gerson Navigating to a Destination You can use your device to navigate to a destination or follow a course. 1 From the watch face, press START.
- Page 171 Title Navigating to the Starting Point of a Saved Activity Identifier GUID-E58FF310-D7E3-4515-B0CC-5EFCEEFF6CCE Language EN-US Description Version Revision Changes For consistency, moving from Navigate app to Navigation menu in activities. Different routing options available based on supported maps. Check conditions. Consistent with companion topic navigating during an activity Status Released...
- Page 172 Title Navigating To Your Starting Point During an Activity Identifier GUID-CF774818-0C30-4992-962C-DDA9EA00E8C6 Language EN-US Description Version Revision Changes No English change. Versioned to fix NO. Status Released Last Modified 17/07/2020 10:34:09 Author pullins Navigating to Your Starting Point During an Activity You can navigate back to the starting point of your current activity in a straight line or along the path you traveled.
- Page 173 Title Navigating with Sight 'N Go (Outdoor watch) Identifier GUID-473708B3-200C-4ADF-BC13-2F1DC729B434 Language EN-US Description Version Revision Changes Changing to navigation in activities instead of Navigate app (consistency). Changing select to press for hard keys, using step conref for first step Status Released Last Modified 06/08/2019 12:13:40...
- Page 174 Courses You can send a course from your Garmin Connect account to your device. After it is saved to your device, you can navigate the course on your device. You can follow a saved course simply because it is a good route. For example, you can save and follow a bike friendly commute to work.
- Page 175 Last Modified 17/06/2020 11:20:27 Author pruekatie Creating a Course on Garmin Connect Before you can create a course on the Garmin Connect app, you must have a Garmin Connect account (Garmin Connect, page 144). 1 From the Garmin Connect app, select 2 Select Training >...
- Page 176 24/05/2019 09:09:10 Author mcdanielm Sending a Course to Your Device You can send a course you created using the Garmin Connect app to your device (Creating a Course on Garmin Connect, page 167). 1 From the Garmin Connect app, select 2 Select Training >...
- Page 177 Title Projecting a Waypoint (Outdoor watch) Identifier GUID-9F043B95-2D8C-472D-9B76-4BE54DB55264 Language EN-US Description Version Revision Changes Reducing steps to add a note to add app instead of making it a step. Changing select to press Status Released Last Modified 06/08/2019 12:13:40 Author gerson Projecting a Waypoint You can create a new location by projecting the distance and bearing from your current location to a new...
- Page 178 Title Customizing Navigation Data Screens Identifier GUID-D16AC8E8-8748-4EF7-AAB7-F4EDE3EB9C40 Language EN-US Description Version 5.1.2 Revision Changes Added a condition to the settings menu. Updated title to match v7. Status Released Last Modified 24/02/2022 15:18:54 Author cozmyer Customizing Navigation Data Screens 1 Hold MENU. 2 Select Navigation >...
- Page 179 Title Setting Navigation Alerts Identifier GUID-D63C6C77-7AC0-4C5F-AA53-44A8C6B1EB9D Language EN-US Description Version Revision Changes No English change. Versioned to fix IT. Status Released Last Modified 07/03/2022 11:34:44 Author pullins Setting Navigation Alerts You can set alerts to help you navigate to your destination. 1 Hold MENU.
- Page 180 5 Select During Sleep to enable the battery saver feature during your normal sleep hours. TIP: You can set your normal sleep hours in the user settings on your Garmin Connect account. 6 Select Low Battery Alert to receive an alert when the battery is low.
- Page 181 Title Customizing Power Modes Identifier GUID-A98507AE-C8FE-4CE7-A441-417DEAC99C65 Language EN-US Description Version Revision Changes Add Settings menu with condition. Status Released Last Modified 17/06/2020 11:21:04 Author pruekatie Customizing Power Modes Your device comes preloaded with several power modes, allowing you to quickly adjust system settings, activity settings, and GPS settings to extend battery life during an activity.
- Page 182 The Every Second recording option provides more detailed activity recordings, but may not record entire activities that last for longer periods of time. USB Mode: Sets the watch to use mass storage mode or Garmin mode when connected to a computer. Reset: Allows you to reset user data and settings (Resetting All Default Settings, page 193).
- Page 183 Title Time Settings (Outdoor watch) Identifier GUID-6895B03A-4D1B-47CC-B0AB-9330A8A031E1 Language EN-US Description Version Revision Changes Removed Settings menu. MARQ/fenix 6 going forward. Use previous version to support older products. Status Released Last Modified 06/08/2019 12:13:40 Author gerson Time Settings Hold MENU, and select System > Time. Time Format: Sets the device to show time in a 12-hour, 24-hour, or military format.
- Page 184 Syncing the Time Each time you turn on the device and acquire satellites or open the Garmin Connect app on your paired phone, the device automatically detects your time zones and the current time of day. You can also manually sync the time when you change time zones, and to update for daylight saving time.
- Page 185 Title Customizing the Hot Keys (fenix 6) Identifier GUID-9122383D-6612-460E-BFD0-D2A43BAA979C Language EN-US Description Version Revision Changes Updated to button. A little awkward since the feature is called hot key. Status Released Last Modified 22/12/2021 13:28:36 Author cozmyer Customizing the Hot Keys You can customize the hold function of individual buttons and combinations of buttons.
- Page 186 You can sync activities and performance measurements from other Garmin devices to your Descent G1 watch using your Garmin Connect account. This allows your watch to more accurately reflect your training status and fitness. For example, you can record a ride with an Edge device, and view your activity details and overall training load on your Descent G1 watch.
- Page 187 Title Viewing Regulatory and Compliance Information Identifier GUID-E9341B2A-C519-47C1-849F-8CC7876C4E6D Language EN-US Description Version Revision Changes Removed Settings menu. MARQ/fenix 6 going forward. Use previous version to support older products. Back under system menu. Status Released Last Modified 26/02/2019 12:52:39 Author gerson Viewing E-label Regulatory and Compliance Information The label for this device is provided electronically.
- Page 188 Title Device Information Identifier GUID-95E6980D-690A-495F-9303-4F2F7E59ED9E Language EN-US Description Title and warning only. No index entries. Version Revision Changes Removed "Delta" from topic title. Status Released Last Modified 22/04/2017 22:13:20 Author jhenson Device Information Title Charging the Watch (pinch-style clip no glyphs) Identifier GUID-C617A48D-E819-4A5D-9975-2D14FD470656 Language...
- Page 189 Title Solar Charging Identifier GUID-675E0F57-BB83-453D-8C2E-AF8922754FD2 Language EN-US Description Version Revision Changes Adding conditioned note specifying feature does not apply to all models. Status Released Last Modified 10/02/2022 10:11:44 Author burzinskititu Solar Charging NOTE: This feature is not available on all models. The solar charging capability of the watch allows you to charge your watch while you use it.
- Page 190 Wireless frequencies 13.56 MHz @ -30 dBm maximum The device withstands pressure equivalent to a depth of 100 m. For more information, go to www.garmin.com/waterrating. Designed to comply with CSN EN 13319. Aside from normal wear and tear, performance is not affected by aging.
- Page 191 Title Battery Information (Descent G1) Identifier GUID-AA042E93-E12A-456C-85B7-6E58EEDD6DCD Language EN-US Description Version Revision Changes Updated updated battery specs. Status Released Last Modified 04/03/2022 15:17:31 Author cozmyer Battery Life Information The actual battery life depends on the features enabled on your watch, such as activity tracking, wrist-based heart rate, phone notifications, GPS, internal sensors, and connected sensors (Tips for Maximizing the Battery Life, page...
- Page 192 Corrosion can prevent charging and data transfer. 1 Wipe the watch using a cloth dampened with a mild detergent solution. 2 Wipe it dry. After cleaning, allow the watch to dry completely. TIP: For more information, go to www.garmin.com/fitandcare. Device Information...
- Page 193 Title Changing the QuickFit Bands (OM) Identifier GUID-FDFEAE9D-7E96-4AC8-801A-AA216768B592 Language EN-US Description Version Revision Changes Status Released Last Modified 22/04/2017 22:46:02 Author gerson Changing the QuickFit Bands ® 1 Slide the latch on the QuickFit band, and remove the band from the watch. 2 Align the new band with the watch.
- Page 194 Title Changing the Spring Bar Bands Identifier GUID-2E224202-DE25-4855-9F47-743ABCE87392 Language EN-US Description Version Revision Changes Updated variables and some terminology so this will also work for the G1. Status Released Last Modified 10/02/2022 13:04:33 Author cozmyer Changing the Spring Bar Bands You can replace the bands with new Descent G1 bands or compatible QuickFit 22 bands.
- Page 195 NOTE: Make sure the band is secure. The latch should close over the watch pin. 4 Repeat the steps to change the other band. Title Data Management Identifier GUID-C28FB1E8-EE56-4BC2-9417-B89FF53612A7 Language EN-US Description Version Revision Changes Status Released Last Modified 22/04/2017 22:58:25 Author wiederan Data Management...
- Page 196 If you do not know the purpose of a file, do not delete it. Your device memory contains important system files that should not be deleted. 1 Open the Garmin drive or volume. 2 If necessary, open a folder or volume.
- Page 197 (System Settings, page 174). On your computer, install Garmin Express (www.garmin.com/express). On your phone, install the Garmin Connect app. This provides easy access to these services for Garmin devices: • Software updates • Course updates • Data uploads to Garmin Connect •...
- Page 198 You can find more information about this product on the Garmin website. • Go to support.garmin.com for additional manuals, articles, and software updates. • Go to buy.garmin.com, or contact your Garmin dealer for information about optional accessories and replacement parts. • Go to www.garmin.com/ataccuracy for information about feature accuracy.
- Page 199 • Remove your watch from the Garmin Dive app and the Bluetooth settings on your phone to retry the pairing process. • If you bought a new phone, remove your watch from the Garmin Dive app on the phone you intend to stop using.
- Page 200 Can I use my Bluetooth sensor with my watch? The device is compatible with some Bluetooth sensors. The first time you connect a sensor to your Garmin device, you must pair the device and sensor. After they are paired, the device connects to the sensor automatically when you start an activity and the sensor is active and within range.
- Page 201 • To reset all of the device settings to the factory default values and delete all user-entered information and activity history, select Delete Data and Reset Settings. NOTE: If you have set up a Garmin Pay wallet, this option deletes the wallet from your device. Troubleshooting...
- Page 202 Title Diving Identifier GUID-FF7B29B4-4E81-41C3-A42C-D28C88E516CF Language EN-US Description Version Revision Changes Status Released Last Modified 21/09/2017 12:01:00 Author cozmyer Diving Title Resetting Your Tissue Load Identifier GUID-192A9298-5D5B-46FF-A2FF-28A020ABCB71 Language EN-US Description Version Revision Changes No English Change. Versioned to fix NL Status Released Last Modified 20/05/2021 13:20:40...
- Page 203 Identifier GUID-475E6349-9762-452A-B5B0-43AD12F8F68A Language EN-US Description Version Revision Changes Adding in xref to "What is GPS" page on garmin.com Status Released Last Modified 06/03/2018 08:46:04 Author mcdanielm Acquiring Satellite Signals The device may need a clear view of the sky to acquire satellite signals. The time and date are set automatically based on the GPS position.
- Page 204 ◦ Connect your watch to a computer using the USB cable and the Garmin Express application. ◦ Sync your watch to the Garmin Dive app using your Bluetooth enabled phone. While connected to your Garmin account, the watch downloads several days of satellite data, allowing it to quickly locate satellite signals.
- Page 205 Title My daily step count does not appear Identifier GUID-7353AAAB-13AA-4BCB-9105-9214FF8E08D7 Language EN-US Description Version Revision Changes Status Released Last Modified 22/04/2017 23:01:25 Author gerson My daily step count does not appear The daily step count is reset every night at midnight. If dashes appear instead of your step count, allow the device to acquire satellite signals and set the time automatically.
- Page 206 145). 2 Wait while the device syncs your data. Syncing can take several minutes. NOTE: Refreshing the Garmin Connect app or the Garmin Express application does not sync your data or update your step count. Title The floors climbed amount does not seem accurate...
- Page 207 NOTE: Not all data fields are available for all activity types. Some data fields require ANT+ or Bluetooth accessories to display data. Some data fields appear in more than one category on the watch. TIP: You can also customize the data fields from the watch settings in the Garmin Connect app. Cadence Fields...
- Page 208 Name Description Heading The direction you are moving. Distance Fields Name Description Distance The distance traveled for the current track or activity. Int. Distance The distance traveled for the current interval. Lap Distance The distance traveled for the current lap. Last Lap Dist.
- Page 209 Elevation Fields Name Description Avg. Ascent The average vertical distance of ascent since the last reset. Avg. Descent The average vertical distance of descent since the last reset. Elevation The altitude of your current location above or below sea level. Glide Ratio The ratio of horizontal distance traveled to the change in vertical distance.
- Page 210 Heart Rate Fields Name Description The percentage of heart rate reserve (maximum heart rate minus resting heart %HRR rate). Aerobic TE The impact of the current activity on your aerobic fitness level. Anaerobic TE The impact of the current activity on your anaerobic fitness level. The average percentage of heart rate reserve (maximum heart rate minus resting Avg.
- Page 211 Name Description Move % Heart Rate The average percentage of heart rate reserve (maximum heart rate minus resting Reserve heart rate) for the current move. Move Heart Rate The average heart rate in the current move. Move Heart Rate %Max. The average percentage of maximum heart rate for the current move.
- Page 212 Name Description The speed at which you are closing on a destination along a route. You must be navi gating for this data to appear. The elevation distance between your current position and the final destination. You must V Dist to Dest be navigating for this data to appear.
- Page 213 Pace Fields Name Description 500m Pace The current rowing pace per 500 meters. Avg. 500m Pace The average rowing pace per 500 meters for the current activity. Average Pace The average pace for the current activity. Int. Pace The average pace for the current interval. Lap 500m Pace The average rowing pace per 500 meters for the current lap.
- Page 214 Power Fields Name Description % FTP The current power output as a percentage of functional threshold power. 3s Avg. Balance The 3-second moving average of the left/right power balance. 3s Avg. Power The 3-second moving average of power output. 10s Avg Balance The 10-second moving average of the left/right power balance. 10s Avg.
- Page 215 Name Description The Normalized Power for the current activity. The measurement of how evenly a rider is applying force to the pedals throughout each Pedal Smooth. pedal stroke. The platform center offset. Platform center offset is the location on the pedal platform where force is applied.
- Page 216 Run Dynamics Name Description Avg. GCT Bal. The average ground contact time balance for the current session. Avg GCT The average amount of ground contact time for the current activity. Avg. Stride Len. The average stride length for the current session. Avg.
- Page 217 Speed Fields Name Description Avg. Moving Speed The average speed when moving for the current activity. Avg. Overall Speed The average speed for the current activity, including both moving and stopped speeds. Avg. Speed The average speed for the current activity. The average speed of travel in knots for the current activity, regardless of the course Avg.
- Page 218 Stroke Fields Name Description Avg Dist Per Stk Swimming. The average distance traveled per stroke during the current activity. Avg Dist Per Stk Paddle sports. The average distance traveled per stroke during the current activity. Avg. Strk Rate Paddle sports. The average number of strokes per minute (spm) during the current activity. Avg.
- Page 219 Swolf Fields Name Description The average swolf score for the current activity. Your swolf score is the sum of the time for Average Swolf one length plus the number of strokes for that length (Swim Terminology, page 44). In open water swimming, 25 meters is used to calculate your swolf score.
- Page 220 Garmin has researched many runners of all different levels. The data values in the red or orange zones are typical for less experienced or slower runners. The data values in the green, blue, or purple zones are typical for more experienced or faster runners.
- Page 221 Elite runners tend to have quick and balanced strides. You can watch the gauge or data field during your run or view the summary on your Garmin Connect account after your run. As with the other running dynamics data, ground contact time balance is a quantitative measurement to help you learn about your running form.
- Page 222 Vertical Oscillation and Vertical Ratio Data NOTE: In the Garmin Connect activity, the running dynamics data displays as colored graphs. The data ranges for vertical oscillation and vertical ratio are slightly different depending on the sensor and whether it is positioned at the chest (HRM-Pro, HRM-Run , or HRM-Tri accessories) or at the waist (Running ™...
- Page 223 Title VO2 Max. Standard Ratings Identifier GUID-1FBCCD9E-19E1-4E4C-BD60-1793B5B97EB3 Language EN-US Description Version Revision Changes Status Released Last Modified 22/04/2017 23:06:07 Author wiederan VO2 Max. Standard Ratings These tables include standardized classifications for VO2 max. estimates by age and gender. Males Percentile 20–29 30–39 40–49...
- Page 224 Title FTP Ratings Identifier GUID-1F58FA8E-09FF-4E51-B9B4-C4B83ED1D6CE Language EN-US Description Version Revision Changes Status Released Last Modified 22/04/2017 20:23:56 Author gerson FTP Ratings These tables include classifications for functional threshold power (FTP) estimates by gender. Males Watts per Kilogram (W/kg) Superior 5.05 and greater Excellent From 3.93 to 5.04 Good...
- Page 225 Title Wheel Size and Circumference Identifier GUID-DB0BC20A-DADF-41EB-A61C-14BEC158B43C Language EN-US Description Version Revision Changes Fixed 700x30C value. Updated intro sentence and table (removed child sizes, added more standard sizes). More comparable with competitor tables. Status Released Last Modified 10/04/2018 10:33:33 Author cozmyer Wheel Size and Circumference Your speed sensor automatically detects your wheel size.
- Page 226 Tire Size Wheel Circumference (mm) 26 × 1-3/8 2068 26 × 2.10 2068 26 × 2.125 2070 26 × 2.35 2083 26 × 1-1/2 2100 26 × 3.00 2170 27 × 1 2145 27 × 1-1/8 2155 27 × 1-1/4 2161 27 ×...
- Page 227 Tire Size Wheel Circumference (mm) 700 × 47C 2268 Title Symbol Definitions Identifier GUID-18FC4FDE-9DC7-4375-8311-C322ADEA03B2 Language EN-US Description Required for IEC 60950 device certifications. No index entries. Include conditions in pub for each symbol that appears on your device or included accessories. Version Revision Changes...
- Page 228 March 2022 GUID-2A58ED2A-14A3-4161-ADB5-259E1781AF1B v2...