Table of Contents
Advertisement
Quick Links
VICTOR COMPANY OF JAPAN, LIMITED
VIDEO DIVISION
SERVICE MANUAL
GR-DV3000A/EA/ED/EG/EK/SH
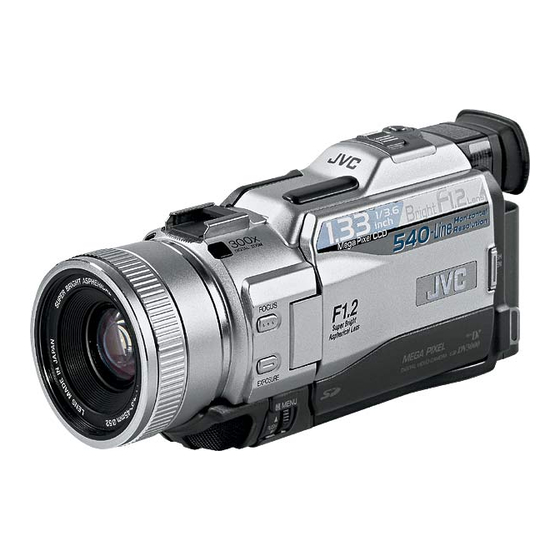
SPECIFICATIONS
Power supply
: DC 6.3 V
Power consumption
LCD monitor off, viewfinder on : Approx. 4.3 W
LCD monitor on, viewfinder off : Approx. 5.4 W
Dimensions (W x H x D)
: 76 mm x 90 mm x 194 mm
Weight
: Approx. 660 g (without cassette, memory card and battery)
Operating temperature
: 0°C to 40°C
Operating humidity
: 35% to 80%
Storage temperature
: –20°C to 50°C
Pickup
: 1/3.6" CCD
Lens
: F 1.2, f = 4.5 mm to 45 mm, 10:1 power zoom lens
Filter diameter
: ø52 mm
LCD monitor
: 3.5" diagonally measured, LCD panel/TFT active matrix system
Viewfinder
: Electronic viewfinder with 0.44" colour LCD
Speaker
: Monaural
Format
: DV format (SD mode)
Signal format
: PAL standard
Recording/Playback format
: Video: Digital component recording
: Audio: PCM digital recording, 32 kHz 4-channel (12-bit),
Cassette
: Mini DV cassette
Tape speed
: SP: 18.8 mm/s
Maximum recording time
: SP: 80 min.
(using 80 min. cassette)
Digital Still Camera Function
Storage media
: SD Memory Card/MultiMediaCard
Compression system
: Still image
File size
: Still image
Picture quality
: 2 modes (FINE/STANDARD)
Approximate number of storable images
(with the provided memory card [8 MB])
FINE
: 32 (640 x 480 pixels), 14 (1024 x 768 pixels),
S40894
STANDARD
: 110 (640 x 480 pixels), 46 (1024 x 768 pixels),
For other memory cards,
pg. 17.
Printed in Japan
DIGITAL VIDEO CAMERA
(The specifications shown pertain specifically to the model GR-DV3000EG/EK)
Camcorder
AV
General
Video output
Video input
Audio output
(Using AC Power Adapter/Charger)
Audio input
DC 7.2 V
(Using battery pack)
DV
Input/output
PHONE
Headphone output
PRINTER
(with the LCD monitor closed and the viewfinder pushed back in,
without the lens hood)
Approx. 740 g (incl. cassette, memory card and battery)
AC Power Adapter/Charger AA-V40EG or AA-V40EK
Power requirement
Power consumption
Output
Charge
VTR
Dimensions (W x H x D)
Weight
AA-V40EG
Digital Video Camera
AA-V40EK
48 kHz 2-channel (16-bit)
Dimensions (W x H x D)
LP: 12.5 mm/s
Weight
LP: 120 min.
USB
S-VIDEO
: JPEG (compatible)
Output
Moving image : MPEG4 (compatible)
: 4 modes (1600 x 1200 pixels, 1280 x 960 pixels,
Input
1024 x 768 pixels, 640 x 480 pixels)
Moving image : 2 modes (240 x 176 pixels, 160 x 120 pixels)
EDIT
Specifications shown are for SP mode unless otherwise indicated. E & O.E. Design and
9 (1280 x 960 pixels), 6 (1600 x 1200 pixels)
specifications subject to change without notice.
30 (1280 x 960 pixels), 20 (1600 x 1200 pixels)
This service manual is printed on 100% recycled paper.
COPYRIGHT © 2002 VICTOR COMPANY OF JAPAN, LTD.
Connectors
: 1 V (p-p), 75 Ω, analogue
: 0.5 V (p-p) – 2.0 V (p-p), 75 Ω, analogue
: 300 mV (rms), 1 kΩ, analogue, stereo
: 300 mV (rms), 50 kΩ, analogue, stereo
: 4-pin, IEEE 1394 compliant
: ø3.5 mm, stereo
: For an optional video printer equipped with a PRINT DATA
connector
: AC 110 V to 240 V`, 50 Hz/60 Hz
: 23 W
: DC 7.2 V
, 1.2 A
: DC 6.3 V
, 1.8 A
: 68 mm x 38 mm x 110 mm
: Approx. 260 g
: Approx. 340 g
Jack Box CU-V504U
General
: 37.5 mm x 18.5 mm x 55 mm
: Approx. 30 g
Connectors
: TYPE B
: Y: 1 V (p-p), 75 Ω, analogue
C: 0.29 V (p-p), 75 Ω, analogue
: Y: 0.8 V (p-p) – 1.2 V (p-p), 75 Ω, analogue
C: 0.2 V (p-p) – 0.4 V (p-p), 75 Ω, analogue
: ø3.5 mm, 2-pole
No. 86666
January 2002
Advertisement
Table of Contents

Related Manuals for JVC GR-DV3000A


Summary of Contents for JVC GR-DV3000A
- Page 1 SERVICE MANUAL DIGITAL VIDEO CAMERA GR-DV3000A/EA/ED/EG/EK/SH SPECIFICATIONS (The specifications shown pertain specifically to the model GR-DV3000EG/EK) Camcorder Connectors General : 1 V (p-p), 75 Ω, analogue Video output : 0.5 V (p-p) – 2.0 V (p-p), 75 Ω, analogue Video input Audio output : 300 mV (rms), 1 kΩ, analogue, stereo...
-
Page 2: Table Of Contents
FE SW BOARD ASSEMBLY <11> .......... 5-23 FRONT BOARD ASSEMBLY <12> ......... 5-23 VF BL BOARD ASSEMBLY <13> ..........5-23 The following table lists the differing points between Models GR-DV3000EG, GR-DV3000EK, GR-DV3000EA, GR-DV3000A, GR-DV3000SH and GR-DV3000ED in this serise. GR-DV3000EG... - Page 3 Important Safety Precautions Prior to shipment from the factory, JVC products are strictly inspected to conform with the recognized product safety and electrical codes of the countries in which they are to be sold. However, in order to maintain such compliance, it is equally important to implement the following precautions when a set is being serviced.
- Page 4 • Safety Check after Servicing Examine the area surrounding the repaired location for damage or deterioration. Observe that screws, parts and wires have been returned to original positions, Afterwards, perform the following tests and confirm the specified values in order to verify compliance with safety standards.
-
Page 5: Disassembly
SECTION 1 DISASSEMBLY 1.1 BEFORE ASSEMBLY AND DISASSEMBLY 1.1.4 Disconnection of Connectors (Wires) 1.1.1 Precautions Connector Pull both ends of the connector in the arrow direction, re- 1. Be sure to remove the power supply unit prior to mount- move the lock and disconnect the flat wire. ing and soldering of parts. -
Page 6: Jigs And Tools Required For Disassembly, Assembly And Adjustment
1.2 JIGS AND TOOLS REQUIRED FOR DISASSEMBLY, 1.3 DISASSEMBLY/ASSEMBLY OF CABINET PARTS ASSEMBLY AND ADJUSTMENT AND BOARD ASSEMBLY 1.2.1 Tools required for adjustments 1.3.1 Disassembly flow chart This flowchart indicates the disassembly step for the cabi- Torque driver YTU94088 YTU94088-003 net parts and board assembly in order to gain access to item(s) to be serviced. -
Page 7: Disassembly Method
1.3.2 Disassembly method NOTE a: Open the cassette cover after removing the STEP Fig.No. PART POINT NOTE screws. ZOOM OPE UNIT Fig.1-3-1 3(S1),(L1a),5(L1b),CN1a NOTE b: Be sure to confirm the position of the screws. FRONT COVER Fig.1-3-2a CN2a,CN2b,2(S2a),(S2b), NOTE2a NOTE c: Be careful not to damage the FPC when unplug- ASSY (S2c),(S2d),2(S2e),CN2c... - Page 8 JUNCTION BOARD ASSY NOTE FE SW BOARD ASSY NOTE FRONT BOARD ASSY WIRERING WIRE Fig. 1-3-1 Fig. 1-3-2b NOTE NOTE NOTE NOTE NOTE (BOTTOM) NOTE NOTE Fig. 1-3-2a...
- Page 9 SHOE ASSY FOCUS UNIT SW FPC UNIT COVER (MENU) MICROPHONE Fig. 1-3-2c NOTE 3 b NOTE 3 b NOTE 3 b NOTE 3 c NOTE 3 a NOTE 3 a (BOTTOM) NOTE 3 c Fig. 1-3-3...
- Page 10 NOTE 4 Fig. 1-3-4 Fig. 1-3-6 NOTE 7 NOTE 5 Fig. 1-3-5 Fig. 1-3-7...
- Page 11 Fig. 1-3-8 Fig. 1-3-9 NOTE NOTE CN407 NOTE CN403 SHIELD COVER (PRE/REC) ∗ ∗ ∗ ∗ ∗ NOTE BKT (MECHA) ASSY ∗ : 0.069 N • m (0.7 kgf • Fig. 1-3-10...
-
Page 12: Precautions
1.4 DISASSEMBLY OF THE OP BLOCK AND CCD 1.4.3 How to install BOARD ASSEMBLIES 1. With the spacer rubbers attached to the CCD base, 1.4.1 Precautions mount the CCD base in the OP Block Assembly and tighten them together using the two screws (1, 2). 1. -
Page 13: Vf(Color)
E.VF(COLOR) 1.5.1. Disassembly/Assembly of the E.VF(COLOR) 1. Remove the two screws (1 and 2) and then remove the EYE CUP. 2. Remove the two screws (3 and 4). 3. Pull out the VF assembly and then remove the three screws (5 to 7) to release the FPC ASSY. 4. -
Page 14: Disassembly/Assembly Of The 7 E.vf(Color)
1.6 DISASSEMBLY/ASSEMBLY OF THE MONITOR a: Be careful not to damage the FPC or the connec- Note ASSEMBLY tor when removing the Monitor Cover Assembly. Note b: Be careful not to damage the parts when remov- 1.6.1 Monitor Assembly and Hinge Assembly ing or mounting the Hinge Assembly. -
Page 15: Manual Ejection Of The Cassette Tape
1.7 MANUAL EJECTION OF THE CASSETTE TAPE 4. In order to change the mechanism mode at the unload- Note: The following procedure describes a simplified method ing end apply 3 V, DC to the electrode on the top sur- of ejecting the cassette tape in case it is not possible face of the Loading Motor Assembly and then set it to to eject it, due to an electrical failure. -
Page 16: Emergency Display
1.8 EMERGENCY DISPLAY Whenever some abnormal signal is input to the syscon Example (in case of the error number E01): CPU, an error number (E01, as an example) is displayed on the LCD monitor or (in the electronic view finder). In every error status, such the message as shown below alternately appear over and over. -
Page 17: Service Note
1.9 SERVICE NOTE 1-13... -
Page 18: Mechanism Adjustment
SECTION 2 MECHANISM ADJUSTMENT 2.1 PRELIMINARY REMARKS ON ADJUSTMENT AND (3) The symbol (T or B)appearing in this column shows the REPAIR side which the objective part is mounted on. T =the upper side, B =the lower side 2.1.1 Precautions (4) Symbols appearing in this column indicate drawing 1. -
Page 19: Jigs And Tools Required For Disassembly, Assembly And Adjustment
2.2 JIGS AND TOOLS REQUIRED FOR DISASSEMBLY, ASSEMBLY AND ADJUSTMENT 2.2.1 Tools required for adjustments 1. Torque driver Torque driver YTU94088 YTU94088-003 Be sure to use to fastening the mechanism and exterior parts because those parts must strictly be controlled for tightening torque. -
Page 20: Disassembly/Assembly Of Mechanism Assembly
2.3 DISASSEMBLY/ASSEMBLY OF MECHANISM AS- 2.3.2 Explanation of mechanism mode SEMBLY The mechanism mode of this model is classified into five 2.3.1 General statement modes as shown in Table 2-3-1. Each mechanism mode can be distinguished from others by the relative position The mechanism should generally be disassembled/assem- of “... -
Page 21: Mechanism Timing Chart
2.3.3 Mechanism timing chart MODE SHORT TU. P. B SLIDE TU. P. B SLIDE RELEASE EJECT CAS. IN START START STOP PLAY PARTS MAIN CAM -12.40° 0° (22.44°) 58.71° (69.53°) (80.5°) (150.58°) (153.5°) 177.79° 212.77° 243.94° SUB CAM -16.97° 0° (30.71°) 80.34°... -
Page 22: Disassembling Procedure Table
2.4 DISASSEMBLING PROCEDURE TABLE MARK: After assembly, perform adjustments. PART NAME FIG. POINT NOTE REMARKS CASSETTE HOUSING ASSY Fig.2-4-3 ),(L a)-(L NOTE a,b,c,d ADJUSTMENT UPPER BASE ASSY Fig.2-4-4 ),(L a),(L NOTE DRUM ASSY a),2(S NOTE REEL DISK ASSY(SUP) Fig.2-4-5 NOTE REEL DISK ASSY(TU) NOTE REEL COVER ASSY... - Page 23 < TOP VIEW > 24 27 36 35 Fig. 2-4-1 < BOTTOM VIEW > 31 16 Fig. 2-4-2...
-
Page 24: Disassembly/Assembly
2.4.1 Disassembly/assembly CASSETTE HOUSING ASSY NOTE NOTE Be careful not to damage any of the parts during work. NOTE NOTE NOTE Special care is required in mounting. NOTE NOTE LOCK When mounting, the CASSETTE NOTE LEVER HOUSING ASSY should be at- NOTE tached in the Eject status. - Page 25 REEL DISK ASSY(SUP) REEL DISK ASSY(TU) REEL COVER ASSY NOTE NOTE Be careful not to attach the REEL DISK wrongly. The Sup- NOTE ply side can be identified by the white color at the center. NOTE NOTE REEL DISK ASSY Be careful not to attach the REEL DISK wrongly.
- Page 26 SLIDE DECK ASSY NOTE Each of the parts on the SLIDE DECK ASSY can be re- placed separately. When detaching the assembly, if there is no need to replace any of its parts, remove the SLIDE DECK ASSY as it is. NOTE When mounting, pay attention to the positions of the ¤...
- Page 27 TENSION CTL LEVER ASSY CENTER GEAR & PINCH ROLLER ARM F. ASSY TENSION CTL PLATE ASSY BRAKE CTL LEVER ASSY NOTE NOTES When mounting, pay attention to the correct positioning. NOTE NOTE NOTE (TOP) NOTE (BOTTOM) NOTE NOTES When mounting, pay atten- &...
- Page 28 fl BASE R ASSY ‡ ROTARY ENCODER ° GEAR COVER ASSY · MAIN CAM ASSY NOTE fl NOTE NOTE When mounting, fold the sliding part to the inner side. ‡ NOTE NOTE When mounting, pay attention to the correct positioning and the FPC layout.
- Page 29 ∞ DRUM BASE ASSY § CAPSTAN MOTOR ¶ MAIN DECK ASSY ∞ § NOTES When detaching, remove them together and then separate § from ∞ a. ∞ NOTE When mounting, attach the DRUM BASE ASSY so that the screw hole is located at the center of the ellipse. NOTE NOTE NOTE...
-
Page 30: List Of Procedures For Disassembly
2.4.2 List of procedures for disassembly Fig. 2-4-13 2-13... -
Page 31: Checkup And Adjustment Of Mechanism Phase
2.5 CHECKUP AND ADJUSTMENT OF MECHANISM PHASE MODE GEAR ROTARY ENCODER Align the MODE GEAR with the Main Deck Mount the ROTARY ENCODER by aligning its mark ( Assembly hole. and the mark ( ) of the Main Deck Assembly. Note: Note: Be careful when handling the FPC during mounting. -
Page 32: Mechanism Adjustments
2.6 MECHANISM ADJUSTMENTS 2.6.1 Adjustment of the slide guide plate Use Fig. 2-6-1 as the reference unless otherwise specified. 1. Set the PLAY mode. See Fig. 2-3-8. 2. Loosen the screws ( A , B ). 3. With the Main Deck and Slide Deck Assemblies pushed into the unit, tighten the screws ( A , B ) while applying pressure to the stud (shaft) on the Slide Guide plate. -
Page 33: Adjustment Of The Tension Arm And Pad Arm Assemblies
2.6.2 Adjustment of the Tension Arm and Pad Arm As- 2.6.3 Adjustment of the Slide Lever 2 semblies Use Fig. 2-6-3 as the reference unless otherwise specified. Use Fig. 2-6-2 as the reference unless otherwise specified. 1. Set the C IN mode. 1. -
Page 34: Service Note
2.7 SERVICE NOTE Use the following chart to manage mechanism parts that are removed for disassembling the mechanism. Fig. Fig. CASSETTE HOUSING ASSY UPPER BASE ASSY Fig. Fig. REEL DISK ASSY(SUP) REEL COVER ASSY DRUM ASSY REEL DISK ASSY(TU) Fig. TENSION ARM ASSY SLANT POLE ARM ASSY TU ARM ASSY... - Page 35 Fig. PINCH ROLLER TENSION BRAKE CTL TENSION CTL CENTER GEAR ARM F. ASSY CTL PLATE LEVER LEVER ASSY ASSY ASSY Fig. MOTOR GUIDE SLIDE LEVER 2 LOADING BRACKET RAIL ASSY ASSY PLATE ASSY ASSY MODE GEAR EJECT LEVER Fig. BASE R ASSY ROTARY GEAR COVER MAIN CAM ASSY...
-
Page 36: Jig Connector Cable Connection
2.8 JIG CONNECTOR CABLE CONNECTION Remove one screw (1) first and the cover (JIG) next. COMMUNICATION CABLE JIG CONNECTOR to 8 pin ( JLIP_RX ) to 9 pin JACK BOX WHITE ( JLIP_TX ) to 5 or 23 pin BLACK ( GND ) COVER CN107... -
Page 37: Tape Pattern Check
2.8.1 Tape pattern check (1) Play back the compatibility adjustment tape. (2) While triggering the MAIN CN107-10PIN (HID1), ob- CN107 serve the waveform of CN107-26PIN (ENV_OUT). (ENV_OUT) (3) Confirm that the waveform is free from remarkable level-down, and entirely parallel and straight. Moreover, perform the following adjustment as re- CN107 quired. -
Page 38: Electrical Adjustment
SECTION 3 ELECTRICAL ADJUSTMENT 3.1 PRECAUTION 3. Tools required for adjustments 1. Precaution Torque driver YTU94088 YTU94088-003 Both the camera and deck sections of this model needs a personal computer for adjustment except simple adjustment with potentiometers. If some of the following parts is replaced for repair or other reason, the repaired set must be adjusted with a personal computer. -
Page 39: Setup
Torque driver PC cable Be sure to use to fastening the mechanism and exte- To be used to connect the VideoMovie and a personal rior parts because those parts must strictly be control- computer with each other when a personal computer led for tightening torque. -
Page 40: Monitor Adjustment
3.3 MONITOR ADJUSTMENT 3.4 ELECTRONIC VIEWFINDER (E.VF) ADJUSTMENT Notes : Unless otherwise specified, all measurement points Notes : Unless otherwise specified, all measurement points and adjustment parts are located on MONITOR and adjustment parts are located on MONITOR board. board. 3.3.1 PLL (MONI) 3.4.1 PLL (VF) •... -
Page 41: Packing And Accessory Assembly
LYT0884-006A INST.BOOK(PRINTER.SP),A LYT0939-015A INST.BOOK(PRINTER.GE),A,C,G LYT0939-016A INST.BOOK(PRINTER.DU),A MODEL MARK LYT0939-017A INST.BOOK(PRINTER.IT),A GR-DV3000EG-X LYT0939-018A INST.BOOK(PRINTER.DA),G LYT0939-019A INST.BOOK(PRINTER.FI),G GR-DV3000EK FINAL ASSY LYT0939-020A INST.BOOK(PRINTER.SW),G GR-DV3000A <M2> LYT0939-021A INST.BOOK(PRINTER.NO),G LYT0972-005A INST.BOOK(PRINTER.CH),C,E,F GR-DV3000EA LYT0972-006A INST.BOOK(PRINTER.RU),C,E,F GR-DV3000ED LYT0972-007A INST.BOOK(PRINTER.AR),C LYT0883-002A INST.BOOK(SOFT.GE),A,C,G GR-DV3000SH LYT0883-004A INST.BOOK(SOFT.DU),A GR-DV3000EG-Y LYT0883-006A INST.BOOK(SOFT.IT),A LYT0883-007A INST.BOOK(SOFT.DA),G... - Page 42 FINAL ASSEMBLY <M2> ELECTRONIC VIEWFINDER 101A <M4> 101E 216E 216C 101F JACK 101G 101C 216E <07> 101D 101G 101B 101B 121A 216D RATING LABEL <05> 216A 216B 121A 251G 231A 251G <10> 231A 121B EJECT <08> 251F MECHANISM 251E <M3> 251D 143A PRE/MDA...
- Page 43 REF No. PART No. PART NAME, DESCRIPTION REF No. PART No. PART NAME, DESCRIPTION - - - - - - - - - - - - - - - - - - - - - - - - - - - - - - - - - - - - - - - - - - - - - - - - - - - - - - - - - - - - - - - - - - - - - - - - - - - - - - - - - - - - - - - - - - - - - - - - - - - - - - - - - - - - - - - - - - - - - - - - - - - - - - - - - - - -...
- Page 44 MECHANISM ASSEMBLY <M3> 436B 436B 436A Classification Part No. Symbol in drawing Grease KYODO-SH-JB NOTE:The section marked in AA and BB, CC indicate YTU94027 lubrication and greasing areas. Grease RX-410R (HANARL)
-
Page 45: Mechanism Assembly
REF No. PART No. PART NAME, DESCRIPTION REF No. PART No. PART NAME, DESCRIPTION - - - - - - - - - - - - - - - - - - - - - - - - - - - - - - - - - - - - - - - - - - - - - - - - - - - - - - - - - - - - - - - - - - - - - - - - - - - - - - - - - - - - - - - - - - - - - - - - - - - - - - - - - - - - - - - - - - - - - - - - - - - - - - - - - - - -... -
Page 46: Electronic Viewfinder Assembly
ELECTRONIC VIEWFINDER ASSEMBLY <M4> VF BL <13> REF No. PART No. PART NAME, DESCRIPTION REF No. PART No. PART NAME, DESCRIPTION - - - - - - - - - - - - - - - - - - - - - - - - - - - - - - - - - - - - - - - - - - - - - - - - - - - - - - - - - - - - - - - - - - - - - - - - - - - - - - - - - - - - - - - - - - - - - - - - - - - - - - - - - - - - - - - - - - - - - - - - - - - - - - - - - -... -
Page 47: Monitor Assembly
MONITOR ASSEMBLY <M5> 501A 501B 501G 501C 501F 501D 501E 501E MONITOR <06> 502B 502A REF No. PART No. PART NAME, DESCRIPTION REF No. PART No. PART NAME, DESCRIPTION - - - - - - - - - - - - - - - - - - - - - - - - - - - - - - - - - - - - - - - - - - - - - - - - - - - - - - - - - - - - - - - - - - - - - - - - - - - - - - - - - - - - - - - - - - - - - - - - - - - - - - - - - - -... -
Page 48: Electrical Parts List
ELECTRICAL PARTS LIST REF No. PART No. PART NAME, DESCRIPTION REF No. PART No. PART NAME, DESCRIPTION - - - - - - - - - - - - - - - - - - - - - - - - - - - - - - - - - - - - - - - - - - - - - - - - - - - - - - - - - - - - - - - - - - - - - - - - - - - - - - - - - - - - - - - - - - - - - - - - - - - - - - - - - - - - - - - - - - - - - - - - - - - - - - - - - - - -... - Page 49 REF No. PART No. PART NAME, DESCRIPTION REF No. PART No. PART NAME, DESCRIPTION - - - - - - - - - - - - - - - - - - - - - - - - - - - - - - - - - - - - - - - - - - - - - - - - - - - - - - - - - - - - - - - - - - - - - - - - - - - - - - - - - - - - - - - - - - - - - - - - - - - - - - - - - - - - - - - - - - - - - - - - - - - - - - - - - - - -...
- Page 50 REF No. PART No. PART NAME, DESCRIPTION REF No. PART No. PART NAME, DESCRIPTION - - - - - - - - - - - - - - - - - - - - - - - - - - - - - - - - - - - - - - - - - - - - - - - - - - - - - - - - - - - - - - - - - - - - - - - - - - - - - - - - - - - - - - - - - - - - - - - - - - - - - - - - - - - - - - - - - - - - - - - - - - - - - - - - - - - -...
- Page 51 REF No. PART No. PART NAME, DESCRIPTION REF No. PART No. PART NAME, DESCRIPTION - - - - - - - - - - - - - - - - - - - - - - - - - - - - - - - - - - - - - - - - - - - - - - - - - - - - - - - - - - - - - - - - - - - - - - - - - - - - - - - - - - - - - - - - - - - - - - - - - - - - - - - - - - - - - - - - - - - - - - - - - - - - - - - - - - - -...
- Page 52 REF No. PART No. PART NAME, DESCRIPTION REF No. PART No. PART NAME, DESCRIPTION - - - - - - - - - - - - - - - - - - - - - - - - - - - - - - - - - - - - - - - - - - - - - - - - - - - - - - - - - - - - - - - - - - - - - - - - - - - - - - - - - - - - - - - - - - - - - - - - - - - - - - - - - - - - - - - - - - - - - - - - - - - - - - - - - - - -...
- Page 53 REF No. PART No. PART NAME, DESCRIPTION REF No. PART No. PART NAME, DESCRIPTION - - - - - - - - - - - - - - - - - - - - - - - - - - - - - - - - - - - - - - - - - - - - - - - - - - - - - - - - - - - - - - - - - - - - - - - - - - - - - - - - - - - - - - - - - - - - - - - - - - - - - - - - - - - - - - - - - - - - - - - - - - - - - - - - - - - -...
- Page 54 REF No. PART No. PART NAME, DESCRIPTION REF No. PART No. PART NAME, DESCRIPTION - - - - - - - - - - - - - - - - - - - - - - - - - - - - - - - - - - - - - - - - - - - - - - - - - - - - - - - - - - - - - - - - - - - - - - - - - - - - - - - - - - - - - - - - - - - - - - - - - - - - - - - - - - - - - - - - - - - - - - - - - - - - - - - - - - - -...
-
Page 55: Dsc Board Assembly <02
REF No. PART No. PART NAME, DESCRIPTION REF No. PART No. PART NAME, DESCRIPTION - - - - - - - - - - - - - - - - - - - - - - - - - - - - - - - - - - - - - - - - - - - - - - - - - - - - - - - - - - - - - - - - - - - - - - - - - - - - - - - - - - - - - - - - - - - - - - - - - - - - - - - - - - - - - - - - - - - - - - - - - - - - - - - - - - - -... -
Page 56: Pre/Mda Board Assembly <03
REF No. PART No. PART NAME, DESCRIPTION REF No. PART No. PART NAME, DESCRIPTION - - - - - - - - - - - - - - - - - - - - - - - - - - - - - - - - - - - - - - - - - - - - - - - - - - - - - - - - - - - - - - - - - - - - - - - - - - - - - - - - - - - - - - - - - - - - - - - - - - - - - - - - - - - - - - - - - - - - - - - - - - - - - - - - - - - -... -
Page 57: Junction Board Assembly <04
REF No. PART No. PART NAME, DESCRIPTION REF No. PART No. PART NAME, DESCRIPTION - - - - - - - - - - - - - - - - - - - - - - - - - - - - - - - - - - - - - - - - - - - - - - - - - - - - - - - - - - - - - - - - - - - - - - - - - - - - - - - - - - - - - - - - - - - - - - - - - - - - - - - - - - - - - - - - - - - - - - - - - - - - - - - - - - - -... -
Page 58: Monitor Board Assembly <06
REF No. PART No. PART NAME, DESCRIPTION REF No. PART No. PART NAME, DESCRIPTION - - - - - - - - - - - - - - - - - - - - - - - - - - - - - - - - - - - - - - - - - - - - - - - - - - - - - - - - - - - - - - - - - - - - - - - - - - - - - - - - - - - - - - - - - - - - - - - - - - - - - - - - - - - - - - - - - - - - - - - - - - - - - - - - - - - -... - Page 59 REF No. PART No. PART NAME, DESCRIPTION REF No. PART No. PART NAME, DESCRIPTION - - - - - - - - - - - - - - - - - - - - - - - - - - - - - - - - - - - - - - - - - - - - - - - - - - - - - - - - - - - - - - - - - - - - - - - - - - - - - - - - - - - - - - - - - - - - - - - - - - - - - - - - - - - - - - - - - - - - - - - - - - - - - - - - - - - -...
-
Page 60: Jack Board Assembly <07
REF No. PART No. PART NAME, DESCRIPTION REF No. PART No. PART NAME, DESCRIPTION - - - - - - - - - - - - - - - - - - - - - - - - - - - - - - - - - - - - - - - - - - - - - - - - - - - - - - - - - - - - - - - - - - - - - - - - - - - - - - - - - - - - - - - - - - - - - - - - - - - - - - - - - - - - - - - - - - - - - - - - - - - - - - - - - - - -... -
Page 61: Ccd Board Assembly <10
REF No. PART No. PART NAME, DESCRIPTION REF No. PART No. PART NAME, DESCRIPTION - - - - - - - - - - - - - - - - - - - - - - - - - - - - - - - - - - - - - - - - - - - - - - - - - - - - - - - - - - - - - - - - - - - - - - - - - - - - - - - - - - - - - - - - - - - - - - - - - - - - - - - - - - - - - - - - - - - - - - - - - - - - - - - - - - - -... - Page 62 54 – 57 Please visit our Homepage on the World Wide Web Basic Connections ........ 54 and answer our Consumer Survey (in English only): Advanced Connections ......56 http://www.jvc-victor.co.jp/english/index-e.html DUBBING 58 – 61 Dubbing To A VCR ........ 58 For Accessories: Dubbing From A VCR ......
- Page 63 The wires in the mains lead are coloured in accordance recording and LCD monitor/ viewfinder playback are with the following code: possible anywhere. Use the JVC BN-V408U/V416U/ V428U battery packs and, to recharge them, the provided Blue to N (Neutral) or Black multi-voltage AC Power Adapter/Charger.
- Page 64 Attaching the Jack Box to the camcorder with cables (S-Video, Editing, DC, etc.) connected, then leaving it on top of the TV is not recommended, as tripping on the cables will cause the camcorder to fall, resulting in damage. Attach only the optional JVC VL-V3U Video Light, VL-F3U Video Flash or MZ-V3U Stereo Zoom Microphone to the camcorder’s Info-Shoe.
- Page 65 PROVIDED ACCESSORIES AC Power Adapter/ Remote Control Unit Jack Box Battery Pack Charger AA-V40EG RM-V717U CU-V504U BN-V408U or AA-V40EK S-Video cable DC Cord Editing Cable Audio/Video Cable (ø3.5 mini-plug to RCA plug) Audio Cable Lens Hood Lens Cap USB Cable (for connection (Already attached pg.
- Page 66 How To Detach/Attach The Lens Hood To detach: Turn the lens hood The provided lens hood helps block counterclockwise. out glare when shooting under bright sunlight, the same way professional photographers do. Threading To attach: Align the lens hood with the camcorder’s lens and screw it in clockwise.
- Page 67 How To Use Audio Cables When using an optional headphones, connect to the provided Audio cable (with a core filter attached), then connect the Audio cable to the camcorder. The core filter reduces interference. Headphones Audio cable To PHONE Core Filter...
-
Page 68: Automatic Demonstration
AUTOMATIC DEMONSTRATION Automatic Demonstration takes place when “DEMO MODE” is set to “ON” (factory-preset). Automatic Demonstration starts when there is no operation for about 3 minutes after the Power Switch is set to “ ” or “ ” and no cassette is in the camcorder. Performing any operation during the demonstration stops the demonstration temporarily. -
Page 69: Getting Started
GETTING STARTED Power Battery pack BN-V408U, This camcorder’s 2-way power supply system lets BN-V416U or you choose the most appropriate source of power. Do To AC outlet BN-V428U not use provided power supply units with other equipment. CHARGING THE BATTERY PACK AC Power Adapter/ Make sure you unplug the camcorder’s DC cord... - Page 70 USING THE BATTERY PACK With the arrow on the battery pack pointing upward, push the battery pack slightly against the battery pack mount Slide up the battery pack until it locks in place • If the battery pack is attached with its mark set in the wrong direction, a malfunction may occur.
- Page 71 GETTING STARTED (cont.) Grip Adjustment Power Zoom Lever Separate the Velcro strip. Recording Start/Stop button Pass your right hand through the loop and grasp the grip. Adjust your thumb and fingers through the grip, to easily operate the Recording Start/Stop button and Power Switch and Power Zoom Lever.
- Page 72 Date/Time Settings Power Switch The date/time is recorded onto the tape at all times, but its display can be turned on or off during playback Power Lamp pg. 31, 32). Set the Power Switch to “ ” while pressing down the Lock Button located on the switch, and open the LCD monitor fully or pull out the viewfinder fully.
- Page 73 GETTING STARTED (cont.) Loading/Unloading A Cassette Erase protection tab* The camcorder needs to be powered up to load or eject a cassette. Slide and hold OPEN/EJECT in the direction of Make sure the the arrow then pull the cassette holder cover open window side is facing out.
- Page 74 Loading A Memory Card Card Cover The provided memory card is already inserted in the camcorder when you receive the camcorder. Make sure the camcorder’s power is off. Open the card cover (MEMORY CARD). Insert the memory card clipped edge first. •...
- Page 75 GETTING STARTED (cont.) Operation Mode To turn on the camcorder, first set the Power Switch to any operation mode except “OFF” while Choose the appropriate operation mode according to pressing down the Lock Button located on the your preference using the Power Switch and VIDEO/ switch, then pull out the viewfinder fully or open MEMORY Switch.
- Page 76 Recording Mode Setting Power Switch Set the tape recording mode depending on your preference. Power Lamp Set the Power Switch to “ ” while pressing down the Lock Button located on the switch, and open the LCD monitor fully or pull out the viewfinder fully.
- Page 77 GETTING STARTED (cont.) Picture Quality/Image Size Setting Power Switch The Picture Quality/Image Size can be selected to best match your needs. Refer to the chart on page 17 Power Lamp for your selection. Set the Power Switch to “ ” while pressing down the Lock Button located on the switch, and open the LCD monitor fully or pull out the viewfinder fully.
- Page 78 STORAGE CAPACITY The number of storable images depends on the selected picture quality and size as well as the composition of the subjects in the images. Approximate number of storable images SD Memory Card (optional) IMAGE SIZE QUALITY 8 MB* 16 MB 32 MB 64 MB...
-
Page 79: Basic Recording
BASIC RECORDING Recording On Tape NOTE: Power lamp You should already have performed the procedures listed below. If not, do so before continuing. Power Switch ● Power ( pg. 8) ● Grip Adjustment ( pg. 10) Tally lamp ● Viewfinder Adjustment ( pg. - Page 80 NOTES: ● When you use the LCD monitor outdoors in direct sunlight, the LCD monitor may be difficult to see. If this happens, use the viewfinder instead. ● The image will not appear simultaneously in the LCD monitor and the viewfinder except during Interface Shooting. It will appear in the viewfinder when the LCD monitor is in the lock position, and it will appear on the LCD monitor when fully extended.
- Page 81 BASIC RECORDING Recording On Tape (cont.) Snapshot (For Tape Recording) SNAPSHOT Button This feature lets you record still images that look like photographs onto a tape. SNAPSHOT MODE SELECTION Power Switch Set the VIDEO/MEMORY Switch to “VIDEO”, then set the Power Switch to “ ”...
-
Page 82: Recording On Memory Card
BASIC RECORDING Recording On Memory Card Basic Shooting (Snapshot) SNAPSHOT Button Power Switch You can use your camcorder as a Digital Still Camera for taking snapshots. NOTE: You should already have performed the procedures listed below. If not, do so before continuing. ●... -
Page 83: Recording On Tape And Memory Card
BASIC RECORDING Recording On Tape And Memory Card Zoom in (T: Telephoto) Zooming FEATURE: PURPOSE: 1x W 1 x W To produce the zoom in/out effect, or an instanta- 2 x W neous change in image magnification. 4 x W OPERATION: Zoom In Slide the Power Zoom Lever towards “T”. - Page 84 NOTE: Recording From The Middle Of A Tape Time Code During recording, a time code is recorded on the tape. This code is to confirm the location of the recorded scene on the tape during playback. If recording starts from a blank portion, the time code begins counting from “00:00:00” (minute:second:frame).
- Page 85 BASIC RECORDING Recording On Tape And Memory Card (cont.) Focus detection zone While focusing on a further While focusing on a nearer subject subject Auto Focus FEATURE: PURPOSE: The camcorder’s Full Range AF system offers continuous shooting ability from close-up (as close as approx. 5 cm to the subject) to infinity.
-
Page 86: Basic Playback
BASIC PLAYBACK Playback From Tape Speaker Load a tape ( pg. 12). Stop Button (5) Set the VIDEO/MEMORY Switch to “VIDEO”, then Rewind Button (2) set the Power Switch to “ ” while pressing down the Lock Button located on the switch. To start Play/Pause Button (4/6) playback, press 4/6. -
Page 87: Playback From Memory Card
BASIC PLAYBACK Playback From Memory Card Normal Playback Stop Button (5) Rewind Button (2) Load a memory card ( pg. 13). Set the VIDEO/MEMORY Switch to “MEMORY”, Play/Pause Button (4/6) then set the Power Switch to “ ” while pressing Fast-Forward Button (3) down the Lock Button located on the switch. - Page 88 Index Playback SELECT Button You can view several different files stored on the memory card at a time. This browsing capability makes it easy to locate a particular file you want. Perform steps 1 through 3 of “Normal Playback”. Press INDEX. The Index Screen appears. Rotate the MENU wheel to move the frame to the desired file.
-
Page 89: Using Menus For Detailed Adjustment
USING MENUS FOR DETAILED ADJUSTMENT For Recording Menu Power Switch This camcorder is equipped with an easy-to-use, on-screen menu system that simplifies many of the more detailed camcorder settings ( pg. 29 – 31). Set the Power Switch to “ ”... - Page 90 Menu Screen Explanations FADER/WIPE Refer to “Fade/Wipe Effects” ( pg. 36, 37). PROGRAM AE Refer to “Programme AE With Special Effects” ( pg. 38, 39). W.BALANCE Refer to “White Balance Adjustment” and “Manual White Balance Operation” pg. 41). REC MODE Allows you to set the tape recording mode (SP or LP) depending on your pre- ference ( pg.
- Page 91 USING MENUS FOR DETAILED ADJUSTMENT (cont.) Menu Screen Explanations (cont.) WIDE Records with no change in the screen ratio. For playback on a TV with a MODE normal screen ratio. CINEMA Inserts black bands at the top and bottom of the screen. During playback on wide-screen TVs, the black bands at the top and bottom of the screen are cut and the screen ratio becomes 16:9.
- Page 92 TITLE W/ Refer to “Title Impose” ( pg. 48). NAVIGATION Refer to “NAVIGATION Function” ( pg. 42). SOUND IN Refer to “Audio Dubbing Using Digital Sound Effects” ( pg. 73). E-CLIP REC Refer to “E-Mail Clip Recording” ( pg. 46). CANCEL Does not reset all settings to the factory-preset.
- Page 93 USING MENUS FOR DETAILED ADJUSTMENT (cont.) For Playback Menu VIDEO/MEMORY Switch Power Switch The following procedure applies to all except Synchro Comp ( pg. 70). Set the VIDEO/MEMORY Switch to “VIDEO”, then set the Power Switch to “ ” while pressing down the Lock Button located on the switch.
- Page 94 Playback Sound During tape playback, the camcorder detects the sound mode in which the recording was made, and plays the sound back. Select the type of sound to accompany your playback picture. According to the menu access explanation on pg. 32, select “SOUND MODE” or “12BIT MODE” from the Menu Screen and set it to the desired parameter.
-
Page 95: Advanced Features
ADVANCED FEATURES Self-Timer Power Switch Once the camcorder is set, the camcorder operator can become part of the scene in a more natural way, SNAPSHOT adding the final touch to a memorable picture. Button Set the Power Switch to “ ”... - Page 96 5-Second Recording Power Switch Record a vacation or an important event in 5-second clips to keep the action moving. This function is SNAPSHOT available only for tape recording. Button Set the VIDEO/MEMORY Switch to “VIDEO”, then set the Power Switch to “ ”...
- Page 97 ADVANCED FEATURES (cont.) Fade/Wipe Effects IMPORTANT Some Fade/Wipe Effects cannot be used with certain These effects let you make pro-style scene transi- modes of Programme AE with special effects ( tions. Use them to spice up the transition from one 38, 39).
- Page 98 Fader And Wipe Menu Menu Effect Fade in or out with a white screen. FADER — WHITE Fade in or out with a black screen. FADER — BLACK Fade in to a colour screen from a black and white screen, or fade out FADER —...
- Page 99 ADVANCED FEATURES (cont.) Night-Scope NOTES: ● During Night-Scope, the following functions or settings Makes dark subjects or areas even brighter than they cannot be activated and its indicator blinks or goes out: would be under good natural lighting. Although the •...
- Page 100 SHUTTER SEPIA 1/50 –The shutter speed is fixed at 1/50th of a Recorded scenes have a brownish tint like old second. Black bands that usually appear when photos. Combine this with the Cinema mode for a shooting a TV screen become narrower. classic look.
- Page 101 ADVANCED FEATURES (cont.) Exposure Control Iris Lock Manual exposure adjustment is recommended in the Use this function in the following situations: following situations: • When shooting a moving subject. • When shooting using reverse lighting or when the • When the distance to the subject changes (so its background is too bright.
- Page 102 White Balance Adjustment Manual White Balance Operation A term that refers to the correctness of colour Perform Manual White Balance when shooting under reproduction under various lighting. If the white various types of lighting. balance is correct, all other colours will be accurately Follow steps 1 through 4 of the white balance reproduced.
- Page 103 ADVANCED FEATURES (cont.) NAVIGATION Function VIDEO/MEMORY Switch (Open the LCD monitor to access this switch.) The NAVIGATION Function helps you check tape contents by making thumbnail images on a memory card. SNAPSHOT Button TO MAKE THUMBNAIL IMAGES DURING TAPE RECORDING Load a memory card ( pg.
- Page 104 IMPORTANT TO ADD THUMBNAIL IMAGES DURING TAPE PLAYBACK • Be sure to always use the same tape and memory card together as they were during recording; Perform step 1 of “TO FIND SCENES ON TAPE otherwise, the camcorder cannot recognize Tape USING THUMBNAIL IMAGES (NAVIGATION and Memory Card IDs to perform NAVIGATION SEARCH)”.
- Page 105 ADVANCED FEATURES (cont.) Blank Search Power Switch Helps you find where you should start recording in the middle of a tape to avoid time code interruption pg. 23). Load a tape ( pg. 12). Set the VIDEO/ MEMORY Switch to “VIDEO” and set the Power Switch to “...
- Page 106 50, sound effects. “Deleting Files”) or protect important ones from accidental erasure ( pg. 49, “Protecting Files”). http://www.jvc-victor.co.jp/english/download/ ● Sound effects can also be used for Audio Dubbing d-sound/index.html pg. 73). • Use the PC Card Adapter CU-VPSD60U, Floppy ●...
- Page 107 ADVANCED FEATURES (cont.) E-Mail Clip Recording You can make video clips from real-time camera Power Switch image or recorded video footage and store them in a memory card as files which can be conveniently sent via e-mail. TO MAKE VIDEO CLIPS FROM REAL-TIME CAMERA IMAGE Recording Start/Stop...
- Page 108 Power Switch TO MAKE VIDEO CLIPS FROM RECORDED VIDEO FOOTAGE Load a memory card ( pg. 13) and cassette pg. 12). Set the VIDEO/MEMORY Switch to “VIDEO”, then set the Power Switch to “ ” while pressing down the Lock Button located on the switch.
- Page 109 ADVANCED FEATURES (cont.) Title Impose TITLE Button A selection of titles/frames stored on the provided memory card can be superimposed. TITLE SELECTION Load the provided memory card ( pg. 13). Set the Power Switch to “ ” while pressing down the Lock button located on the switch.
- Page 110 Protecting Files Power Switch The Protect mode helps prevent the accidental erasure of files. Load a memory card ( pg. 13). Set the VIDEO/MEMORY Switch to “MEMORY”, then set the Power Switch to “ ” while pressing down the Lock Button located on the switch. •...
- Page 111 ADVANCED FEATURES (cont.) Deleting Files Power Switch Previously stored files can be deleted either one at a time or all at once. Load a memory card ( pg. 13). Set the VIDEO/MEMORY Switch to “MEMORY”, then set the Power Switch to “ ”...
- Page 112 Making A New Folder Folder and File names Each time shooting takes place, a file name is New still pictures you are going to take can be made using a number which is larger by one than separated from previously shot pictures by resetting the largest number of the file names which are in the file name to DVC00001;...
- Page 113 ADVANCED FEATURES (cont.) Setting Print Information (DPOF Setting) Power Switch This camcorder is compatible with the DPOF (Digital Print Order Format) standard in order to support future systems such as automatic printing, which records information about the still images you wish to print (such as the number of prints to make).
- Page 114 Fast-Forward (3) Button TO PRINT BY SELECTING STILL IMAGES AND NO. OF PRINTS Rewind Button (2) Perform steps 1 through 4 on pg. 52. Rotate the MENU wheel to select “CURRENT” and press it. Selection is complete. The DPOF Screen appears.
-
Page 115: Connections
CONNECTIONS Basic Connections Use the provided Audio/Video cable and S-Video cable. NOTE: In order to maintain optimum performance of the camcorder, provided cables may be equipped with one or more core filter. Jack Box If a cable has only one core filter, the end that is closest to the (provided) filter should be connected to the camcorder. - Page 116 NOTES: Make sure all units are turned off. ● It is recommended to use the AC Power Adapter/ Charger as the power supply instead of the battery Connect the camcorder to a TV or VCR as shown pack ( pg. 9). in the illustration ( pg.
-
Page 117: Advanced Connections
DV connector-equipped capture board. ● When using a DV cable, be sure to use the optional JVC VC-VDV206U or VC-VDV204U DV cable depending on the type of DV connector (4 or 6 pins) on the PC, or use the DV cable provided with the capture board. - Page 118 Using The Camcorder As A WebCam Power Switch VIDEO/MEMORY Switch (Open the LCD monitor This camcorder can be used as a WebCam via USB to access this switch.) connection. Make sure all necessary software (provided) are installed in your PC and all units are turned off. Connect the camcorder to your PC using the USB cable.
-
Page 119: Dubbing
DUBBING Dubbing To A VCR Power Switch [To use this camcorder as a player] Following the illustration, connect the camcorder and the VCR. Also refer to pg. 54 and 55. Set the VIDEO/MEMORY Switch to “VIDEO”, then set the camcorder’s Power Switch to “ ”... -
Page 120: Dubbing From A Vcr
Dubbing From A VCR Power Switch [To Use This Camcorder As A Recorder] Make sure all units are turned off, then connect the camcorder and the VCR as shown in the illustration. Also refer to pg. 54 and 55. Set “SOUND MODE” to “12 BIT” or “16 BIT” and “REC MODE”... -
Page 121: Dubbing To Or From A Video Unit Equipped With A Dv Connector
● It is recommended to use the AC Power Adapter/Charger as the power supply instead of the battery pack pg. 9). ● If the remote control is used when both the player and recorder are JVC video units, both units will perform the same operation. To prevent this from happening, press the buttons on both units. -
Page 122: Dubbing Still Images Recorded On A Tape To A Memory Card
Dubbing Still Images Recorded On A Tape Power Switch To A Memory Card SNAPSHOT Still images can be dubbed from a tape to a memory Button card. Load a memory card ( pg. 13) and cassette pg. 12). Set the VIDEO/MEMORY Switch to “VIDEO”, then set the Power Switch to “... -
Page 123: Using The Remote Control Unit
USING THE REMOTE CONTROL UNIT The Full-Function Remote Control Unit can operate this camcorder from a distance as well as the basic operations (Playback, Stop, Pause, Fast-Forward and Rewind) of your VCR. It also makes additional playback functions possible. Installing The Batteries The remote control uses two “AAA (R03)”... - Page 124 ^ & Functions With the camcorder’s Power With the camcorder’s Power Switch Buttons Switch set to the camera set to “ ”. position (“ ” or “ ”). Infrared beam transmitting window Transmits the beam signal. Zoom (T/W) Buttons Zoom in/out ( pg.
- Page 125 USING THE REMOTE CONTROL UNIT (cont.) Slow-Motion Playback FEATURE: PURPOSE: To allow slow-speed search in either direction during tape playback. OPERATION: 1) To change from normal to Slow-Motion Playback, press SLOW (9 or 0) more than approx. 2 seconds. After approx. 5 minutes (approx.
-
Page 126: Playback Special Effects
Playback Special Effects PLAYBACK EF FEC PLAYBACK EFFECT FEATURE: Select Menu PURPOSE: CLASS I C F I LM To allow you to add creative effects to the tape MONOTONE playback image. SEP I A STROBE OPERATION: 1) To start playback, press PLAY (4). 2) Point the remote control at the camcorder's remote sensor and press EFFECT. -
Page 127: Random Assemble Editing
VCR BRAND BRAND IMPORTANT NAME CODE NAME CODE Although the MBR is compatible with JVC VCRs AKAI PHILIPS and those of many other makers, it may not work with yours or may offer limited functions. NOTES: BLAUPUNKT ● If the VCR’s power does not come on in step 1, try DAEWOO another code from the VCR CODE LIST. - Page 128 ..connect the editing cable to the Remote PAUSE connector. A JVC VCR not equipped with a remote pause connector but equipped with an R.A.EDIT connector ..connect the editing cable to the R.A.EDIT...
- Page 129 USING THE REMOTE CONTROL UNIT (cont.) Programme SELECT SCENES MODE Random Point the remote control at the camcorder’s – – – – : – – ~ Assemble remote sensor. Press PLAY (4) and then press Editing R.A.EDIT ON/OFF on the remote control. Menu The Random Assemble Editing Menu appears.
- Page 130 AUTOMATIC EDITING TO VCR Rewind the tape in the camcorder to the beginning of the scene you want to edit and press PAUSE (6). Point the remote control towards the VCR’s remote sensor and press VCR REC STBY (q6), or manually engage the VCR’s Record-Pause mode.
-
Page 131: For More Accurate Editing
USING THE REMOTE CONTROL UNIT (cont.) For More Accurate Editing Programme 1 Some VCRs make the transition from Record-Pause Random Assemble MODE to Record mode faster than others. Even if you begin Editing Menu – – – – : – – ~ editing for the camcorder and the VCR at exactly the same time, you may lose scenes you wanted, or find that you have recorded scenes you did not want. -
Page 132: Insert Editing
Insert Editing Display You can record a new scene into a previously recorded tape, replacing a section of the original recording with minimal picture distortion at the in and outpoints. The original audio remains unchanged. NOTES: ● Before performing the following steps, make sure that “TIME CODE”... -
Page 133: Audio Dubbing
USING THE REMOTE CONTROL UNIT (cont.) Audio Dubbing Display Audio Dub Standby The audio track can be customized only when mode recorded in the 12-bit mode ( pg. 29). NOTES: ● Audio Dubbing is not possible on a tape recorded in 16- bit audio, on a tape recorded in the LP mode or on a blank portion of a tape. - Page 134 Audio Dubbing Using Digital Sound Display Effects Audio Dub Standby mode D . SOUND Load the provided memory card ( pg. 13) and perform step 1 and 2 of page 72. Press the MENU wheel in. The Menu Screen LOS I appears.
-
Page 135: Troubleshooting
TROUBLESHOOTING If, after following the steps in the chart below, the problem still exists, please consult your nearest JVC dealer. The camcorder is a microcomputer-controlled device. External noise and interference (from a TV, a radio, etc.) might prevent it from functioning properly. In such cases, first disconnect its power supply unit (battery pack, AC Power Adapter/Battery Charger, etc.) and wait a few minutes;... - Page 136 SYMPTOM POSSIBLE CAUSES CORRECTIVE ACTION The cassette will not load • The cassette is in the wrong • Set it in the right position properly. position. pg. 12). • The battery’s charge is low. • Install a fully charged battery pg.
- Page 137 TROUBLESHOOTING (cont.) SYMPTOM POSSIBLE CAUSES CORRECTIVE ACTION During R.A.Edit, the Picture • The last selected editing scene is • Select Picture Wipe or Dissolve Wipe and Dissolve ending. before beginning editing. The functions do not work. • At the end of the last selected effects are then automatically scene for editing, the Power switch activated (...
- Page 138 LCD monitor become dark. Consult your nearest JVC dealer. The rear of the LCD monitor • The light used to illuminate the LCD • Close the LCD monitor to turn it off is hot.
- Page 139 TROUBLESHOOTING (cont.) SYMPTOM POSSIBLE CAUSES CORRECTIVE ACTION During recording, sound • The optional headphones are not • Connect the optional headphones cannot be heard. connected to the headphone to the headphone connector connector. pg. 82, 83). • The sound volume of the •...
- Page 140 If the indication remains even though you repeat the above two or three times, please consult your nearest JVC dealer. Do not eject the cassette. This will cause damage to the tape. An error indication •...
-
Page 141: User Maintenance
USER MAINTENANCE After Use Cleaning The Camcorder Turn off the camcorder. To clean the exterior, wipe gently with a soft cloth. Put the cloth in diluted mild soap and wring it well to Slide and hold OPEN/EJECT in the direction of wipe off heavy dirt. -
Page 142: Index
INDEX Jack Box DC Input Connector [DC IN] ....pg. 9 Edit Connector [EDIT] ....... pg. 67 Connect the editing cable when performing USB (Universal Serial Bus) Random Assemble Editing ..pg. 66 – 70 Connector ........pg. 56, 57 Multi Connector S-Video Input/Output Connector The Jack Box can be connected with this... -
Page 143: Controls, Connectors And Indicators
INDEX Controls, Connectors And Indicators rt y 7 8 9 0 & ) ( *... - Page 144 PRINTER Connector Controls Connect to the optional printer equipped with a PRINT DATA connector. Refer to the separate Snapshot Button “FOR OWNERS OF AN OPTIONAL PRINTER” [SNAPSHOT] ......pg. 20, 21, 61 instruction sheet. • Power Zoom Lever [T/W] ..... pg.
-
Page 145: Indications
INDEX Indications LCD Monitor/Viewfinder Indications During Tape Recording Only Appears when “NAVIGATION” is set to “ON”. pg. 42) Displays the selected Fade/Wipe effect. pg. 36, 37) Appears when in the Squeeze or Cinema mode. 0 min pg. 30) Rotates while the tape is running. pg. - Page 146 LCD Monitor/Viewfinder Indications During Both Tape And Memory Card Recording 0 x W PHOTO EXPLOS I ON Appears when the Power Switch is set to “ ”. Approximate zoom ratio: Appears during zooming. pg. 14) pg. 22) Appears when Night-Scope is engaged. Appears during zooming.
- Page 147 INDEX Indications (cont.) LCD Monitor/Viewfinder Indications During Tape Playback Displays the sound mode. pg. 32, 33) Displays the Blank Search mode. pg. 44) Appears while the captured image is being stored as a thumbnail image in the memory card. pg. 43) SOUN Displays the tape speed.
- Page 148 ● Appears when the built-in clock battery runs out and the previously set SET DATE/TIME! date/time is erased. Consult your nearest JVC dealer for replacement. LENS CAP Appears for 5 seconds after power is turned on if the lens cap is attached.
- Page 149 MODE REMOVE AND indication to clear. When it does, you can resume using the camcorder. If the REATTACH BATTERY indication remains, consult your nearest JVC dealer. The error indications (E03 or E04) show what type of malfunction has E03 or E04 occured.
-
Page 150: Cautions
CAUTIONS 2. To prevent damage and prolong service life . . . General Battery Precautions ... do not subject to unnecessary shock..charge in an environment where temperatures If the remote control is not functioning even if it is are within the tolerances shown in the chart being operated correctly, the batteries are exhausted. - Page 151 If, after using the cleaning cassette, the problems ... allow inflammables, water or metallic objects to still exist, consult your nearest JVC dealer. enter the unit. Mechanical moving parts used to move the video ... remove the battery pack or disconnect the heads and video tape tend to become dirty and power supply while the power is on.
- Page 152 Serious malfunctioning If malfunctioning occurs, stop using the unit immediately and consult your local JVC dealer. The camcorder is a microcomputer-controlled device. External noise and interference (from a TV, a radio, etc.) might prevent it from functioning properly.
-
Page 153: Terms
Terms AC Power Adapter/Charger ....... pg. 8, 9 Fade-In/Out ........... pg. 36, 37 Analogue Input ........pg. 32, 59 Fast-Forward The Tape ....... pg. 25 Animation ............ pg. 29 5-second recording mode ......pg. 35 Audio Dubbing ..........pg. 72 Frame-By-Frame Playback .... - Page 154 Picture Quality/Image Size ......pg. 16 Tally ............. pg. 30 Picture Wipe/Dissolve ......... pg. 68 Tele Macro ..........pg. 30 Playback Special Effects ......pg. 65 Time Code ........pg. 23, 31 – 33 Playback Zoom ........... pg. 64 Title Impose ..........pg.
-
Page 155: Specifications
SPECIFICATIONS Camcorder General Power supply : DC 6.3 V (Using AC Power Adapter/Charger) DC 7.2 V (Using battery pack) Power consumption LCD monitor off, viewfinder on : Approx. 4.3 W LCD monitor on, viewfinder off : Approx. 5.4 W Dimensions (W x H x D) : 76 mm x 90 mm x 194 mm (with the LCD monitor closed and the viewfinder pushed back in, without the lens hood) - Page 156 Connectors : 1 V (p-p), 75 Ω, analogue Video output : 0.5 V (p-p) – 2.0 V (p-p), 75 Ω, analogue Video input Audio output : 300 mV (rms), 1 kΩ, analogue, stereo Audio input : 300 mV (rms), 50 kΩ, analogue, stereo Input/output : 4-pin, IEEE 1394 compliant PHONE...
- Page 157 VICTOR COMPANY OF JAPAN, LIMITED Printed in Japan EG/EK COPYRIGHT© 2002 VICTOR COMPANY OF JAPAN, LTD. 0102FOV...
- Page 158 SECTION 4 CIRCUIT BOARD NOTES CHARTS AND DIAGRAMS 1. Foil and Component sides 1) Foil side (B side) : NOTES OF SCHEMATIC DIAGRAM 4. Voltage measurement Parts on the foil side seen from foil face (pattern face) 1) Regulator (DC/DC CONV) circuits are indicated.
- Page 159 ∗ NOTE ) : The number of patch cords BOARD INTERCONNECTIONS are indicated by interconnected. ∗ YTU94074-8 ∗ YTU94074-24 YTU94077-8 FOCUS UNIT YTU94077-24 (Page 4-48) VF_UNIT ∗ DECK OPE. YTU94074-6 YTU94077-6 ∗ S2401 (Page 4-45) YTU94074-22 1 0 CCD MAIN LCD MODULE IR_UNIT YTU94077-22...
- Page 160 MAIN IF SCHEMATIC DIAGRAM NOTES : For the destination of each signal and further line connections that are cut off from TO JUNCTION CN1101 MAIN TO SHOE FPC this diagram , refer to "4.1 BOARD INTERCONNECTIONS". CN103 CN114 CN112 When ordering parts , be sure to order according to the Part Number indicated in the Parts List. QGF0517F2-16X QGF0505F1-16X ∗...
- Page 161 NOTES : For the destination of each signal and further line connections that are cut off from SYSCON-CPU SCHEMATIC DIAGRAM this diagram , refer to "4.1 BOARD INTERCONNECTIONS". When ordering parts , be sure to order according to the Part Number indicated in the Parts List. 0 1 MAIN (SYSCON-CPU) MSD-CPU SRV_RST...
- Page 162 NOTES : For the destination of each signal and further line connections that are cut off from MSD-CPU SCHEMATIC DIAGRAM this diagram , refer to "4.1 BOARD INTERCONNECTIONS". When ordering parts , be sure to order according to the Part Number indicated in the Parts List. 0 1 MAIN (MSD-CPU) MAIN IF CN109...
- Page 163 NOTES : For the destination of each signal and further line connections that are cut off from AUDIO AD/DA SCHEMATIC DIAGRAM this diagram , refer to "4.1 BOARD INTERCONNECTIONS". When ordering parts , be sure to order according to the Part Number indicated in the Parts List. MAIN (AUDIO AD/DA) DVMAIN AIBCK...
- Page 164 NOTES : For the destination of each signal and further line connections that are cut off from MAIN AUDIO SCHEMATIC DIAGRAM this diagram , refer to "4.1 BOARD INTERCONNECTIONS". When ordering parts , be sure to order according to the Part Number indicated in the Parts List. 0 1 MAIN (MAIN AUDIO) AUDIO AD/DA...
- Page 165 DVMAIN SCHEMATIC DIAGRAM NOTES : For the destination of each signal and further line connections that are cut off from this diagram , refer to "4.1 BOARD INTERCONNECTIONS". When ordering parts , be sure to order according to the Part Number indicated in the Parts List. MAIN (DVMAIN) C3041 C3040...
- Page 166 NOTES : For the destination of each signal and further line connections that are cut off from this diagram , refer to "4.1 BOARD INTERCONNECTIONS". VIDEO I/O SCHEMATIC DIAGRAM When ordering parts , be sure to order according to the Part Number indicated in the Parts List. MAIN(VIDEO I/O) L3701 10µ...
- Page 167 CDS/AD SCHEMATIC DIAGRAM NOTES : For the destination of each signal and further line connections that are cut off from this diagram , refer to "4.1 BOARD INTERCONNECTIONS". When ordering parts , be sure to order according to the Part Number indicated in the Parts List. 0 1 MAIN(CDS/AD) IC4202 RH5RZ31CA-X...
- Page 168 NOTES : For the destination of each signal and further line connections that are cut off from 4.10 DSP SCHEMATIC DIAGRAM this diagram , refer to "4.1 BOARD INTERCONNECTIONS". When ordering parts , be sure to order according to the Part Number indicated in the Parts List. X4301 0 1 MAIN(DSP) NAX0319-001X...
- Page 169 4.11 OP DRIVE SCHEMATIC DIAGRAM NOTES : For the destination of each signal and further line connections that are cut off from this diagram , refer to "4.1 BOARD INTERCONNECTIONS". When ordering parts , be sure to order according to the Part Number indicated in the Parts List. 0 1 MAIN(OP DRIVE) IC4807 R4839...
- Page 170 4.12 TG/VDR SCHEMATIC DIAGRAM NOTES : For the destination of each signal and further line connections that are cut off from this diagram , refer to "4.1 BOARD INTERCONNECTIONS". When ordering parts , be sure to order according to the Part Number indicated in the Parts List. 0 1 MAIN(TG/VDR) TG_RST CLK_OUT...
- Page 171 NOTES : For the destination of each signal and further line connections that are cut off from 4.13 DSC SCHEMATIC DIAGRAM this diagram , refer to "4.1 BOARD INTERCONNECTIONS". When ordering parts , be sure to order according to the Part Number indicated in the Parts List. 0 2 DSC(DSC) DSC IF CN8401...
- Page 172 4.14 DSC IF AND SD SCHEMATIC DIAGRAMS - DSC IF - NOTES : For the destination of each signal and further line connections that are cut off from this diagram , refer to "4.1 BOARD INTERCONNECTIONS". TO MAIN IF CN105 CN8401 QGB0516M1-80X When ordering parts , be sure to order according to the Part Number indicated in the Parts List.
- Page 173 4.15 USB SCHEMATIC DIAGRAM NOTES : For the destination of each signal and further line connections that are cut off from this diagram , refer to "4.1 BOARD INTERCONNECTIONS". When ordering parts , be sure to order according to the Part Number indicated in the Parts List. 0 2 DSC(USB) TO DSC GIO3...
- Page 174 4.16 MDA SCHEMATIC DIAGRAM NOTES : For the destination of each signal and further line connections that are cut off from this diagram , refer to "4.1 BOARD INTERCONNECTIONS". When ordering parts , be sure to order according to the Part Number indicated in the Parts List. TO MAIN IF CN106 CN401...
- Page 175 4.17 PRE/REC SCHEMATIC DIAGRAM NOTES : For the destination of each signal and further line connections that are cut off from this diagram , refer to "4.1 BOARD INTERCONNECTIONS". When ordering parts , be sure to order according to the Part Number indicated in the Parts List. 0 3 PRE/MDA L3505 NQL302N-100X...
- Page 176 4.18 JUNCTION SCHEMATIC DIAGRAM NOTES : For the destination of each signal and further line connections that are cut off from this diagram , refer to "4.1 BOARD INTERCONNECTIONS". When ordering parts , be sure to order according to the Part Number indicated in the Parts List. D1161 0 4 JUNCTION TALLY...
- Page 177 4.19 REG SCHEMATIC DIAGRAM NOTES : For the destination of each signal and further line connections that are cut off from this diagram , refer to "4.1 BOARD INTERCONNECTIONS". When ordering parts , be sure to order according to the Part Number indicated in the Parts List. TO MAIN IF CN109 TO MULTI PIN CONN.
- Page 178 4.20 MONITOR SCHEMATIC DIAGRAM NOTES : For the destination of each signal and further line connections that are cut off from this diagram , refer to "4.1 BOARD INTERCONNECTIONS". When ordering parts , be sure to order according to the Part Number indicated in the Parts List. 0 6 MONITOR L7302 10µ...
- Page 179 NOTES : For the destination of each signal and further line connections that are cut off from 4.21 JACK SCHEMATIC DIAGRAM this diagram , refer to "4.1 BOARD INTERCONNECTIONS". When ordering parts , be sure to order according to the Part Number indicated in the Parts List. CN303 QGF0501F1-11X 0 7 JACK...
- Page 180 4.22 EJECT, DECK OPE. AND CCD SCHEMATIC DIAGRAMS - EJECT - NOTES : For the destination of each signal and further line connections that are cut off from - CCD - NOTES : For the destination of each signal and further line connections that are cut off from this diagram , refer to "4.1 BOARD INTERCONNECTIONS".
- Page 181 4.23 FE SW, FRONT, ZOOM UNIT, POWER OPE. UNIT, FOCUS UNIT AND SW FPC UNIT SCHEMATIC DIAGRAMS NOTES : For the destination of each signal and further line connections that are cut off from this diagram , refer to "4.1 BOARD INTERCONNECTIONS". When ordering parts , be sure to order according to the Part Number indicated in the Parts List.
- Page 182 4.24 VF BL SCHEMATIC DIAGRAM NOTES : For the destination of each signal and further line connections that are cut off from this diagram , refer to "4.1 BOARD INTERCONNECTIONS". When ordering parts , be sure to order according to the Part Number indicated in the Parts List. C7003 1 3 VF BL CN7002...
- Page 183 4.25 MAIN CIRCUIT BOARD [GR-DV3000EG] TL2008 D2903 C2903 R2907 FOIL SIDE(B) R2902 CN103 C2038 0 1 MAIN PWB L2901 YB10351-01-02 C2902 C2703 R2701 R2703 R6003 R6008 C6001 R6004 C2210 C2211 R2205 R6007 Q6001 L6001 C2701 R2904 C6005 C2207 Q2603 Q2604 Q6002 R2615 C2619...
- Page 184 (1/2) COMPONENT PARTS LOCATION GUIDE <MAIN/YB10351-01-02> REF.NO. LOCATION REF.NO. LOCATION REF.NO. LOCATION REF.NO. LOCATION REF.NO. LOCATION REF.NO. LOCATION REF.NO. LOCATION CAPACITOR C2102 C2611 C3052 C4218 C6006 L1401 C2103 C2612 C3053 C4219 C6007 L2001 C1004 C2104 C2613 C3054 C4220 C6008 L2101 C1006 C2105 C2614...
- Page 185 (2/2) COMPONENT PARTS LOCATION GUIDE <MAIN/YB10351-01-02> REF.NO. LOCATION REF.NO. LOCATION REF.NO. LOCATION REF.NO. LOCATION REF.NO. LOCATION REF.NO. LOCATION REF.NO. LOCATION Q3002 R1410 R2310 R2715 R3721 R4831 TL1005 Q3701 R1411 R2311 R2716 R3723 R4833 TL1006 R1412 R2312 R2717 R3725 R4836 TL1007 Q3702 Q3703 R1413...
- Page 186 CN112 CN114 COMPONENT SIDE(A) R2015 C2037 C2036 TL2007 R2012 0 1 MAIN PWB R2014 R2013 C4202 TL2602 L2602 L2601 YB10351-01-02 R2001 IC4202 C2604 C2603 R2602 R2601 TL2001 C2403 R4207 TL2601 C4203 TL2006 R2409 R2412 CN111 CN110 C4208 C4207 C4204 L2402 L1002 R2417 TL4202...
- Page 187 4.26 MAIN CIRCUIT BOARD [GR-DV3000EK/A/EA/ED/SH] D2903 C2903 CN103 R2907 R2902 FOIL SIDE (B) C2038 0 1 MAIN PWB L2901 YB10366-01-01 C2902 C2703 R2701 R2703 R6003 R6008 C6001 R6004 C2210 C2211 R2205 R6007 Q6001 L6001 C2701 R2904 C6005 C2207 Q2603 Q2604 Q6002 R2615 C2619...
- Page 188 (1/2) COMPONENT PARTS LOCATION GUIDE <MAIN/YB10366-01-01> REF.NO. LOCATION REF.NO. LOCATION REF.NO. LOCATION REF.NO. LOCATION REF.NO. LOCATION REF.NO. LOCATION REF.NO. LOCATION C2037 C2607 C3047 C4209 C5022 IC5004 CAPACITOR C2038 C2608 C3048 C4210 C5023 IC6001 C1003 C2039 C2609 C3049 C4211 C5024 IC6003 C1004 C2101 C2610...
- Page 189 (2/2) COMPONENT PARTS LOCATION GUIDE <MAIN/YB10366-01-01> REF.NO. LOCATION REF.NO. LOCATION REF.NO. LOCATION REF.NO. LOCATION REF.NO. LOCATION REF.NO. LOCATION REF.NO. LOCATION Q2402 R1077 R2219 R2701 R3066 R4811 RA3003 Q2403 R1078 R2220 R2702 R3067 R4812 RA4201 Q2601 R1079 R2221 R2703 R3068 R4814 RA4202 Q2602 R1080...
- Page 190 COMPONENT SIDE (A) CN112 CN114 R2015 C2037 C2036 TL2007 R2012 R2014 0 1 MAIN PWB R2013 TL2602 C4202 L2602 L2601 YB10366-01-01 R2001 IC4202 C2604 C2603 R2602 R2601 TL2001 TL2601 C4203 TL2006 L2402 R4207 C1003 C4208 C4207 C4206 C4204 L1002 CN110 CN111 TL4202 C1004...
- Page 191 4.27 DSC CIRCUIT BOARD FOIL SIDE(B) COMPONENT SIDE(A) C8307 C8305 R8309 R8306 C8308 C8302 C8306 R8305 R8308 R8307 R8303 R8302 C8309 R8312 R8301 Q8001 R8313 R8062 R8060 R8310R8311 C8022 L8006 D8301 C8024 C8023 C8310 IC8005 0 2 DSC PWB 0 2 DSC PWB C8025 R8059 YB10350-01-01...
- Page 192 4.28 PRE/MDA CIRCUIT BOARD FOIL SIDE(B) COMPONENT SIDE(A) TL1614 TL1615 CN402 CN405 CN404 R1642 C1602 R1628 0 3 PRE/MDA PWB 0 3 PRE/MDA PWB R1611 R3507 R3506 R1610 C3511 C3509 YB10303-01-01 YB10303-01-01 R3508 R3503 R3518 CN407 R3509 IC3502 C3516 R3512 R3511 C3525 C3528...
- Page 193 4.29 JUNCTION AND JACK CIRCUIT BOARDS - JUNCTION- - JACK - FOIL SIDE(B) FOIL SIDE(B) 0 7 JACK PWB 0 4 JUNCTION PWB YB10352-01-03 YB10352-01-03 L2801 R2810 R2808 R2829 CN301 C2802 D2801 R2809 TL2841 IC2822 C2821 R2806 IC2821 R2804 C2801 L2842 D2824 R2805...
- Page 194 4.30 REG CIRCUIT BOARD [GR-DV3000EG] FOIL SIDE(B) COMPONENT SIDE(A) 0 5 REG PWB 0 5 REG PWB YB10353 YB10353 ZP61-72 TP601 TP602 TP603 ZP61-29 C6101 ZP61-68 F6101 ZP61-27 F6102 L6101 L6102 ZP61-32 ZP61-44 ZP61-71 R6101 R6102 C6102 R6104 ZP61-46 ZP61-70 C6103 ZP61-15 R6116...
- Page 195 4.31 REG CIRCUIT BOARD [GR-DV3000EK/A/EA/ED/SH] FOIL SIDE(B) COMPONENT SIDE(A) 0 5 REG PWB 0 5 REG PWB YB10353-01-01 YB10353-01-01 ZP61-72 TP601 TP602 TP603 ZP61-29 C6101 ZP61-68 F6101 ZP61-27 F6102 L6101 L6102 ZP61-32 ZP61-44 ZP61-71 R6101 R6102 C6102 R6104 ZP61-46 ZP61-70 C6103 ZP61-15 R6116...
- Page 196 4.32 MONITOR CIRCUIT BOARD FOIL SIDE(B) COMPONENT SIDE(A) MONITOR PWB MONITOR PWB COMPONENT PARTS LOCATION GUIDE YB10354 YB10354 <MONITOR/YB10354> REF.NO. LOCATION REF.NO. LOCATION REF.NO. LOCATION CAPACITOR D7401 R7503 D7501 R7504 C7301 D7502 R7505 R7501 R7504 JP7501 C7302 Q7501 R7506 C7303 FUSE R7503 R7508...
- Page 197 4.33 EJECT AND DECK OPE. CIRCUIT BOARDS - EJECT - - DECK OPE. - FOIL SIDE(B) FOIL SIDE(B) 0 9 DECK OPE. PWB 0 8 EJECT PWB YB10352-01-03 YB10352-01-03 CN2431 S2421 COMPONENT SIDE(A) COMPONENT SIDE(A) 0 9 DECK OPE. PWB 0 8 EJECT PWB YB10352-01-03 YB10352-01-03...
- Page 198 4.34 CCD CIRCUIT BOARD FOIL SIDE(B) 1 0 CCD PWB YB10349-01-01 IC5201 COMPONENT SIDE(A) 1 0 CCD PWB YB10349-01-01 C5209 R5204 R5202 TL5201 R5203 Q5201 C5203 TL5202 C5205 C5206 C5204 4-77...
- Page 199 4.35 FE SW AND FRONT CIRCUIT BOARDS - FE SW - FOIL SIDE(B) 1 1 FE SW PWB YB10352-01-03 COMPONENT SIDE(A) 1 1 FE SW PWB YB10352-01-03 S1181 S1182 - FRONT - FOIL SIDE(B) 1 2 FRONT PWB YB10352-01-03 COMPONENT SIDE(A) 1 2 FRONT PWB YB10352-01-03 R2411...
- Page 200 4.36 VF BL CIRCUIT BOARD FOIL SIDE(B) 1 3 VF BL PWB YB10355 CN7001 CN7002 COMPONENT SIDE(A) 1 3 VF BL PWB YB10355 C7002 D7002 R7005 C7003 D7001 4-79...
- Page 201 4.37 VOLTAGE CHARTS <SYSCON CPU> <MAIN IF> MODE MODE MODE MODE MODE PLAY PLAY PLAY PLAY PLAY PIN NO. PIN NO. PIN NO. PIN NO. PIN NO. IC1001 IC6001 Q2701 IC1002 IC1003 IC6003 Q2702 IC2151 IC1006 IC6004 Q2703 Q2001 Q2002 Q2003 Q2004 Q2901...
- Page 202 <CDS/AD> MODE MODE MODE MODE MODE MODE MODE MODE MODE MODE PLAY PLAY PLAY PLAY PLAY PLAY PLAY PLAY PLAY PLAY PIN NO. PIN NO. PIN NO. PIN NO. PIN NO. PIN NO. PIN NO. PIN NO. PIN NO. PIN NO. IC4201 Q4804 -7.5...
- Page 203 <REG> <MONITOR> <CCD> MODE MODE MODE MODE MODE MODE MODE MODE MODE MODE MODE MODE MODE PLAY PLAY PLAY PLAY PLAY PIN NO. PIN NO. PIN NO. PIN NO. PIN NO. PIN NO. PIN NO. PIN NO. PIN NO. PIN NO. PIN NO.
- Page 204 4.38 POWER SYSTEM BLOCK DIAGRAM MAIN -7.5V TG/VDR CN102 CN5201 BATTERY CCD -7.5V CN601 CN109 CCD_-7.5/CCD_VL CDS/AD TT SW IC5201 REG 15V REG_15V/CCD_VHH (DET) TP602 IC4202 3.1V REG_15V/CCD_VHH IC5003 3.3V CCD 3.1V Q5202 (-) TP603 REG 4.8V REG 4.8V F6101 3.1V SP UNREG (+) TP601...
- Page 205 4.39 VIDEO SYSTEM BLOCK DIAGRAM MAIN IC4802-4804 IC1001 ( SYSCON-CPU ) (OP DRIVE) IC1006 ( SYSCON CN104 DAMP+,DRIVE+ -CPU ) 4,11 HALL AD DSC WKUP DUMP-,HGout-,HGout+ 6,7,9 IRIS O/C DSC RST OSD HD HALL AD IRIS PWM FLSH RST OSD VD IRIS O/C MXDT OUT DOT CLK...
- Page 206 IC8001 ( DSC ) 2~5, 7, 20~25, 40~44 65, 66, 82, 83 CN8401 USB DP ARM A0 A19 A0 A19 A8 A14 USB DN 18, 19, 38, 39, 56~58, 62 FLSH RST 63, 77~80, 97, 98, 108 DSC RST ARM D0 D15 DQ0 DQ15 DQ0 DQ15 D0~D15...
- Page 207 4.40 REGULATOR SYSTEM BLOCK DIAGRAM CN601 CN109 MAIN M UNREG UNREG IC1001 ( CPU ) BATTERY CHKUNREG (+) TP601 BATT SW BATT SW (DET) TP602 F6101 (-) TP603 SP UNREG F6102 Q6004 R6002 IC6001 POWER OFF/ON IC6101 R6003 BATT DC DET R6007 ( DC-DC CONV at PO WER OFF...