
Related Manuals for TCS Carus Adapto


Summary of Contents for TCS Carus Adapto
- Page 1 3 years warranty a brand of TCS AG Design Manufaktur Adelheid Adelheid 41 78098 Triberg Germany info@carus-concepts.com www.carus-concepts.com Tel: +49 7722 91770 Fax: +49 7722 917718 - Art. no. 0035871 Version 1 A -...
- Page 2 Instruction manual Carus Adapto...
- Page 3 Design “A simple form, a classic layout and high-end materials gua- rantee timeless aesthetics. The Carus edition refl ects the reli- ability and sustainability of the products in perfect form and sophisticated design. Our emphasis on traditional crafts that we utilise to manufacture the high-quality surfaces, make the Carus products unique items.
-
Page 4: Table Of Contents
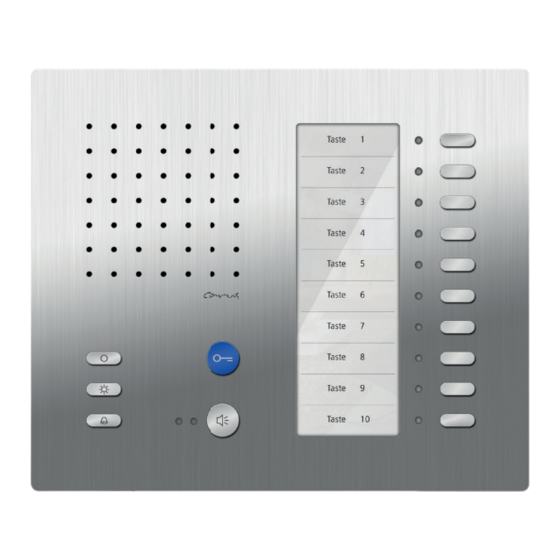
Table of contents Device overview LED indication Indication and operating elements Setting the ring tone volume Ring tone selection Confi gurable functions Cleaning Operating the function keys 1 - 10 8-11 Labeling the function keys 1 - 10 12-13 Notes 14-17... - Page 5 Your brandnew indoor station! CAI1100 Loudspeaker Function key Light switch button Call OFF-button Function keys Microphone Red LED 2 Ring tone volume Labeling fi eld Red LED 1 Green LED Speech button Door release button...
-
Page 6: Led Indication
LED indication Indication and operating elements • • Green LED is on A ring tone signals an inco- • incoming door or ming call. Function keys 1 - 10 Switching lights internal call The green LED is on. Press one of these buttons Shortly press the light switch •... -
Page 7: Setting The Ring Tone Volume
Setting the ring tone volume With the contoller at the bottom of the device, the ring tone volume can be adjusted continuously. turn down turn up... -
Page 8: Ring Tone Selection
Ring tone selection Ring tones can be adju- 2. Select a door ring tone d... from another indoor sted for four different call a... from the (fi rst) station types. front-door station Press the function key Press the door release until the desired ring tone Thus, it is possilbe to button... -
Page 9: Confi Gurable Functions
Confi gurable functions The following functions Door release automatic Parallel call can be confi gured on An incoming door call A second indoor station your video indoor station directly triggers the opening sounds simultaneously in and for the use of further of the door if this function is case of an incoming door, indoor stations. -
Page 10: Cleaning
Cleaning Clean the indoor station with a dry or slightly wet cloth. Remove stronger stains with a PH-neutral detergent. Avoid water from entering the device! Do not use any abrasive detergents! -
Page 11: Operating The Function Keys
Operating the function keys 1 - 10 The following functions can be programmed (see page 9 - 11): • specifi c door call / door release • specifi c internal calls • sensor functions / status indications • activate / deactivate call diversion •... - Page 12 Function Operating the function keys 1 - 10 Specifi c door calls / One front-door station can be allocated to each button of the comfort keypad. door release In case of an incoming door call from the fi rst front-door station: •...
- Page 13 Function Operating the function keys 1 - 10 Specifi c internal calls Each function key of the comfort keypad can be programmed for any indoor station as destination device for the internal calling. In case of an incoming call: • The LED next to the function key blinks slowly.
- Page 14 Functions Operating the function keys 1 - 10 Sensor functions/ Each function key of the comfort keypad can be programmed so that the belonging status indications LED indicates the contact state of a detector (an attention tone sounds). • Additionally, an allocated function can be triggered by pressing the button next to the LED.
-
Page 15: Labeling The Function Keys
Labeling the function keys 1 - 10 There is an embedded black cover with a little slot on the right side located at the underside of the device near the labeling fi eld. Please insert the enclosed opening tool (small metal angle) into the slot and softly press the tool upwards to loosen the name plate cover from the housing. - Page 16 Labeling the function keys 1 - 10...
-
Page 17: Notes
Notes... - Page 18 Notes...
- Page 19 Notes...
- Page 20 Notes...