Table of Contents
Advertisement
Quick Links
Advertisement
Table of Contents
Troubleshooting

Related Manuals for DeLonghi ESAM5600


Summary of Contents for DeLonghi ESAM5600
- Page 2 5713216311/ 06.11...
- Page 3 Instrucciones para el uso. Repase y guarde cafEtEra supErautomatica estas instrucciones. Lea cuidadosamente este instructivo antes de usar su aparato eSaM5600 Register this product on-line and receive a free Registre este producto en línea y reciba un ejemplar trial issue of Cook’s Illustrated. Visit www.
- Page 7 CLEAN...
-
Page 9: Table Of Contents
contEnts hEatinG WatEr ........... 16 Preparation ................16 important safEGuarDs ........8 Changing the quantity ............17 SAVE THESE INSTRUCTIONS ............8 clEaninG ............17 short corD instructions ........8 Cleaning the coffee maker ............. 17 Cleaning the coffee grounds container ........17 introDuction ............ -
Page 10: Important Safeguards
i m p o r t a n t s a f E G u a r D s When using electrical appliances, basic safety precautions should always be followed, including the following. • Read all instructions carefully. • Make sure the voltage of your electrical system corresponds to the voltage shown on the bottom of the machine. • Do not touch hot surfaces. Use handles or knobs. • To protect against fire, electrical shock and personal injury, do not immerse cord, plug or appliance in water or other liquid. -
Page 11: Introduction
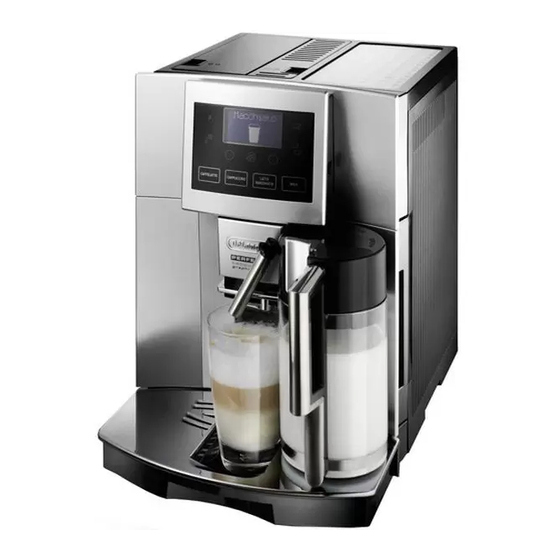
introDuction DEscription Thank you for choosing this coffee machine. To get the very Description of the appliance best out of your new coffee machine it is advisable to read (page 3 - a ) these instructions before using the appliance. This is the only Grinding adjustment dial way to ensure optimum results and ma ximum safety. -
Page 12: Meaning Of Animations
(When in the settings MENU, they change function ac- • The appliance gives off heat. After positioning the ap- cording to the text shown above the icon). pliance on the worktop, leave a space of at least 3 cm cappuccino icon: to deliver a cappuccino. between the surfaces of the appliance and the side and caffElattE icon: to deliver a caffelatte. -
Page 13: Turning The Appliance On
5. “Press OK”: then press the icon corresponding to OK on the Please Note: display (fig. 2). “Please wait...” is displayed and the applian- If the appliance is not used for an extended period, place the ce begins to deliver water from the hot water spout. main switch in the 0 position (fig. 7). The appliance ends the first start up procedure and goes off. -
Page 14: Energy Saving
3. Press the icon to confirm; contrast is reached. The progressive bar indicates the level 4. Press the selection icons < or > until the required langua- of contrast selected. icon to confirm or the p icon to exit ge is displayed; 5. -
Page 15: Adjust Time
enabled: adjust time 1. Choose the “ CLOCK” section as described above. To adjust the time on the display, proceed as follows: 2. Press the selection icons < or > until “Auto-Start” is displa- 1. Choose the “ CLOCK” section as described above. yed. 2. Press the selection icons < or > until “Adjust time” is di- 3. -
Page 16: Quantity" Bar
For full bodied creamier coffee, turn “Quantity” bar coffee Quantity one click anticlockwise towards “1” selected (fl. oz.) (finer ground coffee). For faster MY COFFEE Program from delivery (not a drop at a time), turn ≃0.68 to ≃6.1 one click clockwise towards “7” (co- ≃... -
Page 17: Making Coffee Using Pre-Ground Coffee
• For hotter coffee, see the section “ Tips for a hotter coffee”. Please Note! For a richer denser froth, use skim or 2% milk at refrigerator Important! temperature (about 41°F / 5°C). If the coffee is delivered a drop at a time, too fast and not cre- To avoid milk with poor froth or large bubbles, always clean amy enough or too cold, read the tips in the “Troubleshooting”... -
Page 18: Making Macchiato
(fig. 21). Please Note! 3. Press the CLEAN button (fig. 30) and keep pressing until If during delivery you want to stop preparing milk, press the the progress bar which appears on the display together cappuccino icon or interrupt preparation of the coffee by with the message “Cleaning...”... -
Page 19: Changing The Quantity
avoid splashes). cleaning the coffee grounds container Press the icon (fig. 32). Preparation begins. “Hot When “EMPTY GROUNDS CONTAINER” is displayed, the grounds Water” and the corresponding animation are displayed. container must be emptied and cleaned. 4. Water flows out of the spout. Delivery stops automatically Until the grounds container has been cleaned, the appliance after 250 ml / 0.25 liters. -
Page 20: Cleaning The Water Tank
of the appliance (accessible after removing the drip tray) Please Note! is not dirty. If necessary, remove coffee deposits with the If you encounter difficulty inser- brush provided and a sponge. ting the infuser, before inserting 2. Remove the residues with a vacuum cleaner (fig. 36). it you must adapt it to the right dimension by pressing it forceful- cleaning the water tank... -
Page 21: Descaling
DEscalinG and replace it under the hot water spout. 11. Press the selection icon corresponding to OK to start rin- Descale the machine when the message “DESCALE!” flashes on sing. Hot water flows out of the spout and the message the display. “Rinsing...” is displayed. Important! 12. When the water tank is completely empty, the message Descaler contains acids which may irritate the skin and eyes. “Rinsing Complete... Press OK” is displayed. -
Page 22: Technical Specification
tEchnical spEcification Voltage: 120 V~ 60 Hz max. 10A Absorbed power: 1350W Pressure: 15 bar Water tank capacity: 1,8 L Size: LxHxD: 282x380x441 mm Cable length: 1,5 m Weight: 11,5 Kg Beans container capacity 250 g... -
Page 23: Displayed Messages
DisplayED mEssaGEs DisplayED mEssaGE possiBlE causE solution FILL TANK! • Insufficient water in the tank. • Fill the tank with water and/or insert it correctly, pushing it as far as it will go until it clicks into place. GROUND TOO FINE ADJUST • The grinding is too fine and the coffee is delivered • Repeat coffee delivery and turn the grinding too slowly or not at all. adjustment dial one click clockwise towards “7” MILL! while the coffee mill is in operation. -
Page 24: Troubleshooting
DisplayED mEssaGE possiBlE causE solution INSERT MILK CONTAINER • The milk container is not inserted correctly. • Insert the milk container as far as it will go. CLOSE DOOR! • The service door is open • Close the service door. PRESS CLEAN BUTTON • Milk has been delivered recently and the tubes • Press the CLEAN button and keep it pressed until the inside the milk container must be cleaned. progress bar which appears on the display together with the message “Cleaning...” is complete. Energy Saving •... - Page 25 proBlEm possiBlE causE solution The coffee is delivered too • The coffee is ground too coarsely. • Turn the grinding adjustment dial one click anticlockwise towards “1” while the coffee mill is quickly. in operation (fig. 10). Avoid turning the grinding adjustment dial excessively otherwise when you select two cups, the coffee may be delivered a drop at a time.
-
Page 26: Limited Warranty
Please contact our toll free hotline at 1-866-528-8323 (1-866-Latte-Best) or log onto our website at www.delon- ghi.com residents of canada: Please contact our toll free hotline at 1-888-335-6644 or log onto our website at www.delonghi.com residents of mexico: Please contact our toll free number 01-800-711-8805 for assistance or log onto our website at www.delon- ghi.com...