Table of Contents
Advertisement
Quick Links
Advertisement
Table of Contents

Related Manuals for Dymo Rhino 6500


Summary of Contents for Dymo Rhino 6500
-
Page 1: User Guide
User Guide www.rhinolabeling.com... -
Page 2: Table Of Contents
Getting to Know Your Printer ........ - Page 3 Creating Multi-Line Labels ............. . 12 Using International Characters .
- Page 4 Using Printer Memory ........
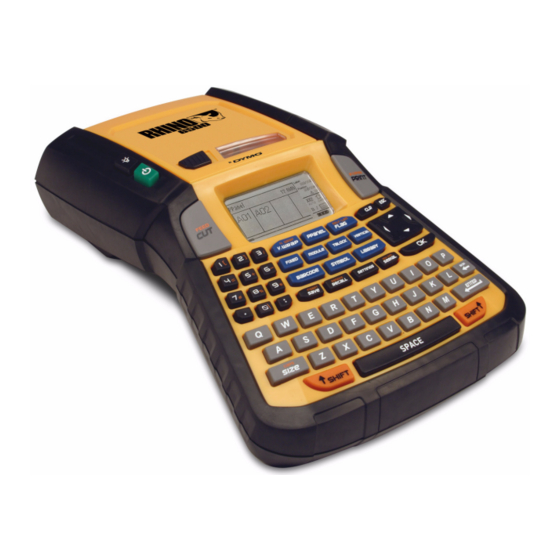
- Page 6 USB connector Tape Exit Backlight Power Tape Door Latch LCD display Print/# of copies Clear Cut/Feed Escape Navigation keys Library Hot Keys Settings Serialization Barcode Symbol Save/Insert Recall/Remove Backspace Enter Size/CAPS Shift Space bar Figure 1 RHINO 6500 Label Printer...
-
Page 7: About Your New Printer
AA alkaline batteries. To insert the battery pack 1. Press the thumb latch on the back of the printer to remove battery compartment cover. See Figure 3. Press thumb latch to open Figure 3 2. -
Page 8: Recharging The Battery Pack
Setting the Tape Width Each time you insert a tape cassette into the printer, you are prompted to set the tape width so the printer knows what size label tape you are currently using. Some of the features you use to design labels are dependent on the width of the tape. -
Page 9: Selecting Units Of Measure
3. Press OK and then select Done (ESC). Getting to Know Your Printer Become familiar with the location of the feature and function keys on your printer. See Figure 1 on the inside front cover. The following sections describe each feature in detail. -
Page 10: Hiding The Caption Bar
General label type. Cutter Button The Cutter button cuts the label tape. When printing multiple labels, the printer automatically cuts each label before printing the next label. You can turn this feature off, so that multiple labels will print continuously. -
Page 11: Working With Label Files
Working with Label Files The printer creates and stores labels as label files. A label file can contain one or more labels. When you create a new label, you also create a new label file. You can then insert additional labels, remove labels, and store the group of labels as a label file in memory. -
Page 12: Changing The Text Style
2. Type the text for the next line. 3. Repeat these steps for each additional line. Using International Characters The printer supports the extended Latin character set using RACE technology. Similar to using a mobile phone keypad, holding down a letter key will scroll through variations of that letter. -
Page 13: Creating Wire Wrap Labels
You select from a number of different wire gauges or cable lengths. The printer then determines the size of the label. The following table shows the selections available. -
Page 14: Creating Flag Labels
Creating Flag Labels Flag labels wrap around a wire or cable leaving the text part of the label extending out from the cable. The text on flag labels is automatically printed on both ends of the label leaving a blank space in the middle that wraps around the cable. -
Page 15: Creating Module Labels
5. Enter the width of each block and press OK. The factory default is 0.5” (17.5 mm). 6. Select Done (ESC) to create the label. 7. Enter the text for each terminal. Use SHIFT + , or = to move among terminals. To create data for the terminal blocks automatically, see Creating a Series of Labels on page 18. -
Page 16: Changing The Label Type
2. Select Vert. lines and press OK. 3. Select On. 4. Press OK and then select Done (ESC). A vertical mark is printed between each cell. Using Barcodes The printer can generate the following types of barcodes. Code 39 EAN 8 Code 128 Auto... -
Page 17: Deleting A Barcode
2. Select Barcode HR and press OK. 3. Select Off. 4. Press OK and then select Done (ESC). Adding Symbols Your printer includes a set of default symbols to use on your labels. The symbols are separated into several categories: Electrical... -
Page 18: Inserting Library Text
When labels are transferred to the printer from RHINO Connect Software, any images are stored separately in the printer as graphic files. You can apply these graphic files to most labels. When a graphic cannot be used with a certain label, a warning appears on the display. -
Page 19: Using Simple Serialization
Using Simple Serialization Simple serialization creates a series of labels by incrementing one alphanumeric character in the pattern. For example, 101, 102, 103, 104, and so on. To use simple serialization 1. Enter the text for your label. 2. Press SERIAL. A box appears around the first character in the label. -
Page 20: Printing Options
3. Select On. 4. Press OK and then select Done (ESC). Pausing between Labels By default the printer pauses after printing each label so you can cut the label. You can turn this feature off to have the labels print continuously. -
Page 21: Adjusting Print Contrast
Cleaning Your Printer Your printer is designed to give you long and trouble- free service, while requiring very little maintenance. Clean your printer from time to time to keep it working properly. To clean the print head 1. Remove the tape cassette. -
Page 22: Using Rhino Connect Software
Using RHINO Connect Software Your printer can be used as a standalone label printer or you can print labels directly from your computer using RHINO Connect Software. This software is optional, and is not included with all printers. RHINO Connect Software offers the following features: •... -
Page 23: Symbols
Symbols The following tables list the default symbols by category. Electrical Voice/Data Audio/Video Warning Punctuation Brackets Arrows Numbers Home Electrical Currency... -
Page 24: Library Text
Library Text The following tables list the library text by category. Location ATTIC KITCHEN BACK LAUNDRY ROOM BASEMENT LEFT BATH LIBRARY BEDROOM LIVING ROOM BILLIARDS ROOM LOBBY CENTER LOWER CLOSET MAIN FLOOR DECK MASTER BATH DEMARC MASTER BEDROOM MEDIA ROOM DINING ROOM OFFICE DRESSING ROOM... - Page 25 Voice/ Data CABLE MODEM LAPTOP NETWORK DSLAM PHONE DEMARC PHONE SYSTEM DESKTOP VoIP INTERNET WIRELESS Security BACK DOOR HEAT DETECTOR CCTV HIGH WATER CAMERA HORN CARBON MONOXIDE LOW TEMP CELL MOTION SENSOR CONTACT CONTROLLER PHONE DOOR POOL DOOR CONTACT POWER DRIVEWAY REMOTE DUAL TECH...
-
Page 26: Troubleshooting
Troubleshooting Review the following possible solutions if you encounter a problem while using your printer. Problem/Error Message Battery Low Battery Empty Poor Print Quality Tape Jam Motor is stalled due to tape jam. Uneven or slanted printing The cassette is not inserted correctly. - Page 27 No response when pressing keys One of the keys may be jammed. If you still need assistance, contact DYMO Customer Support for your country. A list of contact numbers for each country is listed inside the back cover of this User Guide.
- Page 28 Safety Precautions for Lithium-Ion Rechargeable Battery Pack Inaccurate handling of Lithium-ion rechargeable battery may cause leakage, heat, smoke, an explosion, or fire. This could cause deterioration of performance or failure. This may also damage the protection device installed in the battery pack. This could damage equipment or injure users. Thoroughly follow the instructions below. While Charging è...
-
Page 29: Documentation Feedback
We also welcome your suggestions about additional topics you would like to see covered in the documentation. Send email messages to: documentation@dymo.com Please keep in mind that this email address is only for documentation feedback. If you have a technical question,... -
Page 31: Contacting Customer Support
Contacting Customer Support The following table provides a list of telephone numbers to reach DYMO Sales and Support departments. You can also reach DYMO at www.dymo.com. Country Australia België/Belgique Canada Ceská Republika Danmark Deutschland España France Hong Kong Hungaria International... - Page 32 No part of this document may be reproduced or transmitted in any form or by any means or translated into another language without the prior written consent of Sanford, L.P RHINO and RHINO Connect are trademarks or registered trademarks of Sanford, L.P. All other trademarks are the property of their respective holders. www.sanford.com Produced by: DYMO Stamford CT 06902 800-426-7827: www.dymo.com A Newell Rubbermaid Company...