Table of Contents
Advertisement
Advertisement
Table of Contents

Related Manuals for Dymo RHINO 6000


Summary of Contents for Dymo RHINO 6000
- Page 1 User Guide www.rhinolabeling.com...
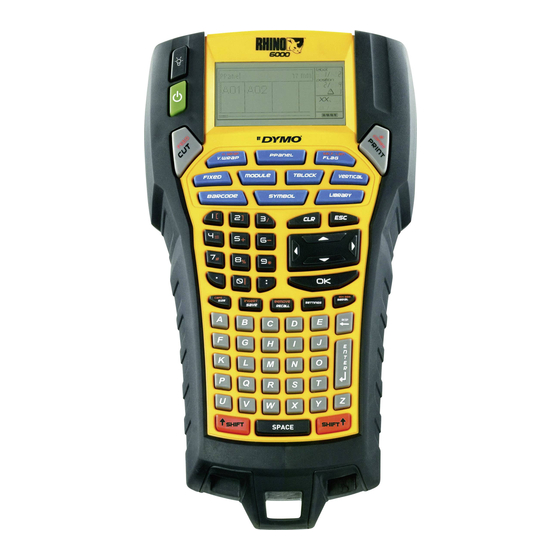
- Page 2 Tape Exit Backlight LCD Display Power Print/# of copies Cut/Feed Hot Keys Library Barcode Escape Symbol Clear Navigation keys Serialization Size/CAPS Save/Insert Settings Recall/Remove Backspace Enter Shift USB connector Space bar Power connector Figure 1 RHINO 6000 Printer...
-
Page 3: Table Of Contents
Contents About Your New Printer ............1 Getting Started . - Page 4 Creating Multi-Line Labels ............. . . 6 Using International Characters .
- Page 5 Using Simultaneous Serialization ............13 Using Advanced Serialization .
-
Page 7: About Your New Printer
About Your New Printer To connect the power adapter 1. Plug the power adapter into the power connector With your new RHINO label printer, you can create a on the bottom of the printer. See Figure 2. wide variety of high-quality, self-adhesive labels. You can choose to print your labels in many different sizes, and styles. -
Page 8: Recharging The Battery Pack
Remove the batteries if the printer will not be 4. Press gently on the cassette until the cassette used for a long period of time. moves into place. The insertion mechanism will guide the cassette into place. Recharging the Battery Pack 5. -
Page 9: Selecting Units Of Measure
To select a language Feature Caption bar indicators 1. Press SETTINGS and select Language. Label i88/i88 2. Select the language. Position 88/88 3. Press OK and then select Done (ESC). è Battery level AUTO CAPS Selecting Units of Measure indicator You can choose to work in inches or millimeters. -
Page 10: Hiding The Caption Bar
Hiding the Caption Bar Navigation Keys The Caption bar at the top of the display shows the The navigation keys operate as follows: current label type and for some label types, additional Function information about the label, such as size or barcode Moves one character to the left in the display type. -
Page 11: Working With Label Files
Working with Label Files 2. Select one of the following: • All to remove all of the labels in the file. The printer creates and stores labels as label files. A • Current to remove the label at the current label file can contain one or more labels. -
Page 12: Changing The Text Style
You can also select Auto as the text size. When Auto is The display shows two lines of text with the Caption selected, the best text size is automatically determined bar displayed; or three lines with the caption bar for the height and width of the label you are creating. hidden. -
Page 13: Creating Wire Wrap Labels
Creating Wire Wrap Labels Creating Horizontal Wrap Labels A Horizontal Wrap label is You can create several types of labels that wrap around placed horizontally along the a cable or wire: vertical wire wrap, horizontal wire length of the wire or cable. The wrap, self-laminating, and flag labels. -
Page 14: Creating Flag Labels
Creating Flag Labels Creating Patch Panel Labels Flag labels wrap around a wire or Patch panel mode allows you to cable leaving the text part of the label a row of ports on a patch label extending out from the panel. -
Page 15: Creating Module Labels
5. Enter the width of each block and press OK. The Using Fuse Multipliers factory default is 0.5” (17.5 mm). Fuse multipliers allow you to adjust the size of 6. Select Done (ESC) to create the label. individual fuse modules within a module type label. 7. -
Page 16: Changing The Label Type
3. Enter a length for the label. Select AUTO to have the 3. Select On. length of the label automatically set to fit the text. 4. Press OK and then select Done (ESC). 4. Press OK to create the label. A vertical mark is printed between each cell. -
Page 17: Deleting A Barcode
3. Press OK. The text of the existing barcode appears. If you transfer a custom set of symbols from the RHINO 4. Edit the barcode text and press OK. Connect™ Software to the printer, an additional set of User symbols becomes available. See Using RHINO Deleting a Barcode Connect Software on page 16 for more information. -
Page 18: Inserting Library Text
My Library text is not included when you select Adding Graphics All from the Library menu. When labels are transferred to the printer from RHINO A complete list of pre-defined text strings can be Connect Software, any images are stored separately in found beginning on page 18. -
Page 19: Using Simple Serialization
Using Simple Serialization 5. Select the second character position you want to increment and press OK. Simple serialization creates a series of labels by 6. Select the amount you want to increment these incrementing one alphanumeric character in the characters on each label and press OK. You can pattern. -
Page 20: Printing Options
Printing Options To collate multiple copies 1. Press SETTINGS. You can choose to print multiple copies of the same 2. Select Collate multi. copies and press OK. label, collate the copies, pause to cut between labels, 3. Select On. advance the label tape, and adjust the print contrast. 4. -
Page 21: Using Printer Memory
Using Printer Memory 2. Use the arrow keys to move to the label file you wish to delete. The printer has a powerful memory feature that can 3. Press and then press OK to clear the memory store label files for later recall. The number of label location. -
Page 22: Using Rhino Connect Software
Using RHINO Connect Software Refer to the RHINO Connect Software Online Help for complete information about using the printer while Your printer can be used as a standalone label printer connected to your computer. or you can print labels directly from your computer using RHINO Connect Software. -
Page 23: Symbols
Symbols The following tables list the default symbols by category. Electrical Brackets Arrows Numbers Voice/Data Home Electrical Audio/Video Warning Punctuation Currency... -
Page 24: Library Text
Library Text The following tables list the library text by category. Location Audio ATTIC KITCHEN ANALOG PHONO BACK LAUNDRY ROOM AUDIO RIGHT BACK SPKR BASEMENT LEFT RIGHT FRONT SPKR BATH LIBRARY CENT FRONT SPKR RIGHT OUTD. SPKR BEDROOM LIVING ROOM CENTER BACKSPKR RIGHT SIDE SPKR BILLIARDS ROOM... - Page 25 Voice/ Data CABLE MODEM LAPTOP NETWORK DSLAM PHONE DEMARC PHONE SYSTEM DESKTOP VoIP INTERNET WIRELESS Security BACK DOOR HEAT DETECTOR CCTV HIGH WATER CAMERA HORN CARBON MONOXIDE LOW TEMP CELL MOTION SENSOR CONTACT CONTROLLER PHONE DOOR POOL DOOR CONTACT POWER DRIVEWAY REMOTE DUAL TECH...
-
Page 26: Troubleshooting
Troubleshooting Review the following possible solutions if you encounter a problem while using your printer. Problem/Error Message Solution Battery Low • Attach the power adapter. Battery Empty • Recharge the battery pack. See Recharging the Battery Pack. • Insert new AA alkaline batteries as a temporary power source. - Page 27 • Press the jammed key firmly until it returns to its normal position. If you still need assistance, contact DYMO Customer Support for your country. A list of contact numbers for each country is listed inside the back cover of this User Guide.
- Page 28 Safety Precautions for Lithium-Ion Rechargeable Battery Pack Inaccurate handling of Lithium-ion rechargeable battery may cause leakage, heat, smoke, an explosion, or fire. This could cause deterioration of performance or failure. This may also damage the protection device installed in the battery pack. This could damage equipment or injure users. Thoroughly follow the instructions below. While Charging è...
-
Page 29: Documentation Feedback
We also welcome your suggestions about additional topics you would like to see covered in the documentation. Send email messages to: documentation@dymo.com Please keep in mind that this email address is only for documentation feedback. If you have a technical question,... -
Page 31: Contacting Customer Support
Contacting Customer Support The following table provides a list of telephone numbers to reach DYMO Sales and Support departments. You can also reach DYMO at www.dymo.com. Country Telephone Support Fax Support Australia 1800/ 633 868 1800/ 817 558 Austria 01/ 599 14 20 12... - Page 32 Produced by: DYMO Stamford CT 06902 800-426-7827: www.dymo.com A Newell Rubbermaid Company © 2007 Sanford, L.P. All Rights Reserved. 04/07 No part of this document may be reproduced or transmitted in any form or by any means or translated into another language without the prior written consent of Sanford, L.P...