Advertisement
Quick Links
Advertisement

Related Manuals for Nikon A1+


Summary of Contents for Nikon A1+
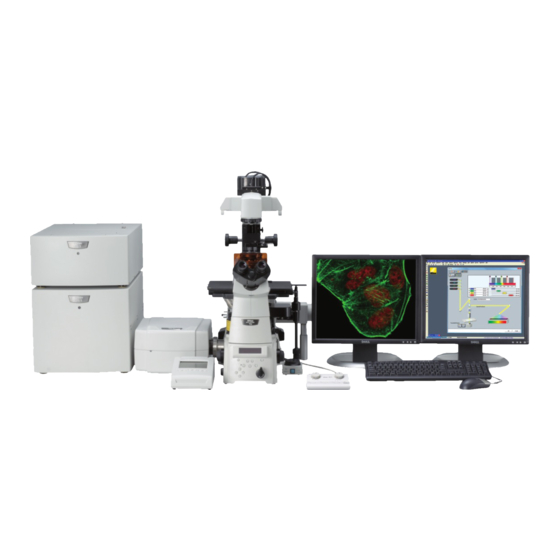
- Page 1 LBIC Nikon confocal A1+ Standard operating procedure Version 1.2 June 2019...
- Page 2 Turning on/off the system 1. Turn on computer 2. Power on A1 controller and laser power supply. Laser 3. Turn the key and select the Laser on/off buttons needed lasers by pressing the buttons. 4. Turn on stage power supply and DIA lamp if bright field is needed A1 controller 5.
- Page 3 Finding your sample 1. Put your sample in the appropriate holder, if you have slides make sure the coverslip is facing down. 2. Start with either 10x or 20x objective 3. Navigate to a suitable place in your sample with the joystick. 4.
- Page 4 Confocal Acquisition: Quick Start Setup your channel requirements HV (Gain), start at 100 for 405/640 and 25 for 488/561 PMTs Offset adjustment, leave at 0 Laser Power, start at 2% Start with a scan size of 512x512 and scan speed of 2.2 µsec. Select “Normal”...
- Page 5 Confocal Acquisition: ND Acquisition Very useful for setting up advanced imaging protocols 1. Enter file save path (O:\ is recommended) 2. Combine function tabs as needed by clicking the boxes • Time is for time lapse videos • XY saves coordinates (Z can be included with the include Z box) •...
- Page 9 Z-focus adjustment Joystick...
- Page 10 Changing sample holder The confocal sample holders: Multi-holder (slides and small petri dishes) Multiwell plate holder (for all standard multiwell plates) Oko-labs stage top incubator (see next page) with fittings for two 35mm petri dishes and one 75mm x 25mm slide (standard slides and chamber slides) Exchanging between them is simple Remove plastic screws with screwdriver located on top of...
- Page 11 Oko-lab stage incubator Using the stage top incubator Please ask Sebastian the first time you want to use the stage top incubator/holder for more in- depth instructions Open C0 valve on tube Turn on incubator tube for Change to the incubator sample incubator holder (see previous page for instructions)
- Page 12 Using the Perfect Focus System (PFS) (12)
-
Page 13: Troubleshooting
Troubleshooting • No light when looking in eye port? • Check that the Sola is activated • Focus is wrong • Start at around Z: 2000 and go up slowly • Sample upside down? • Always put the sample with the coverslip facing the objective •... -
Page 14: Tips And Tricks
Tips and tricks • Most dialogs in NIS-elements can be found under the View tab -> Acquisition/Analysis/Visualization Controls • As a shortcut these can also be found by right clicking in the back open space of elements • NIS-Elements obeys most Windows-based functions, shift/control and Alt are used often; right-clicks are used to display options/properties •... - Page 15 Tips and tricks cont. • Use the ND Acquisition GUI to simplify the imaging process • Create Optical configurations (OC) to save clicks • When creating new OC, uncheck the objective box in the bottom left margin to avoid unwanted objective changes •...