
Related Manuals for Nikon ECLIPSE TS100


Summary of Contents for Nikon ECLIPSE TS100
- Page 1 M590J/E 11.10.NC.1 (1/2) 培養倒立顕微鏡 ECLIPSE TS100/TS100-F TS100LED MV/TS100LED-F MV 使用説明書 Inverted Microscope ECLIPSE TS100/TS100-F TS100LED MV/TS100LED-F MV Instructions...
-
Page 2: Introduction
You can use this product without the need of special training sessions by reading this manual thoroughly before use. Please contact your nearest Nikon representative if you have any questions or find any errors and anything you are aware of. -
Page 3: Table Of Contents
Contents Contents Introduction ...................... E-1 Safety Precautions ..................... E-3 WARNING and CAUTION Symbols Used in This Manual ......E-3 Meaning of Symbols Used on the Product..........E-3 WARNING and CAUTION for Using the TS100/TS100-F ....E-4 WARNING and CAUTION for Using the TS100LED MV/TS100LED-F MV .......... -
Page 4: Safety Precautions
• If the input voltage shown differs from the local voltage level, do not turn on the microscope. Do the following instead: Different voltage on the nameplate: Contact your nearest Nikon representative. Different voltage on right of the AC inlet: Change the input voltage setting; refer to P.33. -
Page 5: Warning And Caution For Using The Ts100/Ts100-F
Disassembly may cause malfunction and/or electrical shock, and will lead to the forfeiture of all claims against warranty. Do not disassemble any part other than those described in this manual. If you experience any problem with the microscope, contact your nearest Nikon representative. 2. Read the instructions thoroughly. - Page 6 Safety Precautions WARNING 5. Cautions on lamp replacement • When replacing the lamp, wait approximately 30 minutes after turning off the lamp, and make sure that the lamp and its surrounding areas have cooled sufficiently before working. • To prevent electric shock and product damage, turn off the power of the microscope (press the power switch to the “○”...
- Page 7 8. Notes on handling flammable solvents The following flammable solvents are used with the product: • Immersion oil (Nikon immersion oil for oil immersion objectives) • Absolute alcohol (ethyl alcohol or methyl alcohol for cleaning optical parts) • Petroleum benzine (for wiping off the immersion oil) •...
- Page 8 Wipe dry the inside if there is any moisture. Check if the lamp cable connector or AC inlet on the rear panel are wet, and if so, wipe them dry. If any liquid or foreign matter gets inside, do not use the microscope, but contact your nearest Nikon representative.
-
Page 9: Warning And Caution For Using
Disassembly may cause malfunction and/or electrical shock, and will lead to the forfeiture of all claims against warranty. Do not disassemble any part other than those described in this manual. If you experience any problem with the microscope, contact your nearest Nikon representative. 2. Read the instructions thoroughly. - Page 10 Wipe dry the inside if there is any moisture. Check if the lamp cable connector or AC inlet on the rear panel are wet, and if so, wipe them dry. If any liquid or foreign matter gets inside, do not use the microscope, but contact your nearest Nikon representative.
-
Page 11: Notes On Handling The Product
Notes on Handling the Product Notes on Handling the Product 1. Handle with care. The microscope is a precision optical instrument. Handle it carefully and do not subject it to strong physical shocks and vibrations. The accuracy of the objective in particular may be adversely affected by even a weak physical shock. - Page 12 Notes on Handling the Product 4. Notes on handling lamps (for TS100/TS100-F only) • Do not touch the lamp glass with bare hands. This may soil the glass surface, degrade performance, damage the lamp, and/or reduce the life expectancy of the lamp. Wear gloves or use a piece of cloth when handling lamps.
-
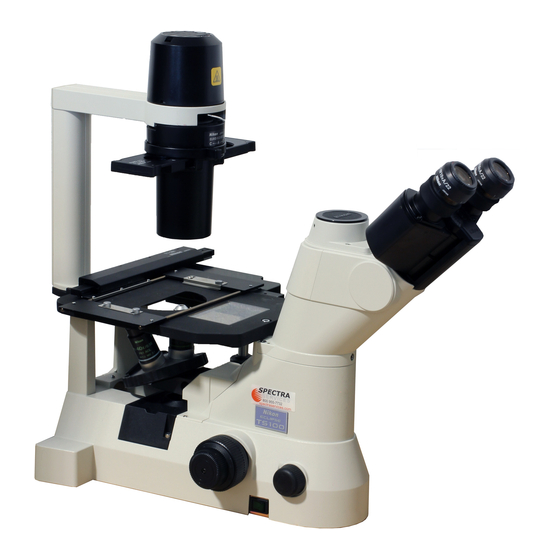
Page 13: Names Of Parts
Power cord *1 This photo shows an example of ECLIPSE TS100-F with ELWD condenser. *2 The light source for ECLIPSE TS100/TS100-F is halogen lamp, and the light source for ECLIPSE TS100LED MV/TS100LED-F MV is white LED. *3 ECLIPSE TS100LED MV/TS100LED-F MV is designed for AC power of 100 to 240 V AC and 50/60 Hz, thus has no fuse. -
Page 14: Names Of Operational Parts
Press the power switch to the “○” position connector (voltage selector) to turn off the power and to turn off the (for TS100/TS100-F only) lamp. (The switch also goes off.) This photo shows an example of ECLIPSE TS100-F with ELWD condenser. E-13... -
Page 15: Microscopy
Microscopy Microscopy Turn on the lamp. Turn on the power to the microscope (press the power switch to the “ ○ ” position) to turn on the lamp. Adjust the brightness of the viewfield with the brightness adjuster. (Turn clockwise to increase brightness. -
Page 16: Adjust The Diopter
3 Microscopy 1 Microscopy Adjust the diopter. Adjust the diopter adjustment rings of the eyepieces according to the visual power of your Remove the slider if any. right and left eyes. Once this adjustment is complete, full performance of the objectives will be properly achieved, including their parfocality. - Page 17 3 Microscopy 1 Microscopy Observe the specimen. Observe the specimen using the optimal microscopy method. For phase contrast microscopy, go to “1-1 Phase Contrast Microscopy”. For modulation contrast (NAMC) microscopy, go to “1-2 Modulation Contrast (NAMC) Microscopy”. For bright-field microscopy, go to “1-3 Bright-field Microscopy”. Turn off the lamp.
-
Page 18: Microscopy
3 Microscopy 1-1 Phase Contrast Microscopy Phase Contrast Microscopy In order to perform phase contrast microscopy, the following items are required: an ELWD condenser, objectives for phase contrast microscopy, a phase slider (either non-centerable or centerable), an annular diaphragm Ph2 (when Ph2 objective is used), a GIF filter and a centering telescope (only when a centerable phase slider is used). - Page 19 3 Microscopy 1-1 Phase Contrast Microscopy Center the annular diaphragm. (Only when using a centerable phase Centering slider.) telescope Center the annular diaphragm so that it aligns with the phase ring of the objective. Perform this adjustment with the center of the container (having an even thickness) in the optical path.
-
Page 20: Modulation Contrast (Namc) Microscopy
3 Microscopy 1-2 Modulation Contrast (NAMC) Microscopy Modulation Contrast (NAMC) Microscopy In order to perform NAMC microscopy, the following items are required: an NAMC condenser, objectives for NAMC, an NAMC slider (with slit diaphragms), and a centering telescope. Before proceeding to the following operations, perform steps 1 to 6 in “1 Microscopy”. Attach the NAMC condenser. - Page 21 3 Microscopy 1-2 Modulation Contrast (NAMC) Microscopy Orient the slit diaphragm. Centering Orient the slit diaphragm so that it properly telescope overlaps the modulator (focal plane pattern) on the NAMC objective. (1) Place the 10x NAMC objective (NAMC1) in the optical path.
- Page 22 3 Microscopy 1-2 Modulation Contrast (NAMC) Microscopy Select the desired NAMC objective. Turn the revolving nosepiece and place the NAMC objective having the desired magnification in the optical path. (Turn the revolving nosepiece until you feel it click in place.) Place the slit diaphragm corresponding to the objective in the optical path.
-
Page 23: Bright-Field Microscopy
3 Microscopy 1-3 Bright-field Microscopy Bright-field Microscopy Before proceeding to the following operations, perform steps 1 to 6 in “1 Microscopy”. Remove the annular diaphragm and slit diaphragm from the optical path. If a phase slider or NAMC slider is set, enter an empty hole into the optical path or remove the slider. -
Page 24: Operation Of Each Part
Operation of Each Part Aperture Diaphragm The aperture diaphragm adjusts the numerical aperture (N.A.) of the illumination system. Aperture of this diaphragm determines optical resolution, brightness, contrast, and depth of focus. Narrowing down the aperture diaphragm decreases resolution and brightness, and increases contrast and depth of focus. -
Page 25: Specimen And Stage
4 Operation of Each Part 2 Specimen and Stage Specimen and Stage Round-holed and long-holed rings When using a small container such as φ 35-mm Petri dish, always attach the supplied round-holed ring to the stage. Using the long-holed ring instead may result in the dish falling through the opening. -
Page 26: Focusing Device
4 Operation of Each Part 3 Focusing Device Remove the condenser for Using large containers observations when using a large container. When using oblong containers, more stable observations are possible by attaching a sub-stage to the sides of the stage. (For details on attaching the sub-stage, see P.37.) When using a large, thick container, remove the condenser and place the container on the stage. -
Page 27: Filters
(The annular diaphragm must also be centered when using a centerable phase slider before making observations.) Although Nikon also offers an objective for phase contrast microscopy with a Ph code of Ph3, this objective is for high-magnification applications and cannot be used for phase contrast observation with this microscope. -
Page 28: Oil Immersion Objectives
Objectives which have a black band around the tip and on which "Oil" is printed are oil immersion objectives. Oil immersion objectives are used by filling Nikon immersion oil between the tip of the objective and the specimen. Use non-fluorescent oil when performing fluorescence microscopy with an oil immersion objective intended for fluorescence microscopy. - Page 29 • Wipe off any oil that collects on the outside of the container during the course of use. • Be careful so that oil does not get in your eyes. Although the Nikon immersion oil is not toxic, apply the first-aid measures listed below if it should come in contact with the skin or enter the eyes.
-
Page 30: Modulation Contrast Method
4 Operation of Each Part 6 Modulation Contrast Method Modulation Contrast Method Modulation Contrast (NAMC) System The Modulation Contrast System offers you a stable relief image which can well be compared to the differential interference contrast microscopy (DIC microscopy). But, unlike the DIC microscopy, you can observe the specimen inside the plastic containers since this system does not require its illumination to be polarized. - Page 31 4 Operation of Each Part 6 Modulation Contrast Method See figure 2 for the principle of the modulation contrast. There is a slit diaphragm on the condenser aperture, and modulator inside the NAMC objective. (The modulator is a density filter placed at the exit pupil of the NAMC objective.
-
Page 32: Photomicrography (For Ts100-F/Ts100Led-F Mv Only
4 Operation of Each Part 7 Photomicrography (for TS100-F/TS100LED-F MV only) Photomicrography (for TS100-F/TS100LED-F MV only) When using the TS100-F/TS100LED-F MV, it is possible to attach a camera or photomicrographic equipment to the vertical tube for taking photographs or observing images on a TV monitor. See the operation manuals accompanying any cameras or photomicrographic equipment to be used for details on proper handling. - Page 33 <1> Photomicrographic vertical tube (secured by two clamp screws) <2> PL lens (large projection lens) <3> TMS-F mount adaptor <4> Nikon single lens reflex camera body (Note that photometric feature of some models may not function on the TS100-F.) <5> Eyepiece cap for camera <6>...
-
Page 34: Assembly
• If the voltage indicated on the nameplate differs from local voltage, do not turn on the power but contact your nearest Nikon representative immediately. • If the voltage indicated to the immediate right of... - Page 35 5 Assembly 1 Assembling the Basic Set Replacing fuses (for TS100/TS100-F only) WARNING In order to prevent electrical shock and/or damage to equipment, be sure to turn off the microscope's power (press the power switch to the “○” position) and unplug the power cord before replacing fuses.
-
Page 36: Connecting The Power Cord
5 Assembly 1 Assembling the Basic Set Attaching a condenser Slide on the condenser to the illumination pillar and secure it by a clamp screw. Attaching objectives Condenser Objectives are screwed into the revolving nosepiece from the top of the stage. Attach objectives so that the magnification increases as the revolving nosepiece is turned clockwise as viewed from above. -
Page 37: Assembling Components Not Included In The Basic Set
5 Assembly 2 Assembling Components Not Included in the Basic Set ■ For TS100LED MV/TS100LED-F MV (1) Turn off the power of the microscope (press the power switch to the “○” position). (2) Connect the socket of the specified power cord to the AC inlet on the rear of the microscope and connect the plug to an AC electrical outlet. -
Page 38: Mechanical Stage
5 Assembly 2 Assembling Components Not Included in the Basic Set Shipping clamp Mechanical stage (1) Remove the round-holed or long-holed ring from the stage if any is attached. (2) Peal off the securing tapes for transportation (at two locations). (3) Loosen the bolts fixing the shipping clamp for three turns. -
Page 39: Troubleshooting
If any of the following problems occurs, be sure to check the following table for possible causes before requesting service. If you detect problems that are not listed below or the problem still persists after measures are taken, turn off the device and contact your nearest Nikon representative. Optical Dirt or dust in viewfield. - Page 40 No immersion oil is applied to the tip of Apply the Nikon immersion oil. (P.27) an oil-immersion objective. The Nikon immersion oil is not used. Use the Nikon immersion oil. The immersion oil contains air bubbles. Remove the air bubbles. (P.28) Immersion oil adhering to the tip of the dry-type objective.
- Page 41 6 Troubleshooting 1 Optical Field of view is too bright. Causes Corrective Measures Turn the brightness adjuster to attain a Lamp voltage is too high. suitable brightness. (P.14) Field of view is too dark. Causes Corrective Measures Turn the brightness adjuster to attain a Lamp voltage is too low.
- Page 42 6 Troubleshooting 1 Optical Condenser is not installed properly. Install the condenser correctly. (P.35) Lamp is not installed properly. Install the lamp correctly. (P.34) (for TS100/TS100-F only) Dirt or dust on lens (condenser, Clean the lens. (P.46) objective, eyepiece). Specimen holder on the stage is in Move the holder.
-
Page 43: Operational
6 Troubleshooting 2 Operational Operational Cannot focus even by moving objective to upper limit. Causes Corrective Measures Specimen surface is too far from stage Locate closer to stage surface. surface. Cannot focus with 20x or 40x objective. Causes Corrective Measures Use a culture container of thickness Culture container is too thick. - Page 44 6 Troubleshooting 2 Operational Eyes get tired during observations. Causes Corrective Measures Interpupillary adjustment has not been Perform interpupillary adjustment. performed. (P.14) Diopter adjustment has not been Perform diopter adjustment. (P.15) performed. Turn the brightness adjuster to attain a Brightness is inadequate. suitable brightness.
-
Page 45: Electrical
6 Troubleshooting 3 Electrical Electrical Lamp does not turn on even when power switch is on. Causes Corrective Measures Insert the power cord into an electrical No electricity. outlet. (P.35) Power cord is not connected to the Insert the power cord into the AC inlet. microscope main body. - Page 46 6 Troubleshooting 3 Electrical Lamps burn out quickly. (for TS100/TS100-F only) Causes Corrective Measures Not using the specified lamp. Use the specified lamp. (P.34) Set voltage selector to match the local Input voltage is wrong. voltage. (P.33) E-45...
-
Page 47: Care And Maintenance
• We especially recommend that the objectives and eyepieces be kept in a container (such as a desiccator) with desiccant in it. Regular Inspection (Charged) • Regular inspection of this microscope is recommended to maintain peak performance. • Contact your nearest Nikon representative for details about regular inspection. E-46... -
Page 48: Specifications
It is intended for the medical professional and those who work on experimentations in the field of genetics, immunology, physiology, pharmacology, neurology, cellular biology and molecular biology. Performance Properties (1) Model name ECLIPSE TS100 ECLIPSE TS100-F ECLIPSE TS100LED MV ECLIPSE TS100LED-F MV (2) Optical system... - Page 49 8 Specifications 2 Performance Properties (9) Focusing Fine focus knob graduation: 2 μm per graduation mechanism Fine focus knob travel: 0.2 mm up or down per turn Coarse focus knob travel: About 37.7 mm up or down per turn Vertical travel range for revolving nosepiece: 7 mm up and 2 mm down from the reference position (stage surface) (10) Photomicrographic...
- Page 50 8 Specifications ■ TS100/TS100-F (Model for 100, 110 and 120V AC areas) (14) Power Cord • UL listed detachable power cord set. 3-conductor grounding Type SVT, No.18 AWG, 3 m long maximum, rated at 125 V AC minimum. Use the above power supply cord only. Using the wrong power cord may result in danger or fire.
-
Page 51: Physical Properties
8 Specifications 3 Physical Properties Physical Properties (1) Model name ECLIPSE TS100 ECLIPSE TS100-F ECLIPSE TS100LED MV ECLIPSE TS100LED-F MV (2) Dimension and Weight ECLIPSE TS100: 228(W) x 517(D) x 480(H) mm, 7.5 kg ECLIPSE TS100-F: 228(W) x 517(D) x 480(H) mm, 8.1 kg ECLIPSE TS100LED MV: 228(W) x 507(D) x 480(H) mm, 8.5 kg... - Page 52 8 Specifications (5) Safety Standards Compliance • UL listed product. (C-UL US Listing Mark approved) • This product meets FCC Part 15 Subpart B Class A requirements: This equipment has been tested and found to comply with the limits for a Class A digital device, pursuant to Part 15 of the FCC Rules.
- Page 53 目次 J-11...
- Page 54 This symbol is provided for use in the People’s Republic of China, for environmental protection in the fi elds of electronic information products.
- Page 55 1300 Walt Whitman Road, Melvile, N.Y. 11747-3064, U.S.A. 1300 Walt Whitman Road, Melvile, N.Y. 11747-3064, U.S.A. tel. +1-631-547-8500 tel. +1-631-547-8500 NIKON INSTRUMENTS EUROPE B.V. NIKON INSTRUMENTS EUROPE B.V. Laan van Kronenburg 2, 1183 AS Amstelveen, The Netherlands Laan van Kronenburg 2, 1183 AS Amstelveen, The Netherlands tel.