Table of Contents
Advertisement
Advertisement
Table of Contents

Related Manuals for Nikon eclipse Ti-U/B


Summary of Contents for Nikon eclipse Ti-U/B
- Page 1 M449 E 07.9.NF.1 Inverted Microscope Instructions...
-
Page 3: Introduction
Introduction Thank you for purchasing a Nikon product. This instruction manual is written for users of Nikon Inverted Microscope Eclipse Ti-U, Ti-U/B, Ti-S, and Ti-S/L100. To ensure correct usage, read this manual carefully before operating the product. • No part of this manual may be reproduced or transmitted in any form without prior written permission from Nikon. -
Page 4: Safety Precautions
Safety Precautions To ensure correct and safe operation, read this manual before using the product. Warning and Caution Symbols in this Manual Although this product is designed to be completely safe during use, incorrect usage or failure to follow the safety instructions provided may cause personal injury or property damage. - Page 5 If the indicated input voltage does not match your regional voltage supply, do not use the power supply device, and contact Nikon. Use of a power supply device with the inappropriate voltage rating may result in overheating or fire due to overcurrent, and may also cause damage the power supply device and connected devices.
- Page 6 Safety Precautions Warning Check the combination of dia pillar illuminator, lamp, and power supply device. The combination of the dia pillar illuminator and the power supply device is specified based on the lamp ratings (12V/100W or 6V/30W) and the power voltage. Use them in the correct combination according to the instructions on page 55.
- Page 7 Warning 10. Notes on handling flammable solvents The following flammable solvents are used with the product: • Immersion oil (Nikon Immersion Oil for oil immersion objectives) • Absolute alcohol (ethyl alcohol or methyl alcohol for cleaning optical parts) • Petroleum benzine (for wiping off the immersion oil) •...
- Page 8 Then, wipe off the liquid with a piece of dry cloth. Intrusion of foreign matters into the product may also result in malfunctions. If liquids or foreign matters enter the product, do not use the product, and contact Nikon. Weak electromagnetic waves The product emits weak electromagnetic waves.
-
Page 9: Notes On Handling The Product
Safety Precautions Notes on Handling the Product Handle with care. The product is a precision optical instrument. Handle the product with care and avoid physical shocks and vibrations. In particular, the precision of objectives may be lost by even weak physical shocks. Installation location and storage location The product is a precision optical instrument. - Page 10 Safety Precautions Notes on using the focus knobs • Never rotate the left and right focus knobs in the opposite directions at the same time. Doing so may damage the product. • Do not rotate the focus knobs past their limit. Doing so may damage the product. Protecting the ports.
-
Page 11: Table Of Contents
Contents Introduction..............................1 Safety Precautions ............................2 Warning and Caution Symbols in this Manual ......................2 Symbols on the Product ............................. 2 Notes on Handling the Product ..........................7 Contents ................................9 Part Names..............................11 Microscope Configuration ..........................12 1.1.1 Ti-U, Ti-U/B............................. 12 1.1.2 Ti-S, Ti-S/L100 .......................... - Page 12 Contents Condenser Operation............................ 65 3.7.1 TI-C Condenser Turret (System Condenser).................. 65 3.7.2 ELWD-S Condenser ........................66 Eyepiece Tube Operation ..........................67 3.8.1 Diopter Adjustment ......................... 67 3.8.2 Interpupillary Distance Adjustment ....................67 3.8.3 Eyepiece Tube Shutter Operation ....................68 3.8.4 Bertrand Lens Operation ........................
-
Page 13: Part Names
Part Names This chapter describes the name of each part of the product. When using the product for the first time, refer to this chapter and check the name and the position of each part. Also refer to this chapter for names and positions of the controls whenever necessary. •... -
Page 14: Microscope Configuration
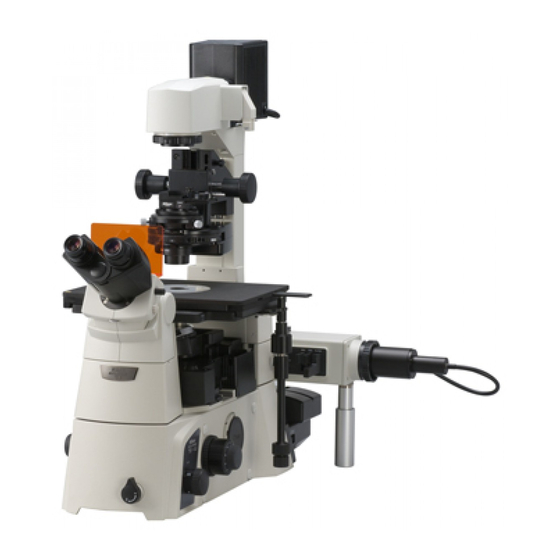
Chapter 1 Part Names 1.1 Microscope Configuration Microscope Configuration 1.1.1 Ti-U, Ti-U/B The illustrations below show the Ti-U microscope body with the following accessories: TI-DH Dia Pillar Illuminator 100W, TI-C Condenser Turret, D-LH/LC Precentered Lamphouse LC, 12V 100W halogen lamp, TI-PS100W Power Supply, TI-SR Rectangular Mechanical Stage, TI-T-B Eyepiece Base Unit, TI-TD Eyepiece Tube B, CFI 10x eyepieces, TI-ND6 Sextuple DIC Nosepiece, objectives, etc. -
Page 15: Ti-S, Ti-S/L100
Chapter 1 Part Names 1.1 Microscope Configuration 1.1.2 Ti-S, Ti-S/L100 The illustrations below show the Ti-S microscope body with the following accessories: TI-DS Dia Pillar Illuminator 30W, ELWD-S Condenser, TE-PS30 30W Power Supply, TI-SR Rectangular Mechanical Stage, TI-T-B Eyepiece Base Unit, TI-TS Eyepiece Tube B, CFI 10x eyepieces, TI-N6 Sextuple Nosepiece, objectives, etc. -
Page 16: Microscope Base
Chapter 1 Part Names 1.2 Microscope Base Microscope Base To keep out extraneous light and dust, be sure to attach the provided caps to all ports not in use. Nosepiece mount Dia pillar illuminator mount (A carrying handle is attached for transportation) Cover Filter turret mount Eyepiece base unit... -
Page 17: Left View
Chapter 1 Part Names 1.2 Microscope Base Left View Epi-fl illumination field diaphragm slider mount Dia illumination lamp ON/OFF switch Dia illumination brightness control knob 6V30W 12V100W MIN. MAX. Fine focus knob, Left side port Coarse focus knob, Torque adjustment ring for coarse focus knob Figure 1-6 Microscope Base (Left View) Rear View (Connector Panel) Epi-fl illumination mount... -
Page 18: Eyepiece Base Unit, Eyepiece Tube, And Eyepieces
Chapter 1 Part Names 1.3 Eyepiece Base Unit, Eyepiece Tube, and Eyepieces Eyepiece Base Unit, Eyepiece Tube, and Eyepieces The following eyepiece base units, eyepiece tubes, and eyepieces can be mounted on the observation port of the microscope. TI-T-B Eyepiece Base Unit Basic eyepiece base unit. - Page 19 Chapter 1 Part Names 1.3 Eyepiece Base Unit, Eyepiece Tube, and Eyepieces TI-TS Eyepiece Tube B Eyepieces Simple and basic eyepiece tube. (both sides, sold separately) Binocular part Figure 1-11 TI-TS Eyepiece Tube B TI-TD Eyepiece Tube B Eyepiece tube with a manual shutter and a Bertrand Eyepieces (both sides, lens.
-
Page 20: Stage
Chapter 1 Part Names 1.4 Stage Stage The following stages can be attached to the product. TI-SR Rectangular Mechanical Stage The specimen can be moved in the X and Y Stage ring directions by operating the stage knob. (concentric ring) The rectangular mechanical stage comes with two stage clips for culture vessels, and the following two Rack... -
Page 21: Dia Pillar Illuminator
Chapter 1 Part Names 1.5 Dia Pillar Illuminator Dia Pillar Illuminator Ti series microscopes can be used with the following two types of dia pillar illuminators. The two dia pillar illuminators differ in lamp rating (12V 100W or 6V 30W) and support different microscopy methods. Select the dia pillar illuminator to suit your application. -
Page 22: Condenser
Chapter 1 Part Names 1.6 Condenser Condenser 1.6.1 TI-C Condenser Turret (System Condenser) The TI-C Condenser Turret allows you to attach various optical elements to a turret and select them as necessary for different microscopy methods. This type of condenser is referred to as a “system condenser”. System Condenser (Mounted on TI-DH Dia Pillar Illuminator 100W) Condenser focus knob Condenser focus knob... -
Page 23: Elwd-S Condenser
Chapter 1 Part Names 1.6 Condenser 1.6.2 ELWD-S Condenser The ELWD-S Condenser supports bright-field Centering knob microscopy and phase contrast microscopy. It can Clamp screws be used with both 100W and 30W dia pillar (both sides) illuminators. Condenser Centering knobs (both sides) Turret Condenser lens... -
Page 24: Power Supply
Chapter 1 Part Names 1.7 Power Supply Power Supply 1.7.1 TI-PS100W Power Supply Warning The bottom of the power supply device becomes hot during use. Do not block the air vents on the side of the product. POWER indicator 12VDC output connector Brightness EXTERNAL connector... -
Page 25: Te-Ps30W Power Supply A (For 100-120V), Te-Pse30 Power Supply A (For 220-240V)
Before turning on the power supply, check that the input voltage indicator matches the power voltage in your area. If the voltages do not match, do not turn on the product, and contact Nikon. Use of the product under a wrong voltage may result in malfunction or fire. •...