Table of Contents
Advertisement
Quick Links
Quick-Start Guide for the
Kenwood TM-D710GA
at MCACS Hospital Stations
Version 1.1
12/29/2019
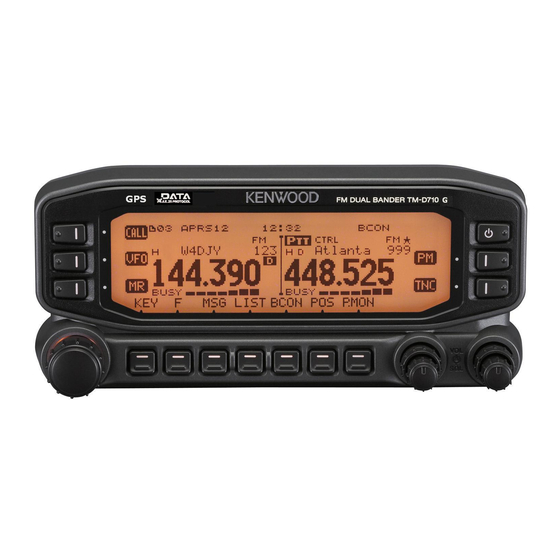
Figure 1
A.
Equipment case and set up
Holy Cross Hospital Silver Spring maintains a Pelican case with two Kenwood TM-D710GA
dual band FM transceivers. The TX/RX units are installed on a plate in the case. The power
supply is installed under the plate and wired to the TX/RX units. The operation panels (aka
control heads), microphones, and speakers are stored under the plate with associated connection
cables. The antennas are wired to N connectors mounted on a wall plate. The antenna cables
have an N connector for the wall plate end and a PL-259 connector for the TX/RX end. Setting
up is a matter of connecting the antenna cables, plugging in the operation panels and microphone
or headset, and plugging in the attached power cord. Finally, a laptop computer can be
connected to the operation panel.
1
Advertisement
Table of Contents

Related Manuals for Kenwood TM-D710GA


Summary of Contents for Kenwood TM-D710GA
- Page 1 Figure 1 Equipment case and set up Holy Cross Hospital Silver Spring maintains a Pelican case with two Kenwood TM-D710GA dual band FM transceivers. The TX/RX units are installed on a plate in the case. The power supply is installed under the plate and wired to the TX/RX units. The operation panels (aka control heads), microphones, and speakers are stored under the plate with associated connection cables.
- Page 2 At Medstar Montgomery Medical Center, the TX/RX Units are permanently mounted in a wall cabinet and the required cables for attaching a microphone, external speaker, and control head are run to the operating position. Placeholder for photo of setup at Medstar Montgomery Figure 2...
-
Page 3: Operation Panel And Microphone Connection
OPERATION PANEL AND MICROPHONE CONNECTION Plug the microphone plug into the MIC jack, then connect the operation panel to the TX/ RX unit with the supplied cable. Figure 2 ANTENNA CABLE CONNECTION Figure 3... - Page 4 ③ The PC port is used only for programing the radio using a Kenwood PG-5G serial cable or compatible USB programming cable. Use the COM port on the Operation Panel to connect a laptop for packet-based data modes such as Winlink using the radio’s built-in TNC.
- Page 5 COMPUTER CONNECTION AND OPERATION PANEL CONNECTION ① Newer radios in the TM-D710 series have an internal GPS receiver. An external GPS can be connected if the radio is used indoors. We don’t use the GPS feature at our hospital stations. ②...
- Page 6 USING A HEADSET WITH BOOM MICROPHONE A headset is a very useful accessory when operating in a busy EOC. At each of the hospital stations equipped with TM-D710 radio, we have provided a Yamaha CM-500 headset, footswitch, and junction box for connecting these accessories to the radio. The junction box has an attached external speaker.
-
Page 7: Operation Panel
B. OPERATION PANEL Figure 8 Press the top right button [ ] ⑯ to turn the transceiver power ON and OFF. Rotate the [BAND SEL] ⑫ to adjust the speaker volume. Press the left [BAND SEL] to select the A band. Press the right [BAND SEL] to select the B band. Press [BAND SEL] (1s) to toggle between single and dual-band mode. -
Page 8: Selecting An Operating Mode
Press [REV] ⑧ to turn the Reverse function ON or OFF. Press [REV] (1s) to turn the Automatic Simplex Checker ON. Press [LOW] ⑨ to toggle the transmit output power as follows: Middle Power ➡ Low Power ➡ High Power. Press [TNC] ⑭... -
Page 9: Menu Mode
D. MENU MODE Many functions on this transceiver are selected or configured through the Menu instead of physical controls. 1. Press [F], Tuning control to access the Menu. 2. Rotate the Tuning control to select your desired setup category. 3. Press the Tuning control to set the selected category. The Menu name and number appear on the display. - Page 10 2m channel. The two bands function as two independent single-band radios unless the radio is set up for crossband operation. Set the Com Port Speed to 9600 – Menu Mode, Menu 929. Winlink VHF Operation — Laptop Setup (Windows) We are currently operating in the BYOL (bring your own laptop) mode. We are working on having a computer set up at the hospital with the software installed and configured.
- Page 11 Session. This brings up a new session window. Click on Settings. For the Packet TNC Type, choose “Kenwood TM-D710 B-Band.” Under Serial Port: select the COM port that you previously identified, and leave the baud rate at 9600. Select Disabled under AutoConnect Time.
- Page 12 WM3M-10 145.090 One White Flint North, Rockville, MD WA3SWJ-10 145.750 Potomac, MD WA3YOO-9 145.750 Ashton, MD WA3YOO-10 145.750 Germantown, MD W3LRC-10 145.750 Laurel, MD W3PGC-10 145.750 Landover Hills, MD W3AAC-10 145.010 Millersville, MD (AA Co) N2LEE-10 145.730 Herndon, VA Unfortunately, the hospital is surrounded by substantial ridges in virtually all directions. This makes simplex VHF/UHF communications a bit of a challenge.
-
Page 13: Appendix A. Menu Configuration
Appendix A. MENU CONFIGURATION... - Page 17 Version Date Description...
- Page 19 The TM-D710 has five different programmable “personalities.” I once got into a situation where every time I turned off the radio, when I turned it back on, it had “forgotten” what frequencies I was using and a whole lot of other settings as well.