Advertisement
Available languages
Available languages
Quick Links
PORTABLE TRANSDUCER Installation Guide
Use the instructions in this guide to install the portable transducer.
NOTE: The procedures and features described in this guide are subject to change without notice. This guide was written in English and may
have been translated to another language. Humminbird® is not responsible for incorrect translations or discrepancies between documents.
NOTE: The illustrations in this guide may not look the same as your product, but your unit will function in the same way.
Install the control head before you start the transducer installation. See the control head installation guide.
Read the instructions in this transducer guide completely to understand the mounting guidelines before beginning the
installation.
Supplies: In addition to the hardware supplied with your accessory, you will need a Phillips-head screwdriver. If you are installing
the Speed Sensor Accessory, you will need the Sonar/Speed Y-Cable. Contact Humminbird Technical Support for details.
Visit our Web site at humminbird.com for additional information and resources for transducer installations. Also, visit
youtube.com/humminbirdtv for informational videos.
Confirm your boat is level for the installation.
Preparation
1
| Test the Transducer Prior to Installation
Prior to installation, test the transducer to make sure that no damage occurred during shipping.
1. Confirm the control head is connected to power. See your control head installation guide for instructions.
2. Connect the transducer cable to the control head. See Connect the Transducer Cable.
3. Lower the transducer into the water.
WARNING! The transducer must be fully submerged in water during operation because the sonar signal cannot pass through air. Air
pinging can damage the transducer.
4. Power On: Press the POWER key to turn on the control head.
If the transducer is detected, the control head will start Normal mode.
5. Select a 2D Sonar View to display on-screen.
If the bottom is visible on-screen with a digital depth readout, the transducer is working properly.
6. Power Off: Press and hold the POWER key.
7. Remove the transducer from the water.
8. Disconnect the transducer cable from the control head.
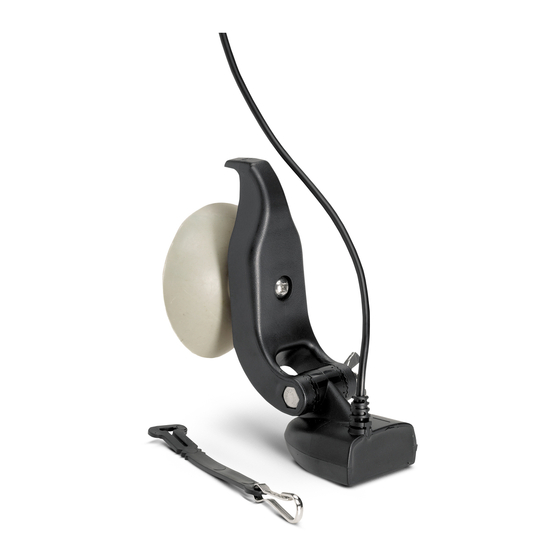
2
| Assemble the Transducer Mounting Bracket
NOTE: Please be aware that the transducer design has changed. If you are replacing or adding mounting hardware to your current transducer,
make sure that you have selected the appropriate hardware. If you are replacing a transducer, you will need to replace the mounting bracket
and hardware. Contact Humminbird Technical Support for details.
Use the illustrations in the section below to find your mounting bracket and assemble the portable transducer bracket.
Installation Preparation
1
532505-3_A
Advertisement

Related Manuals for Humminbird XPT 9 HW T


Summary of Contents for Humminbird XPT 9 HW T
- Page 1 NOTE: The procedures and features described in this guide are subject to change without notice. This guide was written in English and may have been translated to another language. Humminbird® is not responsible for incorrect translations or discrepancies between documents.
- Page 2 Sonar/Speed Y-Cable connector into the jumper port in the portable case. Then, connect the transducer connector and speed sensor connector to the corresponding connectors on the Y-Cable. The Y-Cable requires a separate purchase. Contact Humminbird Technical Support for details.
- Page 3 If the cable is too short, extension cables are available to Transducer Tie-Down Strap extend the transducer cable up to a total of 50'. For assistance, contact Humminbird Technical Support. CAUTION! Do NOT mount the cables where the connectors could be submerged in water or flooded.
-
Page 4: Maintenance
WARNING! The transducer must be fully submerged in water during operation because the sonar signal cannot pass through air. Air pinging can damage the transducer. NOTE: Download Humminbird installation guides and operations manuals from our Web site at humminbird.com. NOTE: Product specifications and features are subject to change without notice. -
Page 5: Préparation De L'installation
REMARQUE : Les procédures et les fonctionnalités décrites dans ce manuel sont susceptibles d'être modifiées à tout moment sans préavis. Ce manuel a été rédigé en anglais et a été traduit dans d'autres langues. Humminbird n'est pas responsable de la traduction inexacte ou des légères anomalies susceptibles d’être rencontrées dans les différents documents. - Page 6 Connectez ensuite le connecteur du transducteur et le connecteur du capteur de vitesse dans les connecteurs correspondants du câble en Y. Le câble en Y est vendu séparément. Contactez le support technique Humminbird pour obtenir plus d'informations.
- Page 7 VHF ou de câble de tachymètre, afin de limiter les possibilités d’interférence. Si le câble du transducteur est trop court, vous pouvez vous procurer des rallonges pour le prolonger jusqu’à une longueur totale de 15 m (50 pi). Contactez le support technique Humminbird pour obtenir plus d'informations.
-
Page 8: Entretien
REMARQUE : Les guides d’utilisation et d’installation sont téléchargeables sur notre site Web à l’adresse humminbird.com. Si le transducteur est sorti de l’eau pendant une période REMARQUE : Les caractéristiques et spécifications de ce produit prolongée, il faut le laisser reposer un certain temps...