Table of Contents
Advertisement
Quick Links
Advertisement
Table of Contents

Related Manuals for Roland TR-6S


Summary of Contents for Roland TR-6S
- Page 1 Owner’s Manual © 2020 Roland Corporation...
-
Page 2: Table Of Contents
: Saving the Pattern, Kit, or System Settings : Before You Begin Playing (WRITE) : Copying a Pattern or Kit (COPY) Turning the TR-6S On : Deleting a Pattern Turning Off the Power Clearing a Variation Formatting an SD Card... - Page 3 : Synchronizing with a DAW (TR-6S as Slave) : Synchronizing with a MC-101 (TR-6S as Master) : Using the TR-6S as a MIDI Controller : Connecting a Computer via USB : Using a Computer to Manage the Connected SD Card...
-
Page 4: Panel Descriptions
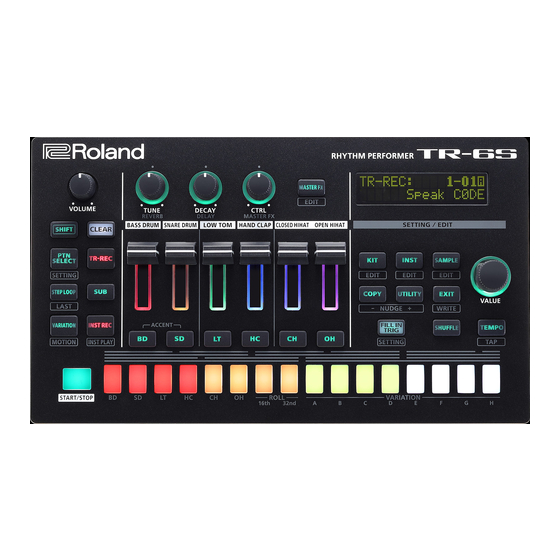
Panel Descriptions Top Panel [INST REC] button Common section 1 Records a pattern in real time. page [VOLUME] knob * If you hold down the [SHIFT] button and press the [INST REC] button, you enter INST PLAY mode, and can use pads [1]–[8] to Adjusts the MIX OUT jack, PHONES jack’s volume. -
Page 5: Front Panel
Panel Descriptions Instrument select [BD] [SD] [LT] [HC] [CH] [OH] buttons Mode Explanation During realtime recording, the pads record the During TR-REC, these buttons select the instrument that is INST REC corresponding instrument’s tone. recorded. Selects the step that is loop-played. STEP LOOP In the INST screen or INST Edit screen, these buttons select the instrument whose settings you want to edit. -
Page 6: Rear Panel (Connecting Your Equipment)
Use a commercially available USB 2.0 cable to connect this port to your computer. It can be used to transfer USB MIDI and USB audio data. You must install the USB driver before connecting the TR-6S to your computer. For details, refer to Readme.htm in the downloaded file. &... -
Page 7: Before You Begin Playing
Power-off the connected system first, and then the TR-6S. Formatting an SD Card (SD CARD FORMAT) If using an SD card, please format it on the TR-6S. SD cards are sold separately. Please obtain a SD card separately. [UTILITY] Press the button. -
Page 8: Overview Of The Tr-6S
Overview of the TR-6S TR-6S 128 patterns PATTERN 128 KITs (16 x 8 banks) PATTERN No. 8-16 KIT No. 128 PATTERN No. 1-3 KIT No. 3 PATTERN No. 1-2 KIT No. 2 PATTERN No. 1-1 KIT No. 1 PATTERN EFFECT... -
Page 9: What Is A "Pattern
“M” icon appears in the screen when you operate a knob or switch. The 6 instruments are collectively called a “kit. ” The TR-6S has 128 kits. When [INST REC] button is lit The pattern plays the instruments of the currently selected kit. -
Page 10: Main Screens
Main Screens PTN SELECT TR-REC Pattern that plays next Select the pattern to play. Create a pattern by specifying the steps at which each track plays a sound. Bank Number Name of pattern that plays next Name of currently playing pattern Variation currently selected for recording A–H... -
Page 11: Playing Patterns
Playing Patterns Playing Patterns About variations [START/STOP] Press the button. Each pattern has eight variations, A–H. Use the controllers of the instrument edit section to modify the sound. Press an [A]–[H] button to select the variation A–H that you want to play back or record. -
Page 12: Changing The Length Of A Specific Track (Setting The Track's Last Step)
Playing Patterns Use the [VALUE] knob to select the copy-source, and Changing the Length of a Specific Track [VALUE] press the knob. (Setting the Track’s Last Step) The number of steps used by a track (the track’s Last Step) can be specified individually for each track. -
Page 13: Selecting A Fill-In Variation
Playing Patterns A confirmation message appears. Adjusting the Reverb or Delay To copy, use the [VALUE] knob to select “OK,” If all the instrument select buttons are unlit, you can use the knobs to press the [VALUE] knob. adjust reverb or delay. If you decide to cancel, use the [VALUE] knob to select “Cancel, ”... -
Page 14: Assigning A Different Function For Each Instrument To The [Ctrl] Knob
Playing Patterns Assigning a Different Function for Each Recording to a Variation That’s Not Playing Instrument to the [CTRL] Knob Here’s how you can record to a different variation without changing the variation that’s selected to play (TR-REC only). Hold down the [SHIFT] button and press the [KIT]... -
Page 15: Recording Knob Movements At Steps (Motion)
Recording Knob Movements at Steps (Motion) Recording/Playing MOTION Clearing motion data for only a specific knob This clears all motion data of a knob recorded in the track that’s When “INST REC” is “ON, ” movements of the instrument’s [TUNE] knob, specified by the variation selected for playback. -
Page 16: Editing The Pattern Settings (Pattern Setting)
Editing the Pattern Settings (Pattern Setting) Here’s how to specify the kit and tempo used by a pattern. Parameter Value Explanation Hold down the [SHIFT] button and press the [PTN ScatterDepth 1–10 Adjusts the depth of scatter. SELECT] button. [FILL IN TRIG] + [VALUE] The PTN SETTING screen appears. -
Page 17: Saving The Pattern, Kit, Or System Settings (Write)
Editing the Pattern Settings (Pattern Setting) Saving the Pattern, Kit, or System Settings Copying a Pattern or Kit (WRITE) (COPY) Here’s how to save a pattern or kit. Here’s how to copy a pattern or kit. [SHIFT] [EXIT] [COPY] Hold down the button and press the Press the button. -
Page 18: Deleting A Pattern
Editing the Pattern Settings (Pattern Setting) Deleting a Pattern Press the [PTN SELECT] button. [CLEAR] Hold down the button and use the pads [1]–[16] to specify the pattern that you want to delete. Clearing a Variation Press the [VARIATION] button. Hold down the [CLEAR] button and use the... -
Page 19: Step Recording (Tr-Rec)
Step Recording (TR-REC) In this method of recording, you create a pattern by specifying the Inputting Weak Beats steps at which each track will sound. You can even play back the pattern while you’re creating it. While holding down the [SHIFT] button, press a pad * If you want to keep the edits that you made to a pattern or kit, you must... -
Page 20: Realtime Recording
Realtime Recording (INST REC) In this method of recording, you create a pattern by realtimerecording your performance on pads [1] (BD)–[6] (OH). This modifies the selected pattern. Operations of the various knobs are also recorded as motion data. * If you want to keep the edits that you made to a pattern or kit, you must save that pattern or kit (p 24) Press the [VARIATION]... -
Page 21: Playing The Pads (Inst Play)
Playing the Pads (INST PLAY) You can use pads [1] (BD)–[6] (OH) to perform in real time. Your performance does not modify the pattern. [SHIFT] [INST Hold down the button and press the REC] button. The [INST REC] button blinks green. Play the pads [1](BD)–[6](OH). -
Page 22: Looping A Specific Step
Looping a Specific Step (STEP LOOP) While a pattern is playing back, you can make the selected step play as a loop. All instruments sounded by the selected step play as a loop. Press the [START/STOP] button to play the pattern. [STEP LOOP] Press the button. -
Page 23: Editing A Kit's Settings (Kit Edit)
Editing a Kit’s Settings (KIT Edit) Selecting kits Grouping instruments (KIT) Here’s how to select kits. You can create a group of multiple instruments and play their layered sound with a single note. Press the [KIT] button to make it light. Specify one instrument as the “master instrument, ”... -
Page 24: Saving The Pattern, Kit, Or System Settings (Write)
Editing a Kit’s Settings (KIT Edit) How to enter characters Saving the Pattern, Kit, or System Settings (WRITE) Here’s how to save a pattern or kit. Use the [VALUE] knob to select “NAME ” [SHIFT] [EXIT] Hold down the button and press the button. -
Page 25: Editing An Instrument's Sound (Inst Edit)
Instrument’s tones of the currently selected kit are selected individually. [INST] Press the button. Preset: Tones originally in the TR-6S The [INST] button and the [BD]–[OH] button (that had been Sample: Tones that use samples selected for [TR-REC]) are lit, and the INST screen appears. Loop:... -
Page 26: Importing Or Exporting A Pattern Or Kit
Importing or Exporting a Pattern or Kit Exporting a Pattern or Kit Exporting a Kit Insert the SD card into the TR-6S. Here’s how you can export a kit or pattern to an SD card. Press the [UTILITY] button to make it light. -
Page 27: Importing A Pattern Or Kit
[VALUE] knob. File formats that can be imported 5 Backup files created by the TR-6S 5 Export files created by the TR-6S NOTE A confirmation message appears. Simply executing the import does not save the kit or pattern in internal memory, so it will be lost when you turn off the power. -
Page 28: Importing A Kit
Importing or Exporting a Pattern or Kit Importing a Kit Insert the SD card into the TR-6S. Press the [UTILITY] button to make it light. The Utility screen appears. Use the [VALUE] knob to select “UTILITY:Import,” and then press the [VALUE] knob. -
Page 29: Assigning An Imported User Sample To An Instrument
[VALUE] knob. sample. * Use the TR-6S to format the SD card. * The maximum time length of a single audio file is approximately 180 seconds (in the case of 44.1 kHz/mono), and a maximum of 400 files can be imported. Depending on memory usage, the maximum time and... -
Page 30: Assigning A User Sample To An Instrument (Sample)
“---” and cannot be edited. Parameter Value Explanation Preset: Samples originally in the TR-6S Start Specify the locations at which (number of samples, in User: Imported samples playback starts and ends. -
Page 31: Deleting A User Sample
Assigning an Imported User Sample to an Instrument Deleting a User Sample Optimizing the User Sample Area (SAMPLE Delete) (OPTIMIZE) Here’s how to optimize the user sample area. Press the [UTILITY] button to make it light. If you repeatedly import and delete user samples, the user sample [VALUE] “SAMPLE:Delete,”... -
Page 32: Convenient Functions And Settings (Utility)
Convenient Functions and Settings (UTILITY) Here’s how to make system settings for the TR-6S itself, or back up and SYSTEM Parameters / UTILITY Menu restore data. [UTILITY] Press the button to make it light. GENERAL The setting screen appears. Specify overall settings. -
Page 33: Initializing, Backing-Up, Restoring
(FACTORY RESET) (BACKUP) * If you want to make a backup, save the data (patterns, kits, system Here’s how to return the TR-6S to its factory-set state. settings) before you proceed. The backup will not include the pattern or NOTE kit that you’re currently editing (shown by an “*”... -
Page 34: Restoring Data That Was Backed Up To Sd Card
If you decide to cancel, use the [VALUE] knob to select “Cancel, ” and then press the [VALUE] knob. “Completed Turn off When the display indicates power ” turn the TR-6S’s power off and on again. -
Page 35: Synchronizing/Recording With Other Devices
[VALUE] knob. [UTILITY] Press the lit button. The [UTILITY] button goes dark, and you exit the UTILITY screen. * Even if you press pads or if MIDI is received, the TR-6S’s internal sound engine does not produce sound. -
Page 36: Error Message List
NotReady! selected data that was on the SD card. The format of the SD card Use the TR-6S to format is invalid. the SD card (p. 7) Data could not be read Make sure that the SD from the SD card. -
Page 37: List Of Shortcut Keys
List of Shortcut Keys Switching Screens and Modes MOTION Operation Shortcut Operation Shortcut Show the PTN SETTING Show the ERASE MOTION [SHIFT] + [PTN SELECT] [SHIFT] + Long-press [VARIATION] screen screen [SHIFT] + [KIT] Show the KIT EDIT screen Show the MOTION/ (in TR-REC mode) VELOCITY input screen Long-press a pad [1]–[16]... -
Page 38: Copying
List of Shortcut Keys Copying Reloading Operation Shortcut Operation Shortcut Copy pattern [UTILITY] + [PTN SELECT] Load a pattern (PATTERN COPY [COPY] + [PTN SELECT] screen) Load a variation While [VARIATION] is lit, [UTILITY] + Pad [A]–[H] [COPY] + [KIT] Copy kit (KIT COPY screen) [UTILITY] + [BD]–[OH]... -
Page 39: Main Specifications
1 lb 9 oz Leaflet “Read Me First” Accessories Alkaline battery (AA, LR6) * This document explains the specifications of the product at the time that the document was issued. For the latest information, refer to the Roland website.