Table of Contents
Advertisement
Available languages
Available languages
Quick Links
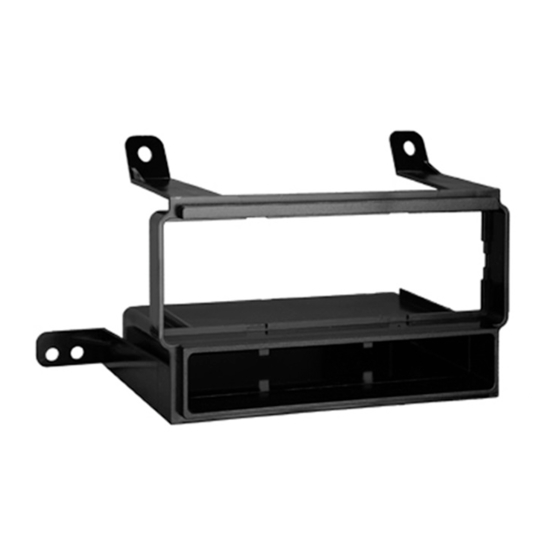
KIT COMPONENTS
• A) Radio housing • B) ISO DIN brackets • C) ISO DIN trim plate • D) ISO DDIN trim plate
A
B
APPLICATIONS
See inside front cover
Metra. The World's Best Kits.
®
2005-2017
Nissan
Visit
MetraOnline.com
for more detailed information about the product and up-to-date vehicle
specific applications
KIT FEATURES
• DIN radio provision with pocket
• ISO DIN radio provision with pocket
• ISO DDIN radio provision
C
D
MetraOnline.com
/ Suzuki
2009
© COPYRIGHT 2020 METRA ELECTRONICS CORPORATION
99-7581
I N S TA L L AT I O N I N S T R U C T I O N S
TABLE OF CONTENTS
- Nissan Frontier 2005-2017................................4
- Nissan Pathfinder 2005-2012 ...........................3
- Nissan Xterra 2005-2013 ...................................4
- Suzuki Equator 2009 ........................................4
- DIN radio provision with pocket ......................5
- ISO DIN radio provision with pocket ...............6
- ISO DDIN radio provision ..................................7
WIRING & ANTENNA CONNECTIONS (sold separately)
Wiring Harness: Please visit metraonline.com
for options
Antenna Adapter: Please visit metraonline.com
for options
TOOLS REQUIRED
• Torx T-20 screwdriver • Phillips screwdriver
Attention!
Let the vehicle sit with the key
out of the ignition for a few minutes before
removing the factory radio. When testing the
aftermarket equipment, ensure that all factory
equipment is connected before cycling the
key to ignition.
REV. 3/10/20 INST99-7581
Advertisement
Chapters
Table of Contents

Related Manuals for Metra Electronics 99-7581


Summary of Contents for Metra Electronics 99-7581
-
Page 1: Table Of Contents
When testing the aftermarket equipment, ensure that all factory APPLICATIONS equipment is connected before cycling the key to ignition. See inside front cover Metra. The World’s Best Kits. MetraOnline.com ® © COPYRIGHT 2020 METRA ELECTRONICS CORPORATION REV. 3/10/20 INST99-7581... - Page 2 APPLICATIONS Nissan Suzuki Frontier LE 2005-2008 Equator (extended cab) 2009 Frontier S 2011-2012 Frontier S (king cab) 2013-2015 Frontier SE 2005-2008 Frontier SE (with a 4-cylinder engine) 2009-2011 Frontier XE 2005-2011 Frontier (radio delete) 2016-2017 Pathfinder LE (without NAV) 2005-2007 Pathfinder S 2006-2012 Pathfinder S FE+...
-
Page 3: Dash Disassembly
DASH DISASSEMBLY Nissan Pathfinder 2005-2012 (Note: Do not cycle the key while the dash is removed or the air bag light will come on.) 1. Unclip and remove the trim panel from around the cup holders, in the center console. (Figure A) 2. -
Page 4: Nissan Frontier 2005-2017
DASH DISASSEMBLY Nissan Frontier 2005-2017, Xterra 2005-2013 / Suzuki Equator 2009 (Note: Do not cycle the key while the dash is removed or the air bag light will come on.) 1. Unclip and remove the panel at the top of the radio, and remove (1) Phillips screw underneath. -
Page 5: Kit Assembly
KIT ASSEMBLY DIN radio provision with pocket 1. Remove the metal DIN sleeve from the aftermarket radio. 2. Slide the sleeve into the radio housing and secure by bending the metal locking tabs down. (Figure A) 3. Slide the radio back into the sleeve until it clicks in. -
Page 6: Iso Din Radio Provision With Pocket
KIT ASSEMBLY ISO DIN radio provision with pocket 1. Remove the metal DIN sleeve and trim ring from the aftermarket radio. 2. Secure the ISO DIN brackets to the radio using screws supplied with the radio. (Figure A) 3. Slide the radio into the radio housing until it snaps into place. -
Page 7: Iso Ddin Radio Provision
KIT ASSEMBLY ISO DDIN radio provision 1. Remove the mounting brackets from the factory radio. Secure the brackets to the aftermarket radio using screws supplied with the aftermarket radio. 2. Remove (2) T-20 Torx screws from the a/c vents, then remove. (Figure A) 3. - Page 8 Log onto www.installerinstitute.com or call 800-354-6782 for more information and take steps toward a better tomorrow. Metra recommends MECP certified technicians Metra. The World’s Best Kits. MetraOnline.com ® © COPYRIGHT 2020 METRA ELECTRONICS CORPORATION REV. 3/10/20 INST99-7581...
- Page 9 APLICACIONES el radio de fábrica con la llave en la posición o de encendido ni con el vehículo funcionando. Ver interior de la portada Metra. The World’s Best Kits. MetraOnline.com ® © COPYRIGHT 2020 METRA ELECTRONICS CORPORATION REV. 3/10/20 INST99-7581...
- Page 10 APLICACIONES Nissan Suzuki Frontier LE 2005-2008 Equator (cabina extendida) 2009 Frontier S 2011-2012 Frontier S (cabina rey) 2013-2015 Frontier SE 2005-2008 Frontier SE (con un motor de 4-cilindros) 2009-2011 Frontier XE 2005-2011 Frontier (borrar radio) 2016-2017 Pathfinder LE (sin NAV) 2005-2007 Pathfinder S 2006-2012...
-
Page 11: Desmontaje Del Tablero
DESMONTAJE DEL TABLERO Nissan Pathfinder 2005-2012 (Nota: No cicle la llave sin tener instalado el tablero o la luz de la bolsa de aire se encenderá.) 1. Desenganche y quite el panel de moldura que rodea los portavasos en la consola central. -
Page 12: Nissan Frontier 2005-2017
DESMONTAJE DEL TABLERO Nissan Frontier 2005-2017, Xterra 2005-2013 / Suzuki Equator 2009 (Nota: No cicle la llave sin tener instalado el tablero o la luz de la bolsa de aire se encenderá.) 1. Desenganche y quite el panel de la parte superior del radio, luego quite (1) tornillo Phillips de abajo. -
Page 13: Ensamble Del Kit
ENSAMBLE DEL KIT Provisión de radio DIN con cavidad 1. Quite la manga de metal DIN del radio de mercado secundario. 2. Deslice la manga en la carcasa de radio y seguro doblando las lengüetas de fijación de metal hacia abajo. (Figura A). 3. -
Page 14: Provisión De Radio Iso Din Con Cavidad
ENSAMBLE DEL KIT Provisión de radio ISO DIN con cavidad 1. Quite la manga de metal DIN y el anillo de moldura del radio de mercado secundario. 2. Atornille los soportes ISO DIN al radio usando los tornillos suministrados con el radio. -
Page 15: Provisión De Radio Iso Ddin
ENSAMBLE DEL KIT Provisión de radio ISO DDIN 1. Retire los soportes de montaje de la radio de fábrica. Asegure los soportes a la radio no original utilizando los tornillos suministrados con la radio no original. 2. Retire (2) tornillos T-20 Torx de las rejillas de ventilación del aire acondicionado, luego retírelos. - Page 16 800-354-6782 para obtener más información y avance hacia un futuro mejor. Metra recomienda técnicos con certificación del Programa de Certificación en Electrónica Móvil (Mobile Electronics Certification Program, MECP). Metra. The World’s Best Kits. MetraOnline.com ® © COPYRIGHT 2020 METRA ELECTRONICS CORPORATION REV. 3/10/20 INST99-7581...