Delta Ultron HPH Series User Manual
Hide thumbs
Also See for Ultron HPH Series:
- User manual (240 pages) ,
- User manual (52 pages) ,
- User manual (66 pages)

Related Manuals for Delta Ultron HPH Series


Summary of Contents for Delta Ultron HPH Series
- Page 1 The power behind competitiveness Delta UPS - Ultron Family HPH Series, Three Phase 20/30/40 kVA User Manual www.deltapowersolutions.com...
- Page 2 (“Manual”), including but not limited to the contents, information, and figures are solely owned and reserved by Delta Electronics Inc. (“Delta”). The Manual can only be applied to the operation or the use of this product. Any disposition, duplication, dissemination, reproduction, modification, translation, extraction, or usage of this Manual in whole or in part is prohibited without the prior written permission of Delta.
-
Page 3: Table Of Contents
Table of Contents Chapter 1: Important Safety Instructions ..................5 Installation Warnings ......................5 Connection Warnings ......................5 Usage Warnings ........................ 5 Storage Warnings ......................6 Standard Compliance ......................7 Chapter 2: Introduction ......................... 8 Product Introduction ......................8 Package Inspection ......................8 Functions and Features ..................... - Page 4 Turn on the touch panel ....................82 ON/ OFF Button ......................83 Introduction of Touch Panel and Function Keys .............. 84 Password Entry ....................... 88 Main Screen ........................88 Power Flow & Summary ....................92 Measurement ........................94 7.8.1 Main Input ........................ 95 Ultron HPH Series...
- Page 5 7.8.2 Bypass Input ......................95 7.8.3 Inverter Output ......................96 7.8.4 UPS Output ......................96 7.8.5 Battery Status ......................97 Setup ..........................98 7.9.1 Bypass Setting ......................98 7.9.2 Mode Setting ......................100 7.9.3 Output Setting ......................101 7.9.4 Battery and Charging Setting ................. 103 7.9.5 Parallel Setting .......................
-
Page 6: Chapter 1: Important Safety Instructions
Please refer to 5.2 Installation Environment. Only authorized Delta engineers or service personnel can perform installation and maintenance. If you want to install the UPS by yourself, please install it under the supervision of authorized Delta engineers or service personnel. -
Page 7: Storage Warnings
operation of the UPS and to protect the UPS from overheating, these slits and openings must not be blocked or covered. Do not insert any object into the slits and openings that may hinder ventilation. In a low temperature environment (below 0°C), you must allow the UPS to adjust to room temperature for at least one hour to avoid moisture condensing inside the UPS before usage. -
Page 8: Standard Compliance
The charging time must not be less than 24 hours each time. 1.5 Standard Compliance IEC62040-1 IEC62040-2 C2 IEC61000-4-2 (ESD) Level 4 IEC61000-4-3 (Radiated Field) Level 3 IEC61000-4-4 (EFT) Level 4 IEC61000-4-5 (Surge) Level 4 Ultron HPH Series... -
Page 9: Chapter 2: Introduction
Chapter 2: Introduction 2.1 Product Introduction The HPH series UPS provides three different rated power levels, 20kVA, 30kVA and 40kVA, for your selection, is a three-phase four-wire online uninterruptible power supply which provides reliable and stable sine-wave power to your electronic devices. The UPS applies the latest design of DSP digital control technology and highest quality assembly, with an output power factor up to unity. -
Page 10: Functions And Features
The HPH series UPS is designed for systems with medium power. It provides clean power supply to data systems, communication systems, computer network systems, medical treatment systems, monitoring systems, factory equipment, etc. The HPH series UPS utilizes all digital high frequency modulation technology, which de- Ultron HPH Series... - Page 11 creases volume, improves reliability and prolongs service life. Wide AC input voltage range (100% load: 176~276/ 305~478Vac; 70%~100% load: 132~276/ 228~478Vac) reduces frequent transfer from normal mode to battery mode to save battery consumption and prolong battery life. Battery test in online mode and regular battery test prolong battery life. ...
-
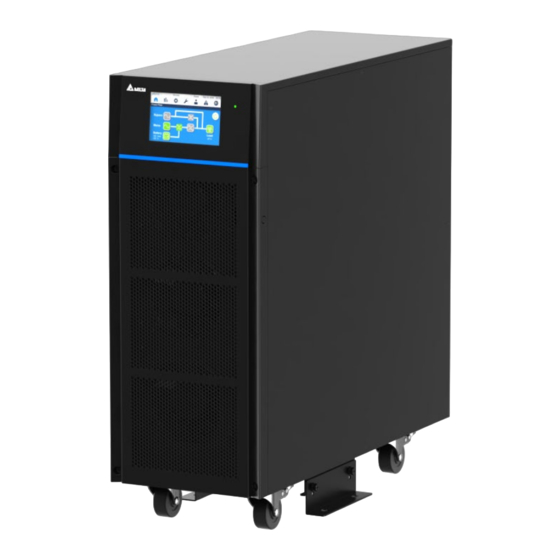
Page 12: Appearance And Dimensions
2.4 Appearance and Dimensions (Figure 2-1: 20/ 30/ 40kVA UPS Appearance and Dimensions) 2.5 Front Panel Tri-color LED Indicator 5’’ Touch Panel (Figure 2-2: Front Panel) Ultron HPH Series... - Page 13 The buzzer beeps 0.1 second for every 2 seconds. Medium The buzzer beeps 0.1 second for every 0.5 second. To clear the warning, please contact Delta service personnel. There is a major warning and the buzzer sounds. Warning Level Buzzer Frequency Major Long beep To clear the warning, please contact Delta service personnel.
-
Page 14: Rear Panel
2.6 Rear Panel (Figure 2-3: 20kVA UPS Rear Panel) Ultron HPH Series... - Page 15 (Figure 2-4: 30/ 40kVA UPS Rear Panel) Item Description When there are no AC mains, but the external battery cabinet Battery Start is connected well with the UPS, the user can turn on the battery switch so that the UPS can work in battery mode. Connects to a computer.
- Page 16 Please note that opening this cover plate in online mode will cause inverter shutdown. AC Input Terminal Connects the main AC source. Block Battery Input Connects the external battery cabinet. Terminal Block UPS Output Connects the critical loads. Terminal Block Ultron HPH Series...
- Page 17 Item Description For the UPS system grounding. For external battery cabinet’s grounding. For critical load grounding. For bypass grounding. The casters are designed for a short distance movement only. Do not use the casters to move the UPS over a long distance. Casters The casters are not designed to provide long-term support for the UPS after installation, please use the balance supports to...
-
Page 18: Chapter 3: Operation Modes
When the input voltage and frequency of the main AC power are within the normal range, the UPS runs in standby mode and charges the batteries. The bypass and the inverter have no output. The LED indicator illuminates yellow. (Figure 3-2: Path of Electrical Power through the UPS in Standby Mode) Ultron HPH Series... - Page 19 ECO Mode You can manually set the UPS to ECO mode. In ECO mode, when the utility input voltage is within the range of rated voltage (default: ±10%), the load is supplied by the main AC power and the LED indicator illuminates green;...
- Page 20 50Hz or 60Hz. After the output frequency is set up, the system will automatically disable the bypass function. Please note that once the inverter shuts down, there is no bypass output. During converter mode, the LED indicator illuminates green. Ultron HPH Series...
- Page 21 (Figure 3-6: Path of Electrical Power through the UPS in Frequency Conversion Mode) Energy Recycle Mode When the UPS is manually set in energy recycle mode, the charger will turn off, and the output power will be recycled to input. Energy recycle mode is applicable to UPS self-loading test only. During energy recycle mode, the LED indicator illuminates green.
-
Page 22: Chapter 4: Communication Interfaces
3. The length of the communication cable must be less than 10 meters. 4. For the location of the communication interfaces, please refer to Figure 2-3~2-4. 4.1 Mini Slot The Mini slot is for installation of a mini card. You can install a Delta Mini SNMP, Mini Relay I/O or Mini ModBus card in this slot to let the system have network communication, dry contact function, or MODBUS communication. -
Page 23: Parallel Ports
3. Pin Assignment: 1) PIN 2: TXD <Transmitting Data> 2) PIN 3: RXD <Receiving Data> 3) PIN 5: GND <Signal Ground> Figure 4-1: RS-232 Port ( ) 4.4 Parallel Ports The two parallel ports are for UPS parallel communication. UPSs (at maximum four) with the same capacity, voltage and frequency can be coupled via the provided parallel cable to run in parallel mode. -
Page 24: Input Dry Contacts
UPS would turn off its inverter and wait for the Synchronization Active Standby with other paralleled UPSs, then transfer to manual bypass. Li-ion Battery Receive the over discharge signal of li-ion battery power Over Discharge management system. Warning (Table 4-1: Input Dry Contact Events and Description) Ultron HPH Series... - Page 25 (Figure 4-3: Input Dry Contacts) There are two types of input dry contact configurations. Figure 4-4 shows the 1st type of configuration. It requires internal power, +12VSF. (Figure 4-4: Input Dry Contact Configuration I) Figure 4-5 shows the 2nd type of configuration. It requires external power with a voltage range between 6~12Vdc.
-
Page 26: Repo And Output Dry Contacts
UPS output power. The configuration is shown as follows. (Figure 4-7: REPO Port Configuration) NOTE: If you need more information about REPO setting, please contact your dealer or Delta service personnel. Only qualified Delta engineer or service personnel can modify the REPO setting. -
Page 27: Output Dry Contacts
4.7.2 Output Dry Contacts The HPH UPS provides four sets of programmable output dry contacts for you to receive UPS events. Please see Figure 4-8. The output dry contacts are normally open. There are eighteen events for you to select, and you can choose four of them to set up the output dry contacts. Please refer to the table below. - Page 28 Backfeed Protection UPS will send a signal to the connected external shunt trip device to cut off the backfeed voltage. (Table 4-2: Output Dry Contact Events and Description) (Figure 4-8: Output Dry Contacts: Port Definition and Design) Ultron HPH Series...
-
Page 29: Chapter 5: Installation And Wiring
If you want to install the UPS by yourself, installation must be under the supervision of authorized Delta engineers or service personnel. If you use a forklift or other equipment to move the UPS, please make sure its load bearing is sufficient. For the weight of the UPS, please refer to Appendix 1: Technical Specifications. -
Page 30: Ups Transportation & Handling
Installation without the Balance Supports After moving the UPS to its final installation area, press the brakes of the casters to stabilize the UPS cabinet on the ground. (Figure 5-1: Stabilize the UPS with the Brakes of the Casters) Ultron HPH Series... - Page 31 NOTE: If you need to move the UPS, raise the brakes of the casters first. Installation with the Balance Supports If you want to install the UPS with the balance supports that have been removed from the UPS during the unpacking process, please follow the following steps. 1.
- Page 32 UPS on the ground and use the M6 screws to reinstall the balance supports (that have been removed from the UPS during the unpacking process) on the UPS. Please refer to the figure below. (Figure 5-3: Balance Support Installation) Ultron HPH Series...
-
Page 33: Wiring
The wiring must be performed by qualified professional personnel. If you want to install the UPS by yourself, installation must be under the supervision of Delta service personnel. Before wiring or making any electrical connection, make sure the power supplied to the input and output of the UPS is completely cut off. - Page 34 Table 5-1: Specifications of Input/ Output Cables and the UPS’s Breakers NOTE: 1. In accordance with National Electrical Codes (NEC), please install a suitable conduit and bushing. 2. Please refer to national and local electrical codes for acceptable protective device and cable size. Ultron HPH Series...
- Page 35 The UPS default setting is single input. If there is an intention to change the UPS into dual input or hot standby redundancy configuration, please contact Delta service personnel. Please check whether the electric potential of the neutral line (bN) of the bypass source is the same as that of the neutral line (mN) of the main AC source.
-
Page 36: Single Input/ Dual Input Modification
5.5.2 Single Input/ Dual Input Modification WARNING: 1. Only authorized Delta engineers or service personnel can modify single input/ dual input setup. 2. For dual input, the main AC source’s Neutral (mN) must be connected with the bypass source’s Neutral (bN). -
Page 37: Single Unit Wiring
bL3). (Figure 5-6: Remove the Copper Bars) 5.5.3 Single Unit Wiring NOTE: Prior to wiring, please read 5.5.1 Precautions Prior to Wiring first. Single Input (Single Unit) When there is only one AC power source, single unit wiring procedures are as follows. Remove the cover shown in Figure 5-5 and you will see the wiring terminal block shown below. - Page 38 3-pole protective device is installed between the UPS and the main AC power. If your main AC power is the TT system, please in- stall a 4-pole protective device between the UPS and the main AC power. Ground the UPS. Ultron HPH Series...
- Page 39 When there are two AC power sources, single unit wiring procedures are as follows. 1. Follow 5.5.2 Single Input/ Dual Input Modification to modify the UPS into dual input. Please note that only authorized Delta engineers or service personnel can modify single input/ dual input setup.
-
Page 40: Parallel Units Wiring
UPS and the main AC power. 3. Use the provided parallel cable to connect the parallel ports on the parallel units. Please see Figure 2-3~2-4 for parallel port location. 4. Ground the parallel UPSs. Ultron HPH Series... - Page 41 2. Only UPSs with the same capacity, voltage and frequency can be paralleled; otherwise, parallel functions will fail. 3. Before startup of parallel units, Delta service personnel should set ID (1, 2, 3 or 4) through touch panel. Otherwise, UPSs cannot be started. If there is a conflict between ID numbers, a warning information will appear on touch panel correspondingly.
- Page 42 3. Before start-up of parallel units, qualified service personnel should set ID (1, 2, 3 or 4) through touch panel. Otherwise, UPSs cannot be started. If there is a conflict between ID numbers, a warning information will appear on touch panel correspondingly. (Figure 5-11: Parallel Units Dual Input Wiring Diagram) Ultron HPH Series...
-
Page 43: External Battery Cabinet Connection Precautions
Each adjustment level is 1A. 3. If you need to modify the charge current default setting and low battery shutdown default setting, please contact your local dealer or Delta service personnel. WARNING: The parameter setting of the number of batteries must be consistent with the actual number of batteries installed, otherwise the battery will be overcharged or under- charged, and the battery may be damaged. - Page 44 100 A (Per pole voltage ≥ 250Vdc) 3-Pole DC Circuit Breaker 50 A 75 A 100 A (Per pole voltage ≥ 500Vdc) 6AWG/10mm² 4AWG/ 16mm² 2AWG/ 25mm² Battery Cable ( Table 5-2 : External Battery Cabinet’s Protective Device) Ultron HPH Series...
- Page 45 NOTE: 1. The above mentioned DC fuse and DC circuit breaker are optional. For details, please contact Delta service personnel. 2. If you need to parallel multiple strings of external battery, please contact Delta service personnel for relevant information. ...
- Page 46 2. A battery can present a risk of electric shock and high short-circuit current. Servicing of batteries and battery cabinets must be performed or supervised by qualified service personnel knowledgeable in batteries, battery cabinets and the required precautions. Keep unauthorized personnel away from batteries and battery cabinets. Ultron HPH Series...
- Page 47 External Battery Cabinet Alarm When an external battery cabinet connected to the UPS has the following problems, the UPS system will sound an alarm. Please see the table below. External Battery Cabinet Status Alarm Battery Test Fail Sounds once every 0.5 seconds. Battery End of Discharge Imminent Sounds once every 0.5 second.
-
Page 48: Chapter 6: Ups Operation
2. For parallel units, ensure that each parallel cable (provided) is connected well. 3. Make sure that all of breakers, including every external battery cabinet’s breaker, are turned to the OFF position. 4. Check if the wiring is correct. Ensure that the input power’s voltage, frequency, phase and Ultron HPH Series... -
Page 49: Start-Up Procedures
UPSs. For parallel application, if you just want to operate a specific UPS but not all parallel ones, please contact Delta service personnel. 1. Ensure that the manual bypass breaker is in the OFF position. 2. Switch ON each external battery cabinet’s breaker. - Page 50 ) once and the following screen will pop up to ask you if you want to power on the UPS’s inverter. If yes, please select ‘Power On’. Please refer to the below figure. (Figure 6-2: Power On Reminder Screen) Ultron HPH Series...
-
Page 51: Battery Mode Start-Up Procedures
UPSs. 3. For parallel application, if you just want to operate a specific UPS but not all parallel ones, please contact Delta service personnel. 1. Ensure that the manual bypass breaker is in the OFF position. -
Page 52: Bypass Mode Start-Up Procedures
UPSs. 2. For parallel application, if you just want to operate a specific UPS but not all parallel ones, please contact Delta service personnel. 1. Ensure that the manual bypass breaker is in the OFF position. - Page 53 (Figure 6-5: Main Screen) 5. For parallel application, please check each parallel UPS’s parallel settings. Please note that each parallel UPS’s parallel ID No. must be different, and parallel group No., input, output and battery settings must be the same. For parallel application, (M) &...
-
Page 54: Manual Bypass Mode Start-Up Procedures
UPSs. 2. For parallel application, if you just want to operate a specific UPS but not all parallel ones, please contact Delta service personnel. 3. Please note that you can switch on the manual bypass breaker only when the UPS needs maintenance. - Page 55 Switching from online mode to manual bypass mode 1. When the UPS is in online mode, the main screen will appear shown in the figure below. At this time, the tri-color LED indicator will illuminate green. (Figure 6-8: Online Mode Screen) Press the ON/ OFF button ( ) once and the following screen will pop up to ask you if you want to power off the UPS’s inverter.
- Page 56 UPSs. 2. For parallel application, if you just want to operate a specific UPS but not all parallel ones, please contact Delta service personnel. 1. Switch ON each external battery cabinet’s breaker. 2. Single Input: Switch ON the bypass breaker, input breaker and output breaker...
- Page 57 Dual Input: Switch ON the bypass breaker, input breaker and output breaker. 3. Switch ON the input breaker and bypass breaker, the UPS will start up, and the main screen will appear after about 25 seconds. 4. If the bypass voltage is within the normal range, the UPS will transfer to run in bypass mode, the screen will show as follows, and the tri-color LED indicator will illuminate yellow.
-
Page 58: Eco Mode Start-Up Procedures
UPSs. For parallel application, if you just want to operate a specific UPS but not all parallel ones, please contact Delta service personnel. 1. Ensure that the manual bypass breaker is in the OFF position. 2. Switch ON each external battery cabinet’s breaker. - Page 59 LED indicator will illuminate yellow. (Figure 6-14: Main Screen) Please log in as an Administrator. For the Administrator password, please contact Delta service personnel. After login, ensure that you are in the Administrator login status.
- Page 60 After the system confirms that the bypass voltage is normal, the UPS will automatically switch to run in ECO mode to let the bypass AC source supply power. the tri-color LED indicator will illuminate green and the following screen will appear. Ultron HPH Series...
-
Page 61: Frequency Conversion Mode Start-Up Procedures
UPSs. For parallel application, if you just want to operate a specific UPS but not all parallel ones, please contact Delta service personnel. Ensure that the manual bypass breaker is in the OFF position. Switch ON each external battery cabinet’s breaker. - Page 62 (Figure 6-18: Main Screen) Please log in as an Administrator. For the Administrator password, please contact Delta service personnel. After login, ensure that you are in the Administrator login status. Click SETUP → Mode Setting → Frequency Conversion. (Figure 6-19: Select Frequency Conversion Mode) After manually selecting Frequency Conversion mode via the touch panel, the UPS will run in standby mode and the output will be terminated.
- Page 63 Press the ON/ OFF button ( ) once and the following screen will pop up to ask you if you want to power on the UPS’s inverter. Please select ‘Power On’. (Figure 6-20: Power On Reminder Screen) After selection of ‘Power On’ to start up the UPS’s inverter, the UPS will start up and perform self-inspection.
-
Page 64: Energy Recycle Mode Start-Up Procedures
LED indicator will illuminate yellow. (Figure 6-22: Main Screen) Please log in as an Administrator. For the Administrator password, please contact Delta service personnel. After login, ensure that you are in the Administrator login status. Click SETUP → Mode Setting → Energy Recycle. - Page 65 (Figure 6-23: Select Energy Recycle Mode) After manually selecting Energy Recycle mode via the touch panel, press the icon ( located in the upper left corner of the screen to go back to the Main Screen. Press the ON/ OFF button ( ) once and the following screen will pop up to ask you if you want to power on the UPS’s inverter.
-
Page 66: Turn-Off Procedures
For parallel units, ensure that every operation procedure mentioned below is synchronized to all parallel UPSs. For parallel application, if you just want to operate a specific UPS but not all parallel ones, please contact Delta service personnel. Ultron HPH Series... - Page 67 In online mode, the touch panel shows the following screen and the tri-color LED indicator illuminates green. (Figure 6-26: Online Mode Screen) Press the ON/ OFF button ( ) once and the following screen will pop up to ask you if you want to power off the UPS’s inverter.
-
Page 68: Battery Mode Turn-Off Procedures
For parallel units, ensure that every operation procedure mentioned below is synchronized to all parallel UPSs. For parallel application, if you just want to operate a specific UPS but not all parallel ones, please contact Delta service personnel. Ultron HPH Series... - Page 69 In battery mode, the touch panel shows the following screen and the tri-color LED indicator illuminates yellow. (Figure 6-29: Battery Mode Screen) Press the ON/ OFF button ( ) once and the following screen will pop up to ask you if you want to power off the UPS’s inverter.
-
Page 70: Bypass Mode Turn-Off Procedures
For parallel units, ensure that every operation procedure mentioned below is synchronized to all parallel UPSs. For parallel application, if you just want to operate a specific UPS but not all parallel ones, please contact Delta service personnel. Ultron HPH Series... -
Page 71: Manual Bypass Mode Turn-Off Procedures
UPSs. For parallel application, if you just want to operate a specific UPS but not all parallel ones, please contact Delta service personnel In manual bypass mode, the touch panel and the tri-color LED indicator are both OFF. In either single input or dual input, please directly switch OFF the manual bypass breaker to completely shut down the UPS. -
Page 72: Eco Mode Turn-Off Procedures
UPSs. For parallel application, if you just want to operate a specific UPS but not all parallel ones, please contact Delta service personnel. In ECO mode, the touch panel shows the following screen and the tri-color LED indicator illuminates green. - Page 73 Press the ON/ OFF button ( ) once and the following screen will pop up to ask you if you want to power off the UPS’s inverter. If yes, please select ‘Power Off’. (Figure 6-34: Power Off Reminder Screen) After selection of ‘Power Off’, the UPS will shut down the inverter, terminate the output and transfer to run in bypass mode.
-
Page 74: Frequency Conversion Mode Turn-Off Procedures
Please log in as an Administrator. For the Administrator password, please contact Delta service personnel. After login, ensure that you are in the Administrator login status. Click SETUP → Mode Setting → On-Line. (Figure 6-36: Select On-Line Mode) Single Input: Switch OFF the bypass breaker, input breaker and output breaker. - Page 75 In frequency conversion mode, the touch panel shows the following screen and the tri-color LED indicator illuminates green. (Figure 6-37: Frequency Conversion Mode Screen) Press the ON/ OFF button ( ) once and the following screen will pop up to ask you if you want to power off the UPS’s inverter.
- Page 76 (Figure 6-39: Standby Mode Screen) Switch OFF output breaker and log in as an Administrator. For the Administrator password, please contact Delta service personnel. After login, ensure that you are in the Administrator login status. Click SETUP → Mode Setting → On-Line. If the bypass voltage is in the normal range, the UPS will run in bypass mode to let the bypass AC source supply power to the output.
-
Page 77: Energy Recycle Mode Turn-Off Procedures
Single Input: Switch OFF the bypass breaker, input breaker and output breaker. Dual Input: Switch OFF the bypass breaker, input breaker and output breaker. The UPS will discharge DC bus voltage, and the tri-color LED indicator will illuminate yellow. After discharging is completed, the UPS will shut down, and the touch panel and the tri-color LED indicator will be off. - Page 78 (Figure 6-43: Bypass Mode Screen) Switch OFF output breaker and log in as an Administrator. For the Administrator password, please contact Delta service personnel. After login, ensure that you are in the Administrator login status. Click SETUP → Mode Setting → On-Line. If the bypass voltage is in the normal range, the...
- Page 79 UPS will run in bypass mode to let the bypass AC source supply power to the output. (Figure 6-44: Select On-Line Mode) Switch OFF the bypass breaker, input breaker and output breaker. The UPS will discharge DC bus voltage, and the tri-color LED indicator will illuminate yellow. After discharging is completed, the UPS will shut down, and the touch panel and the tri-color LED indicator will be off.
-
Page 80: Chapter 7: Touch Panel Display And Settings
Chapter 7: Touch Panel Display and Settings 7.1 Touch Panel Display Hierarchy Ultron HPH Series... - Page 82 ADMINISTRATOR password is needed. For password information, please refer to 7.5 Password Entry. need to be carried out by qualified service The items marked with * personnel, please contact Delta service personnel for assistance. reserved for inbuilt battery model. Ultron HPH Series...
-
Page 83: Turn On The Touch Panel
7.2 Turn on the touch panel NOTE: Confirm the AC mains is normal before turning on the touch panel. Please refer to the following steps to turn on the touch panel. a. Switch ON the bypass breaker, the touch panel will then light up; or b. -
Page 84: On/ Off Button
UPS’s inverter. If yes, please select ‘Power On’. After selecting ‘Power On’, the ON/ OFF button will turn green ( ), indicating that the UPS is starting up or the power-on process is completed. (Figure 7-4: Power On Reminder Window) Ultron HPH Series... -
Page 85: Introduction Of Touch Panel And Function Keys
Power Off When the ON/ OFF button is green ( ), it indicates that the UPS’s inverter is in the ON status. Press the button once and the following reminder window will pop up to ask you if you want to power off the UPS’s inverter. If yes, please select ‘Power Off’. After selecting ‘Power Off’, the ON/ OFF button will turn gray ( ), indicating that the power-off process is completed. - Page 86 Conversion Mode User Indicates login by User. Administrator Indicates login by Administrator. Indicates the date and time. Back to the main screen. Shortcut button for the measurement menu. For more information, please refer to 7.8 Measure- ment. Ultron HPH Series...
- Page 87 Button Function Icon/ Text Description (Yes or Shortcut button for the setup menu. For more information, please refer to 7.9 Setup. Shortcut button for the maintenance menu. For more information, please refer to 7.10 Maintenance. Indicates login by User or Administrator. The button can be pressed to change the login permission.
- Page 88 1. Output status (green: normal; gray: no output). 2. Load capacity (%) 3. Output screen shortcut button. Other symbols which will appear during the operation of the touch panel are shown in the table below: Symbol Function Down Delete Ultron HPH Series...
-
Page 89: Password Entry
Password entry is only required for login as an Administrator. User login does not require any password. Click ( ) → enter the Administrator password (please contact Delta service personnel for the password) →the ‘Admin’ appears at the top edge of the screen, indicating Administrator login is successful. - Page 90 About how to set up online mode, please refer to 7.9.2 Mode Setting and 6.2.1 Online Mode Start-up Procedures. The screen below indicates that the UPS is in standby mode. The inverter is not turned on and the bypass is out of range. Ultron HPH Series...
- Page 91 C. The screen below indicates that the UPS is in ECO mode. The inverter is in the ready-to- power-on status, and the loads are supplied by the bypass power. About how to set up ECO mode, please refer to 7.9.2 Mode Setting and 6.2.5 ECO Mode Start-up Procedures.
- Page 92 The screen below indicates that the UPS is in frequency conversion mode and the bypass output is restricted. About how to set up frequency conversion mode, please refer to 7.9.2 Mode Setting and 6.2.6 Frequency Conversion Mode Start-up Procedures. Ultron HPH Series...
-
Page 93: Power Flow & Summary
7.7 Power Flow & Summary There are two shortcut buttons for you to check the Power Flow and Summary respectively. Please see the figure below. Press the Power Flow button ( ) to check the UPS’s power flow diagram, shown in the figure below. - Page 94 Input information includes Main Voltage and Bypass Voltage. Output information includes Frequency, Total Output Power, Voltage, Current, Power and Load. Ultron HPH Series...
-
Page 95: Measurement
Battery information includes Remaining Capacity, Remaining Time, Voltage and Current. 7.8 Measurement There are five shortcut buttons for you to check the Main Input, Bypass Input, Inverter Output, UPS Output and Battery Status respectively. Please see the figure below. -
Page 96: Main Input
Phase Voltage, Line Voltage, Current, Frequency, DC BUS Voltage and Kilowatt-Hour readings. 7.8.2 Bypass Input In the Bypass Input screen, you can inquire about the Phase Voltage, Line Voltage, Frequency and Kilowatt-Hour readings. Ultron HPH Series... -
Page 97: Inverter Output
7.8.3 Inverter Output In the Inverter Output screen, you can inquire about the Phase Voltage, Line Voltage, Current and Frequency readings. 7.8.4 UPS Output In the UPS Output screen, you can inquire about the Phase Voltage, Line Voltage, Current, Load, Apparent Power, Active Power, Power Factor and Frequency readings. -
Page 98: Battery Status
7.8.5 Battery Status In the Battery Status screen, you can inquire about the Status, Voltage, Current, Remaining Capacity, Remaining Time, Estimated Recharging Time, Test Result, Battery Temp., Charger Voltage and Charger Current readings. Ultron HPH Series... -
Page 99: Setup
Bypass Voltage - Max, Bypass Voltage - Min, ECO Voltage - Max and ECO Voltage - Min. If the range is exceeded, the system will issue an alarm. These settings must be performed by qualified service personnel, please contact Delta service personnel for assistance. - Page 100 Bypass Voltage - Min Set up the bypass output’s minimum voltage. Set up the bypass output’s maximum voltage in ECO mode. ECO Voltage - Max Set up the bypass output’s minimum voltage in ECO mode. ECO Voltage - Min Ultron HPH Series...
-
Page 101: Mode Setting
In the Mode Setting screen, the administrator can set up the UPS system mode, of which there are four options: On-line, ECO, Energy Recycle and Frequency Conversion. These settings must be performed by qualified service personnel. Please contact Delta service personnel for assistance. -
Page 102: Output Setting
In the Output Setting screen, the administrator can set up Voltage, Frequency, Slew Rate, System Redundancy, Asnyc Transfer Time, Industrial Mode, Bypass Disable and System Sequential Start. These settings must be carried out by qualified service personnel, please contact Delta service personnel for assistance. Ultron HPH Series... - Page 103 Item Description Set up the output voltage. NOTE: Voltage The output voltage can be modified only when the inverter is powered off, that is bypass mode or standby mode. Set up the output frequency as 50Hz (default) or 60Hz. The system will automatically select the output frequency in accordance with the bypass power.
-
Page 104: Battery And Charging Setting
In the Battery and Charging Setting screen, the administrator can set up the following items (as shown in the figure below). These settings must be carried out by qualified service personnel, please contact Delta service personnel for assistance. Ultron HPH Series... - Page 106 Ultron HPH Series...
- Page 107 Item Description Battery Type* Set up the battery type. Set up the battery rating voltage. Battery Rating Voltage* Set up the battery capacity. Capacity* Battery Strings* Set up how many battery strings that are used on site. Battery Low Warning* Set up the battery low warning voltage.
- Page 108 Charger Off (Negative)) through the UPS touch panel. For detail setting method, please refer to 4.6 Input Dry Contacts. 2. These settings must be carried out by qualified service personnel, please contact Delta service personnel for assistance. Ultron HPH Series...
-
Page 109: Parallel Setting
7.9.5 Parallel Setting In the Parallel Setting screen, you can set up Parallel Group ID, Parallel ID and Common Battery. These settings must be carried out by qualified service personnel, please contact Delta service personnel for assistance. Item Description The UPSs in parallel connection must be assigned the same parallel group ID. -
Page 110: Dry Contact Setting
Dry Contact Setting In the Dry Contact Setting screen, you can set up the events of input and output dry contacts. These settings must be carried out by qualified service personnel, please contact Delta service personnel for assistance. Ultron HPH Series... - Page 111 Item Description Select one of the following events as the Set up NO (normally open) or setting for each input dry contact. NC (normally closed) for each Input 1 For detail setting, please refer to Table 4-1 input dry contact. Input 2 Input Dry Contact Events and Descrip- tion.
-
Page 112: General Setting
In the General Setting screen, the user can set up Date Format, Date, Time, Screen Brightness, Screen Sleep (after) and Language. Other settings must be carried out by qualified service personnel, please contact Delta service personnel for assistance. Ultron HPH Series... - Page 114 Ultron HPH Series...
- Page 115 Sub Item Item Description Date Format Select the date format. Date/ Date Set up the date. Time Time Set up the time. Screen Brightness Adjust the touch panel display brightness (default: 80). Screen Screen Sleep Set up the touch panel backlight sleep time (default: 1 minute). (after) Language Set up the display language (default: English).
- Page 116 If you need ‘CAP Replacement Warning’, please select Warning ‘Enable’. The default setting is ‘Disable’. Set up the CAP installation date. NOTE: CAP Installation Only when you select ‘Enable’ for ‘CAP Replace- Date ment Warning’ can you set up the ‘CAP Installation Date’. Ultron HPH Series...
-
Page 117: Control
In the Control screen, the user can set up Buzzer. The setting of Force Equalized Charge, Force Bypass to Inverter, Force Inverter to Bypass and Reset System must be carried out by qualified service personnel, please contact Delta service personnel for assistance. - Page 118 Force Bypass to inverter keeps staying in the soft-start status and is unable to Inverter transfer to on-line mode successfully. Force Inverter to Manually force the UPS to switch from inverter to bypass when any emergency occurs. Bypass Ultron HPH Series...
-
Page 119: Maintenance
Item Description Reset the system or not. In bypass mode, when you press the ON/ OFF button ( ) to start Reset System up the UPS but the UPS does not respond, please select ‘Reset’ to reset the system. After the system is reset, please press the ON/ OFF button ( ) to start up the UPS. -
Page 120: Historical Event
Click the number on the right side of the historical event screen (as shown in the figure below) and enter a specific page number, you can quickly switch to the corresponding page and view the historical event logs. Ultron HPH Series... -
Page 121: Statistics
7.10.3 Statistics In the Statistics screen, the user can inquire On Battery Mode, Battery Mode Duration, On Bypass Mode, Bypass Mode Duration and Operation Time. Item Description On Battery Mode Means how many times that the UPS runs in battery mode. Means how long the UPS runs in battery mode. -
Page 122: Test
In the Test screen, the user can perform Buzzer & LED Test, and the administrator can perform Manual Battery Test and Battery Depth of Discharge Test. 7.10.5 Clear In the Clear screen, you can clear the records of Statistics, kWH, Historical Event and Battery Test Result. Ultron HPH Series... -
Page 123: Advanced Diagnosis
NOTE: The records mentioned above are important information for UPS analysis and maintenance. Do not clear any of them without the consent of qualified service personnel. 7.10.6 Advanced Diagnosis In the Advanced Diagnosis screen, the administrator can check System Temperature and INV Temperature. -
Page 124: Version & S/N
System FW Version, and can upgrade Touch Panel FW version and System FW version. Touch Panel FW version and System FW version upgrading must be carried out by qualified service personnel, please contact Delta service personnel for assistance. Ultron HPH Series... -
Page 125: Chapter 8: Optional Accessories
Chapter 8: Optional Accessories There are several optional accessories available for the HPH series UPS. Please refer to the table below for the optional accessories and their functions. If you need any of the optional accessories, please contact your local dealer. Item Functions Prevents dust from entering into the UPS to ensure UPS reli-... -
Page 126: Chapter 9: Maintenance
24 hours each time. NOTE: 1. If the batteries need to be replaced, please contact qualified service personnel. During battery replacement, the loads connected to the UPS will not be protected if input power fails. Ultron HPH Series... - Page 127 Fans Higher temperatures will shorten fan life. When the UPS is running, please check if all of the fans work normally and make sure if the ventilation air can move freely around and through the UPS. If not, replace the fans immediately. NOTE: Please ask your local dealer or customer service for more maintenance information.
-
Page 128: Appendix 1: Technical Specifications
SMF/ VRLA Battery Voltage ± 240 Vdc Battery & Maximum Charge Charger Current Float charge 272 ± 2 Vdc Charge Voltage Equalized charge 280 ± 2 Vdc < 55 dBA < 60 dBA < 60 dBA Audible Noise Ultron HPH Series... - Page 129 Model HPH-20K HPH-30K HPH-40K Tri-color LED indicators and 5’’ touch panel Display Mini Slot x 2, Parallel Port x 2, RS232 Port x 1, USB Port x 1, EXT BATT TEMP Port x 1, Communication Interfaces REPO Port x 1, Input Dry Contact x 2, Output Dry Contact x 4 Manual Bypass Switch Dimensions...
-
Page 130: Appendix 2: Warranty
The User Manual must be carefully followed. Seller makes no representation or warranty as to the suitability or fitness of this product for any specific application. No.: 501328520000 Version: V 0.0 Release Date: 2020_07_23 Ultron HPH Series... - Page 131 - Regional Office The United States Australia Delta Electronics (Americas) Ltd. Delta Energy Systems Australia Pty Ltd. 46101 Fremont Blvd. Fremont, CA 94538 Unit 20-21, 45 Normanby Road, Notting Hill VIC 3168, Australia T +1 510 344 2157 T +61 3 9543 3720 E ups.na@deltaww.com...
- Page 132 5013285200...