Britax MARATHON CLICKTIGHT User Manual
Hide thumbs
Also See for MARATHON CLICKTIGHT:
- User manual (52 pages) ,
- User manual (96 pages) ,
- Canadian user manual (92 pages)
Table of Contents
Advertisement
Available languages
Available languages
Advertisement
Chapters
Table of Contents

Related Manuals for Britax MARATHON CLICKTIGHT


Summary of Contents for Britax MARATHON CLICKTIGHT
- Page 1 MARATHON CLICKTIGHT ® ™ User Guide Guia del usuario...
-
Page 3: Table Of Contents
® ™ ™ ® by Britax and registered in the U.S.A. and other countries. All rights reserved. ©2020 Britax Child Safety, Inc. This product and its components are subject to change without notice. Printed in USA. P11857600 _A:01.20... -
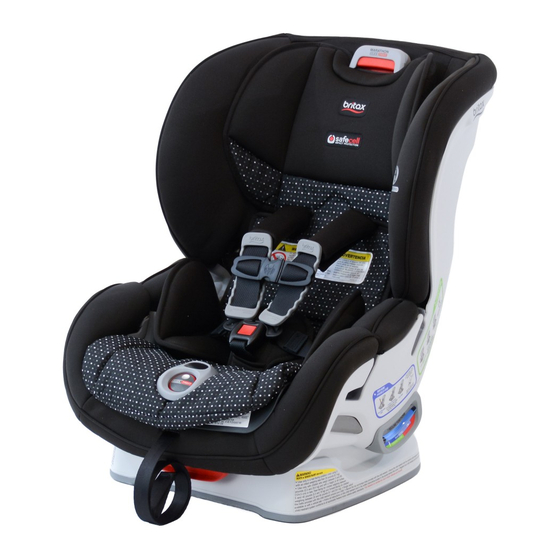
Page 4: Child Seat Features
Britax Child Safety, Inc. Child Seat Features Front Rear... - Page 5 MARATHON CLICKTIGHT User Guide Description 1. Cover 2. Harness Height Adjuster 3. Head Pad 4. Comfort Pads User Guide Storage (in pocket behind cover) 6. Chest Clip 7. Comfort Pillow 8. Forward-Facing Belt Slot / Harness Holder 9. Lower Connector Strap (LATCH component) 10.
-
Page 6: Safety Information
Manufactured Date Label on child seat (pages 2-3). • The use of non-Britax covers, inserts, toys, accessories, or tightening devices is not approved by Britax. Their use could cause this child seat not to perform as intended in a crash. -
Page 7: Important Notes
Send your name, address, e-mail address if available and the restraint’s model number and manufacturing date to Britax Child Safety, Inc. P.O. Box 91167 Allentown, PA 18109- 9925, or call 1-888-427-4829 or 1-704-409-1699, or register online at us.britax.com/registration. -
Page 8: Certification
Britax Child Safety, Inc. Certification This Restraint is Certified For Use in Motor Vehicles and Aircraft� Motor Vehicles This child seat system conforms to all applicable Federal motor vehicle safety standards (FMVSS 213). Aircraft This child seat is certified for aircraft use. The... -
Page 9: Child Fit Information
MARATHON CLICKTIGHT User Guide Child Fit Information Rear Facing: 5 – 40 lbs (2�3 – 18 kg) Britax strongly recommends that children ride rear facing to the highest weight or height specified. Use rear facing: • with harness straps in the closest position at or below the child’s... -
Page 10: Rear-Facing Installation
Britax Child Safety, Inc. Rear-Facing Installation Lap-Shoulder Belt Installation (Preferred Method) 1. Open the CLICKTIGHT. a. Press the dimple on the CLICKTIGHT dial. b. Rotate dial clockwise until CLICKTIGHT releases and lift to open. 2. Attach the anti-rebound bar, if included (see page 27). - Page 11 MARATHON CLICKTIGHT User Guide 7. Close the CLICKTIGHT. – A click confirms the CLICKTIGHT is secure. Rear-Facing Installation with Lap-Shoulder Belt 9 Ensure that the logo on the CLICKTIGHT dial has returned to a horizontal position. 9 Ensure that the recline indicator ball is within the allowable blue section for the size of the child and that no more than 3 in.
-
Page 12: Lower Anchor Installation
Britax Child Safety, Inc. Lower Anchor Installation IMPORTANT: Do not install rear-facing with the lower anchors for a child weighing more than 35 lbs (15.8 kg). 1. Open the CLICKTIGHT. a. Press the dimple on the CLICKTIGHT dial. b. Rotate dial clockwise... - Page 13 MARATHON CLICKTIGHT User Guide 6. Pull the end of the lower connector strap to remove slack. 7. Close the CLICKTIGHT. – A click confirms the CLICKTIGHT is secure. Rear-Facing Installation with Lower Anchors 9 Ensure that the logo on the CLICKTIGHT dial has returned to a horizontal position.
-
Page 14: Lap Belt Installation
Britax Child Safety, Inc. Lap Belt Installation 1. Open the CLICKTIGHT. a. Press the dimple on the CLICKTIGHT dial. b. Rotate dial clockwise until CLICKTIGHT releases and lift to open. 2. Attach the anti-rebound bar, if included (see page 27). - Page 15 MARATHON CLICKTIGHT User Guide 7. Close the CLICKTIGHT. – A click confirms the CLICKTIGHT is secure. Rear-Facing Installation with Lap Belt 9 Ensure that the logo on the CLICKTIGHT dial has returned to a horizontal position. 9 Ensure that the recline indicator ball is within the allowable blue section for the size of the child and that no more than 3 in.
-
Page 16: Forward-Facing Installation
Britax Child Safety, Inc. Forward-Facing Installation Lap-Shoulder Belt Installation (Preferred Method) 1. Remove the tether from the tether storage compartment and retainer tabs and place it up and over the child seat back. 2. Place upright forward- facing on the vehicle seat. - Page 17 MARATHON CLICKTIGHT User Guide 7. Close the CLICKTIGHT. – A click confirms the CLICKTIGHT is secure. 8. Attach the tether to a designated anchor (see vehicle owner’s manual) and remove slack (see page 30). Forward-Facing Installation with Lap-Shoulder Belt 9 Ensure that the logo on the CLICKTIGHT dial has returned to a horizontal position.
-
Page 18: Lower Anchor Installation
Britax Child Safety, Inc. Lower Anchor Installation IMPORTANT: Do not install forward-facing with the lower anchors for a child weighing more than 40 lbs (18 kg). 1. Remove the lower connectors from the storage compartment at the rear of the seat... - Page 19 MARATHON CLICKTIGHT User Guide 7. Close the CLICKTIGHT. – A click confirms the CLICKTIGHT is secure. 8. Attach the tether to a designated anchor (see vehicle owner’s manual) and remove slack (see page 30). Forward-Facing Installation with Lower Anchors 9 Ensure that the logo on the CLICKTIGHT dial has returned to a horizontal position.
-
Page 20: Lap Belt Installation
Britax Child Safety, Inc. Lap Belt Installation 1. Remove the tether from the tether storage compartment and retainer tabs and place it up and over the child seat back. 2. Place upright forward- facing on the vehicle seat. Ensure that the base of... - Page 21 MARATHON CLICKTIGHT User Guide 7. Close the CLICKTIGHT. – A click confirms the CLICKTIGHT is secure. NOTE: If the CLICKTIGHT is difficult to close, repeat step 6 with less tension in the vehicle belt. 8. Attach the tether to a designated anchor (see vehicle owner’s manual)
-
Page 22: Securing Your Child
Britax Child Safety, Inc. Securing Your Child IMPORTANT: Impact absorbing chest pads are highly recommended for forward-facing mode. Removal of chest pads is optional for rear-facing mode to ensure a snug fit for small infants. 1. Make the proper adjustments to the harness and buckle (see pages 22-24). - Page 23 MARATHON CLICKTIGHT User Guide 7. Fasten the harness buckle. Proper connection is confirmed with a click after inserting each buckle tongue. 8. Check for proper harness height and pull any excess slack up to the child’s shoulder area before tightening.
-
Page 24: Child Seat Functions
Britax Child Safety, Inc. Child Seat Functions Adjusting the Harness Height • In rear-facing mode, the harness straps should be in the closest position at or below your child’s shoulders. See page 7. • In forward-facing mode, the harness straps should be in the closest position at or above your child’s... - Page 25 MARATHON CLICKTIGHT User Guide 3. Thread the end of the harness through the opening on the inside of the metal bar behind the anchor to the bottom of the seating area. 4. Wrap the end of the harness around to the...
-
Page 26: Harness Buckle Position
Britax Child Safety, Inc. Harness Buckle Position The child seat shell contains an inner buckle slot and an outer buckle slot. Position the buckle in the slot closest to but not under the child. INNER SLOT ADJUSTMENT Reposition the harness buckle... -
Page 27: Comfort Pillow
MARATHON CLICKTIGHT User Guide Comfort Pillow The comfort pillow is designed to provide better fit and comfort for infants using this child seat. NOTE: Remove the comfort pillow after the child can sit comfortably in the child seat without additional support. -
Page 28: Uninstalling The Seat
Britax Child Safety, Inc. Overhang It is important that the base of the child seat rests completely flat on the vehicle seat with no side overhang. As seen in the illustration, it is permissible to allow up to 3 in. (7.6 cm) of the... -
Page 29: Anti-Rebound Bar (Select Models)
MARATHON CLICKTIGHT User Guide Anti-Rebound Bar (Select Models) In the event of a crash, the anti-rebound bar is designed to prevent rebound rotation in rear-facing car seat installations. The anti-rebound bar is not intended for use as a carry handle. Do not use the anti-rebound bar to carry this child seat. -
Page 30: Using The Lower Anchors And Tethers For Children (Latch)
Britax Child Safety, Inc. Using the Lower Anchors and Tethers for Children (LATCH) The Lower Anchors and Tethers for Children or LATCH, is a system available on this child seat that offers an alternative to vehicle seat belt installation methods. The figure below shows typical locations for lower anchors and tether anchors in a vehicle. -
Page 31: Impact Absorbing Tether
Failure to follow the guidelines below may cause the child seat not to perform as intended. • Britax recommends that the tether be used when installing the child seat forward facing. Using the tether will improve the stability of your child seat and reduce the risk of injury. - Page 32 Britax Child Safety, Inc. Using the Tether IMPORTANT: Do not use the top tether strap with rear- facing installations. To improve rear-facing performance of this child seat an anti-rebound bar can be purchased at us.britax.com. To attach the tether to a tether anchor: 1.
- Page 33 MARATHON CLICKTIGHT User Guide The Tether as a Crash Indicator The tether can indicate when the child seat has been in a moderate or severe crash (see “Important Notes” on page 5) and replacement of the child seat is necessary.
-
Page 34: Vehicle Compatibility
Britax Child Safety, Inc. Vehicle Compatibility Vehicle Seating Positions DO NOT place child seat rear-facing in the front seat of a vehicle with a passenger air bag. DEATH or SERIOUS INJURY can occur. Owners of vehicles with front passenger side airbags should refer to their owner’s... -
Page 35: Incompatible Vehicle Seat Belts
NOTE: This Britax car seat may not be compatible with every inflatable lap-shoulder belt. See FAQs in the support section of the Britax website (us.britax.com/faqs) for additional instructions. -
Page 36: Maintenance
Britax Child Safety, Inc. Maintenance Cover Removing the Cover Never remove the buckle tongues from the harness. They cannot be reattached after removal. If reassembled incorrectly, the child seat may not perform as intended. 1. Loosen and unbuckle the harness. - Page 37 MARATHON CLICKTIGHT User Guide d. Pull the end of the belly pad and buckle retainer out of the buckle slot in the cover to remove. – Turn the buckle retainer sideways and slide the buckle out of the belly pad (see page 39).
- Page 38 Britax Child Safety, Inc. Replacing the Cover 1. Attach one side of the upper shell cover at the forward-facing belt path, pull the cover over the back of the shell, and secure at opposite belt path. 2. Replace lower shell cover.
- Page 39 MARATHON CLICKTIGHT User Guide f. Reattach the two elastic loops at the front of the lower shell. 3. Replace the belly pad and buckle: a. Turn the buckle retainer sideways and route it through the belly pad. b. Route the belly pad...
-
Page 40: Harness Buckle
Britax Child Safety, Inc. 7. Replace the head pad. a. Loosen the harness and raise the head pad to the highest position. b. Slide on the head pad to install. c. Reattach the hook and loop fasteners on the head restraint around the harness. - Page 41 MARATHON CLICKTIGHT User Guide 4. Pull the end of the belly pad and buckle retainer out of the slot in the seat cover to remove. 5. Turn the buckle retainer sideways and route the buckle assembly out of the belly pad.
-
Page 42: Impact Absorbing Chest Pads
Britax Child Safety, Inc. 5. Replace the cover, ensuring the seat cover is tucked behind the CLICKTIGHT bar, then close the CLICKTIGHT. Impact Absorbing Chest Pads IMPORTANT: Impact absorbing chest pads are highly recommended for forward-facing mode. Removal of chest pads is optional for rear-facing mode to ensure a snug fit for small infants. - Page 43 MARATHON CLICKTIGHT User Guide 8. Nest the end of the left harness strap into the right. 9. Slide the harness straps completely onto the yoke. Ensure that the adjuster and harness straps are not twisted and that the ends of the harness straps are securely attached to the yoke.
- Page 44 Britax Child Safety, Inc. 7. Route the harness straps through the seat to the back. Ensure that the TUBE harness straps pass over the tube. 8. Nest the end of the left harness strap into the right. 9. Slide the harness straps completely onto the yoke.
-
Page 45: Cleaning
MARATHON CLICKTIGHT User Guide Cleaning Shell • SPONGE CLEAN the DO NOT shell using warm water • Use abrasive and mild soap. cleaners • TOWEL DRY. Cover • HAND WASH the DO NOT cover using cold water • Bleach and mild soap. -
Page 46: Troubleshooting
Clean the buckle (see a click after page 42), then try fastening the each tongue is buckle again. inserted� Please contact Britax Consumer Services at 1-888-427- 4829 or 1-704-409-1699 if you have an issue not listed here. -
Page 47: Warranty
Proof of purchase is required. Your exclusive remedy for this warranty is that Britax will, at its option, provide repair or replacement components for this product. Britax reserves the right to discontinue or change fabrics, parts, models or products, or to make substitutions. - Page 48 Britax Child Safety, Inc.
- Page 49 ® ™ ™ ® propiedad de Britax, y registradas en EE�UU� y otros países� Todos los derechos reservados� ©2020 Britax Child Safety, Inc� Este producto y sus componentes están sujetos a cambios sin previo aviso� Impreso en EE�UU� P11857600_A:01�20...
-
Page 50: Características Del Asiento Para Niños
Britax Child Safety, Inc. Características del asiento para niños Parte frontal Parte trasera... - Page 51 MARATHON CLICKTIGHT Guía del usuario Descripción 1� Cubierta 2� Regulador de altura del arnés 3� Almohada de cabeza 4� Almohadillas de confort 5� Compartimento para la guía del usuario (en el bolsillo detrás de la cubierta) 6� Broche pectoral 7� Almohada de confort 8�...
-
Page 52: Información De Seguridad
(página 2-3)� • El uso de cubiertas, piezas, juguetes, accesorios o dispositivos de ajuste que no sean de Britax no está aprobado por Britax� Su uso podría hacer que el asiento para niños no cumpla con su función prevista en un... -
Page 53: Notas Importantes
Envíe su nombre, dirección, dirección de correo electrónico si está disponible y el número de modelo y fecha de fabricación del asiento a Britax Child Safety, Inc� P�O� Box 91167 Allentown, PA 18109-9925, o llame al 1-888- 427-4829 o 1-704-409-1699, o regístrese en us.britax.com/ registration�... -
Page 54: Certificación
Britax Child Safety, Inc. Certificación Este asiento está certificado para su uso en vehículos de motor y aviones� Vehículos de motor Este sistema de asiento para niños cumple con todas las normas federales de seguridad para vehículos de motor aplicables (FMVSS 213)�... -
Page 55: Información Para Acomodar Al Niño
Orientación hacia adelante: 9,1 - 29,4 kg (20 - 65 lb) Britax recomienda firmemente que los niños estén sujetos con un sistema de arnés hasta que excedan los límites de peso o altura especificados�... -
Page 56: Instalación Con Orientación Hacia Trasera
Britax Child Safety, Inc. Instalación con orientación hacia trasera Instalación del cinturón banda horizontal y transversal (metodo preferido) 1� Abra el CLICKTIGHT� a� Presione la cavidad en el disco CLICKTIGHT� b� Rote el disco en el sentido de las agujas... - Page 57 MARATHON CLICKTIGHT Guía del usuario 7� Cierre el CLICKTIGHT� – Un clic confirma que el CLICKTIGHT está asegurado� Instalación con orientación hacia atrás con cinturón de banda horizontal y transversal 9 Asegúrese de que el logo en el disco CLICKTIGHT ha regresado a una posición horizontal�...
-
Page 58: Instalación Del Anclajes Inferiors
Britax Child Safety, Inc. Instalación del anclajes inferiors IMPORTANTE: No instale el asiento con los anclajes inferiores para un niño que pese más de 15,8 kg (35 lb)� 1� Abra el CLICKTIGHT� a� Presione la cavidad en el disco CLICKTIGHT�... - Page 59 MARATHON CLICKTIGHT Guía del usuario 6� Jale del extremo de la correa del conector inferior para tensarla� 7� Cierre el CLICKTIGHT� – Un clic confirma que el CLICKTIGHT está asegurado� Instalación con orientación hacia atrás con anclajes inferiores 9 Asegúrese de que el logo en el disco CLICKTIGHT ha regresado a una posición horizontal�...
-
Page 60: Instalación Del Cinturón De Banda Horizontal
Britax Child Safety, Inc. Instalación del cinturón de banda horizontal 1� Abra el CLICKTIGHT� a� Presione la cavidad en el disco CLICKTIGHT� b� Rote el disco en el sentido de las agujas del reloj hasta que CLICKTIGHT se suelte y se abra�... - Page 61 MARATHON CLICKTIGHT Guía del usuario 7� Cierre el CLICKTIGHT� – Un clic confirma que el CLICKTIGHT está asegurado� Instalación con orientación hacia atrás con cinturón de banda horizontal 9 Asegúrese de que el logo en el disco CLICKTIGHT ha regresado a una posición horizontal�...
-
Page 62: Instalación Con Orientación Hacia Delante
Britax Child Safety, Inc. Instalación con orientación hacia delante Instalación del cinturón banda horizontal y transversal (metodo preferido) 1� Retire la correa de fijación del compartimento de almacenamiento para la correa de retención y colóquela hacia arriba y sobre la parte trasera del asiento para niños�... - Page 63 MARATHON CLICKTIGHT Guía del usuario 7� Cierre el CLICKTIGHT� – Un clic confirma que el CLICKTIGHT está asegurado� 8� Coloque la correa de retención en un anclaje designado (consulte el manual del propietario del vehículo) y ténsela (véase página 30)�...
-
Page 64: Instalación Del Anclajes Inferiors
Britax Child Safety, Inc. Instalación del anclajes inferiors IMPORTANTE: No instale el asiento con los anclajes inferiores para un niño que pese más de 18 kg (40 lb)� 1� Retire los conectores inferiores del compartimento de almacenamiento atrás del asiento y estire la correa hasta la longitud máxima,... - Page 65 MARATHON CLICKTIGHT Guía del usuario 7� Cierre el CLICKTIGHT� – Un clic confirma que el CLICKTIGHT está asegurado� 8� Coloque la correa de retención en un anclaje designado (consulte el manual del propietario del vehículo) y ténsela (véase página 30)�...
-
Page 66: Instalación Del Cinturón De Banda Horizontal
Britax Child Safety, Inc. Instalación del cinturón de banda horizontal 1� Retire la correa de fijación del compartimento de almacenamiento para la correa de retención y colóquela hacia arriba y sobre la parte trasera del asiento para niños� 2� Coloque el asiento verticalmente con orientación hacia adelante... - Page 67 MARATHON CLICKTIGHT Guía del usuario 7� Cierre el CLICKTIGHT� – Un clic confirma que el CLICKTIGHT está asegurado� NOTA: Si es difícil cerrar el CLICKTIGHT, repita el paso 6 con menos tensión en el cinturón del vehículo. 8� Coloque la correa de retención en un anclaje...
-
Page 68: Sujeción Del Niño
Britax Child Safety, Inc. Sujeción del niño IMPORTANTE: Se recomienda encarecidamente el uso de las almohadillas de pecho con resitencia a impacto por orientación hacia delante� Retirar los almohadillas de pecho es opcional en la orientación hacia atrás para asegurar un ajuste holgado para los niños pequeños�... - Page 69 MARATHON CLICKTIGHT Guía del usuario 7� Abroche la hebilla del arnés� Las lengüetas de la hebilla están bien enganchadas si escucha un clic cuando inserta cada lado de las lengüetas� 8� Compruebe la altura correcta del arnés y jala el exceso de las correas hasta los hombros antes de apretar�...
-
Page 70: Funciones Del Asiento Para Niños
Britax Child Safety, Inc. Funciones del asiento para niños Cómo ajustar la altura del arnés • Con una orientación hacia atrás, las correas del arnés deben estar en la posición más cercana o por debajo de los hombros del niño� Consulte la página 7�... - Page 71 MARATHON CLICKTIGHT Guía del usuario 3� Pase el extremo del arnés a través de la abertura en el interior de la barra de metal detrás del anclaje en la parte inferior del asiento� 4� Envuelve el extremo del arnés alrededor de la barra, y deslice el lazo del arnés completamente...
-
Page 72: Posición De La Hebilla Del Arnés
Britax Child Safety, Inc. Posición de la hebilla del arnés El exterior del asiento de seguridad para niños tiene una ranura interior y una ranura exterior� Use la ranura más cercano pero no debajo del RANURA INTERNA niño� RANURA DE AJUSTE... -
Page 73: Almohada De Confort
MARATHON CLICKTIGHT Guía del usuario Almohada de confort La almohada de confort está diseñada para proporcionar comodidad a los niños que usan este asiento para niños� NOTA: Quite la almohada de confort después de que el niño se siente cómodamente en el asiento para niños sin... -
Page 74: Cómo Quitar El Asiento Para Niños
Britax Child Safety, Inc. Sobresalga Es importante que la base del asiento para niños quede completamente plana sobre el asiento del vehículo� Como se ve en la ilustración, se permite que sobresalga hasta 7,6 cm (3 pulgadas) de la base sobre... -
Page 75: Barra Anti-Rebote (Modelos Especificos)
MARATHON CLICKTIGHT Guía del usuario Barra anti-rebote (Modelos especificos) En el caso de un accidente, la barra anti-rebote está diseñada para evitar la rotación del rebote en las instalaciones del asiento para niños orientadas hacia atrás� La barra anti-rebote no está diseñada para ser utilizada como asa de transporte�... -
Page 76: Cómo Usar Los Anclajes Inferiores Y Las Correas De Retención Para Niños (Sistema Latch)
Britax Child Safety, Inc. Cómo usar los anclajes inferiores y las correas de retención para niños (sistema LATCH) Los anclajes inferiores y las correas de fijación para niños o LATCH es un sistema disponible en este asiento para niños que ofrece una alternativa a los métodos de instalación del cinturón de seguridad del vehículo�... -
Page 77: Correa De Retención Con Resistencia A Impacto
Si no sigue las pautas indicadas a continuación quizás el asiento para niños no cumpla con la función prevista� • Britax recomienda que la correa de retención se utilice cuando se instale el asiento para niños en orientación hacia delante� Usar la correa mejorará la estabilidad de su asiento para niños y reducirá... - Page 78 Britax en el 1-888-427-4829 o 1-704-409-1699 para obtener un extensor para la correa de retención. Para retirar la correa de retención de un anclaje de la correa: 1�...
- Page 79 MARATHON CLICKTIGHT Guía del usuario La correa de retención como indicador de accidentes La correa de fijación puede indicar cuándo el asiento para niños ha estado involucrado en un choque moderado o grave (véase «Notas importantes» en la página 5) y cuándo es necesario reemplazarlo�...
-
Page 80: Compatibilidad Con El Vehículo
Britax Child Safety, Inc. Compatibilidad con el vehículo Posiciones de los asientos en el vehículo NO coloque el asiento para niños mirando hacia atrás en el asiento frontal de un vehículo con airbag para el pasajero� Hay riesgo de MUERTE o de LESIONES GRAVES�... -
Page 81: Cinturones Del Asiento No Compatibles Con El
NOTE: El asiento de seguridad para niños de Britax puede no ser compatible con cada uno de los cinturones expandibles sobre el hombro y la cadera. Consulte las preguntas frecuentes en la sección de ayuda en el sitio web de Britax (us.britax.com/faqs) para obtener instrucciones... -
Page 82: Mantenimiento
Britax Child Safety, Inc. Mantenimiento Cubierta Cómo quitar la cubierta Nunca quite las lengüetas de la hebilla del arnés� No pueden volver a colocarse después de quitarlas� Si las vuelve a colocar de forma incorrecta, el asiento para niños puede no cumplir con la función prevista�... - Page 83 MARATHON CLICKTIGHT Guía del usuario d� Empuje el extremo de la almohadilla abdominal y el sujetador de la hebilla fuera de la ranura en la cubierta para sacarla� – Gire los laterales del sujetador de la hebilla y deslícelos hacia afuera de la almohadilla abdominal (véase la...
- Page 84 Britax Child Safety, Inc. Cómo reemplazar la cubierta 1� Coloque un lado de la cubierta del asiento superior en la guía del cinturón con orientación hacia delante, jale de la cubierta sobre la parte posterior del asiento y sujétela en la guía del cinturón contrario�...
- Page 85 MARATHON CLICKTIGHT Guía del usuario e� Coloque nuevamente las correas elásticas en la base del asiento inferior� 3� Reemplace la almohadilla abdominal y la hebilla: a� Gire los laterales del sujetador de la hebilla y oriéntela a través de la almohadilla abdominal�...
-
Page 86: Hebilla Del Arnés
Britax Child Safety, Inc. 7� Reemplace la cubierta de la almohada de cabezas� a� Afloje el arnés y eleve el arnés a la posición más alta� b� Deslice la cubierta de la almohada de cabezas para quitarla� c� Vuelva a abrochar el gancho y la correa de sujeción ubicados... - Page 87 MARATHON CLICKTIGHT Guía del usuario 4� Empuje el extremo de la almohadilla abdominal y el sujetador de la hebilla fuera de la ranura en la cubierta para sacarla� 5� Gire los laterales del sujetador de la hebilla y oriente el conjunto de la hebilla hacia afuera de la almohadilla abdominal�...
-
Page 88: Almohadillas De Pecho Con Resitencia A Impacto
Britax Child Safety, Inc. 5� Vuelve a colocar la cubierta y asegúrese de que la cubierta del asiento esté plegado detrás de los marcadores rojo en la barra de CLICKTIGHT, a continuación cierre el CLICKTIGHT� Almohadillas de pecho con resitencia a impacto... - Page 89 MARATHON CLICKTIGHT Guía del usuario 6� Repita con la otra correa� 7� Pase las correas del TUBO arnés a través del asiento hacia la parte posterior� Asegúrese de que las correas del arnés pasen a través del tubo� 8� Encaje el extremo de la correa del arnés izquierdo...
- Page 90 Britax Child Safety, Inc. 5� Vuelva a pasar la correa del arnés a través de la almohadilla del pecho, la broche pectoral y la almohadilla de confort� 6� Repita con la otra correa� 7� Pase las correas del arnés a través del asiento hacia la parte posterior�...
-
Page 91: Limpieza
MARATHON CLICKTIGHT Guía del usuario Limpieza Exterior • LIMPIE CON UNA ESPONJA el exterior • Utilice usando agua tibia y limpiadores jabón suave� abrasivos • SEQUE CON UNA TOALLA� Cubierta • LAVAR A MANO con agua fría y jabón • Utilice lejía suave�... -
Page 92: Resolución De Problemas
Britax Child Safety, Inc. Resolución de problemas Problema Posible solución El CLICKTIGHT Puede haber suciedad u otros no se cerrará objectos que interfieren con el con un clic para mecanismo� Asegúrese de que el indicar que es área del asiento esté despejado seguro�... - Page 93 (véase página 42) e intente ajustar la insertar cada hebilla de nuevo� lengüeta� Comuníquese con el servicio de atención al cliente de Britax en el 1-888-427-4829 o 1-704-409-1699 si tiene alguna consulta que no esté incluida aquí.
-
Page 94: Garantía
Para realizar una reclamación de acuerdo con esta garantía, debe ponerse en contacto con el departamento de atención al cliente de Britax llamando al 1 888 427 4829 o 1 704 409 1699, o enviando una carta a la dirección especificada en la contraportada de este manual�... - Page 96 Britax Child Safety, Inc. Tel.: 1-888-427-4829 4140 Pleasant Road Tel.: 1-704-409-1699 Fort Mill, SC 29708 USA A Britax Childcare company www.Britax.com...