Table of Contents
Advertisement
Advertisement
Table of Contents

Related Manuals for Geemarc PHOTOPHONE 450


Summary of Contents for Geemarc PHOTOPHONE 450
- Page 1 PHOTOPHONE 450 Amplified Big Button Telephone With Photo Dial English...
-
Page 2: Table Of Contents
CONTENTS SETTINGS SETTINGS SETTINGS !!!Please refer to our website: www.geemarc.com for an up to date user guide, as there may be important updates and changes you need to be aware of !!! CONTENTS .................. 1 INTRODUCTION ................3 Unpacking the Telephone ............. 4 DESCRIPTION ................ - Page 3 CONTENTS Receiving a Call ................17 Hearing Aid Use ................. 17 OPTIONAL ACCESSORIES ............18 Flash Signal ................18 Headset ..................18 CALLER ID ................19 View Caller ID List ..............19 Dial a Number from the Caller ID List ......... 19 Add a Number from the Caller ID List to the Phone Book ..
-
Page 4: Introduction
It is important that you read the instructions below in order to use your Geemarc telephone to its full potential. Keep this user guide in a safe place for future reference. This guide explains how to use the PHOTOPHONE 450... -
Page 5: Unpacking The Telephone
Unpacking the Telephone When unpacking the telephone, you will find the following in the box: • 1 PHOTOPHONE 450 • 1 PHOTOPHONE 450 handset with curly cord • 1 Telephone line cord • 1 Mains power adaptor • 1 User Guide For product support and help visit our website at www.geemarc.com... -
Page 6: Description
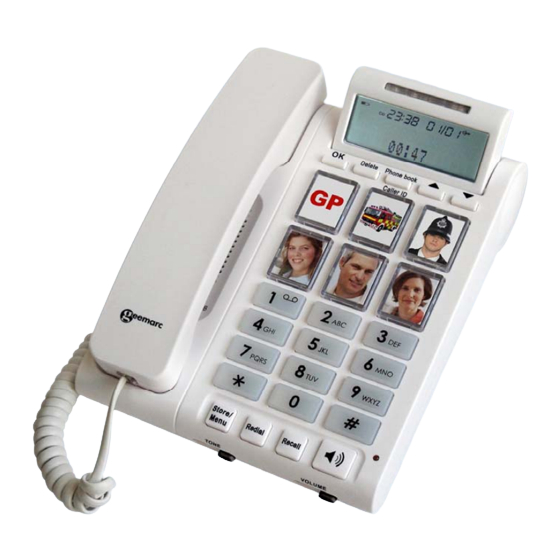
DESCRIPTION DESCRIPTION General Description Ringer indicator/ Scroll up/ Phonebook/ Confirm/OK Delete/Clear New call LED down Caller ID List LCD screen Handset Holder Photo Dial Speaker Amplify Numeric keypad R key Redial Loud speaker Menu/Store Volume slider Tone slider... - Page 7 DESCRIPTION Phone line cord jack Ringer tone Volume boost Ringer volume Headset Power jack reset override jack screen tilt Loudspeaker Handset volume cord jack slider Battery compartment...
-
Page 8: Key Description
DESCRIPTION Key Description Enter the change settings menu. Store/Menu Store numbers to memory. Last number redial. Redial Insert a pause when pre-dialing a number. This button is used to disconnect a call and re- Recall establish dial tone or to switch over to another caller provided you have requested these services i.e. -
Page 9: Installation
Connect one end of the curly cord to the handset. The other end of the curly cord plugs into the jack on the left hand side of the PHOTOPHONE 450 unit marked Handset Cord. Place the handset on the cradle. - Page 10 INSTALLATION snaps into place. Now place the telephone over the screws and push it downwards (slightly). Place the phone onto the screw-heads and slide down to secure. Diagram 1 85CM Diagram 2...
-
Page 11: Table Mounting
INSTALLATION INSTALLATION Table Mounting When using the wall mounted bracket with the telephone mounted on a table, it allows better access to the keypad. Feed the guide tabs on the wall-mounting bracket into the slots at the top of the telephone and place on a table. See diagram below. Diagram 1 Diagram 2... -
Page 12: Settings
SETTINGS Once you have plugged the Photophone450 into the mains, the default language will flash on the LCD screen. This will be ‘ENGLISH’ . If this is not displayed, press Store/Menu to enter the settings change menu. Set Language to select another language. There are 6 languages to choose from. -
Page 13: Set Date And Time
SETTINGS SETTINGS Set Date and Time In standby mode, the telephone displays the current date and time. You need to set the date and time so that when you receive calls they will appear in the call list with the correct date and time. If you subscribe to a Caller ID service, the time and date will be set automatically when you receive your first call. -
Page 14: Set Service Access
SETTINGS Set Service Access You can select keys 1 and/or 2 on the numeric keypad to store service access telephone numbers e.g. 1571 for British Telecom’s answering machine service. ‘SERVICE ACCESS’ will be displayed on the screen. Press OK button to save and move onto the next setting ‘KEY 1, 2’... -
Page 15: Set Ringer Volume
SETTINGS SETTINGS SETTINGS Set Ringer Volume The ringer volume switch is found at the rear of the telephone. You can select one of 3 volume settings: Lo / Mid / Hi . It is not possible to switch the ringer off, but it can be set to low volume by selecting the Lo setting. - Page 16 SETTINGS SETTINGS Use the tone slide control found at the front of the telephone to adjust the tone in the handset* The tone control can be used to increase the high (treble) frequencies and the low (base) frequencies. Bass Treble +10dB max +10dB max * The tone control only has an affect when the amplify function is...
-
Page 17: Using The Telephone
USING THE TELEPHONE USING THE TELEPHONE Making a Call Pick up the handset. When you hear the dialling tone, dial the number on the keypad. To end the call simply replace the handset in the cradle Making a Call – Hands Free (speakerphone) Press the button to hear the dialling tone then dial the telephone number on the keypad. -
Page 18: Last Number Redial
USING THE TELEPHONE Last Number Redial Lift the handset or press for hands free use Press Redial to redial the last number dialled. Dialling a Number from the Redial List Redial Press repeatedly whilst in standby mode to scroll through the redial list of 5 telephone numbers to find the desired number Lift the handset, press or press... -
Page 19: Optional Accessories
OPTIONAL ACCESSORIES OPTIONAL ACCESSORIES Flash Signal The Recall button can be used with special services such as Call Waiting (if provided by your service provider) e.g. when a call waiting signal is heard, press Recall and await the dialling tone, then press 2 to transfer to the other caller. -
Page 20: Caller Id
CALLER ID CALLER ID The features described in this section onwards is only available if you subscribe to a Caller ID service from your network provider. Caller ID means you can see who is calling on your handset display (provided the number is not withheld, unavailable or is an international call). -
Page 21: Add A Number From The Caller Id List To The Phone Book
CALLER ID Add a Number from the Caller ID List to the Phone Book to scroll through the Caller ID list until you find the number you wish to add to the phone book Press and hold Store/Menu until ‘COPY NUMBER?’ is displayed Press and hold Store/Menu again... -
Page 22: Phone Book
PHONE BOOK PHONE BOOK Telephone numbers can be stored in the phone book. It allows you to store frequently used numbers so that you can easily make a call without having to remember or enter the telephone number. The phone book can contain 50 entries. Each phone number can contain up to 22 digits and the associated name can have 16 characters. -
Page 23: View Phone Book Entries
PHONE BOOK Character Map If you need to enter the same letter twice or another letter with the same key, wait a few seconds and the cursor will move automatically to the next space. View Phone Book Entries Press Phone book/Caller ID button until the icon is displayed... -
Page 24: Modify A Phone Book Entry
PHONE BOOK Modify a Phone Book Entry Phone book/Caller ID Press button until the icon is displayed ‘TOTAL: X’ will be displayed showing the number of entries stored in the Phone Book to scroll through the phone book until you find the contact you wish to edit Press and hold Store/Menu ‘EDIT?’... -
Page 25: Delete A Phone Book Entry
PHONE BOOK Delete a Phone Book Entry Phone book/Caller ID Press button until the icon is displayed ‘TOTAL: X’ will be displayed showing the number of entries stored in the Phone Book to scroll through the phone book until you find the contact you wish to delete Press DELETE... -
Page 26: Photo Dial
PHOTO DIAL This telephone has 6 photo dial memory buttons. You can store your contact’s photograph under the perspex of the button. This is very useful if you tend to forget telephone numbers or names. Create a Photo Dial Number Press and hold Store/Menu until... -
Page 27: Service Access
SERVICE ACCESS Calling a Service Number If a BT service access telephone number has been stored (see Settings – Set Service Access Number) e.g. BT’s 1571 service, this service access number can be called with the press of just one key. ‘1’... -
Page 28: Troubleshootiing
• Make sure that the power adaptor is plugged in correctly and is not damaged. • Check for a power cut in the area. PHOTOPHONE 450 does not ring • Make sure that the telephone line cord is plugged in correctly and is not damaged. -
Page 29: Safety Information
SAFETY INFORMATION General Only use the power supply that is included with this product. Do not open the unit. Contact the helpline or your retailer for all repairs. Hearing damage The phone is capable of amplifying sounds to a loud volume. It is important to instruct all potential users of its proper operation. -
Page 30: Guarantee
GUARANTEE From the moment your Geemarc product is purchased, Geemarc guarantee it for the period of two years. During this time, all repairs or replacements (at our discretion) are free of charge. Should you experience a problem then contact our help line or visit our website at www.geemarc.com. -
Page 31: Recycling Directives
- Or, hand the old product to the retailer. If you purchase a new one, they should accept it. Thus if you respect these instructions you ensure human health and environmental protection. For product support and help visit our website at www.geemarc.com telephone 01707 387602 or fax 01707 832529... - Page 32 UGPHOTOPHONE450 _En_v1.1...