
Related Manuals for Geemarc PhotoPHONE 100


Summary of Contents for Geemarc PhotoPHONE 100
- Page 1 Now available to purchase from www.M2Cshop.com Now available to purchase from www.M2Cshop.com...
- Page 2 Now available to purchase from www.M2Cshop.com Now available to purchase from www.M2Cshop.com...
-
Page 3: Table Of Contents
CONTENTS Now available to purchase from www.M2Cshop.com CONTENTS INTRODUCTION Unpacking the Telephone DESCRIPTION General Description INSTALLATION Setting Up Wall Mounting SETTINGS Ringer Settings Flash (Recall) Setting Receiving Voume and Tone Settings Speakerphone Volume Setting USING THE TELEPHONE Making a Call Receiving a Call Last Number Redial Mute Function... - Page 4 CONTENTS Now available to purchase from www.M2Cshop.com TROUBLESHOOTING SAFETY INFORMATION GUARANTEE RECYCLING DIRECTIVES Now available to purchase from www.M2Cshop.com...
-
Page 5: Introduction
Its is important that you read the instructions below in order to use your Geemarc telephone to its full potential. Keep this user guide in a safe place for future reference. This guide explains how to use the following telephone: PHOTOPHONE 100 Now available to purchase from www.M2Cshop.com... -
Page 6: Unpacking The Telephone
When unpacking the telephone, you should find the following in the box: x 1 PHOTOPHONE 100 unit x 1 PHOTOPHONE 100 handset with curly cord x 1 Telephone line cord x 1 User Guide For product support and help visit our website at www.geemarc.com... -
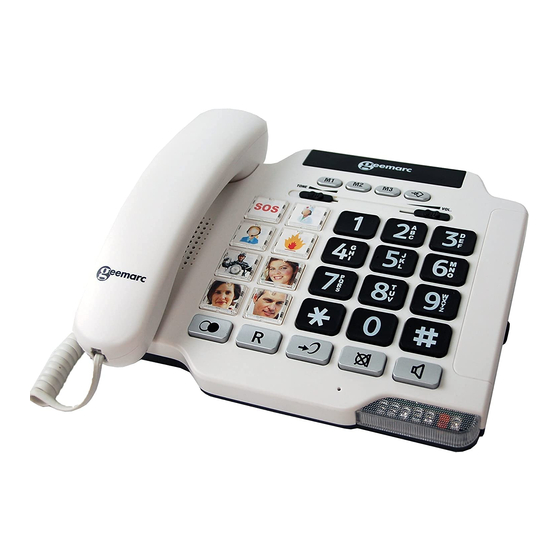
Page 7: Description
DESCRIPTION Now available to purchase from www.M2Cshop.com General Description Special memory (M1~M3) Store button Tone reception Volume reception adjustment adjustment Hook Switch Redial/Pause button In use Mute button Flash button Direct memory Mute LED Amplify button Speaker button Amplify LED Now available to purchase from www.M2Cshop.com... - Page 8 DESCRIPTION Now available to purchase from www.M2Cshop.com Flash time Switch Speaker volume control Handset cord jack Ringer Amplify Phone line volume cord jack switch it h Now available to purchase from www.M2Cshop.com...
-
Page 9: Installation
Connect the handset to one end of the curly cord. Plug the other end of the curly cord into the jack on the left hand side of the PHOTOPHONE 100 unit. Place the handset on the cradle. Connect the line cord to the jack located at rear of telephone then connect the plug at the other end of the line cord into the wall socket *. -
Page 10: Wall Mounting
INSTALLATION Now available to purchase from www.M2Cshop.com Wall Mounting Slide the handset hanger tab out and reverse its position (rotate it 180 degrees). Slide it back into place so that the hook points up (see diagram 1). This will keep the handset from falling out of the cradle when it is mounted on the wall. -
Page 11: Settings
SETTINGS Now available to purchase from www.M2Cshop.com Ringer Settings A switch located on the rear of the PHOTOPHONE 100 unit allows the ringer volume to be switched to HI (maximum volume), LO (lowest volume) or OFF (if you would prefer not to be disturbed). -
Page 12: Receiving Volume And Tone Settings
SETTINGS Now available to purchase from www.M2Cshop.com Receiving Volume and Tone Settings You can alter the receiving volume and tone during a conversation according to your hearing requirements. Use the Volume slide control found at the top of the telephone base to adjust the level. The volume adjustment available is 0-15dB. - Page 13 SETTINGS Now available to purchase from www.M2Cshop.com AMPLIFY ON/OFF Switch at OFF Position The additional amplification and tone controls are deactivated each time you use the telephone. The Amplify LED will be off whenever you use the telephone. Pressing the Amplify button once during a call will enable tone control and additional amplification.
-
Page 14: Speakerphone Volume Setting
SETTINGS Now available to purchase from www.M2Cshop.com Speakerphone Volume Setting In hands free mode you can adjust the speaker volume by using the volume controls V+ or V- located on the right side of the phone. Now available to purchase from www.M2Cshop.com... -
Page 15: Using The Telephone
USING THE TELEPHONE Now available to purchase from www.M2Cshop.com Making a Call Pick up handset. When you hear the dialling tone, dial the number on the keypad. To end the call simply replace the handset in the cradle Making a Call – Hands Free Press the button to get a dialling tone Dial the telephone number on the keypad. -
Page 16: Receiving A Call
USING THE TELEPHONE Now available to purchase from www.M2Cshop.com Receiving a Call When an incoming call is received, the telephone rings and the incoming call LED lights up. Lift the handset and speak To end the call simply replace the handset in the cradle Receiving a call –... -
Page 17: Mute Function
USING THE TELEPHONE Now available to purchase from www.M2Cshop.com Mute Function If you wish, you can speak privately to someone else in the room without your caller overhearing. You will still be able to hear the caller but they cannot hear you during the mute operation. To switch on the mute mode during a call press the MUTE button once (the mute LED will light up). -
Page 18: Memory
MEMORY Now available to purchase from www.M2Cshop.com Storing a Number to Memory There are 11 memory buttons (M1, M2 and M3 and 8 photo dial buttons). You can slip your contact’s photograph under the perspex of the button. This is very useful if you tend to forget telephone numbers or names. -
Page 19: Now Available To Purchase From Www.m2Cshop.com
TROUBLESHOOTING Now available to purchase from www.M2Cshop.com PHOTOPHONE100 does not ring x Make sure that the telephone line cord is plugged in correctly and is not damaged x Connect another telephone to the telephone PTT socket or move your telephone to another socket to track if the failure is coming from your telephone or your PTT socket x There may be too many communication devices connected to a single telephone line e.g. -
Page 20: Safety Information
SAFETY INFORMATION Now available to purchase from www.M2Cshop.com General Do not open the unit. Contact the helpline for all repairs. Cleaning Clean the telephone with a soft cloth. Never use polishes or cleaning agents - they could damage the finish or the electrics inside. -
Page 21: Guarantee
GUARANTEE Now available to purchase from www.M2Cshop.com From the moment your Geemarc product is purchased, Geemarc guarantee it for the period of one year. During this time, all repairs or replacements (at our discretion) are free of charge. Should you experience a problem then contact our help line or visit our website at www.geemarc.com. - Page 22 GUARANTEE Now available to purchase from www.M2Cshop.com Telephone connection: Voltages present on the telecommunication network are classified TNV-3 (Telecommunication Network Voltage) according to the EN60950 standard. Now available to purchase from www.M2Cshop.com...
-
Page 23: Recycling Directives
- Or, hand the old product to the retailer. If you purchase a new one, they should accept it. Thus if you respect these instructions you ensure human health and environmental protection. For product support and help visit our website at www.geemarc.com Telephone 01707 384438 Or fax 01707 372529 PHOTOPHONE100_UK ED.01...