Geemarc CL100 User Manual
Hide thumbs
Also See for CL100:
- User manual (28 pages) ,
- User manual (18 pages) ,
- User manual (42 pages)

Related Manuals for Geemarc CL100


Summary of Contents for Geemarc CL100
- Page 1 Multifunction telephone Téléphone multifonctions Multifunktionstelefon English P2 Français P15 Deutsch P28...
- Page 2 !!!User manual to read carefully before start to use!!! !!!Manuel d’utilisation à lire impérativement avant la mise en service!!! !!! Bevor Ihr neues Telefongerät zu benutzen, bitte lesen Sie dies Benutzerhandbuch sehr sorgfältig!!! CAUTION: this telephone is specifically designed for the people with hearing difficulties and is provided with a handset earpiece volume control for individual requirements.
-
Page 3: Table Of Contents
Index Description ..............3 Setting up ..............5 1- Connecting the telephone ........5 2- Ringer volume setting ..........5 3- Tone/Pulse switch ............ 6 4- Time break recall setting .......... 6 5- Wall mounting ............6 Volume and tone adjustment ........8 1- Receiving volume and tone adjustment .... -
Page 4: Description
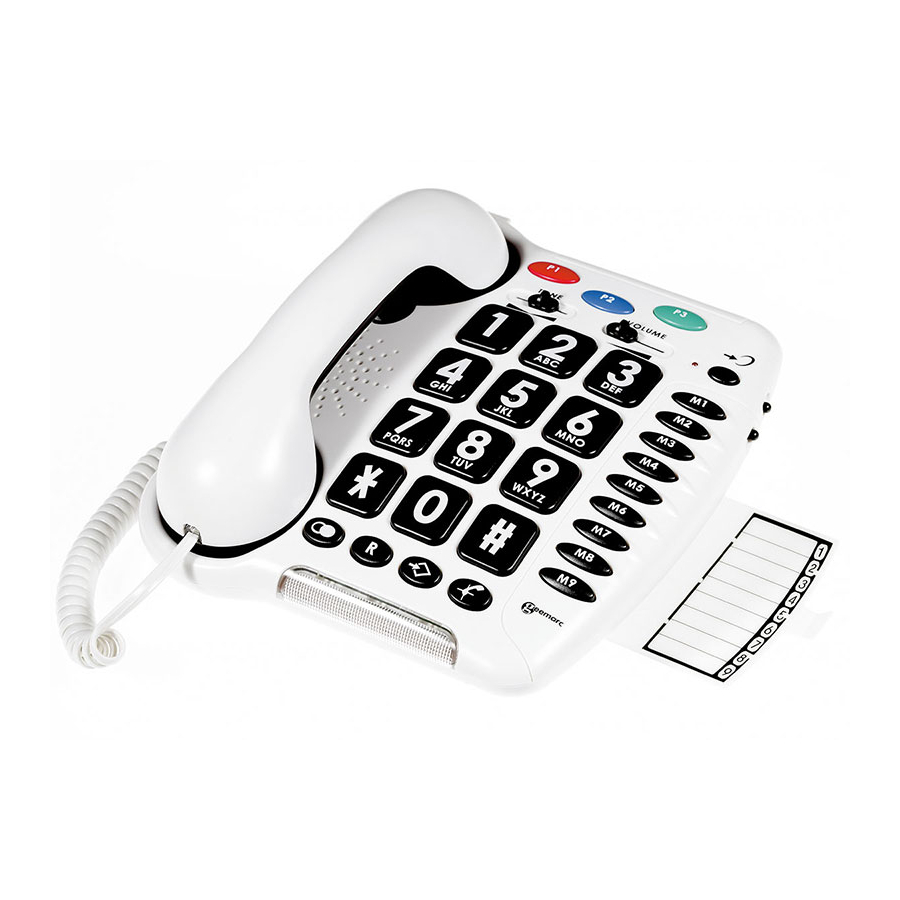
Description 1. Line socket. 2. Volume and tone adjustment ON/OFF switch. 3. 3 emergency numbers. 4. Reception tone adjustment. 5. Clip for wall mounting. 6. Reception volumen adjustment. 7. Handset cord socket. - Page 5 Description 8. Last number redial. 9. Time break recall. 10. Memory storing. 11. Flashing incoming ring indicator. 12. Mute. 13. Direct memories. 14. Ring volume setting. 15. Sending volume setting. 16. Extra volume and tone adjustment. 17. Red light of tone/volume activation. 18.
-
Page 6: Setting Up
Setting up 1 – Connecting the telephone - Connect the handset cord (1). - Open the battery compartment (2). - Insert 4 alkaline batteries (type AAA 1.5V, not supplied) in the comartment (*). Batteries are required if you wish to increase the ringer level up to 10 dB (2). -
Page 7: 3- Tone/Pulse Switch
Setting up 3 – Dialling mode (Tone/Pulse) settings The Tone/Pulse switch is factory pre-set to Tone position. In the UK, all telephone exchanges now use Tone (T) dialing. If your phone does not dial out, it is probably being used from an older private switch board (PBX). - Page 8 Setting up - Drill 2 holes in the wall (80mm apart). - Insert the wall plugs and the screws leaving about 6 mm of the screws projecting from the wall. - Slide the telephone downwards to secure. Screw...
-
Page 9: Volume And Tone Adjustment
Volume and tone adjustment 1 – Receiving volume and tone adjustment You can increase the volume and adjust the receiving tone according to your own hearing requirements. The button allows extra receiving and tone functions to be activated or not during the conversation. When the function is activated, the red light of extra receiving and tone function located near the button is lit. -
Page 10: 2- Sending Volume Adjustment
Volume and tone adjustment Note: When the tone (treble), earpiece volume and sending levels are set to the maximum, whistling may occur. Then the sending level settings should be decreased with the switch When the switch located behind the phone is ON, the extra-receiving and tone functions are automatically activated each time you use the phone. -
Page 11: Using The Phone
Using the phone Using the phone Using the phone Using the phone If you are using this telephone with a hearing aid, set your hearing aid to the “T” setting. 1 – Answer a call - When an incoming call is received the phone will ring and flash, to answer the call lift the handset and speak. -
Page 12: 6- Storing Telephone Numbers
Using the phone 6 – Storing telephone numbers Your telephone can store12 direct memories including 3 priority numbers (24 digits maximum for priority memory and 32 digits for M1, M2...M9). For example, the 3 priority P1, P2, P3 memories allow you to store the 3 numbers below: = Fire = Police = Doctor... -
Page 13: 7- Dialling Stored Number
Using the phone 7 – Dialing stored numbers - Lift the handset and await the dial tone. - Press appropriate button M1, M2, ..., or M9 or one of 3 priority memories, the stored number will be dialled automatically. To register your stored phones numbers, use the index located under the base. -
Page 14: General Informations
Guarantee: From the moment your Geemarc product is purchased, Geemarc guarantee it for the period of two years. During this time, all repairs or replacements (at our option) are free of charge.Should you experience a problem then contact our helpline or visit our website at www.geemarc.com. - Page 15 EN60950 standard. The telephone does not operate if the line current is lower than 18 mA. Declaration: Hereby Geemarc Telecom SA declares that this product is in compliance with the essential requirements and other relevant provisions of the Radio and...
- Page 16 Index Description ..............16 Installation ..............16 1- Raccordements ............16 2- Réglage de la sonnerie ..........16 3- Numérotation multifréquences ou décimale ..... 19 4- Interrupteur 300/100ms ..........19 5- Montage murale ............19 Réglage du volume et de la tonalité ......21 1- Réglage du volume et de la tonalité...
-
Page 17: Description
Description 1. Prise cordon de ligne. 2. Activation automatique de la correction d’écoute au décroché. 3. 3 mémoires d’urgence. 4. Réglage de la tonalité de réception. 5. Ergot de position murale. 6. Réglage du volume de réception. 7. Prise de cordon combiné. - Page 18 Description 8. Rappel du dernier numéro composé. 9. Touche R. 10. Mise en mémoire. 11. Flash lumineux de sonnerie. 12. Secret. 13. Mémoires directes. 14. Réglage du volume de sonnerie. 15. Réglage du volume d’émission. 16. Activation de la correction de tonalité et volume de réception.
-
Page 19: Installation
Installation 1 – Raccordements - Branchez le cordon du combiné (1). - Ouvrez le compartiment à piles (2). - Insérez 4 piles (type AAA 1.5V alkalines), non fournies dans le compartiment (*). Les piles sont necessaires si vous désirez augmenter le niveau de sonnerie de 10 dB (2). - Refermez le compartiment à... -
Page 20: 3- Numérotation Multifréquences Ou Décimale
Installation 3 – Numérotation multifréquences (T) ou décimale (P) Au moment de sa livraison, votre téléphone est en mode multifréquences (T). Si le central téléphonique dont vous dépendez fonctionne en mode décimale (P), vos appels n’aboutiront pas. Il vous suffira alors de commuter l’interrupteur T/P situé en dessous du téléphone sur la position P pour remédier à... - Page 21 Installation - Percez 2 trous verticaux distant de 80 mm dans votre mur. - Insérez 2 chevilles avec leurs vis. - Laissez dépasser les vis de 6mm. - Faites glisser votre téléphone dans les têtes de vis. La vis...
-
Page 22: Réglage Du Volume Et De La Tonalité
Réglage du volume et de la tonalité 1 – Réglage du volume et de la tonalité de réception Vous pouvez amplifier le volume et régler la tonalité de réception de votre combiné. La touche permet d’activer ou de désactiver le correcteur de réception durant la conversation. -
Page 23: 2- Réglage Du Volume D'émission
Réglage du volume et de la tonalité Note: Des sifflements dans l’écouteur peuvent apparaître dans certaines configurations de réglage (tonalité des aigus, volume de réception et volume d’émission au max), dans ce cas diminuez le niveau d’émission à l’aide de l’interrupteur L’interrupteur sur ON situé... -
Page 24: Utilisation
Utilisation Using the phone Using the phone Using the phone Si vous êtes porteur d’une aide auditive, commutez cette dernière en position «T». 1 – Recevoir un appel - Lorsque le téléphone sonne (flash lumineux de sonnerie de votre téléphone activé), décrochez le combiné pour parler à votre correspondant. -
Page 25: 6- Mémoriser Un Numéro De Téléphone
Utilisation 6 – Mémoriser un numéro de téléphone Votre téléphone possède 12 mémoires directes dont 3 d’urgences, (24 chiffres maximum par mémoire prioritaires et 32 pour les mémoires M1, M2...M9). Les mémoires d’urgence permettent de mémoriser par exemple les 3 numéros suivants: =Pompier =Police =Docteur... -
Page 26: 7- Appel D'un Numéro En Mémoire
Utilisation 7 – Appel d’un numéro en mémoire - Décrochez le combiné. - Appuyez sur une des touches M1, M2, ..., ou M9 ou sur une des trois touches d’urgence, le numéro en mémoire se recompose automatiquement. Pour repérer vos numéros enregistrés, utilisez le répertoire situé... -
Page 27: Informations Générales
Informations générales Recommandations pour le recyclage: La directive DEEE (Déchet d'Equipement Electrique et Electronique) a été mise en place dans le but d'assurer la collecte sélective en vue de la valorisation, réutilisation ou recyclage des produits en fin de vie. Lorsque votre produit ne fonctionne plus, ne le jeter pas dans votre poubelle ménagère. - Page 28 La déclaration de conformité peut être consultée sur le site : www.geemarc.com Si vous avez besoin d'aide ou de soutien technique, consultez notre site Internet: www.geemarc.com Téléphone +33 (0)3 28 58 75 99 Ou Fax +33 (0)3 28 58 75 76...
- Page 29 Index Beschreibung ............. 29 Aufbau ................. 31 1- Anschließen des Telefons ........31 2- Rufton einstellung ............ 31 3- Einstellen von Ton- / Pulswahl ......... 32 4- Einstellen der Flashzeit ..........32 5- Wandinstallation ............32 Ton- u. Lautstärke Regelung ........34 1- Einstellen der Hörerlautstärke sowie der Höhen und Tiefen ...............
-
Page 30: Beschreibung
Beschreibung 1. Buchse für das Telefonkabel. 2. Schalter zur automatischen Aktivierung der Hörerverstärkung beim Abnehmen des Hörers. 3. 3 Notfalltasten. 4. Hoch-/Tieftonregelung. 5. Clip für die Wandmontage. 6. Lautstärkeregelung. - Page 31 Beschreibung 7. Hörerkabel. 8. Wahlwiederholung. 9. R-Taste. 10. Speichertaste. 11. Blitzlicht für Anrufsignal. 12. Stummschalttaste. 13. Direktwahltasten. 14. Einstellung Klingellautstärke. 15. Einstellung Sprachverstärkung. 16. Taste zum Anund Ausschalten der Hörerverstärkung. 17. Rotes Licht bei eingeschalteter Hörerverstärkung. 18. Hörerkabel. 19. Batteriefach. 20.
-
Page 32: Aufbau
Aufbau 1 – Anschließen des Telefons - Schließen Sie das Telefonhörerkabel an (1). - Öffnen Sie das Batteriefach (2). - Legen Sie 4 Micro (AAA) Alkalibatterien (nicht im Lieferumfang) richtig herum in das Batteriefach ein. Batterien werden benötigt wenn Sie die Klingellautstärke um 10dB verstärken wollen (2). -
Page 33: 3- Einstellen Von Ton- / Pulswahl
Aufbau 3 – Einstellen von Ton- / Pulswahl (T/P) Das Telefon ist ab Werk auf Tonwahl eingestellt. Alle Anschlüsse in Deutschland funktionieren heutzutage mit Tonwahl (T). Sollten Sie dennoch Probleme haben einen Anruf zu tätigen, betreiben Sie das Telefon eventuell an einer älteren Telefonanlage. - Page 34 Aufbau - Bohren Sie zwei Löcher mit einem abstand von 80MM in die Wand (nutzen Sie dazu die Wandinstallations-Schablone). - Führen 2 Dübel und die Befestigungsschrauben ein. - Die Schrauben sollten dabei 6MM von der Wand abstehen. - Hängen Sie das Telefon über die Schraubenköpfe und ziehen Sie es nach unten um es zu sichern.
-
Page 35: Ton- U. Lautstärke Regelung
Ton- u. Lautstärke Regelung 1 – Einstellen der Hörerlautstärke sowie der Höhen und Tiefen Sie können die Lautstärke sowie die Höhen und Tiefen des Hörers entsprechend Ihrer Erfordernisse anpassen. Mit der Taste können Sie die Hörerverstärkung, sowie die veränderten Höhen und Tiefen während des Gesprächs aktivieren und deaktivieren. -
Page 36: 2- Einstellen Der Sprachverstärkung
Ton- u. Lautstärke Regelung Achtung : Wenn die Hoch-/Tieftonregelung, die Hörerlautstärke und die Sprachverstärkung auf Maximum eingestellt sind, kann ein Pfeifen auftreten. Wenn dies der Fall ist, sollte die Sprachverstärkung mit dem Schalter reduziert werden. Wenn der Schalter an der Rückseite des Telefons auf ON eingestellt ist, ist die zusätzliche Verstärkung der Lautstärke sowie der Höhen und Tiefen bei jedem Gebrauch automatisch eingeschaltet. -
Page 37: Benutzung Des Telefons
Benutzung des telefons Using the phone Using the phone Using the phone Wenn Sie dieses Telefon mit einem Hörgerät benutzen stellen Sie ihr Hörgerät auf die „T“- Position. 1 – Annahme eingehender Telefonanrufe - Einen eingehenden Telefonanruf signalisiert das Telefon durch einen Klingelton und Lichtblitze. -
Page 38: 6- Einspeichern Von Telefonnummern
Benutzung des telefons 6 – Einspeichern von Telefonnummern Ihr Telefon kann 12 Direktwahl- und 3 Notfallrufnummern speichern (Höchstens 24 Ziffern per vorrangige gespeicherte Nummer und höchstens 32 Ziffern für M1, M2…M9). Auf den Notfalltasten können Sie z. B. Feuerwehr, Polizei, den Notruf oder die Nummer Ihres Arztes speichern. -
Page 39: 7- Eine Gespeicherte Nummer Anwahlen
Benutzung des telefons 7 – Eine gespeicherte nummer anwahlen - Heben Sie den Telefonhörer ab und warten Sie auf das Freizeichen. - Drücken Sie M1 bis M9 oder eine der Notfalltasten; die gespeicherte Nummer wird automatisch angewählt. Um die gespeicherten Telefonnummern registrieren, verwenden Sie den Index unter der Basis entfernt. -
Page 40: Generelle Informationen
Generelle Informationen GARANTIE : Auf Ihr Geemarc Produkt wird von Geemarc Telecom SA eine einjährige Garantie ab Kaufdatum gemäß diesen Garantiebestimmungen gewährt. Während dieser Zeit werden im Garantie- fall nach Wahl der Geemarc Telecom SA Material- und Fabrikationsfehler unentgeltlich beseitigt oder Ihr Geemarc Produkt ausgetauscht. - Page 41 - Oder geben Sie das alte Produkt dem Händler zurück. Bei Kauf eines neuen Gerätes sollte der Händler das Altgerät annehmen. Wenn Sie sich an diese Anweisungen halten, stellen Sie den Schutz der Gesundheit und Umwelt sicher. Produktsupport und Hilfe erhalten Sie auf unserer Webseite unter www.geemarc.com/de E-mail : kontakt@geemarc.com...
- Page 42 UGCL100v2_EnFrGe_v1.8...