
Related Manuals for TANDBERG Video Conferencing System 7000


Summary of Contents for TANDBERG Video Conferencing System 7000
- Page 1 User Manual Software version E2 D13099-02 This document is not to be reproduced in whole or in part without permission in writing from:...
- Page 2 Avoid displaying the same images continuously over a long period of time on the TANDBERG 7000 monitors. Displaying the same images such as still images for a long time may cause after-image lagging. This may occur in the following two cases: 1.
- Page 3 Waste handling: No need to send material back to TANDBERG as there are no consumables to take care of. Please contact your local dealer for information on recycling the product by sending the main parts of the product for disassembly at local electronic waste stations, marking recyclable parts so the waste station can disassemble and re-use these parts.
- Page 4 If the apparatus has been subjected to excessive shock by being dropped, or the cabinet has been damaged If the apparatus fails to operate in accordance with the operating instructions TANDBERG Videoconferencing System Equipment Markings The lightning flash symbol within an equilateral triangle is intended to alert the user to the presence of uninsulated “dangerous voltages”...
-
Page 5: Table Of Contents
Contents Introduction ... 7 Menu structure ... 8 TANDBERG 7000 Videoconferencing System ... 9 At a glance — the TANDBERG 7000 system ... 9 Installation ... 13 Precautions ... 13 Unpacking and mounting ... 13 MPORTANT System configuration... 19 LEASE READ THIS SECTION CAREFULLY FOR Getting started ... - Page 6 TANDBERG Videoconferencing System Advanced use ... 49 Main menu ... 49 Call quality ... 50 Presentations ... 52 Utilities ... 54 MCU services ... 57 Audio Settings ... 61 Video Settings ... 68 Terminal Settings ... 73 Network Configuration ... 73 LAN Settings ...
-
Page 7: Introduction
Introduction This User Manual is provided to help you make the best use of your TANDBERG system. The TANDBERG system offers superior audio and video quality in a fully-featured unit. Main Features: • Supports videoconferencing via both IP and ISDN networks. -
Page 8: Menu Structure
Rel. Floor to View Site # site # End View Disconnect Site # Chair Control Terminate Meeting Press U Press O to select. TANDBERG Videoconferencing System Main Menu Audio MCU Services Settings Settings Level Settings Level Settings Network Settings Call Settings... -
Page 9: Tandberg 7000 Videoconferencing System
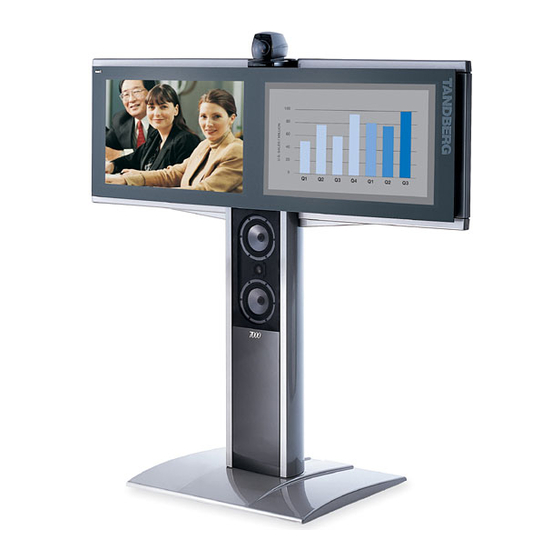
TANDBERG 7000 Videoconferencing System At a glance — the TANDBERG 7000 system WAVE II camera 2 x 30'' LCD Monitors NAM II (Natural Audio Module) Base TANDBERG Videoconferencing System Column Foot Microphone Remote Control... - Page 10 TANDBERG Videoconferencing System W.A.V.E. II Camera The Main Camera is mounted on top of the monitor. The Main Camera includes a high quality color camera with a fast pan/tilt/zoom action. The Main Camera is controlled by the system’s infra-red remote control and operates pan/tilt, focus and zoom.
- Page 11 TANDBERG Videoconferencing System Remote control The remote control is used to control all functions of the system. If the screen saver is activated (black monitor), touching the remote control will automatically wake up the system.
- Page 12 The system will automatically equalize sound levels. Loud and soft voices are picked up and transmitted to the far end at approximately the same level. TANDBERG Natural Audio Module II The Natural Audio Module II is designed to improve audio quality during a videoconference. It is mounted in the column underneath the monitors and consists of an audio system optimized for speech.
-
Page 13: Installation
• This product complies with directives: LVD 73/23/EC, EMC 89/366/EEC, R&TTE 99/5/EEC Unpacking and mounting The TANDBERG 7000 is delivered in one transport case with all components inside as shown in Figure 1.: • Foot • Column • Monitor Frame with built-in LCD monitors •... - Page 14 Secure the column and the foot with nuts (nuts and wrench is found in the accessories box) by tipping the base (column/foot) as shown in Figure 3. Figure 3 Place the base in an upright position where the system is supposed to stand. TANDBERG Videoconferencing System...
- Page 15 TANDBERG Videoconferencing System Installation Unpacking and installing the monitor frame Lift the monitor frame out of the transport case. NOTE O NOT REMOVE THE PROTECTIVE PLASTIC FILM FROM THE MONITOR FRONT BEFORE THE MONITOR FRAME IS SECURELY FASTENED TO THE BASE Place the monitor frame on top of the base.
-
Page 16: Connecting Cables
Remove the protection paper which is placed behind the front glass of the camera. Figure 6 NOTE HE CAMERA SHOULD BE ALIGNED WITH THE FRONT EDGE OF THE MONITOR TO ENSURE THE FROM THE REMOTE CONTROL TANDBERG Videoconferencing System SENSOR IN THE CAMERA CAN PICK UP SIGNALS... - Page 17 If you are using other networks, please refer to ‘External Network Settings’ and ‘Appendix 2’. 6. LAN cable • To use the system on LAN, connect a LAN cable from the ‘Ethernet’ connector on the system to your LAN. TANDBERG Videoconferencing System IN NETWORK TERMINATOR F YOUR WALL SOCKET PROVIDES YOU WITH AN...
- Page 18 The monitor back cover is kept in place by magnets. Place the cover against the magnetic points on the monitor frame as shown in Figure 7. Duct cover Figure 7 When everything is mounted correctly, the TANDBERG 7000 should look like shown in Figure 8. TANDBERG Videoconferencing System NOTE...
-
Page 19: System Configuration
A dial tone should be heard if the network is active. ONNECT • Press the V keys on the remote control to adjust the volume to a level of your choice. OLUME TANDBERG Videoconferencing System ‘T ’, ‘N ELECT THE MENU ERMINAL ETTINGS ‘E... - Page 20 For details, follow the instructions in chapter ‘Terminal Settings’, ‘Network Configuration’ in this manual. For further information refer to the examples in: Appendix 1: Connecting the system to ISDN using NT1 network adapters Appendix 2: Connecting the system to the Switched 56 network TANDBERG Videoconferencing System...
- Page 21 Specify the necessary LAN settings according to the instructions from your LAN administrator. If there is an H.323 Gatekeeper present on your LAN, see also ‘H.323 Settings’. For details, follow the instructions in chapter ‘LAN Settings’ in this manual. TANDBERG Videoconferencing System Installation...
-
Page 22: Getting Started
Getting started TANDBERG Videoconferencing System Getting started System start-up Your system should be in standby mode. When in standby mode, pressing any key or picking up the remote control will wake up the system. An incoming call will also wake up the system. -
Page 23: Basics
Used to make a call. The twelve number keys, (0-9), #, * operate in the same way as on a modern push-button telephone. These buttons are also used when entering a name into a text field. TANDBERG Videoconferencing System Getting started... -
Page 24: Making And Ending Calls
123.3.0.12. If a gatekeeper is present, you may place IP-calls using “telephone-style” numbers (an E.164 alias), according to the numbering plan implemented in the gatekeeper. The dialed number will then be translated into an IP-address by the gatekeeper. TANDBERG Videoconferencing System... - Page 25 (after connected to the MCU). ADDRESS IS USED TO ADDRESS DIFFERENT SYSTEMS ON THE SAME TCS-4 IS USED TO ADDRESS DIFFERENT SYSTEMS ON A TANDBERG Videoconferencing System ISDN LINE LAN,...
- Page 26 CALL USING KBPS OR KBPS ‘2 :’ ARE DISPLAYED NTER THE SECOND NUMBER TANDBERG Videoconferencing System KBPS NETWORK Y DEFAULT THE SYSTEM WILL DIAL AN UNRESTRICTED CALL KBPS IF NECESSARY O FORCE A RESTRICTED CALL ORTH MERICA IT IS NECESSARY TO DIAL BOTH ‘128’...
- Page 27 TANDBERG Videoconferencing System Getting started Selecting / setting default network To select a specific network, press the ‘Net’ Quick Key when you are in the Dial menu: 1 Highlight the network to be used in your call. 2 Press ‘Select’ to select network or press ‘Set as Default’ to set the selected network as your preferred choice for this and all subsequent calls.
- Page 28 Manual answer of a call is needed if the autoanswer facility is switched off. See ‘Utilities’ in ‘Advanced use’. End a call To end a call, press D disconnect Correcting keying mistakes To delete the last digit (or character) entered, press D delete TANDBERG Videoconferencing System ONNECT ISCONNECT ELETE...
-
Page 29: Directory
The MultiSite entries will not be displayed when you are in a call. By using the dataport file system or external management systems like the TANDBERG Management Suite, it is possible to store 400 additional entries. These entries can only be changed from the dataport or the management system. - Page 30 To edit an entry, highlight the entry you want to edit and press ‘Edit Entry’. Edit the entry and select ‘Previous Menu’ to return to the Directory menu. Delete Entry To delete an entry, highlight the entry and press D TANDBERG Videoconferencing System ELETE...
- Page 31 Highlight the entry you want to add to the meeting and press O ‘Add New Entry’ to add an new point-to-point directory entry. NOTE LOBAL ENTRIES WILL NOT BE AVAILABLE FOR FOR TANDBERG Videoconferencing System KBPS WO ENTRIES ARE ADDED ONE WITH...
-
Page 32: General Use
In a call, if audio is detected, the on-screen symbol will start to flash. Pressing M one more time will activate the microphone again. NOTE FF WILL MUTE AUDIO INPUTS TANDBERG Videoconferencing System . An on screen indicator will appear when the 4. I UDIO... - Page 33 This open padlock symbol is shown during the initialization phase for encryption. During this period the call is not secure. When the system is On Air in a Multisite conference, this symbol will be shown. * Optional feature TANDBERG Videoconferencing System General use...
-
Page 34: Do Not Disturb / Sleep Mode
General use TANDBERG Videoconferencing System Do Not Disturb / Sleep Mode Press any Quick key when not in a call to activate the Quick Menu. When Do Not Disturb is activated, the system will not accept any incoming calls. The caller will hear a busy tone when calling this unit. -
Page 35: Controlling The Main Camera
HEN SELECTING THE DOC CAM OR PC VIDEO SOURCES THE SYSTEM WILL AUTOMATICALLY REQUEST FLOOR WHEN CONNECTED TO A CONFERENCE AS ULTI ITE HOST OR CONNECTED TO AN EXTERNAL TANDBERG Videoconferencing System zoom for zooming. THE ARROW KEYS WILL NAVIGATE IN THE MENUS to select the video source to be transmitted to the far end. -
Page 36: Voice Activated Camera Positioning
• disconnecting the call. An on-screen indicator ‘CamTrackOff’ will appear. HE CAMERA TRACKING SPEEDS MAY BE ALTERED IN THE TANDBERG Videoconferencing System MUST BE RELATED TO THEREFORE ALL PARTICIPANTS WHO ARE LOCATED CLOSEST TO HEN CAMERA TRACKING IS ACTIVATED AND A PERSON CLOSE TO ‘V... -
Page 37: Presets
Storing preset 10 to 15 To store preset 10-15 the TANDBERG Tracker has to be used: • Select which preset to be used on the TANDBERG Tracker (see separate documentation). • Press S once on the TANDBERG Remote Control and wait for the on-screen indicator to appear. -
Page 38: Far End Camera Control (Fecc)
T DEPENDS ON THE FAR END SYSTEM CONFIGURATION IF THE FAR END DOCUMENT CAMERA IS DISPLAYED WHEN NOTE To prevent others controlling your camera, select ‘Far End Camera Control:Off’ in ‘Utilities’. TANDBERG Videoconferencing System for zooming. zoom AM IS PRESSED... -
Page 39: Sending And Receiving Snapshots
• Press F until the ‘FarEndCamera’ on screen indicator is displayed. • Press S . A snapshot from the far end is automatically displayed. NAPSHOT TANDBERG Videoconferencing System NOTE HEN IN A CONFERENCE AS MCU, SENDING A SNAPSHOT WILL AUTOMATICALLY INITIATE A FLOOR REQUEST ‘P... -
Page 40: Duo Video
F THE FAR END SUPPORTS IDEO NOTE IDEO N EXTRA CALL WILL BE MADE AND TANDBERG Videoconferencing System IDEO WITHIN THE SAME CALL T IS NOT NECESSARY TO MAKE A NEW CALL AND THE CONNECT TIME IDEO IS ALSO UNI DIRECTIONAL AND HENCE... - Page 41 IDEO PRESENTATIONS WITH SUPERIOR QUALITY INPUT ON THE PLASMA MONITOR WILL BE ACTIVATED WHEN IDEO IS ACTIVE TANDBERG Videoconferencing System . Select if you want to disconnect only the Duo Video ISCONNECT ND MONITOR PRESSING ANY OF THE VIDEO SOURCE BUTTONS WILL CHANGE...
-
Page 42: Multisite (Mcu)
KBPS VERSION * - R 1-3 ISDN EQUIRES CHANNELS AVAILABLE TANDBERG Videoconferencing System A conference can consist of any combination of ISDN/IP sites. It is possible to have telephone meetings with up to 5 participants. The MultiSite supports both Voice Switched and Continuous Presence mode (see ‘MCU Services’... - Page 43 TANDBERG Videoconferencing System General use MultiSite cascading By connecting four MultiSite systems together, it is possible to connect up to 10 video sites (including the four MultiSite sites) plus 4 audio sites (telephones), see drawing below. The host can connect up to 3 other video systems with MultiSite functionality. The host can use Voice Switched or Continuous Presence mode.
- Page 44 To use another network operator, press ‘Net’ and select operator in the Net menu. connect • Press C ONNECT T IS POSSIBLE TO CONNECT SEVERAL TELEPHONES TANDBERG Videoconferencing System SITES IN ADDITION TO THE HOST KBPS WHEN CONNECTING THE OTHER SITES VIDEO SYSTEMS TELEPHONES...
- Page 45 Disconnecting sites from a conference disconnect To disconnect a site or end the conference, press D • Select site and press O To end the meeting press ‘Disconnect All’. TANDBERG Videoconferencing System ISCONNECT or ‘Disconnect Site’. General use O FIND THE DIAL IN NUMBERS FOR THE ‘M...
-
Page 46: Pc Softpresenter
PC SoftPresenter is used to display PC images on your system without using a VGA cable (PC Presenter). The TANDBERG video conferencing system and your PC must be connected to a LAN. In addition, VNC (Virtual Network Computing) server software must be installed on the PC. -
Page 47: Web-Interface
See ‘LAN Settings’ in ‘Advanced use’ for further information. • Start your Web-browser. In the address field type the IP-address of the codec. Enter the password and the Web-page of the codec will be shown. The default password is ‘TANDBERG’. TANDBERG Videoconferencing System... - Page 48 To view streaming, select ‘Streaming’ from the Web-page of the codec. See separate ‘Streaming’ section in this manual for further information. Snapshots Snapshots of current stream (if MultiSite), selfview, far end and DuoVideo streams are accesible via http. See Appendix 5 for descriptions of the possible snapshot files. TANDBERG Videoconferencing System...
-
Page 49: Advanced Use
Utilities menu. By doing this, only dialing and camera control commands will be available. When pressing the key, the user will be asked to enter a Menu Password as can be seen below. TANDBERG Videoconferencing System key. Advanced use key. -
Page 50: Call Quality
VGA capabilities (VGA/SVGA/XGA) and SIF capabilities will be transmitted and enabled. VGA capabilities will not be transmitted. Useful if far end can not handle these capabilities. - MainCam/Aux/VCR will select ‘Motion’. DocCam/PC will select ‘Sharpness’. CAPABILITIES WILL ENABLE BETTER VIDEO QUALITY FOR TANDBERG Videoconferencing System NTSC (SIF: 352 SYSTEMS G722.1... - Page 51 Status Format Provides call quality feedback on the status line. Auto Video off/on, Audio off/normal/high Advanced Shows video/audio standards (Example: Video: H261 CIF, Audio: G722). TANDBERG Videoconferencing System Advanced use ‘A ’ NOTE SETTINGS ARE RECOMMENDED CHOICES FOR MOST CASES...
-
Page 52: Presentations
Manual: Duo Video must be opened by pressing C * - Requires option ‘Presenter’ and H263 video. To check which options are installed, see the ‘System Info’ menu in ‘Diagnostics’. ** - 4CIF: PC and DocCam, otherwise CIF. TANDBERG Videoconferencing System select ‘Presentation Mode: Normal’. NAPSHOT again. - Page 53 Snapshot Filter Select On to remove any instability in the high quality snapshot. * - Requires option ‘Presenter’. To check which options are installed, see the ‘System Info’ menu in ‘Diagnostics’. TANDBERG Videoconferencing System Advanced use ELFVIEW...
-
Page 54: Utilities
Dual Monitor Selfview, snapshots and Duo Video will be displayed on the 2nd monitor. Off: The 2nd monitor shows Selfview only. TANDBERG Videoconferencing System to switch the microphone on. key. ONNECT... - Page 55 • when using the Web-interface. • when the codec is acting as an SNMP Agent. • towards a DHCP server. • as an H323 ID. Other systems can call in using this name instead of IP-number/IP-address. TANDBERG Videoconferencing System ‘O ’ ‘R...
-
Page 56: Web Snapshots
Menu Password Enter the code whch should be entered to get access to the menu system on the TANDBERG system. When pressing the ‘Menu’ button on the remote control, the user will be asked to enter the Password written here. -
Page 57: Mcu Services
The system can also control external MCUs in a very flexible manner using the functions described below. URING AN CONFERENCE A STATUS LINE WILL PROVIDE INFORMATION ABOUT THE CONFERENCE ‘U ’, ‘MCU S TILITIES TATUS TANDBERG Videoconferencing System MCU, M ULTI WHICH SUPPORTS UP TO ONTINUOUS RESENCE MODE SEE SECTION ’. - Page 58 Advanced use TANDBERG Videoconferencing System Quick Menu When connected to an MCU RESS ANY UICK KEY WHEN IN A MULTIPOINT CONFERENCE TO ACTIVATE THE UICK This menu provides access to the most commonly used MCU functions. If ‘ Request Floor’ is selected, ‘Request Floor’ will change to ‘Release Floor’.
-
Page 59: Terminal Names
Allows you to stop viewing the site previously chosen with ‘View Site #’, and returns your view to the site that is currently ‘On Air’. ‘V ’ ‘E ’ CAN BE USED BY ALL CONFERENCE PARTICIPANTS * - NOT supported by the MultiSite TANDBERG Videoconferencing System Advanced use... -
Page 60: Chair Control
Allows the chairman to disconnect any participant in the conference. Terminate meeting Allows the chairman to terminate the conference altogether. * - NOT supported by the MultiSite TANDBERG Videoconferencing System N ORDER TO MAKE USE OF MUST SUPPORT HAIR ONTROL FEATURES THE (H.243). -
Page 61: Audio Settings
IT IS VERY IMPORTANT THAT THIS IS A FIXED MIXER MIGHT CAUSE THE ECHO CANCELLER TO MALFUNCTION Audio input 5 is intended for connection to external playback devices or to telephone add-on hybrids. TANDBERG Videoconferencing System UTOMATIC Advanced use SMART AND OTHER TYPES OF ADAPTIVE MIXERS... - Page 62 Audio Technica AT871 Audio Technica AT851R TANDBERG Audio Science Audioinputs 4, 5 and 6 are set to a default level which is adhered to by most manufacturers of audio-visual equipment and is a level at which most audio-visual equipment (CD-players, VCRs) will work.
- Page 63 Audio Outputs Audio out 1 is intended for connection to TANDBERG Natural Audio, televisions or audio amplifiers. Audio out 2 is intended for connection to audio recording equipment or to a telephone add-on hybrid. The signal is a mix of audio from both the far end and local end (not from Audio in 5).
-
Page 64: Echo Control
NR reduces constant background noise (e.g. noise from air-conditioning systems, cooling fans etc.). In addition, a highpass filter (Humfilter) reduces very low frequency noise. Choose On+NR to activate both Echo Control and Noise Reduction. TANDBERG Videoconferencing System ‘O ’ IF EXTERNAL ECHO CANCELLATION OR PLAYBACK EQUIPMENT IS USED... - Page 65 The system adapts slowly to acoustic changes in the room. Decrease the setting. After a change, the system will need a few seconds to re-adjust. Motion If you experience echo caused by movements in the room, increase the value. TANDBERG Videoconferencing System Advanced use...
- Page 66 • Place all microphones as far as possible from noise sources. • Reduce the volume setting. Ensure that the loudspeaker does not distort the audio. TANDBERG Videoconferencing System AGC, IT IS CRUCIAL THAT THE LEVELS ON THE INPUT CONNECTORS ARE ADJUSTED CORRECTLY USING THE...
- Page 67 There are many audio settings and the codec could easily be made unusable by configuring these by mistake. It is therefore possible to return all audio settings to their factory default settings by using Restore Audio Defaults. TANDBERG Videoconferencing System Advanced use...
-
Page 68: Video Settings
Pressing PC will use VNC to show images from your PC (see ‘VNC Settings’ for further information). * - Requires option ‘Presenter’. To check which options are installed, see the ‘System Info’ menu in ‘Diagnostics’. TANDBERG Videoconferencing System NOTE AMERA... - Page 69 TANDBERG Videoconferencing System Advanced use Focus To manually adjust the focus select ‘Manual’ and use the arrow keys to adjust. Camera Brightness To manually adjust the brightness select ‘Manual’ and use the arrow keys to adjust. Monitor Settings Use the arrow keys to adjust the monitor brightness for each of the monitors.
- Page 70 Advanced use TANDBERG Videoconferencing System Video Name As a default each video input corresponds to the name used on the remote control. To edit the name, use the number keys on the remote control.
- Page 71 Will sense the resolution on the ‘VGA input’ port and use the same resolution on the ‘VGA Out’ port. VGA: Will force ‘VGA out’ to VGA(640X480). SVGA: Will force ‘VGA out’ to SVGA(800X600). XGA: Will force ‘VGA out’ to XGA(1024X768). TANDBERG Videoconferencing System NOTE NOTE Advanced use ‘VGA O ’...
-
Page 72: Vnc Settings
To activate VNC, press ‘PC’ on the remote control. Please make sure that ‘PC’ is set to ‘VNC’ in the ‘Video Settings Menu’. See also ‘PC SoftPresenter’ section for further information. * - Requires option ‘Presenter’. To check which options are installed, see the ‘System Info’ menu in ‘Diagnostics’. TANDBERG Videoconferencing System NOTE VNC S... -
Page 73: Terminal Settings
TANDBERG Videoconferencing System Advanced use Terminal Settings This menu provides basic network setup for the unit and should be used when installing the system. Network Configuration Before using the system it is necessary to specify which network to use and define its settings. - Page 74 Advanced use TANDBERG Videoconferencing System If you want to use your system via Leased E1/T1, you should select ‘Current Network: Leased E1/T1’ and enter the ‘Leased E1/T1 Settings’ menu to set the Leased E1/T1 parameters. NOTE ‘L E1/T1’ ‘ISDN-PRI’ ‘E1/T1’.
- Page 75 SWITCH TYPE ISDN (+ SPID NTER LINE NUMBERS ISABLE UNUSED LINES ISDN switch type Select the type of ISDN network connected to your unit. TANDBERG Videoconferencing System ISDN-BRI, MAKE THE FOLLOWING SETTINGS S IF REQUIRED Advanced use NOTE ISDN ATIONAL...
- Page 76 ISDN BRI 2: 23478060 23478070 ISDN BRI 3: 23478420 23478430 ISDN BRI 4: 23478520 23478530 ISDN BRI 5: 23478540 23478550 ISDN BRI 6: 23478560 23478570 TANDBERG Videoconferencing System SPIDS 016783849800 016783849810 012347806000 012347807000 012347842000 012347843000 012347852000 012347853000 012347854000 012347855000 012347856000 012347857000...
- Page 77 TANDBERG Videoconferencing System Advanced use Advanced ISDN settings Subaddress Using a subaddress enables you to connect up to eight ISDN terminals to the same ISDN telephone number and line. The terminals are addressed by using different subaddresses. To call a terminal with a subaddress, separate the ISDN telephone number and the subaddress with a ‘*’.
- Page 78 Sending Complete The system will send the ISDN message information element ‘Sending Complete’. The system will not send ‘Sending Complete’. TANDBERG Videoconferencing System Call 12345601 Line 1 Setup, Number1: 602 Validate Numbers (MSN): On...
- Page 79 Enter the main number for your PRI line. If this number is programmed and ‘MSN: On’ (see ‘Validate numbers’ in ‘Advanced ISDN Settings’) only calls to this number will be answered. PRI Switch Type Select the type of PRI switch to which your unit is connected. TANDBERG Videoconferencing System NOTE ISDN-PRI, CONFIGURE THE FOLLOWING SETTINGS...
- Page 80 Channel hunting is normally used in conjunction with PRI daisy-chaining with Codec 1 TANDBERG units in the daisy-chain. If only TANDBERG units are used in the Low Channel: 10 High Channel: 20 daisy-chain, default setting should be used, as these units will find available B- Max Channel: 6 channels automatically.
- Page 81 TANDBERG Videoconferencing System Advanced use In the example on the previous page, the unit will start searching for available B-channels at channel 20, since ‘Search’ is set to ‘High’ and ‘High Channel’ is set to 20. The unit will not search for channels below 10, since ‘Low Channel’...
- Page 82 Service profiles for AT&T: NSF Service Disable SDN (including GSDN) Megacom 800 Megacom Accunet Long Distance International 800 MultiQuest Call Redirection Service TANDBERG Videoconferencing System Service profiles for Sprint: NSF Service Reserved Private Inwatts Outwatts TieTrunk Service profiles for MCI: NSF Service VNET/Vision...
- Page 83 NOTE LL SETTINGS MUST BE IDENTICAL ON BOTH SIDES OF THE Line Settings This is the same menu as for ISDN-PRI. Please refer to section ‘ISDN-PRI Settings’. TANDBERG Videoconferencing System E1/T1 EASED CONNECTION Advanced use E1/T1 G.703...
-
Page 84: External Network Settings
Triggered’ when no handshake signals are available. ‘Manual’ should be used when no handshake signals are available, and the external equipment requires a constantly connected line. ‘L O MAKE AN CALL WHEN EASED TANDBERG Videoconferencing System KBPS BPS USING THE XTERNAL ETWORK ’ IS SELECTED... - Page 85 RS366 ACR RS366 CRQ RS366 PND RS366 DLO RS366 NB1 RS366 NB2 RS366 NB4 RS366 NB8 RS366 GND Cable Marking DSU V.35 TANDBERG Videoconferencing System Male 25pin Comments DSUB Twisted pair Twisted pair Twisted pair Twisted pair DSU RS366 Advanced use...
-
Page 86: Lan Settings
This is used for streaming data to limit how many routers the data should pass before it is rejected. If TTL is set to 2, data will not traverse more than 2 router hops. * - Please contact your TANDBERG representative for further information. TANDBERG Videoconferencing System... - Page 87 After streaming is started, an easy way to view the streamed audio/video is to start your Web-browser and enter the IP-address of the streaming system. After the Web page of the codec is shown, click on ‘Streaming’. Alternatively, enter http://<codec ip-address>/stream.sdp. TANDBERG Videoconferencing System Advanced use...
- Page 88 Advanced use TANDBERG Videoconferencing System H.323 Settings E.164 alias This is the E.164 address of the codec. The E.164 address is equivalent to a telephone number, sometimes combined with access codes. Valid characters are 0-9,* and #. When using a gatekeeper the codec will send a message to the gatekeeper containing both the E.164 address and the system name of the codec.
- Page 89 In the router, the following ports must be routed to the codec’s IP-address: Port 1720 Port 5555-5560 Port 2326-2365 Please contact your TANDBERG representative for further information. H.323 Ports Static When selecting static H323 ports for TCP connections the ports 5555 or 5556 will be used for Q931 and H245 respectively.
- Page 90 Used to define which priority Audio, Video, Data and Signaling packets should have in an IP network. The priority ranges from 0 to 63 for each type of packets. TANDBERG Videoconferencing System Used to define which priority audio, video, data and signalling should have in the network.
- Page 91 When using DHCP, the default gateway will be set automatically. If the LAN utilizes static IP addresses, IP address, subnet mask, and default gateway must be specified by the LAN administrator. TANDBERG Videoconferencing System Advanced use HANGES IN THIS MENU WILL NOT HAVE...
- Page 92 SNMP Community SNMP Community names are used to authenticate SNMP requests. SNMP requests must have a ‘password’ in order to receive a response from the SNMP agent in the codec. NOTE SNMP C OMMUNITY NAME IS CASE SENSITIVE TANDBERG Videoconferencing System...
-
Page 93: Call Settings
When pressing CONNECT or any number to make a call, an Access Code menu will be shown. The user will then have to enter the correct Access Code in order to make a call. No Access Code is necessary to make a call. TANDBERG Videoconferencing System Advanced use... -
Page 94: Encryption Mode
DES is not supported by all other sites, no other type of encryption will be initiated. DES E NCRYPTION IS SUPPORTED FOR MIXED CONNECTED AT THE SAME TIME ULTISITE CAN RUN ENCRYPTED SITES AT TANDBERG Videoconferencing System ISDN/IP CALLS N ADDITION 128 K BPS AND... -
Page 95: Network Profiles
DIALED WILL BE Using the three last profiles you can enter the name of a profile, prefix and network selection. This is useful if you have a fixed prefix for your service provider. TANDBERG Videoconferencing System , ISDN. I 12345678... -
Page 96: Dataport Configuration
T.120 systems using your PC and your system. Dataport 1 is used for monitor control cable on the TANDBERG 8000. This means that to enable T.120, this cable must be disconnected from the codec, which is not recommended. - Page 97 TANDBERG Videoconferencing System Advanced use Dataport 2 Dataport 2 is dedicated to the main camera and will not be available in standard configuration. The Codec will automatically detect WAVE cameras. If you are using a camera supporting the VISCA protocol, select ‘Mode: VISCA’.
-
Page 98: Language
The following options are available 1. No option 2. NPP (Presenter) 3. MultiSite + NPP 4. Security + NPP 5. Security + NPP + MultiSite The TANDBERG 7000 has all options (option 5) installed as standard. -
Page 99: Diagnostics
Sync when the channels are synchronised Active when all available channels are connected Releasing waiting for the network to confirm a release of the call Released when disconnected - the network has acknowledged the disconnection TANDBERG Videoconferencing System Advanced use... - Page 100 Incompatible destination 100 - Invalid information element contents 102 - Recovery on timer expiry 127 - Internetworking, unspecified 255 - TANDBERG specific. undefined cause code TANDBERG Videoconferencing System ’ TO BRING THIS MENU UP WHEN NOT IN THE MENU SYSTEM...
-
Page 101: Call Status
If Duo Video or MultiSite is used, pressing the LEFT/RIGHT keys will show one page per connected site. Please contact your TANDBERG representative for further information. Restore defaults You may restore all system settings to the factory default using this function. - Page 102 This window will display all the system settings. Use the arrow keys to scroll through the list. IP Address Conflict Check The codec will give a warning if there is an IP conflict. This check may be initiated by the user by selecting IP Address Conflict Check. TANDBERG Videoconferencing System...
-
Page 103: Peripheral Equipment
TANDBERG Videoconferencing System Peripherals Peripheral Equipment Using the optional peripheral devices outlined in this chapter and the many others available, you will be able to build your own applications for use with the system, thereby better integrating the system into your business environment. - Page 104 • 1 VCR output (line level) via RCA connector providing a mixed signal between audio from the local side (except from the VCR input) and audio from the far end. This output is intended for connection to a VCR. TANDBERG Videoconferencing System...
-
Page 105: Dual Monitor
TANDBERG Videoconferencing System Peripherals Dual Monitor The Dual Monitor can be used to show full screen selfview, snapshots and Duo Video. To use the system in the Dual Monitor configuration: • Connect ‘Video Out 2’ (preferably) otherwise 4 on the system to a video input on the dual monitor. -
Page 106: Document Camera
If you want to use S-Video from the document camera, you can connect the document camera to the Aux input on the codec and set ‘Document Camera: Video2’ in ‘Video Settings’. Pressing D will then activate the S-Video input on the codec. TANDBERG Videoconferencing System on the remote control... -
Page 107: Multiple Controllable Cameras
TANDBERG Videoconferencing System Peripherals Multiple controllable cameras Attaching multiple cameras to one system expands visibility and is useful in large group applications. The system is able to control up to 4 WAVE-cameras. Optional WAVE cameras are supplied with the necessary cabling. -
Page 108: Tracker
Peripherals AudioScience microphone TANDBERG's award-winning AudioScience microphone is a ceiling-mounted, wide coverage, boundary microphone, that can eliminate the need for table microphones. It is designed to pick up the audio from all conference participants seated within in its pick-up area, defined by a quarter-sphere of approximately 14 foot (4.25m) radius extended in front of, and to the sides of the microphone. -
Page 109: Video Cassette Recorder (Vcr)
Audio Codec: Audio Output 3 VCR: Audio Input TANDBERG Videoconferencing System For playback, connect a cable between Video Out on the VCR and ‘VideoIn 4 (VCR)’ on the system. Connect a cable between Audio Out on the VCR and the VCR audio input on the system. -
Page 110: Telephone Add-On
You can connect extra fixed cameras to your system, for example, a whiteboard camera. Connect the video output of the additional camera to one of the available Video in sockets on the system. TANDBERG Videoconferencing System ULTI ITE HAS THE ABILITY TO ADD UP TO ISDN. -
Page 111: Pc Softpresenter
TANDBERG Videoconferencing System Peripherals PC SoftPresenter A PC image can be displayed on the system using PC SoftPresenter. For further information, see ‘PC SoftPresenter’ in ‘General use’. LAN-port LAN-port Additional microphones If your environment is such that you require more than one microphone for your room, e.g. you have a whiteboard at a distance from your table microphone, it is possible to connect additional microphones to your system. -
Page 112: Appendices
Connect the first ISDN cable from ISDN 1 on the codec to the S-interface on your first NT1 network adapter. Connect the other ISDN cables to the appropriate NT1 network adapters. Connect the U-interface of your NT1 adapter to the line provided from your network provider. TANDBERG can provide NT- adapters. - Page 113 Important: Use the Quick key ‘Set Restrict (56k)’ in the Quality menu to specify a restricted call (56k) when you dial a number. Set Restrict (56k) Example: One number dialing enter: Number: Two number dialing enter: Number: 2nd: TANDBERG Videoconferencing System ISDN1 BRI S/T TANDBERG LINE 2 SETUP NUMBER1: NUMBER2: SPID1: SPID2 And so on for the other lines.
- Page 114 Codec. - Go to main menu and enter ‘1)NETWORK’ menu. ‘7)SET LBO: 0.0 (According to information from Telco). - Also, other network parameters should be set according to information from your Telco. TANDBERG Videoconferencing System Codec Adtran...
- Page 115 TANDBERG Videoconferencing System Appendices Appendix 4: Environmental considerations This section explains how to carry out basic adjustments and simple tests to ensure that you send and receive the best possible image and audio quality when using your system. Iris control and lighting By default the system camera will use an automatic iris to compensate for changes in lighting.
- Page 116 1–3: Prestored camera views Grand Vison Document camera system Leader Board TANDBERG Videoconferencing System Audio: - Noise Floor preferred less than 44dBC. - Reverb Time .3 to .5 sec. - Ventilation: - Keep in mind Noise Floor. - Velocity = Noise. Therefore keep velocity of air low.
- Page 117 - the system software globdir.prm - file containing up to 400 entries. These entries can not be edited from the TANDBERG Videoconferencing system, but can be edited as a text-file. Files accessible only by ‘ftp get /tmp/snapshots/xxx.jpg’ or ‘http://<IP-address of codec>/tmp/snapshots/xxx.jpg’: main.jpg...
- Page 118 Appendices TANDBERG Videoconferencing System Custom logos · Go to the folder where your logo is located. NOTE : 704 480, OGO MAX SIZE FILE FORMAT F THE FILE IS TOO LARGE NO LOGO WILL BE DISPLAYED · Type “ftp <IP-address of your local codec>”.
- Page 119 · Exit from ftp, type ‘bye’. Menu Password: Access to the menu system on the TANDBERG Videoconferencing unit can be controlled using password protection. This is done by using the following dataport command: menupassword set <pin-code>. The pin-code should be maximum 5 - five digits. To erase the menu password, enter an empty pin-code.
- Page 120 TANDBERG Videoconferencing Unit. IP Password By setting a IP Password on the TANDBERG codec, all access to the system using IP (Telnet, FTP, WEB) requires a password. This password can be enabled from telnet or dataport using the command: ippassword <ip-password>. The default IP password is ‘TANDBERG’.
- Page 121 MCU, a TANDBERG system will attempt to establish a secure conference using AES* or DES encryption. The TANDBERG system will attempt this for both IP and ISDN connections. Where a remote system or MCU supports encryption, the highest common encryption algorithm will be selected on a port by port basis.
- Page 122 Appendices TANDBERG Videoconferencing System Appendix 7: Declaration of Conformity...
-
Page 123: Index
Boot up Logo 118 Cable Specification, V.35 85 Cables 16 Call making a LAN call 24 restricted 26 Call control 84 TANDBERG Videoconferencing System Call Quality menu 50 Call Settings 93 Call status 101 Camera 10 controlling 35 extra camera 110... - Page 124 Menu system 49 Microphone levels 62 on/off 32 Monitor Settings 69 Motion 50 Moving camera 35 TANDBERG Videoconferencing System MSN (Multi Subscriber Number) 78 Multiple cameras 107 Multipoint Control Unit (MCU) 57 MultiSite (Built-in) 42 MultiSite cascading 43 NAT Address 89...
- Page 125 68 inputs 35, 104 mode 51 outputs 104 sources 35 Video call 24 Video cassette recorder (VCR) 109 TANDBERG Videoconferencing System View current settings 102 outgoing video 32 Viewing a still image 39 VNC 68 VNC Settings 72 Voice Activated Camera Positioning 36...