Table of Contents
Advertisement
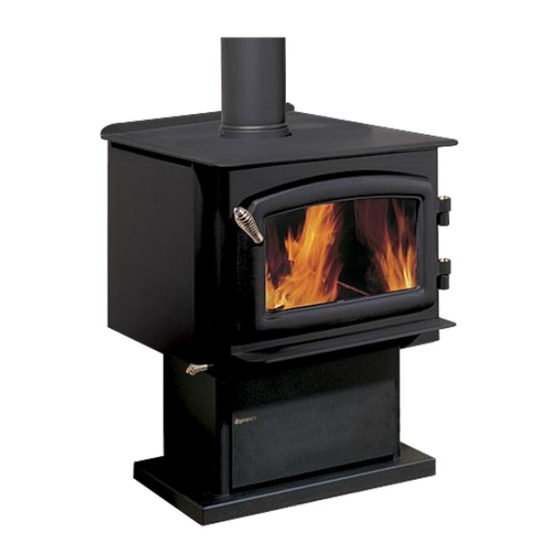
Cascades™ Series
Owners &
Installation Manual
Freestanding Woodstove
French Manual Download: https://bit.ly/2GAZEMB
www.regency-fire.com
Manuel en Français: https://bit.ly/2GAZEMB
MODEL:
F2500
Tested by:
Installer: Please complete the details on the back cover
and leave this manual with the homeowner.
Homeowner: Please keep these instructions for future reference.
0219WS024S
919-412d
FPI FIREPLACE PRODUCTS INTERNATIONAL LTD. 6988 Venture St., Delta, BC Canada, V4G 1H4
07.15.19
Advertisement
Table of Contents

Related Manuals for Regency F2500


Summary of Contents for Regency F2500
- Page 1 Freestanding Woodstove French Manual Download: https://bit.ly/2GAZEMB www.regency-fire.com Manuel en Français: https://bit.ly/2GAZEMB MODEL: F2500 Tested by: Installer: Please complete the details on the back cover and leave this manual with the homeowner. Homeowner: Please keep these instructions for future reference. 0219WS024S 919-412d FPI FIREPLACE PRODUCTS INTERNATIONAL LTD.
- Page 2 Tested to ASTM E3053. Model Regency F2500 – 1.0g /hr. “This manual describes the installation and operation of the Regency F2500 catalytic equipped wood heater. This heater meets the 2020 U.S. En- vironmental Protection Agency’s cord wood emission limits for wood heaters. Under specific test conditions this heater has been shown to deliver heat at rates ranging from 14,746 BTU/hr.
-
Page 3: Table Of Contents
Safety Label for F2500 ..........4 Operation Dimensions Operating Instructions ..........24 Draft Control ..............24 Unit Dimensions ............5 Bypass Operating Handle ..........24 Outside Air Dimensions ..........5 Bypass Rod Replacement ..........25 First Fire ..............26 Installation Fan Operation ..............27 Ash Disposal ..............27 Modular installation options ...........6... -
Page 4: Safety Label For F2500
C 178 mm / 7 in F 483 mm / 19 in F2500 – 1.0g /hr. This wood heater needs periodic inspection and repair for proper operation. Consult the owner's manual for further information. It is against federal regula- INSTALLATION USING LISTED DOUBLE WALL INSTALLATION USING LISTED DOUBLE WALL tions to operate this wood heater in a manner inconsistent with the operating instructions in the owner's manual. -
Page 5: Dimensions
Dimensions Unit Dimensions " 690mm " 630mm 24" " 610mm Images for OUTSIDE AIR DIMENSIONS 163mm Images for OUTSIDE AIR DIMENSIONS " 540mm 4-9/16" (115mm) Rear Outside Air Dimensions Front 6-13/16"(173mm) 4-9/16" (115mm) Rear Rear F2500 Regency Freestanding Woodstove Front... -
Page 6: Installation
WARNING: ONLY USE SPECIFIED COMPONENTS. The following items are required when assembling your Regency Stove. F2500 unit - the Rear Heat Deflector is supplied with the stove, but if you choose not to use it you must use the Airmate instead... -
Page 7: Stove Assembly Prior To Installation
The F2500 unit requires the pedestal (or heat the rear stove top. See diagram 1. Discard the has been selected. It stops the heat radiated shield and legs) to be attached to the base. - Page 8 Plate Knockout Washer Bolt Shown with Classic door Logo Installation 1. Push the Regency logo into 5. Reinstall cover plate if not using ash drawer the two holes in the front option. bottom left corner of the pedestal 6. Install logo plate onto heat shield by placing in cover plate.
-
Page 9: Room Air
From Corner From Flue Center-Line Medium F2500M with Airmate 15" (381mm) 7" (178mm) 5" (127mm) 27" (686mm) 13.5" (343mm) 17" (432mm) with Rear Deflector 15" (381mm) 9" (229mm) 5" (127mm) 27" (686mm) 15.5" (394mm) 17" (432mm) F2500 Regency Freestanding Woodstove... - Page 10 Minimum Alcove Clearance and Clearance to Combustible Materials The Regency Freestanding models have been alcove approved and must be installed with a listed double wall connector to the ceiling level. Note: Minimum alcove ceiling height - 83" Maximum depth of alcove - 48"...
- Page 11 27-5/16" (694mm) 33-11/16" (856mm) 59-7/16" (1510mm) 49-3/4" (1264mm) 25-7/8" (657mm) Residential Close Clearance (To be installed with required pipe components) Canada 33-11/16" (856mm) 57-15/16" (1472mm) 48-5/8" (1235mm) 24-13/16" (630mm) 33-11/16" (856mm) 55-15/16" (1421mm) 47-1/4" (1200mm) 23-7/16" (595mm) F2500 Regency Freestanding Woodstove...
-
Page 12: Step By Step Chimney And Connector Installation
6. Fasten the raincap with spark screens (if required) to the top of your chimney. 7. For optimum efficiency when installing into a Horizontal Installation masonry chimney, size accordingly, i.e. the 6" (152mm) flue diameter is 28.28 sq.in. F2500 Regency Freestanding Woodstove... -
Page 13: Masonry Chimney
Maintain proper clearance to the structure as recommended by the manufacturer. The chimney must be the required height above the roof or other obstructions for safety and proper draft operation. The space heater is to be connected to a factory-built chimney conforming to CAN/ULC-S629, Standard for 650 C Factory-Built Chimneys. F2500 Regency Freestanding Woodstove... -
Page 14: Combustible Wall Chimney Connector Pass-Throughs
24 gage minimum sheet metal supports. See that the supports are fastened securely to wall surfaces on all sides. Make sure fasteners used to secure the metal chimney connector do not penetrate chimney flue liner. F2500 Regency Freestanding Woodstove... -
Page 15: Mobile Home Installation (Usa Only)
11. WARNING: DO NOT INSTALL IN A SLEEPING ROOM OF A MOBILE HOME. 12. Use silicone to create an effective vapour barrier at the location where the chimney or other com- ponent penetrates to the exterior of the structure. F2500 Regency Freestanding Woodstove... -
Page 16: Recommended Heights For Woodstove Flue
Example b) 1000' 18.72' 21.84' 2000' 19.44' 22.68' 5000' 21.60' 25.20' 8000' 23.76' 27.72' WARNING: CAUTION: The structural integrity of the mobile home DO NOT INSTALL IN SLEEPING floor, wall and ceiling/roof must be maintained. ROOM F2500 Regency Freestanding Woodstove... -
Page 17: Optional Outside Air Kit
Mark the position of your unit as outlined in the "General Information" and "Clearances to Combustibles" section of the manual. Pipe fresh air into the pedestal area by using a minimum 4" duct pipe with a mesh grill at the outside termination. Rear View F2500 Regency Freestanding Woodstove... -
Page 18: Brick Installation
Brick Partial: 1-1/4" x 2" x 9" NOTE: This kit contains one spare brick in case of breakage. NOTE: The "AD" brick covers the Ash Dump hole that is used when the Ash Drawer Kit is installed. F2500 Regency Freestanding Woodstove... -
Page 19: Brick Installation
Firebrick is included to extend the life of your stove and radiate heat more Your Regency stove is supplied with 5 mm Neoceram ceramic glass that will evenly. Check to see that all firebricks are in their correct positions and have withstand the highest heat that your unit will produce. -
Page 20: Wood Handle & Door Assembly
(Refer to Diagram 1) Door hinges Wood handle Door Door handle Hinge Cap Cover Diagram 2 tooltip Diagram 3 F2500 Regency Freestanding Woodstove 919-967a 04.03.19... -
Page 21: Flue Baffle & Secondary Air Tube Installation
Front View 2. Remove the front secondary air tube with pliers as shown below. Important: push both baffles so they are tight against the side walls. Front View 5. Reverse Steps 1 and 2. F2500 Regency Freestanding Woodstove... -
Page 22: Fan Installation
Wiring errors can cause improper and dangerous operation. Neutral Manual/ Green Live Ground Auto 120V AC Switch Switch 60 Hz Fan Thermodisc (normally open) Black Black Black Ground Wiring Diagram 908-126a 04/08/14 F2500 Regency Freestanding Woodstove... -
Page 23: Stainless Steel Smoke Deflector Installation
WARNING: Operation of the unit with out proper installation of smoke deflector will void warranty. Ensure deflector is seated so bolts are situated at the top of the keyhole before tightening. F2500 Regency Freestanding Woodstove... -
Page 24: Seasoned Firewood
- slide to the left to open, and to Softer woods like pine, spruce and poplar/aspen that decrease - slide to the right to close. The F2500 is cut, split and stacked properly in the early spring unit has a secondary draft system that continually maybe be ready for burning in the fall. -
Page 25: Bypass Rod Replacement
This could also be removed by hand if reaching up into the catalyst slide and lifting up on the retaining clip. tooltip Catalyst slide Bypass rod Retaining clip 4. Slide bypass rod out. 5. Replace with a new bypass rod. 6. Reverse Steps 3 and 2. F2500 Regency Freestanding Woodstove... -
Page 26: First Fire
Regency Stove causing a draft down your medium to high firing rate for about 10 minutes chimney. If this occurs, slightly open a window to ensure that the catalyst reaches operating near your unit. -
Page 27: Fan Operation
3. Never start a fire if the ash plug and ash drawer are not in place. This will cause over firing which 8. Your Regency stove can be very hot. You may be can cause excessive warping of the stove. - Page 28 Place combustor in a partially open position after a hot fire has been started to burn off the soot accumulation. Burning coal will cause a sulfur-based compound to coat the catalyst. Revert to burning wood and fire the combustor to elevated temperatures for one hour. F2500 Regency Freestanding Woodstove...
-
Page 29: Maintenance
When wood is burned slowly, it produces tar and It is very important to carefully maintain your fire- Your Regency stove is supplied with 5mm Neoceram other organic vapours combine with moisture to place stove, including burning seasoned wood and ceramic glass (Part #846-306) that will withstand the form creosote. -
Page 30: Catalytic Combustor Part# 021-531
Check and clean the combustor, if necessary, before each burning sea- son and inspect the flue system for any signs of creosote buildup. A clean flue helps prevent chimney flue fires. F2500 Regency Freestanding Woodstove... - Page 31 5. Lift the left baffle out from underneath the right baffle - then lift out. Remove the right baffle. 9. Loosen bolts on catalyst retainer, slide the catalyst retainer to the right to Front View Catalyst 10. Reverse steps to reinstall catalyst. F2500 Regency Freestanding Woodstove...
-
Page 32: Secondary Air Tube Removal / Installation
NOTE: Replacement combustors can be retrieved from Applied Ceramics grips from right to left until air tube is released from grip. Remove. or contact your local Regency Dealer—see warranty information at the back of this manual for details. 4. Remove top left and right metal retainers, followed by the fragile three piece C-Cast Baffles (see catalyst removal instructions for details), then remove the remaining 2 tubes. -
Page 33: Parts
Black with Nickel Accent Door - Complete 846-515 Fan Assembly Complete 910-138 2 Way Switch 910-140 3 way Switch 075-912 Airmate 075-051 SS Slide Holder 075-073F Tool Hanger 948-223 Regency Logo Plate 910-157/P Fan Motor Only With Squirrel cage 910-142 Fan Thermodisc F2500 Regency Freestanding Woodstove... - Page 34 F2500 Regency Freestanding Woodstove...
-
Page 35: Bases
5/16" x 5 1/2 " Long Hex Head Bolt (Each) 820-468F Metal Washer 820-456 Metal Spacer/Support Bracket (Each) Part # Description 021-915 Pedestal Complete 075-069 Pedestal Door 904-257 Magnetic Catch (Each) 075-910 Ashdrawer 904-023 5/16 x 1-1/2 Hex Head Bolt (Each) F2500 Regency Freestanding Woodstove... - Page 36 Brick - Regular Full Size: 1-1/4" x 4-1/2" x 9" Brick Partial: 1-1/4" x 2" x 4-1/2" Brick Partial: 1-1/4" x 4-1/2" x 3-1/2" Brick Partial: 1-1/4" x 2" x 9" NOTE: This kit contains one spare brick in case of breakage. F2500 Regency Freestanding Woodstove...
-
Page 37: Catalytic Combustor
Part # Description 075-101 Catalyst slide 075-102 Gasket bracket 075-104 Long shield bracket 936-236 Rope gasket 1/2" diameter 075-043 Rod lock 075-531 5.83 diameter combustor assembly 075-044 Cat cradle 021-035 Offset flame shield 075-103 Rod clip lock F2500 Regency Freestanding Woodstove... -
Page 38: Warranty
At all times FPI reserves the right to inspect reported complaints on location in the field claimed to be defective prior to processing or authorizing of any claim. Failure to allow this upon request will void the warranty. Revision Date: July 2019 Regency Wood Products Warranty F2500 Regency Freestanding Woodstove... - Page 39 Freight damages for products or parts are not covered under the terms of the warranty. Products made or provided by other manufacturers and used in conjunction with the FPI appliance without prior authorization from FPI may void this warranty. Revision Date: July 2019 Regency Wood Products Warranty F2500 Regency Freestanding Woodstove...
- Page 40 Product Registration and Customer Support: Thank you for choosing a Regency Fireplace. Regency strives to be a world leader in the design, manufacture, and marketing of hearth products. To provide the best support for your product, we request that you complete a product registration form at http://www.regency-fire.com/Customer-Care/Warranty-Registration.aspx...
- Page 41 Product Registration and Customer Support: Thank you for choosing a Regency Fireplace. Regency strives to be a world leader in the design, manufacture, and marketing of hearth products. To provide the best support for your product, we request that you complete a product registration form found on our Web Site under Customer Care within ninety (90) days of purchase.
-
Page 43: Catalytic Combustor Warranty Coverage
All warranty claims must be sent to: Regency Fireplace Products By Authorized Regency Dealer * Prices subject to change. Regency reserves the right to reject any claim if it is determined the damage is a result of misuse, abuse or improper cleaning/ handling. F2500 Regency Freestanding Woodstove... - Page 44 F2500 Regency Freestanding Woodstove...
- Page 45 F2500 Regency Freestanding Woodstove...
- Page 46 F2500 Regency Freestanding Woodstove...
- Page 47 F2500 Regency Freestanding Woodstove...
- Page 48 Dealer Name & Address: ___________________________________ ________________________________________________________ Installer: ________________________________________________ Phone #: ________________________________________________ Date Installed: ___________________________________________ Serial No.: _______________________________________________ Printed in Canada Regency is a trademark of FPI Fireplace Products International Ltd. © Copyright 2019, FPI Fireplace Products International Ltd. All rights reserved.