Bosch FLEXIDOME IP starlight 8000i Series Installation Manual
Hide thumbs
Also See for FLEXIDOME IP starlight 8000i Series:
- Installation manual (52 pages) ,
- User manual (68 pages) ,
- Installation manual (42 pages)

Related Manuals for Bosch FLEXIDOME IP starlight 8000i Series


Summary of Contents for Bosch FLEXIDOME IP starlight 8000i Series
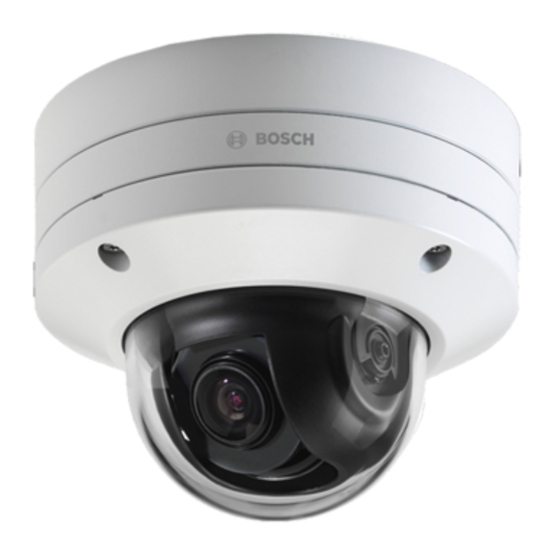
- Page 1 FLEXIDOME IP starlight 8000i NDE‑8502 | NDE‑8503 | NDE‑8504 Installation manual...
-
Page 3: Table Of Contents
Establishing the connection Password protection in camera Troubleshooting Resolving problems Testing the network connection Customer service Maintenance Bubble handling Bubble cleaning Bubble replacement Camera reset Decommissioning 10.1 Transfer 10.2 Disposal Bosch Security Systems B.V. Installation manual 2019.07 | 02 |... -
Page 4: Safety
Legal information Copyright This manual is the intellectual property of Bosch Security Systems, and is protected by copyright. All rights reserved. Trademarks All hardware and software product names used in this document are likely to be registered trademarks and must be treated accordingly. -
Page 5: Power Connection In Applications
® (NEC)), Canadian Electrical Code, Part I (also called CE Code or CSA C22.1), and all applicable local codes. Bosch Security Systems accepts no liability for any damages or losses caused by incorrect or improper installation. All-pole power switch - Incorporate an all-pole power switch, with a contact separation of at least 3 mm / 0.12 in, into the electrical installation of the building. - Page 6 The antennas used for this transmitter must be installed to provide a separation distance of at least 20 cm from all persons and must not be located or operating in conjunction with any other antenna or transmitter. 2019.07 | 02 | Installation manual Bosch Security Systems B.V.
- Page 7 Simplified EC DoC (European Union) Hereby, Bosch declares that the radio equipment type FLEXIDOME IP starlight 8000i is in compliance with Directive 2014/53/EU. The full text of the EU declaration of conformity is available at the following internet address: www.boschsecurity.com / (Product Catalog) /...
-
Page 8: System Overview
When the application variant is switched, the device reboots, but all settings are maintained. Notice! SD + WLAN mode WLAN mode is used for wireless local commissioning with the Project Assistant app only and cannot be used in standard operation. 2019.07 | 02 | Installation manual Bosch Security Systems B.V. -
Page 9: Preparing For Installation
This equipment should be unpacked and handled with care. If an item appears to have been damaged in shipment, notify the shipper immediately. Verify that all parts are included. If any items are missing, notify your Bosch Security Systems sales or customer service representative. - Page 10 The necessary cables are ready for use (refer to Wiring, page 11 for more information): – Network cable. – 24V AC / 12-26V DC (optional) – Audio input cables (optional). – External inputs (optional). 2019.07 | 02 | Installation manual Bosch Security Systems B.V.
-
Page 11: Wiring
If auxiliary power (24V AC / 12-26V DC) and PoE is applied simultaneously, the camera draws its power from PoE by default, and seamlessly switches to auxiliary input if PoE power fails. Bosch Security Systems B.V. Installation manual 2019.07 | 02 |... -
Page 12: 24V Ac / 12-26V Dc Power Input
Use the alarm output for switching external devices such as lamps or sirens. The alarm output switching capability has a maximum voltage of 30V AC or +40V DC; maximum 0.5 A continuous, 10 VA. 2019.07 | 02 | Installation manual Bosch Security Systems B.V. -
Page 13: Grounding
Grounding provides improved surge protection (up to 1 kV, 2 kA to ground (8/20 µs pulse)). The grounding wire is not included in the box. Bosch recommends the use of a grounding wire with a ring terminal. -
Page 14: In-Box Configuration
B - Connect and configure the camera via the wired network by using the web interface , the Project Assistant app or the Configuration Manager. For more detail about the Project Assistant app, refer to Commissioning, page 31. 2019.07 | 02 | Installation manual Bosch Security Systems B.V. -
Page 15: Hardware Installation
Installation overview The installation of the camera follows these steps: Installing the mounting plate, page 16. Installing the camera base, page 20. Installing the camera module, page 26. Bosch Security Systems B.V. Installation manual 2019.07 | 02 |... -
Page 16: Installing The Mounting Plate
Additionally, the camera can cover various mounting options when combined with the available accessories. See the Mounting accessories, page 28 chapter for the available accessories. Notice! The plugs and screws for surface mounting are not supplied with the camera. 2019.07 | 02 | Installation manual Bosch Security Systems B.V. -
Page 17: Installing The Mounting Plate Without Conduit
Drill the 4 holes with the appropriate diameter drill to support your 5-6 mm (0.2 in.) screws and plugs. Install 4 plugs in the holes. Put the cable through the center hole of the mounting plate. Bosch Security Systems B.V. Installation manual 2019.07 | 02 |... -
Page 18: Installing The Mounting Plate With Conduit
If the conduit or cable diameter is smaller than M20, use the rubber adapter with the conduit plate adapter with the larger hole. The rubber must be perforated to put the conduit or cable through. 2019.07 | 02 | Installation manual Bosch Security Systems B.V. - Page 19 11. Install 4 plugs in the holes. 12. Attach the mounting plate to the surface with 4 screws. Tighten the screws between 4 and 7 Nm (3 and 5.2 lbfft). Bosch Security Systems B.V. Installation manual 2019.07 | 02 |...
-
Page 20: Installing The Camera Base
Remove the camera base from the box. If the installation of the mounting plate was done with the conduit, remove the door on the camera base as shown in the image. Keep the screw and lid. 2019.07 | 02 | Installation manual Bosch Security Systems B.V. - Page 21 1 Network cable inlet. 2 Secondary cable inlet for additional cabling. It is waterproof if not in use. 3 Protective breathing vents. Do not remove or break the sealing from these holes. Bosch Security Systems B.V. Installation manual 2019.07 | 02 |...
- Page 22 Hold the camera base and attach the screw with the grounding cable. 0.07 inch Warning! Trained electricians only! Work at electric appliances must only be carried out by qualified technicians. 2019.07 | 02 | Installation manual Bosch Security Systems B.V.
-
Page 23: Installation Steps
Grab the camera base with both hands and push the grommet into the network cable inlet with both thumbs on the opposite sides of the network cable. Make sure that the grommet is pushed in to its full length. Bosch Security Systems B.V. Installation manual 2019.07 | 02 |... - Page 24 Push the camera base against the mounting plate and turn the camera base in the clockwise direction until you hear/feel a click. Make sure that the camera base is secured. 2019.07 | 02 | Installation manual Bosch Security Systems B.V.
- Page 25 After removing the desiccant tablet from the bag, installation must be completed in less than 10 minutes. Attach the desiccant tablet with the adhesive side facing the camera base. Make sure not to cover the vents with the desiccant. Bosch Security Systems B.V. Installation manual 2019.07 | 02 |...
-
Page 26: Installing The Camera Module
4 Nm (1.8 and 3 lbfft). Make sure that the arrow on the camera module points in the same direction as the red arrow on the camera base. Remove the protective cover from the bubble. 2019.07 | 02 | Installation manual Bosch Security Systems B.V. -
Page 27: Led Status
Make sure that all necessary wiring is done, and that energy is being supplied. Notice! Use full size SD cards for maximum reliability, and to eliminate the risk of bad connections in a microSD to full size SD adapter. Bosch recommends the use of industrial SD cards with health monitoring. LED status A status LED can be seen in the camera bubble on the opposite side of the camera lens. -
Page 28: Mounting Accessories
Optional soft ceiling support for in-ceiling mount kit. NDA-8000-WP On-camera weather protector for FLEXIDOME IP 8000i. NDA-8000-PIPW Pendant interface plate including weather protector, outdoor. NDA-8000-PIP Pendant interface plate for FLEXIDOME IP 8000i, indoor. 2019.07 | 02 | Installation manual Bosch Security Systems B.V. - Page 29 NDA-U-PSMB Surface mount box (SMB) for wall mount or pipe mount. NDA-U-PMAL Universal pole mount adapter, white; large. NDA-U-PAx Surveillance cabinet NDA-U-WMT Universal wall mount for dome cameras, white. Bosch Security Systems B.V. Installation manual 2019.07 | 02 |...
- Page 30 | Hardware installation FLEXIDOME IP starlight 8000i NDA-U-PMT Universal pipe mount for dome cameras, 31 cm, white. NDA-U-RMT Universal roof mount for dome cameras, white. 2019.07 | 02 | Installation manual Bosch Security Systems B.V.
-
Page 31: Commissioning
WLAN mode of the camera are designed as installation aid for first set-up or adjustments at a later moment in time only. Notice! Remote commissioning can be done down to temperatures of -40º C / 104º F. Bosch Security Systems B.V. Installation manual 2019.07 | 02 |... -
Page 32: Connection Via The Web Browser
Connection via the web browser This device can be accessed via a web browser to configure, control, receive live images, and replay stored video. For best experience, use Microsoft Internet Explorer browser with the Bosch MPEG-ActiveX plugin. This enables these functions: –... - Page 33 Fill in the fields User name and Password. Click OK. If the password is correct, the desired page appears. Note: New releases of software may require you to set a new and stronger password. Bosch Security Systems B.V. Installation manual 2019.07 | 02 |...
-
Page 34: Troubleshooting
Camera parts are out of place Please contact your supplier or or broken due to transportation. system integrator, or go directly to Bosch Security Systems customer service. PTRZ does not work Camera has lost calibration Reset the PTR in the user correctly. - Page 35 Closing seals are damaged. Please contact your supplier or system integrator, or go directly to Bosch Security Systems customer service. Rubber grommet not placed Re-install rubber grommet. correctly. Cable diameter or shape is not Re-install camera with proper as specified.
-
Page 36: Testing The Network Connection
Customer service If a fault cannot be resolved, please contact your supplier or system integrator, or go directly to Bosch Security Systems customer service. The version numbers of the internal firmware can be viewed on a service page. Please note this information before contacting customer service. -
Page 37: Maintenance
Bubble may become yellow overtime due to exposure to UV radiation like direct or indirect sunlight. In case the bubble gets damaged or yellow, it can be replaced by a clear bubble (NDA-8000- CBL) or a tinted bubble (NDA-8000-TBL). Bosch Security Systems B.V. Installation manual 2019.07 | 02 |... -
Page 38: Camera Reset
Press tightly and hold the reset button on top of the SD card slot for 15 seconds. The LED light by the reset button flashes in red. Release the reset button. 2019.07 | 02 | Installation manual Bosch Security Systems B.V. - Page 39 Remove the connection PCB from the camera module. Disconnect the network or power cable from the camera module. 10. Re-install the connection PCB in the camera base. 11. Re-attach the camera module onto the camera base. Bosch Security Systems B.V. Installation manual 2019.07 | 02 |...
-
Page 40: Decommissioning
The unit should only be passed on together with this installation guide. 10.2 Disposal Disposal - Your Bosch product was developed and manufactured with high-quality material and components that can be recycled and reused. This symbol means that electronic and electrical appliances, which have reached the end of their working life, must be collected and disposed of separately from household waste material. - Page 41 FLEXIDOME IP starlight 8000i Decommissioning | Bosch Security Systems B.V. Installation manual 2019.07 | 02 |...
- Page 42 | Decommissioning FLEXIDOME IP starlight 8000i 2019.07 | 02 | Installation manual Bosch Security Systems B.V.
- Page 44 Bosch Security Systems B.V. Torenallee 49 5617 BA Eindhoven Netherlands www.boschsecurity.com © Bosch Security Systems B.V., 2019...