Table of Contents
Advertisement
Advertisement
Table of Contents

Related Manuals for Roland DJ-808


Summary of Contents for Roland DJ-808
- Page 1 Owner’s Manual Before using this unit, carefully read “USING THE UNIT SAFELY” and “IMPORTANT NOTES” (leaflet “USING THE UNIT SAFELY” and Startup Guide). After reading, keep the document(s) where it will be available for immediate reference. Copyright © 2016 ROLAND CORPORATION...
-
Page 2: Table Of Contents
Inputting Sound from a Mic About this owner’s manual Downloading the Serato DJ owner’s manual This manual explains basic operation of the DJ-808. Start a browser and access the following Serato DJ webpage. Read it in conjunction with the startup guide. -
Page 3: Installing The Software
Installing the Software Downloading the Software Install the software as follows. * The DJ-808 USB driver and Serato DJ are not included in the package. Mac OS Users Decompress the DJ-808 USB driver file that you downloaded. Downloading the DJ-808 USB Driver Open the decompressed file, and double-click “DJ-808_... -
Page 4: Panel Descriptions
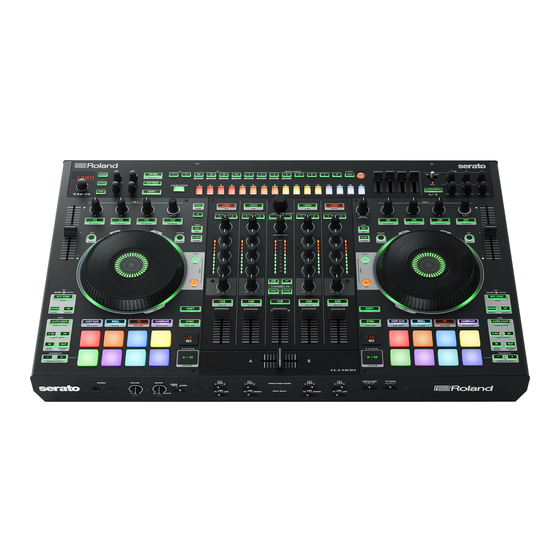
Panel Descriptions The top panel of the DJ-808 is divided into six sections by function: browser, deck mixer, effects, TR-S, and VT. Cross fader assign and input assign are located on the front side, and input/output jacks are located on the rear side. -
Page 5: Deck Section
Panel Descriptions Deck Section The deck sections located at the left and right control four decks (left: decks 1 and 3, right: decks 2 and 4). LOOP area [AUTO LOOP] button Turns auto loop on/off. When you use the [IN]/[OUT] buttons to set the loop point, the button automatically lights. -
Page 6: Effect Section
Panel Descriptions Deck Section [ r ] button Plays or pauses the song. Returns to the temporary cue point, [SHIFT] + [ r ] and plays. [SHIFT] button You can recall other functions by holding down this button and pressing another button. [DECK] buttons Switch the deck to be operated. -
Page 7: Mixer Section
Adds a delayed sound several times while attenuating it. The delay time is synchronized with the tempo of the DJ-808. [SHIFT] + If you turn the [FX] knob toward the right, the [DUB ECHO] delayed sound is added in the center. -
Page 8: Tr-S Section
Panel Descriptions TR-S Section This is a 16-step sequencer. It lets you create a rhythm track using the sounds of the Roland TR-909/TR-808/TR-707/TR-606 rhythm machines, or perform rhythms by striking the performance pads. * For details on how to use the TR-S section, refer to “TR-S Operations” (p. 18). -
Page 9: Front Panel
Panel Descriptions Front Panel Headphones [PHONES] jacks [INPUT SELECT] switches Connect headphones here. Select the input source for each channel. Stereo 1/4” (Ø 6.3 mm) and stereo 1/8” (Ø 3.5 mm) plugs are supported. CH1, CH2 [VOLUME] knob The sound loaded into the Serato DJ deck is the source. Select this if you’re using DVS. - Page 10 If you have any settings that you want to Both ports 3 and 4 can supply USB bus power. keep, you should save them beforehand. * For more about devices that can be connected, refer to the Roland 5 To restore power, turn the power on again. website.
-
Page 11: Using Serato Dj
Windows 10 In the [Start] screen or [App View], click the [Serato DJ] icon. Basic Operations in Serato DJ Songs shown in the browser view can be imported into a deck area, and controlled from the DJ-808. Deck section Waveform panel... -
Page 12: Playing A Song
Using Serato DJ Playing a Song Monitoring Through Headphones Set the DJ-808’s knobs and switches as follows. Set the DJ-808’s knobs as follows. [MASTER LEVEL] knob [MIXING] knob Turned all the way to the left Turned all the way to the left... -
Page 13: Operating The Dj-808
Operating the DJ-808 Press the same performance pad once again. Performance Pad Operations Loop playback is cancelled. Hot Cue Operations (HOT CUE) Roll Operations (ROLL) By specifying a hot cue, you can instantly play back from the specified location. When you press a performance pad, a roll continues playing in time with You can specify up to eight hot cues for each song. -
Page 14: Slicer Operations (Slicer)
Operating the DJ-808 Slicer loop mode Slicer Operations (SLICER) When the playback location progresses to the end of the region that was Slicer divides the specified region into eight, and assigns the divided divided into eight, the playback location returns to the beginning of the regions to the performance pads. -
Page 15: Pattern Operations (Pattern)
Operating the DJ-808 Pattern Operations (PATTERN) You can press the performance pads to switch TR-S patterns (p. 18). Slot 1 Slot 2 Slot 3 Slot 4 Hold down the [SHIFT] button and press the [TR] button to make the button light in green. -
Page 16: Dual Deck Mode Operations
Each time you press the button, you alternate between multi FX mode and single FX mode. Song analysis begins when you press the DJ-808’s [LOAD] button to load a song into a deck, but if you’re using Serato DJ as an offline player (i.e.,... -
Page 17: Single Fx Mode Operations
You can use Serato DJ’s recording functionality to record sounds that you’ve mixed on the DJ-808. Hold down the [SHIFT] button and press the effect button to * For details, refer to the Serato DJ owner’s manual. -
Page 18: Inputting Sound From A Mic
Inputting Sound from a Mic TR-S Operations Connect your mic to the MIC IN jack. You can play and create patterns using the sounds of the Roland TR-909/ TR-808/TR-707/TR-606 rhythm machines. Set the VT section’s mic switch to “ON” or “DUCK.”... -
Page 19: Changing Instruments
Operating the DJ-808 Copying a pattern Changing the sound of an individual instrument While the pattern is stopped, hold down the [PATTERN] button Hold down one of the [BD]–[OH] buttons and turn the [VALUE] and press one of the TR-S pads [1]–[16] to select the copy- knob. -
Page 20: Tr-Rec (Step Recording)
Operating the DJ-808 Inputting velocity TR-REC (Step Recording) In this method of recording, you create a pattern by specifying the steps For each step, you can specify the velocity with which each instrument at which each instrument is sounded. You can also create a pattern while it is sounded. -
Page 21: Synchronizing The Tr-S Tempo With The Serato Dj Tempo
Operating the DJ-808 Clearing a recorded instrument/accent from the pattern Using the DJ-808 in Stand-Alone Mode You can use the DJ-808 when it is not connected to Serato DJ (when Serato Clearing only some of the steps DJ is not running). -
Page 22: System Settings
While holding down the [PANEL] button, press the [POWER] switch to turn on the power. The DJ-808 is in system setting mode, and the [START/STOP] button of the TR-S section is blinking. Press the TR-S pad or button that corresponds with the setting you want to make. -
Page 23: Adjusting The Performance Pad Sensitivity
– – NOTE * If the sensitivity is too great, vibrations of the DJ-808 itself might make Never turn off the power until the display indicates “ Oc W . ” the pad operate unintendedly. Take care not to make the sensitivity excessive. -
Page 24: Using Serato Flip
* You can also purchase this from the Serato online store. http://store serato com/us/software As directed by the screen, enter the necessary items. Connect an internet-connected computer to the DJ-808’s USB port. The “Serato Flip Expansion Pack” voucher code is sent to you. -
Page 25: Flip Display In The Serato Dj Screen
If this is highlighted, the Flip plays as a loop. Flip slot delete Deletes the Flip. Close Serato DJ. Turn off the power of the DJ-808, wait about one minute, and then turn the power on again. Serato DJ Flip panel Restart Serato DJ. -
Page 26: Flip Operations
Using Serato Flip Saving the Flip Flip Operations In the virtual deck screen, click a Flip slot to select the save- Here we explain the procedure for using Serato Flip to create a song that destination for the Flip. has a different structure than the original song. In the Flip panel, click [Save]. -
Page 27: Using Serato Dvs
* You can also purchase this from the Serato online store. http://store serato com/us/software As directed by the screen, enter the necessary items. Connect an internet-connected computer to the DJ-808’s USB The “Serato Flip Expansion Pack” voucher code is sent to you. port. - Page 28 If it does not have a check mark, add a check mark. When the Serato DVS Expansion is activated, the DJ-808’s sound card mode switches to “DVS mode. ” While the DJ-808 is in “DVS mode, ” the state is as shown below.
-
Page 29: About The Virtual Deck Screen
Connect your turntables or DJ players as described in “Rear Panel (Connecting Your Equipment).” * Be sure to connect the ground wire of the turntable to the DJ-808’s PHONO GROUND terminal. As appropriate for the connected channels, set the front panel [INPUT SELECT] switch to “PC.”... -
Page 30: Playing A Song With Dvs
* If the green circle is not shown on the scope, check the following items. 5 The turntable/DJ player is correctly connected with the DJ-808. Function REL mode ABS mode 5 The ground wire of the turntable is connected to the DJ-808’s Hot cue (*1) Roll PHONO GROUND terminal. -
Page 31: Appendix
Appendix Troubleshooting If the DJ-808 does not function in the way you expect, first check the following points. If this does not resolve the problem, consult your dealer or a nearby Roland service center. Problem Items to check Action Page Make sure that the DJ-808’s AC adaptor is correctly connected to an AC outlet and to... -
Page 32: Main Specifications
USB cable serato P’NT DJ EXPANSION PACK VOUCHER card * 0 dBu = 0.775 Vrms * This document explains the specifications of the product at the time that the document was issued. For the latest information, refer to the Roland website.