Roland DJ-202 - DJ Controller Manual
- Service notes (38 pages) ,
- Owner's manual (17 pages) ,
- Startup manual (12 pages)
Advertisement
Check the Included Items
The DJ-202 includes the following items. Please take a moment to confirm that all of these items have been included with the DJ-202. If you find that any item is missing, contact the nearest authorized Roland distributor in your country.
- Startup Guide (this document)
- USB cable
Installing the Software
System Requirements
Verify that your computer meets the system requirements before you proceed with installing the software.
| Mac OS | Windows | |
| Operating System | macOS 10.12 OS X 10.11 OS X 10.10 | Windows 10 Windows 8.1 Windows 7 SP1 |
| CPU/Clock | Intel Core i7/1.07 GHz Intel Core i5/1.07 GHz Intel Core i3/1.07 GHz | |
| Screen Resolution | 1280 x 720 | |
| Memory | 4 GB | |
| Free HDD Space | 5 GB | |
| USB | Available USB 2.0 port | |
* For the latest system requirements, refer to the Serato DJ Intro webpage.
Downloading the Software
The DJ-202 USB driver and Serato DJ Intro are not included in the package. Download them from the Roland or Serato website.
Downloading the Device USB Driver
The DJ-202 USB driver is software that outputs audio from your computer to the DJ-202.
Mac OS users
- Start a browser and access the following Roland support webpage.
http://www.roland.com/support/ - Search for "DJ-202."
- In downloads, find "DJ-202 Driver for macOS / OS X" and click it.
- Download the driver as directed by the screen.
Windows 10 users
- Connect your internet-connected computer to the DJ-202's USB port.
- Power-on the DJ-202.
- Download the driver as directed by the screen.
Users of other than Windows 10
- Start a browser and access the following Roland support webpage.
http://www.roland.com/support/ - Search for "DJ-202."
- In downloads, find "DJ-202 Driver for Windows **" and click it.
- Download the driver as directed by the screen.
Downloading the Serato DJ Intro Software
- Start a browser and access the following Serato DJ Intro webpage.
https://serato.com/dj/intro/downloads - Click "DOWNLOAD SERATO DJ INTRO."
- Enter your email address, and click "CONTINUE."
- Enter your password and country, and click "CONTINUE."
An email is sent to the address you specified. - Click "Download Serato DJ Intro" as directed by the email.
- Follow the instructions as directed by the screen, then download the Serato DJ Intro.
Installing the Software
Install the software as follows.
Mac OS Users
- Decompress the DJ-202 USB driver file that you downloaded.
- Open the decompressed file, and double-click "DJ202_USBDriver.pkg."
The installer starts. - Install the software as directed by the screen.
- Decompress the Serato DJ Intro software file that you downloaded.
- Double-click the decompressed file.
The installer starts. - Read the license agreement, and if you accept the conditions, click [Agree].
- When the following screen appears, drag and drop the [Serato DJ Intro] icon into the Applications folder.
This completes the installation.


Windows Users
- Right-click the DJ-202 USB driver folder that you downloaded, and choose "Extract all."
The folder is decompressed. - Open the decompressed folder, and double-click "Setup.exe."
The installer starts. - Install the software as directed by the screen.

- Right-click the Serato DJ Intro software folder that you downloaded, and choose "Extract all."
The folder is decompressed. - Double-click the decompressed file.
The installer starts. - Read the license agreement, and if you accept the conditions, choose [I agree to the license terms and conditions] and click [Install].
Installation begins. - When the following screen appears, click [Close].
This completes the installation.

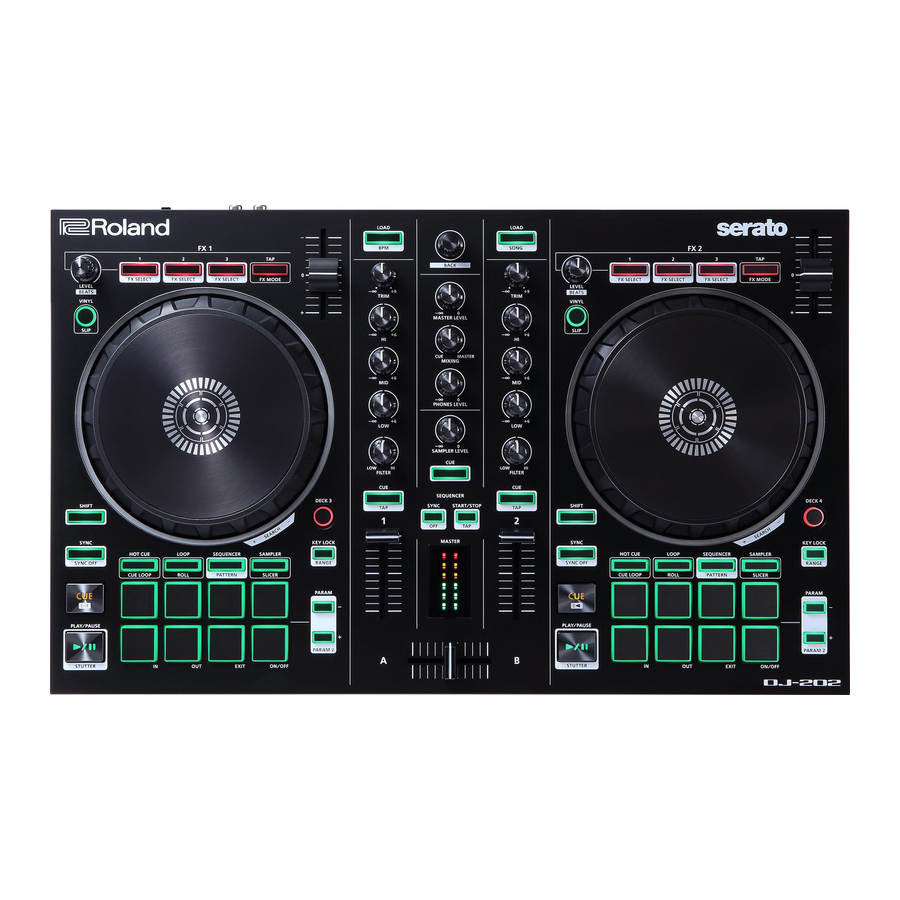
Panel Descriptions
The top panel of the DJ-202 is divided into three sections by function: browser, deck, and mixer.
Phones jack is located on the front side, and input/output jacks are located on the rear side.
For details about each part, refer to the DJ-202 owner's manual and the Serato DJ Intro manual.

- Browser section
- Deck section
- Mixer section
Browser Section
Use these controls to operate Serato DJ Intro and load songs.

- [LOAD] buttons
Load a song selected on Serato DJ Intro into a deck.
| [SHIFT] + [LOAD] | Sorts the song library by SONG or BPM. |
- Rotary selector
Turn this knob to move the cursor up/down. Press this knob to move the cursor to a lower level.
| [SHIFT] + Press the knob | Moves the cursor to a higher level. |
Deck Section
The deck sections located at the left and right control four decks (left: decks 1 and 3, right: decks 2 and 4).

- Jog dial
Controls scratch and pitch bend (playback speed adjustment).
| Rotate the top surface | Performs scratch if the VINYL mode is on, or performs pitch bend if the button is off. |
| Rotate the outer edge | Performs pitch bend. |
| [SHIFT] + rotate the top surface | Rapidly moves the playback location. |
- [VINYL] button
Turns VINYL mode on/off. - [SHIFT] button
You can recall other functions by holding down this button and pressing another button. - [SYNC] button
Automatically matches the tempo (pitch) of multiple songs.
| [SHIFT] + [SYNC] | Cancels SYNC. |
- [CUE
![]() ] button
] button
Specifies, plays, or recalls a temporary cue point. - [
![]() ] button
] button
Plays or pauses the song
 ] button
 [SHIFT] + [  ] ] | Returns to the temporary cue point, and plays. |
- Pad Mode select
Here you can select the control mode of the performance pads.
[HOT CUE] button
Selects hot cue mode.
[LOOP] button
Selects loop mode.
[SEQUENCER] button
Selects sequencer mode.
| [SHIFT] + [SEQUENCER] | Selects pattern mode. Switches the sequencer's pattern. |
[SAMPLER] button
Selects sampler mode.
- Performance pads
Use these pads to perform in the pad mode that you've selected. - PARAM area
Here you can specify the value of the parameter that's operated by the performance pads. - [KEY LOCK] button
Turns the key lock function on/off.
| [SHIFT] + [KEY LOCK] | Specifies the variable range of the Tempo slider. |
- [DECK 3], [DECK 4] buttons
Switch the deck (left: decks 1 and 3, right: decks 2 and 4) to be operated. - Tempo slider
Adjusts the playback speed of the song. - FX 1, FX 2 area
Here you can adjust the effects (FX 1: decks 1 and 3, FX 2: decks 2 and 4).
[LEVEL] knob
Adjust the character of the effect.
| [SHIFT] + [LEVEL] knob | Adjusts the time for which the effect is applied. |
Effect buttons [1]–[3]
Turn the effect on/off.
| [SHIFT] + Effect button | Changes the effect type. |
[TAP] button
The interval at which you press this button (tap tempo) specifies the reference tempo of the effect.
If you long-press the button, the specified tempo is reset.
Mixer Section
This is a four-channel mixer. Here you can adjust the sound, connect sounds, and turn headphone cue on/off.

- [TRIM] knobs
Adjust the volume. - [HI], [MID], [LOW] knobs
Boost/cut the volume of the high-frequency, mid-frequency, and lowfrequency regions. - [FILTER] knobs
Applies a filter to each channel.
If you turn the [FILTER] knob toward the right, only the high-frequency range is heard.
If you turn the knob toward the left, only the low-frequency range is heard. - Channel [CUE] buttons
Turn cue on/off for each channel. The sound of channels whose [CUE] button is lit is output from the headphones.
| [SHIFT] + [CUE] | You can specify the tempo of the track by the interval at which you repeatedly press the [CUE] button (Tap Tempo function). |
- Channel faders
Adjust the output level of each channel. - Cross fader
Switches between the audio output of the left and right decks. - [MASTER LEVEL] knob
Adjusts the master output level. - [MIXING] knob
Adjusts the volume balance of the channel whose Channel [CUE] button is lit and the master output for phones output. - [PHONES LEVEL] knob
Adjusts the volume of the headphones. - [SAMPLER LEVEL] knob
Adjusts SAMPLER output level. - SAMPLER [CUE] button
Turns SAMPLER output cue on/off. - MASTER level indicator
Indicates the master output level. - SEQUENCER area
[SYNC] button
Synchronizes the tempo of the sequencer to the tempo of Serato DJ Intro.
| [SHIFT] + [SYNC] | Disables tempo synchronization. |
[START/STOP] button
Plays/stops the pattern.
| [SHIFT] + [START/STOP] | The interval at which you press this button (tap tempo) specifies the tempo of the sequencer. |
Front Panel

- [PHONES] jacks
Connect headphones here.
Rear Panel
Connecting Your Equipment
To prevent malfunction and equipment failure, always turn down the volume, and turn off all the units before making any connections.

- PC port
Use the included USB cable to connect this port to your computer. When this is connected, power is supplied from the computer. - MIDI OUT connector
This outputs MIDI messages such as MIDI clock. - MASTER OUT L, R jacks
Connect your powered speakers or power amp here. - MIC IN jack
Connect your microphone here. - [MIC SENS] knob
Adjusts the mic input sensitivity.
Using Serato DJ Intro
This document explains basic use of Serato DJ Intro. For details on the functions and use of the software, refer to the Serato DJ Intro software manual.
Starting Serato DJ Intro
* Before turning the unit on/off, always be sure to turn the volume down. Even with the volume turned down, you might hear some sound when switching the unit on/off. However, this is normal and does not indicate a malfunction.
- Turn on the power of the computer.
- Connect the DJ-202 (USB port) to the computer.
The power of the DJ-202 turns on. - Turn on the power of the equipment that's connected to the DJ-202.
- Start Serato DJ Intro.
Mac OS
In the Finder, open the [Applications] folder and double-click the [Serato DJ Intro] icon.
Windows 7
In the [Start] menu, click [All Programs]  [Serato] [Serato DJ Intro] [Serato DJ Intro] icon.
Windows 8.1
In the [App View], click the [Serato DJ Intro] icon.
Windows 10
In the [Start] screen or [App View], click the [Serato DJ Intro] icon.
Basic Operations in Serato DJ Intro
Songs shown in the browser view can be imported into a deck area, and controlled from the DJ-202.

- Deck section
- Waveform panel
- Crate panel
- Library
Importing a Song
Here we'll explain typical operations for importing a song.
* Serato DJ Intro provides a variety of ways to import songs. For details, refer to the Serato DJ Intro software manual.
* If you're using Serato Corporation's DJ software (Scratch Live, ITCH, Serato DJ) and you have already created a song library, the library you created can be used as-is.
- In Serato DJ Intro, click the [Files] key.
The [Files] panel opens, and the files on your computer and on the peripheral devices connected to your computer are displayed. - In the [Files] panel, click the folder that contains the songs you want to add to the library.
- Drag and drop the selected folder onto the crate panel.
A crate is created, and the songs are added to the library.
Loading a Song
Here's how to load a song so that it can be output.
- On the DJ-202, hold down the [SHIFT] button and press the rotary selector to move the cursor to the crate panel.
- Turn the DJ-202's rotary selector to move to the folder containing the song that you want to load; then press the rotary selector.
The cursor moves to the library. - Turn the rotary selector to move to the song that you want to load.
- On the DJ-202, press the [LOAD] button of the deck into which you want to load the song.
Playing a Song
- Set the DJ-202's knobs and switches as follows.
| [MASTER LEVEL] knob | Turned all the way to the left |
| [TRIM] knobs | Center |
| [HI], [MID], [LOW] knobs | |
| [FILTER] knobs | |
| Channel faders | Lowest position |
- Press the [
![]() ] button to play back the loaded song.
] button to play back the loaded song. - Move the channel fader upward and turn the [TRIM] knob toward the right to adjust the volume.
Adjust the volume so that the channel level indicator is lit as far as the orange portion. - Turn the [MASTER LEVEL] knob toward the right to adjust the level of the speakers.

Monitoring Through Headphones
- Set the DJ-202's knobs as follows.
| [MIXING] knob | Turned all the way to the left |
| [PHONES LEVEL] knob |
- Press the channel [CUE] button of the channel that you want to monitor.
- Turn the [PHONES LEVEL] knob toward the right to adjust the headphone level.
Closing Serato DJ Intro
- Close the Serato DJ Intro screen.
Mac OS
In the upper left of the Serato DJ Intro screen, click the [ 6 ] (red: close) button.
Windows
In the upper right of the Serato DJ Intro screen, click the [X] button.
A confirmation screen appears. - Click [Yes] to close Serato DJ Intro.
- Turn off the power of the equipment that's connected to the DJ-202.
- Turn off the power of the computer.
USING THE UNIT SAFELY


INSTRUCTIONS FOR THE PREVENTIONS OF FIRE, ELECTRIC SHOCK, OR INJURY TO PERSONS
| About WARNING and CAUTION Notices | |
 | Used for instructions intended to alert the user to the risk of death or severe injury should the unit be used improperly. |
 | Used for instructions intended to alert the user to the risk of injury or material damage should the unit be used improperly. * Material damage refers to damage or other adverse effects caused with respect to the home and all its furnishings, as well to domestic animals or pets. |
| About the Symbols | |
 | The  symbol alerts the user to important instructions or warnings. The specific meaning of the symbol is determined by the design contained within the triangle. In the case of the symbol at left, it is used for general cautions, warnings, or alerts to danger. symbol alerts the user to important instructions or warnings. The specific meaning of the symbol is determined by the design contained within the triangle. In the case of the symbol at left, it is used for general cautions, warnings, or alerts to danger. |
 | The  symbol alerts the user to items that must never be carried out (are forbidden). The specific thing that must not be done is indicated by the design contained within the circle. In the case of the symbol at left, it means that the unit must never be disassembled. symbol alerts the user to items that must never be carried out (are forbidden). The specific thing that must not be done is indicated by the design contained within the circle. In the case of the symbol at left, it means that the unit must never be disassembled. |
 | The  symbol alerts the user to things that must be carried out. The specific thing that must be done is indicated by the design contained within the circle. In the case of the symbol at left, it means that the power-cord plug must be unplugged from the outlet. symbol alerts the user to things that must be carried out. The specific thing that must be done is indicated by the design contained within the circle. In the case of the symbol at left, it means that the power-cord plug must be unplugged from the outlet. |
ALWAYS OBSERVE THE FOLLOWING
Do not disassemble or modify by yourself
Do not carry out anything unless you are instructed to do so in the owner's manual. Otherwise, you risk causing malfunction.

Do not repair or replace parts by yourself
Refer all servicing to your retailer, the nearest Roland Service Center, or an authorized Roland distributor, as listed on the "Information. "
Do not use or store in the following types of locations
- Subject to temperature extremes (e.g., direct sunlight in an enclosed vehicle, near a heating duct, on top of heat-generating equipment); or are
- Damp (e.g., baths, washrooms, on wet floors); or are
![]()
- Exposed to steam or smoke; or are
- Subject to salt exposure; or are
- Exposed to rain; or are
![]()
- Dusty or sandy; or are
- Subject to high levels of vibration and shakiness; or are
- Placed in a poorly ventilated location.


Do not place in an unstable location
Otherwise, you risk injury as the result of the unit toppling over or dropping down.

Avoid extended use at high volume
Use of the unit at high volume for extended periods of time may cause hearing loss. If you ever experience any hearing loss or ringing in the ears, you should immediately stop using the unit and consult a specialized physician.
Do not allow foreign objects or liquids to enter unit; never place containers with liquid on unit
Do not place containers containing liquid (e.g., flower vases) on this product. Never allow foreign objects (e.g., flammable objects, coins, wires) or liquids (e.g., water or juice) to enter this product. Doing so may cause short circuits, faulty operation, or other malfunctions.

Turn off the unit if an abnormality or malfunction occurs
Immediately turn the unit off, and request servicing by your retailer, the nearest Roland Service Center, or an authorized Roland distributor, as listed on the "Information" when:
- If smoke or unusual odor occurs; or
- Objects have fallen into, or liquid has been spilled onto the unit; or
- The unit has been exposed to rain (or otherwise has become wet); or
- The unit does not appear to operate normally or exhibits a marked change in performance.
Be cautious to protect children from injury
Always make sure that an adult is on hand to provide supervision and guidance when using the unit in places where children are present, or when a child will be using the unit.
Do not drop or subject to strong impact
Otherwise, you risk causing damage or malfunction.
Route all power cords and cables in such a way as to prevent them from getting entangled
Injury could result if someone were to trip on a cable and cause the unit to fall or topple.
Avoid climbing on top of the unit, or placing heavy objects on it
Otherwise, you risk injury as the result of the unit toppling over or dropping down.

Disconnect all cords/cables before moving the unit
Damage or malfunction may result if you fail to disconnect all cables before moving the unit.
IMPORTANT NOTES
Placement
- This unit may interfere with radio and television reception. Do not use this unit in the vicinity of such receivers.
- Noise may be produced if wireless communications devices, such as cell phones, are operated in the vicinity of this unit. Such noise could occur when receiving or initiating a call, or while conversing. Should you experience such problems, you should relocate such wireless devices so they are at a greater distance from this unit, or switch them off.
- When moved from one location to another where the temperature and/or humidity is very different, water droplets (condensation) may form inside the unit. Damage or malfunction may result if you attempt to use the unit in this condition. Therefore, before using the unit, you must allow it to stand for several hours, until the condensation has completely evaporated.
- Depending on the material and temperature of the surface on which you place the unit, its rubber feet may discolor or mar the surface.
- Do not place containers or anything else containing liquid on top of this unit. Also, whenever any liquid has been spilled on the surface of this unit, be sure to promptly wipe it away using a soft, dry cloth.
Maintenance
- Never use benzine, thinners, alcohol or solvents of any kind, to avoid the possibility of discoloration and/or deformation.
Repairs and Data
- Before sending the unit away for repairs, be sure to make a backup of the data stored within it; or you may prefer to write down the needed information. Although we will do our utmost to preserve the data stored in your unit when we carry out repairs, in some cases, such as when the memory section is physically damaged, restoration of the stored content may be impossible. Roland assumes no liability concerning the restoration of any stored content that has been lost.
Additional Precautions
- Any data stored within the unit can be lost as the result of equipment failure, incorrect operation, etc. To protect yourself against the irretrievable loss of data, try to make a habit of creating regular backups of the data you've stored in the unit.
- Roland assumes no liability concerning the restoration of any stored content that has been lost.
- Use a reasonable amount of care when using the unit's buttons, sliders, or other controls; and when using its jacks and connectors. Rough handling can lead to malfunctions.
- When disconnecting all cables, grasp the connector itself— never pull on the cable. This way you will avoid causing shorts, or damage to the cable's internal elements.
- To avoid disturbing others nearby, try to keep the unit's volume at reasonable levels.
- Continuous playing may cause dis-coloration of the pad, but this will not affect the pad's function.
- Do not use connection cables that contain a built-in resistor.
Main Specifications
| Roland DJ-202: DJ Controller | |
| Power supply | USB bus power |
| Current draw | 500 mA |
| Dimensions | 478 (W) x 297 (D) x 62 (H) mm 18-7/8 (W) x 18-7/8 (D) x2-1/2 (H) inches |
| Weight | 2.1 kg 4 lbs 11 oz |
| Accessories | Startup Guide USB cable |

Documents / Resources
References
Download manual
Here you can download full pdf version of manual, it may contain additional safety instructions, warranty information, FCC rules, etc.
Advertisement
Thank you! Your question has been received!


Need Assistance?
Do you have a question about the DJ-202 that isn't answered in the manual? Leave your question here.