Table of Contents
Advertisement
Advertisement
Table of Contents

Related Manuals for Omron HV-F013


Summary of Contents for Omron HV-F013
- Page 1 INSTRUCTION MANUAL Electronic Nerve Stimulator HV-F013...
-
Page 2: Table Of Contents
TABLE OF CONTENTS Before Using the Unit How to Control and Reduce Your Pain ........24 Introduction..................2 When Should You Start Therapy?.........24 How Electronic Nerve Stimulator Works ........3 Get to Your Pain Early ............24 Important Safety Precautions and Warnings ........4 How Long Should You Use it? ..........24 Know Your Unit .................11 When to Stop Using the Unit? ..........24 Package Contents ..............11... -
Page 3: Before Using The Unit
Medical purpose In order to use the unit safely, read the complete manual carefully OMRON Electronic Nerve Stimulator is intended for the relief before using the unit for the first time. of pain associated with sore or aching muscles of the lower back,... -
Page 4: How Electronic Nerve Stimulator Works
HOW Electronic Nerve Stimulator WORKS What is it? How does it work? The OMRON Electronic Nerve Stimulator unit is a portable Scientific theory suggests that electrical stimulation therapy may device designed for adults only. It is designed to reduce and... -
Page 5: Important Safety Precautions And Warnings
IMPORTANT SAFETY PRECAUTIONS AND WARNINGS It is important that you read all the warnings and DANGER precautions included in this instruction manual because Do not use this unit with these other devices: they are intended to keep you safe, prevent injury and avoid a (1) If you have a pacemaker, implanted defibrillator, or other situation that could result in damage to the unit. - Page 6 IMPORTANT SAFETY PRECAUTIONS AND WARNINGS DO NOT USE THIS UNIT UNDER THESE CONDITIONS If you have suspected or diagnosed heart disease, you should Consult with your physician before using this unit. follow precautions recommended by your physician. The unit may cause lethal rhythm disturbances in certain If you have suspected or diagnosed epilepsy, you should susceptible individuals.
- Page 7 IMPORTANT SAFETY PRECAUTIONS AND WARNINGS NEVER APPLY THE PADS TO THESE BODY AREAS: Open wounds or rashes or over swollen, Both sides of the thorax red, infected or inflamed areas or The head, the mouth, or any area simultaneously (lateral or front skin eruptions (such as varicose of the face.
- Page 8 Do not plug this cord into any other device consult with your physician before using this unit. that is not an OMRON HV-F013. If your pain does not improve, becomes seriously chronic or No modification of this unit is allowed.
- Page 9 IMPORTANT SAFETY PRECAUTIONS AND WARNINGS PRECAUTIONS REGARDING THE PADS The pads are for the exclusive use of a single patient. Do not share pads with another person. This may cause a skin Do not move the pads to another location while the unit is on. irritation or infection.
- Page 10 IMPORTANT SAFETY PRECAUTIONS AND WARNINGS CAUTION WHILE USING UNIT BATTERY Do not throw the batteries into a fire. The batteries may explode. MAIN UNIT Dispose of the unit, batteries, and components according If the unit is not functioning properly or you feel discomfort, to applicable legal regulations.
- Page 11 IMPORTANT SAFETY PRECAUTIONS AND WARNINGS General Precautions Keep unit away from young children. The unit contains The long-term effects of electrical stimulation are unknown. small pieces that may be swallowed. Immediately contact Apply stimulation to only normal, intact, clean, dry, and your physician.
-
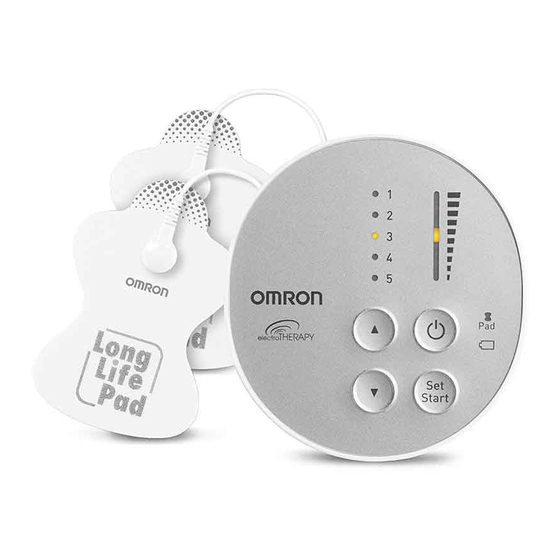
Page 12: Know Your Unit
Front Back trial use only, they may have a shorter life. Instruction Manual Quick Start Guide / Pad Placement Guide Electrode Cord Long Life Pads INSTRUCTION MANUAL Electronic Nerve Electronic Nerve Stimulator Stimulator HV-F013 HV-F013 Quick Start Guide 6602357-0A HV-F013-AP... -
Page 13: Features
Page 22 and the Back of Main Unit) Press once for “ON” and again up to 150 uses). for “OFF”. (Only use OMRON manufactured pads or Pad Light cord with this unit). Mode/Intensity Button If the pad dislodges, Select mode and intensity 4. -
Page 14: Operating Instructions
Operating Instructions ASSEMBLY STEPS Before using your unit, inspect these things. 2 Insert batteries. Make sure the signs correspond when 1. Cord is not broken. inserting batteries. 2. Pad gel is not damaged. 3. Electrode cord connection is not broken. 4. -
Page 15: Step 2 - Attach Electrode Cord To The Main Unit
ASSEMBLY STEPS STEP 2 – ATTACH ELECTRODE CORD STEP 3 – SNAP EITHER ELECTRODE CORD TO TO THE MAIN UNIT EACH OF THE PADS Attach the electrode cord plug to the bottom of the main unit. For the fi rst time, take the pads out of the sealed package. Do NOT turn unit on, until pads are on your skin. -
Page 16: Step 4 - Remove And Discard Plastic Film From Pads
ASSEMBLY STEPS STEP 4 – REMOVE AND DISCARD PLASTIC FILM FROM PADS For the first time, remove the clear plastic film from the back STORING PADS ON PAD HOLDER of the pad. Discard the plastic film backing as well as the clear packaging. Remove plastic film and put sticky Pad facing down side of pads on either side of the... -
Page 17: Get Started With Your Therapy
GET STARTED WITH YOUR THERAPY (USE FOR A MAXIMUM OF 30 MINUTES PER SESSION) STEP 1 – PAD PLACEMENT For optimal therapy: Place pads on either side of the pain, not directly on the pain. Place pads at least 2.5 cm apart. MUST USE TWO PADS at a time for therapy to work. - Page 18 GET STARTED WITH YOUR THERAPY STEP 1 – PAD PLACEMENT (continued) SHOULDER Attach both pads on the shoulder according to your SHOULDER pain. Attach one pad on the front and on the back of your shoulder. Do not use near the heart, on both sides of the thorax or across your chest because the introduction of electrical current may cause rhythm disturbances which could be lethal.
- Page 19 GET STARTED WITH YOUR THERAPY STEP 1 – PAD PLACEMENT (continued) LOWER BACK LOWER BACK Attach both pads on the lower back according to your pain. Attach one pad below and Place pads on muscle of back, not on spine, for optimal therapy. above the region in pain, both on same side.
- Page 20 GET STARTED WITH YOUR THERAPY STEP 1 – PAD PLACEMENT (continued) Outside Inside FOOT (HIP & THIGH) (CALF) (ANKLE) Attach both pads on Attach both pads on the calf where Attach pads on the left for pain on the outside of either side of the area you feel pain.
- Page 21 GET STARTED WITH YOUR THERAPY STEP 1 – PAD PLACEMENT (continued) JOINT JOINT (ELBOW) (KNEE) Attach both pads above the knee or Attach both pads on either side above and below the joint with pain. of the joint with the pain.
-
Page 22: Step 2 - Select 1 Of 5 Modes
GET STARTED WITH YOUR THERAPY STEP 2 – SELECT 1 OF 5 MODES How to change modes during therapy? If you want to change modes during therapy, press the Set/Start Press the Power button. button and ▲(Up) or ▼(Down) button to select a new mode. You Press ▲(Up) or ▼(Down) button to choose 1 of the 5 modes. - Page 23 GET STARTED WITH YOUR THERAPY STEP 2 – SELECT 1 OF 5 MODES (continued) Therapies Arm/Shoulder Lower Back Leg/Foot Knead Steady designed for Mode Light and the Back of Main Unit Potential Stiffness, sore or achy, Stiffness, soreness, Swelling, fatigue, chilly Stiffness, soreness, Stiffness, soreness, conditions...
-
Page 24: Step 3 - Select Intensity Level (1 Low - 10 High)
GET STARTED WITH YOUR THERAPY What intensity level is my unit on? STEP 3 – SELECT INTENSITY LEVEL (1 LOW – 10 HIGH) Press ▲(Up)/▼(Down) button to increase/decrease the intensity. The Intensity Light moves up/down after pressing it once or twice The unit automatically starts at the intensity level of 1. -
Page 25: How To Control And Reduce Your Pain
HOW TO CONTROL AND REDUCE YOUR PAIN When should you start therapy? How long should you use it? Start with one 15 minute session. Always turn unit off with pads Use as soon as your pain begins. Start with one session (the unit still on. -
Page 26: What Type Of Pain Is It Best For
HOW TO CONTROL AND REDUCE YOUR PAIN What type of pain is it best for? Before using, check these points to make sure everything is This therapy works best on acute pain because it is localized. working properly. Acute pain is pain in one area for less than 3 months. If you have 1. -
Page 27: Cleaning And Storage
5. Pads are replaceable and can be purchased. Please consult 1. Turn the power off and remove the electrode cord from the pads. your local OMRON representatives. 2. Wash the pads when the adhesive surface becomes dirty and/or The life of the pads may vary by how often you wash the pads, the the pads are difficult to attach. -
Page 28: Cleaning The Unit
CLEANING AND STORAGE Cleaning the unit Storing the unit and pads 1. Turn unit off and disconnect the electrode cord from the pads. • Place the unit, pads with electrode cord on pad holder, Pad 2. Clean with a lightly moistened cloth (or a cloth soaked in a Placement Guide and Instruction Manual inside the original neutral cleaning solution) and wipe gently. -
Page 29: Troubleshooting
TROUBLESHOOTING In case of any of the below problems occurs during use, first check that no other electrical device is within 30cm. If the problem persists, refer to the table below. If this happens... Possible causes... Try this solution... If this happens... Possible causes... Try this solution... - Page 30 TROUBLESHOOTING If this happens... Possible causes... Try this solution... If this happens... Possible causes... Try this solution... The skin turns red Is the pad surface Replace both pads at Pad gel does not stick Have you removed the Peel off film on the or the skin feels worn out? the same time.
- Page 31 3 seconds Pad Light is blinking. Are both pads Re-attach dislocated under slow running attached to the body? pad(s) onto the skin cold water. firmly. If the above measures are not effective, please consult your local OMRON representatives.
-
Page 32: Specifications
(when used for 15 minutes a day, Lower Quick Start Guide/Pad Placement Guide Back Mode, max. intensity). Energy Consumption Approx. 30mA This OMRON product is produced under the strict quality system Frequency Approx. 1 to 108Hz of OMRON HEALTHCARE Co. Ltd., Japan. PULSE Duration 100 μsec... - Page 33 Accessories/replacement parts Long Life Pads ........Model Number : HV-LLPAD This device fulfils the provisions of EC directive 93/42/EEC (Medical Device Directive). Description of symbols that, depending on a model, can be found on the product itself, product sales package or IM This product should not be used by persons with medical implants, e.g.
- Page 34 2 digits - month of production. Important information regarding Electro Magnetic Compatibility (EMC) HV-F013 manufactured by OMRON HEALTHCARE Co., Ltd. conforms to EN60601-1-2:2015 Electro Magnetic Compatibility (EMC) standard. Further documentation in accordance with this EMC standard is available at http://www.omronhealthcare-ap.com/emc-information.
- Page 35 Correct Disposal of this Product (Waste Electrical & Electronic Equipment) This marking shown on the product or its literature, indicates that it should not be disposed with other household wastes at the end of its working life. To prevent possible harm to the environment or human health from uncontrolled waste disposal, please separate this from other types of wastes and recycle it responsibly to promote the sustainable reuse of material resources.
- Page 36 OMRON HEALTHCARE EUROPE B.V. Scorpius 33, 2132 LR Hoofddorp, THE NETHERLANDS OMRON DALIAN Co., Ltd. Production facility Dalian, China OMRON HEALTHCARE SINGAPORE PTE LTD. Asia Pacific HQ 438A Alexandra Road, #05-05/08, Alexandra Technopark Singapore 119967 www.omronhealthcare-ap.com Made in China 6602358-8B...