
Related Manuals for Omron HeatTens HV-F311-UK


Summary of Contents for Omron HeatTens HV-F311-UK
- Page 1 Pain Reliever HeatTens (HV-F311-UK) • Pain Reliever. Instruction Manual. IM-HV-F311-UK-01-05/2018 3787476-5A...
-
Page 2: Table Of Contents
Table of Contents Before Using the Unit ....... 2 STEP 4 – Pick 1 out of 9 TENS Introduction ..........2 Modes ....... 21 Important Safety Precautions and STEP 5 – Select the Preferred Warnings ..........4 Intensity Level (1 low - Know Your Unit ........ -
Page 3: Before Using The Unit
Introduction Thank you for purchasing the OMRON 3. Improves the blood circulation (as result HeatTens. of repeated muscle contracting and In order to use the unit safely, read the relaxing). complete manual carefully before using the unit for the first time. - Page 4 Introduction Since the 1970s, pain relief based on TENS has been widely used by many healthcare professionals, such as physiotherapists and pain specialists. Intended User This unit is intended to be operated by adults who can understand this instruction manual. It is not for professional use in hospitals or other medical facilities, it is intended for home use only.
-
Page 5: Important Safety Precautions And Warnings
Important Safety Precautions and Warnings It is important that you read all the DANGER warnings and precautions included in this instruction manual because they Do not use this unit with these other devices: are intended to keep you safe, prevent •... - Page 6 Important Safety Precautions and Warnings Do not use on these individuals • For Hospitals and Clinics, operation in Pregnant women. close proximity (e.g. 1 m) to a shortwave Do not use on children under 15 years or microwave therapy Medical Electronic old because this unit has not been equipment may produce instability to the evaluated for pediatric use.
- Page 7 Important Safety Precautions and Warnings NEVER APPLY THE PADS TO THESE On both legs at the same time BODY AREAS: because this may cause cardiac disturbance. The head, the mouth, or any area of the face. On the bottom of both feet at the same time because this may The neck or any area of the cause cardiac disturbance.
- Page 8 Do not use heat function if you are a patient stimulation in that area of the skin. with a lack of temperature sensation. The pads can only be used with OMRON If used on the elderly, use caution due to gels.
- Page 9 Important Safety Precautions and Warnings Pads should not touch any metal object, The pads do not work correctly without such as a belt buckle, necklace, or other the gels. For safety and effectiveness, metal worn under clothing. they must be used together. Do not share pads with another person.
- Page 10 Important Safety Precautions and Warnings Cord Possible adverse reactions Do not insert the cord plug into any place Do not use to treat one region for other than the jack on the unit. extended periods of time (more than Do not pull on the cord during treatment. one 30 minutes a session, up to 3 times/ Do not bend or pull the end of the cord.
-
Page 11: Know Your Unit
Know Your Unit Package Contents Main Unit Cord with Pads Pad Holder Gels (2 pairs) Instruction Manual AC Adapter (HHP-BFH11) Pain Reliever HeatTens (HV-F311-UK) • Pain Reliever. Instruction Manual. IM-HV-F311-UK-01-05/2018 3787476-5A Optional Medical Accessories (within the scope of EC Medical Device Directive 93/42/EEC) Product description Model Gels... -
Page 12: Buttons And Their Functions
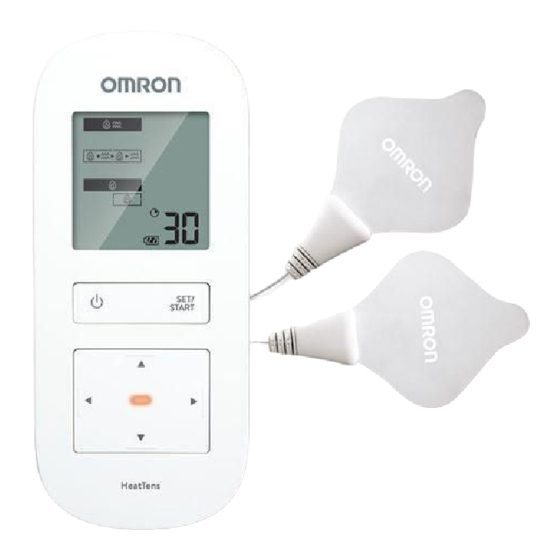
Know Your Unit Buttons and Their Functions SET/START (power) Therapy Choice Button Button TENS Push once for Push to Modes confirm the ON and again Heat for OFF. therapy, heat Setting and mode Intensity Minutes and/or to start level Remaining the therapy. -
Page 13: Inspect Unit And Charge Battery
Inspect Unit and Charge Battery STEP 2 – Insert the Power Plug into Before using, check that: 1. The cord is not broken. an Outlet Outlet 2. The gels are not damaged. 3. The connection between cord and pad is not damaged. 4. -
Page 14: Battery Icon
Inspect Unit and Charge Battery Battery Icon STEP 3 – Unplug Power Plug Once Note: While the battery is charging, the the Battery is Fully Charged main unit does not work. Outlet Display Contents Battery charge is full. Battery charge is half. Battery is close to low. -
Page 15: Operating Instructions
Assembly Steps STEP 1 – Prepare Pads STEP 2 – Place Gels onto the Pads Put the jack into the bottom left side of the • Remove the gels from the sealed plastic main unit. bag. Note: Each gel has a film on each side of the gel. -
Page 16: Step 3 - Attach The Pads To The Body
Assembly Steps For optimal therapy: “SKIN” Side’s • The gel should read “SKIN” Plastic Film Place pads on either side of the pain, on top. Remove the “SKIN” not directly on the pain. side’s plastic film and place Place pads at least 2.5 cm apart for the pads onto the skin. -
Page 17: Get Started With Your Therapy
Get Started with Your Therapy STEP 1 – Pad Placement Clean and dry the proper area so it is free of all lotions/oils/sweat/ointment. LOWER BACK Attach 1 pad below Attach both pads and above the on either side of the region in pain, both area with pain. - Page 18 Get Started with Your Therapy STEP 1 – Pad Placement JOINT (KNEE) (CALF) Attach both pads above the knee or Attach both pads on the calf with pain. above and below the joint with pain. Pads should not be placed Outside simultaneously on the calves of both legs.
- Page 19 Get Started with Your Therapy STEP 1 – Pad Placement SHOULDER Attach both pads on the shoulder according to your pain. SHOULDER Attach 1 pad on the front and on the back of your shoulder. Do not use near the heart, on both sides of the thorax or across your chest because the introduction of electrical current may cause rhythm disturbances which could be lethal.
-
Page 20: Step 2 - Pick Your Preferred Therapy
Get Started with Your Therapy Therapy STEP 2 – Pick your Preferred - Heat 15 min, TENS 15 min Therapy Push (power) button to turn on. Select 1 out of 3 therapies using the ▲ ▼ (up/down) arrow buttons. Next, push SET/START to confirm therapy. -
Page 21: Step 3 - Pick Heat Setting
Get Started with Your Therapy Therapy - Electrical Stimulation only (for 30 min). 15 min 30 min START STEP 3 – Pick Heat Setting Select Heat (Low) or (High) using the ◄► (left/right) arrow buttons. Next, push Note: Heat (Low): 42 °C SET/START to confirm heat setting. -
Page 22: Step 4 - Pick 1 Out Of 9 Tens Modes
Get Started with Your Therapy How to select the right TENS mode STEP 4 – Pick 1 out of 9 TENS Modes Any of the modes can be used on body Select a (TENS Mode) using the parts or pains described in this manual. 4 arrow buttons. - Page 23 Get Started with Your Therapy STEP 4 – Pick 1 of 9 Modes Therapies Potential conditions Sensation designed for Mode 1 - Tap Stiffness, soreness, tight Series of low rate tapping feeling. sensations. Mode 2 - Knead Stiffness, sore or achy, Series of medium rate knotty muscles, tight pulsing sensations to...
- Page 24 Get Started with Your Therapy STEP 4 – Pick 1 of 9 Modes Therapies Potential conditions Sensation designed for Mode 5 - Stiffness, soreness, Series of high rate to low tingling Lower Back muscle spasm, nerve sensations, followed by tapping. pain.
-
Page 25: Step 5 - Select The Preferred Intensity Level (1 Low - 20 High)
Get Started with Your Therapy Duration of the therapy STEP 5 – Select the Preferred The unit will operate for 30 minutes before Intensity Level (1 low - 20 high) it automatically shuts off. A maximum of Push SET/START to start at the lowest one 30 minute therapy per session, up to intensity level and slowly increase it by 3 times/day, is recommended. -
Page 26: How To Manage And Reduce Your Pain
How to Manage and Reduce Your Pain When should I start therapy? See precautions on page 9. Long- Use as soon as your pain begins. Start with time treatment and strong stimulation 1 session (the unit automatically turns off may cause muscular fatigue and may after 30 minutes). -
Page 27: Cleaning And Storing
Cleaning and Storage The cord with pads, and the main unit Cleaning the unit can be cleaned, but you cannot clean the 1. Turn the unit off and disconnect the cord gels. with pads from the unit. 2. Clean with a cloth lightly moistened Cleaning the cord with pads or soaked in a neutral (mild) cleaning 1. -
Page 28: Storing The Pads With Gels
• For information about how to dispose 4. Wrap the pads with gels of the unit, refer to section “Correct cord around the pad Disposal of This Product” on page 36. holder. • To dispose this device, refer to www.omron-healthcare.com... -
Page 29: Troubleshooting
Troubleshooting In case any of the below problems occurs during use, first check that no other electrical device is within 30 cm. If the problem persists, refer to the table below. If this happens... Possible causes... Try this solution... The intensity is not Are you using only 1 pad? Put the other pad on your skin. - Page 30 Troubleshooting If this happens... Possible causes... Try this solution... Display not The battery may be depleted. Recharge the battery fully. working. Is the battery properly charged? Check if the AC Adapter is properly connected to the unit. Check if AC Adapter is connected to a power outlet.
- Page 31 Troubleshooting If this happens... Possible causes... Try this solution... The gel does not Have you removed the transparent film Peel off the film on the adhesive stick to skin. from the gels? surface of gels. Is the pad wet? Or is your skin too wet? Air dry the pads. Or dry the skin. Is there any lotions/oils/sweat/ointment Clean and dry skin.
- Page 32 Troubleshooting If this happens... Possible causes... Try this solution... Only 1 pad is attached, or both pads Re-attach dislocated pad(s) onto the is displayed. are not attached. skin firmly. Was transparent film removed from Peel off the film on the adhesive the gel? surface of gels.
- Page 33 Troubleshooting If this happens... Possible causes... Try this solution... The cord with pads may be short- Stop using the unit immediately, and circuited. refer to the warranty conditions. E2 is displayed. Device error. The main unit may be broken. Stop using the unit immediately, and E3 is displayed.
-
Page 34: Technical Data
Technical Data Product Category Electroanalgestic Transcutaneous Stimulators Product Description Pain Reliever Model (code) HeatTens (HV-F311-UK) Power Source AC Adapter (INPUT 100V-240V, 50Hz-60Hz, 0.12-0.65 A) Lithium-ion battery built in (3.7 V; Approx. 1510 mAh) Battery Life Will last for 500 times usage when fully charged and in normal temperatures of 23 °C Frequency Approx. - Page 35 NOTE: These specifications are subject to change without notice. This OMRON product is produced under the strict quality system of OMRON HEALTHCARE Co., Ltd., Japan. Designed for a minimum of 5 years life expectancy except gels. Gels can be used up to 30 times.
- Page 36 Technical Data Description of symbols that, depending on a model, can be found on the product itself, product sales package or IM This product should not be used by persons with medical implants, e.g. heart pacemakers, artificial heart, lung or other electronic life support systems. Applied part - Type BF Degree of protection against electric shock (leakage current) Ingress protection degree...
-
Page 37: Important Information Regarding Electro Magnetic Compatibility (Emc)
HV-F311-UK manufactured by OMRON HEALTHCARE Co., Ltd. conforms to EN60601-1-2:2015 Electro Magnetic Compatibility (EMC) standard. Further documentation in accordance with this EMC standard is available at OMRON HEALTHCARE EUROPE at the address mentioned in this instruction manual or at www.omron-healthcare.com. Refer to the EMC information for HV-F311-UK on the website. -
Page 38: Warranty
Transport costs and risks of transport. described in the instruction manual. b. Costs for repairs and / or defects resulting This product is warranted by OMRON for a from repairs done by unauthorised persons. period of 3 years after the date of purchase. - Page 39 Should (warranty) service be required please apply to the dealer whom the product was purchased from or an authorised OMRON distributor. For the address refer to the product packaging / literature or to your specialised retailer. If you have difficulties in finding OMRON customer services, visit our...
- Page 40 ﻓﻲ ﺣﺎﻟﺔ ﺿرورة اﺳﺗﺧدام ﺧدﻣﺔ )اﻟﺿﻣﺎن(، ﻓ ﯾ ُرﺟﻰ اﻟرﺟوع إﻟﻰ اﻟﺗﺎﺟر اﻟذي ﺗم ﺷراء اﻟﻣﻧﺗﺞ ﻣﻧﮫ أو إﻟﻰ ﻣوزع ﻣﻌﺗﻣد ﺗﺎﺑﻊ ﻟﺷرﻛﺔ / . ﻟﻠﺗﻌرف ﻋﻠﻰ ﻋﻧواﻧﮫ، ارﺟﻊ إﻟﻰ ﻋﺑوة اﻟﻣﻧﺗﺞOMRON وﺛﺎﺋﻘﮫ أو إﻟﻰ ﺑﺎﺋﻊ اﻟﺗﺟزﺋﺔ اﻟﻣﺗﺧﺻص اﻟذي ﺗﺗﻌﺎﻣل ﻣﻌﮫ. إذا ﻛﻧت...
- Page 41 اﻟﺿﻣﺎن واﻟﺿﻣﺎن ﻻ ﯾﻐطﻲ إﻻ اﻟﻣﻧﺗﺟﺎت اﻟﺗﻲ ﯾﺗم ﺷراؤھﺎ ﻓﻲ أوروﺑﺎ . ﺗمOMRON ﺷﻛرً ا ﻟك ﻋﻠﻰ اﺧﺗﯾﺎر أﺣد ﻣﻧﺗﺟﺎت ﺷرﻛﺔ .وروﺳﯾﺎ ودول راﺑطﺔ اﻟدول اﻟﻣﺳﺗﻘﻠﺔ واﻟﺷرق اﻷوﺳط وإﻓرﯾﻘﯾﺎ ﺗﺻﻧﯾﻊ ھذا اﻟﻣﻧﺗﺞ ﻣن ﻣواد ﻋﺎﻟﯾﺔ اﻟﺟودة ﻛﻣﺎ ﺗم ﺗوﺧﻲ اﻟﻌﻧﺎﯾﺔ...
- Page 42 (EMC) ﻣﻌﻠوﻣﺎت ھﺎﻣﺔ ﺣول اﻟﺗواﻓق اﻟﻛﮭروﻣﻐﻧﺎطﯾﺳﻲ ، وھو ﻣﺗواﻓق ﻣﻊ ﻣﻌﯾﺎر ﻣﺗطﻠﺑﺎت اﻟﺗواﻓقOMRON HEALTHCARE Co., Ltd ﻣن ﻗﺑل ﺷرﻛﺔHV-F311-UK ﺗم ﺗﺻﻧﯾﻊ (. ﯾﺗواﻓر اﻟﻣزﯾد ﻣن اﻟوﺛﺎﺋق طﺑﻘ ﺎ ً ﻟﻣﻌﯾﺎر ﻣﺗطﻠﺑﺎت اﻟﺗواﻓق اﻟﻛﮭروﻣﻐﻧﺎطﯾﺳﻲEMC) EN60601-1-2:2015 اﻟﻛﮭروﻣﻐﻧﺎطﯾﺳﻲ ﻋﻠﻰ اﻟﻌﻧوان اﻟﻣذﻛور ﻓﻲ ھذا اﻟدﻟﯾل اﻟﻣﺧﺻص ﻟﻺرﺷﺎدات أوOMRON HEALTHCARE EUROPE ( ﻓﻲ ﺷرﻛﺔEMC) ( ﻟﻠﺣﺻول...
- Page 43 اﻟﺑﯾﺎﻧﺎت اﻟﻔﻧﯾﺔ وﺻف ﻟﻠرﻣوز اﻟﻣﻘدﻣﺔ ﻋﻠﻰ اﻟﻣﻧﺗﺞ ﻧﻔﺳﮫ، أو ﻋﺑوات ﺑﯾﻊ اﻟﻣﻧﺗﺞ، أو دﻟﯾل اﻹرﺷﺎدات وﻓ ﻘ ً ﺎ ﻟﻠطراز ،ﯾﺟب أﻻ ﯾﺗم اﺳﺗﺧدام ھذا اﻟﻣﻧﺗﺞ ﻣن ﺧﻼل أﺷﺧﺎص ﺧﺿﻌوا ﻟزراﻋﺔ أﺟﮭزة طﺑﯾﺔ ﻓﻲ أﺟﺳﺎﻣﮭم، ﻋﻠﻰ ﺳﺑﯾل اﻟﻣﺛﺎل .أﺟﮭزة ﺗﻧظﯾم ﻧﺑﺿﺎت اﻟﻘﻠب، أو اﻟﻘﻠب اﻟﺻﻧﺎﻋﻲ، أو اﻟرﺋﺔ اﻟﺻﻧﺎﻋﯾﺔ، أو ﻏﯾر ذﻟك ﻣن اﻷﻧظﻣﺔ اﻹﻟﻛﺗروﻧﯾﺔ ﻟدﻋم اﻟﺣﯾﺎة BF اﻟﺟزء...
- Page 44 .ﻣﻼﺣظﺔ: ھذه اﻟﻣواﺻﻔﺎت ﺗﺧﺿﻊ ﻟﻠﺗﻐﯾﯾر دون إﺧطﺎر .، ﺑﺎﻟﯾﺎﺑﺎنOMRON HEALTHCARE Co., Ltd. ھذا ﻓﻲ ﻧطﺎق ﻧظﺎم اﻟﺟودة اﻟﺻﺎرم ﻟﺷرﻛﺔOMRON ﺗم إﻧﺗﺎج ﻣﻧﺗﺞ .ھذا اﻟﻣﻧﺗﺞ ﻣﺻﻣم ﺑﺣﯾث ﯾﻛون اﻟﻌﻣر اﻟﺗﺷﻐﯾﻠﻲ اﻟﻣﺗوﻗﻊ ﻟﮫ ٥ أﻋوام ﻓﯾﻣﺎ ﻋدا ﻗطﻊ اﻟﺟل. ﯾﻣﻛن اﺳﺗﺧدام ﻗطﻊ اﻟﺟل ﺣﺗﻰ ۰۳ ﻣرة...
- Page 45 اﻟﺑﯾﺎﻧﺎت اﻟﻔﻧﯾﺔ ﻣﺣﻔزات ﺗﺧﻔﯾف اﻵﻻم اﻟﻛﮭرﺑﯾﺔ ﻋﺑر اﻟﺟﻠد ﻓﺋﺔ اﻟﻣﻧﺗﺞ وﺣدة ﺗﺧﻔﯾف اﻷﻟم وﺻف اﻟﻣﻧﺗﺞ HeatTens (HV-F311-UK) (اﻟطراز )اﻟﻛود ﻣﮭﺎﯾﺊ اﻟﺗﯾﺎر اﻟﻣﺗردد )اﻟﻣدﺧﻼت ۰۰۱ ﻓوﻟت إﻟﻰ ۰٤۲ ﻓوﻟت ۰٥ ھرﺗز إﻟﻰ ﻣﺻدر اﻟﺗﯾﺎر اﻟﻛﮭرﺑﺎﺋﻲ (A ۰٫٦٥-۰٫۱۲ ،۰٦ ھرﺗز ﺑطﺎرﯾﺔ ﻣدﻣﺟﺔ ﻣﺻﻧوﻋﺔ ﻣن أﯾون اﻟﻠﯾﺛﯾوم )۷٫۳ ﻓوﻟت؛ ۰۱٥۱ ﻣﻠﻠﻲ أﻣﺑﯾر ﻓﻲ (اﻟﺳﺎﻋﺔ...
- Page 46 ﺗﺣري اﻷﺧطﺎء وإﺻﻼﺣﮭﺎ ...ﺟر ّ ب ھذا اﻟﺣل ...اﻷﺳﺑﺎب اﻟﻣﺣﺗﻣﻠﺔ ...إذا ﺣدث ذﻟك .ﺗوﻗف ﻋن اﺳﺗﺧدام اﻟوﺣدة ﻓورً ا، وراﺟﻊ ﺷروط اﻟﺿﻣﺎن ﻗد ﯾﻛون اﻟﺳﻠك اﻟﻣﺗﺻل ﺑﺎﻟوﺳﺎﺋد ﯾﻌﺎﻧﻲ ﻣن ﻗﺻر اﻟداﺋرة .اﻟﻛﮭرﺑﯾﺔ .E2 ﯾﺗم ﻋرض .ﻗد ﺗﻛون اﻟوﺣدة اﻟرﺋﯾﺳﯾﺔ ﺗﺎﻟﻔﺔ .ﺧطﺄ...
- Page 47 ﺗﺣري اﻷﺧطﺎء وإﺻﻼﺣﮭﺎ ...ﺟر ّ ب ھذا اﻟﺣل ...اﻷﺳﺑﺎب اﻟﻣﺣﺗﻣﻠﺔ ...إذا ﺣدث ذﻟك .أﻋد ﺗوﺻﯾل اﻟوﺳﺎدة )اﻟوﺳﺎﺋد( اﻟﻣﻔﺻوﻟﺔ ﻋﻠﻰ اﻟﺟﻠد ﺑﺈﺣﻛﺎم ﻟم ﯾﺗم ﺗوﺻﯾل إﻻ وﺳﺎدة واﺣدة، أو ﻟم ﯾﺗم ﺗوﺻﯾل أي ﻣن ﯾﺗم ﻋرض .اﻟوﺳﺎدﺗﯾن .ﻗم ﺑﺗﻘﺷﯾر اﻟﻐﺷﺎء ﻣن ﻋﻠﻰ اﻟﺳطﺢ اﻟﻼﺻق ﻟﻘطﻊ اﻟﺟل ھل...
- Page 48 ﺗﺣري اﻷﺧطﺎء وإﺻﻼﺣﮭﺎ ...ﺟر ّ ب ھذا اﻟﺣل ...اﻷﺳﺑﺎب اﻟﻣﺣﺗﻣﻠﺔ ...إذا ﺣدث ذﻟك .ﻗم ﺑﺗﻘﺷﯾر اﻟﻐﺷﺎء ﻣن ﻋﻠﻰ اﻟﺳطﺢ اﻟﻼﺻق ﻟﻘطﻊ اﻟﺟل ھل ﻗﻣت ﺑﺈزاﻟﺔ اﻟﻐﺷﺎء اﻟﺷﻔﺎف ﻣن ﻋﻠﻰ ﻗطﻊ اﻟﺟل؟ .ﻗطﻌﺔ اﻟﺟل ﻻ ﺗﻠﺗﺻق ﺑﺎﻟﺟﻠد .ﻗم ﺑﺗﺟﻔﯾف اﻟوﺳﺎﺋد ﻓﻲ اﻟﮭواء. أو ﻗم ﺑﺗﺟﻔﯾف اﻟﺟﻠد ھل...
- Page 49 ﺗﺣري اﻷﺧطﺎء وإﺻﻼﺣﮭﺎ ...ﺟر ّ ب ھذا اﻟﺣل ...اﻷﺳﺑﺎب اﻟﻣﺣﺗﻣﻠﺔ ...إذا ﺣدث ذﻟك .ﻗم ﺑﺈﻋﺎدة ﺷﺣن اﻟﺑطﺎرﯾﺔ ﺑﺎﻟﻛﺎﻣل .ﻗد ﺗﻛون اﻟﺑطﺎرﯾﺔ ﻗد ﻧﻔذت .ﺷﺎﺷﺔ اﻟﺟﮭﺎز ﻻ ﺗﻌﻣل ٍ ﺗﺣﻘق ﻣﻣﺎ إذا ﻛﺎن ﻣﮭﺎﯾﺊ اﻟﺗﯾﺎر اﻟﻣﺗردد ﻣﺗﺻ ﻼ ً ﺑﺷﻛل ھل ﺗم ﺷﺣن اﻟﺑطﺎرﯾﺔ ﺑطرﯾﻘﺔ ﺻﺣﯾﺣﺔ؟ .ﺻﺣﯾﺢ...
- Page 50 ﺗﺣري اﻷﺧطﺎء وإﺻﻼﺣﮭﺎ .ﻓﻲ ﺣﺎل ﺣدوث أي ﻣن اﻟﻣﺷﻛﻼت اﻟﻣذﻛورة أدﻧﺎه ﻓﻲ أﺛﻧﺎء اﻻﺳﺗﺧدام، ﻓﺗﺣﻘق أو ﻻ ً ﻣن ﻋدم وﺟود أي ﺟﮭﺎز ﻛﮭرﺑﻲ آﺧر ﻓﻲ ﻧطﺎق ۰۳ ﺳم .إذا اﺳﺗﻣرت اﻟﻣﺷﻛﻠﺔ، ﻓراﺟﻊ اﻟﺟدول اﻟﻣﺑﯾن أدﻧﺎه ...ﺟر ّ ب ھذا اﻟﺣل ...اﻷﺳﺑﺎب...
- Page 51 ٤. ﻟف ﺳﻠك اﻟوﺳﺎﺋد اﻟﻣزودة ﺑﻘطﻊ اﻟﺟل ،• ﻟﻠﺣﺻول ﻋﻠﻰ ﻣﻌﻠوﻣﺎت ﺣول ﻛﯾﻔﯾﺔ اﻟﺗﺧﻠص ﻣن اﻟوﺣدة .ﺣول ﺣﺎﻣل اﻟوﺳﺎﺋد "راﺟﻊ اﻟﻘﺳم "اﻟﺗﺧﻠص ﻣن ھذا اﻟﻣﻧﺗﺞ ﺑﺻورة ﺻﺣﯾﺣﺔ .۳٦ اﻟﻣوﺟود ﻓﻲ ﺻﻔﺣﺔ • ﻟﻠﺗﺧﻠص ﻣن ھذا اﻟﺟﮭﺎز، ﻗم ﺑﺎﻟرﺟوع إﻟﻰ www.omron-healthcare.com ۲۷...
- Page 52 اﻟﺗﻧظﯾف واﻟﺗﺧزﯾن ﺗﻧظﯾف اﻟوﺣدة ﯾﻣﻛن ﺗﻧظﯾف اﻟﺳﻠك اﻟﻣﺗﺻل ﺑﺎﻟوﺳﺎﺋد واﻟوﺣدة اﻟرﺋﯾﺳﯾﺔ، وﻟﻛن ۱. ﻗم ﺑﺈﯾﻘﺎف ﺗﺷﻐﯾل اﻟوﺣدة واﻓﺻل اﻟﺳﻠك اﻟﻣﺗﺻل ﺑﺎﻟوﺳﺎﺋد ﻣن .ﯾﺗﻌذر ﻋﻠﯾك ﺗﻧظﯾف ﻗطﻊ اﻟﺟل .اﻟوﺣدة ۲. ﻗم ﺑﺗﻧظﯾف اﻟوﺣدة ﺑﺎﺳﺗﺧدام ﻗطﻌﺔ ﻗﻣﺎش ﻣرطﺑﺔ ﺑﺷﻛل ﺧﻔﯾف ﺗﻧظﯾف اﻟﺳﻠك اﻟﻣﺗﺻل ﺑﺎﻟوﺳﺎﺋد .أو...
- Page 53 ﻛﯾﻔﯾﺔ اﻟﺳﯾطرة ﻋﻠﻰ اﻷﻟم وﺗﺧﻔﯾﻔﮫ ﻣﺗﻰ أﺑدأ اﻟﻌﻼج؟ راﺟﻊ اﻟﺗﺣذﯾرات اﻟواردة ﻓﻲ ﺻﻔﺣﺔ ۹. ﯾﻣﻛن أن ﯾؤدي اﺳﺗﺧدم اﻟﻌﻼج ﺑﻣﺟرد أن ﯾﺑدأ اﻷﻟم. اﺑدأ ﺑﺟﻠﺳﺔ واﺣدة )ﺗﺗوﻗف اﻟﻌﻼج ﻟﻔﺗرة طوﯾﻠﺔ واﻟﺗﺣﻔﯾز اﻟﻘوي إﻟﻰ إﺟﮭﺎد اﻟﻌﺿﻼت اﻟوﺣدة ﻋن اﻟﻌﻣل ﺑﺷﻛل ﺗﻠﻘﺎﺋﻲ ﺑﻌد ﻣرور ۰۳ دﻗﯾﻘﺔ(. ﻗم .وﯾﻣﻛن...
- Page 54 اﺑدأ اﻟﻌﻼج اﻟﺧﺎص ﺑك اﻟﺧطوة ٥ – ﺣدد ﻣﺳﺗوى اﻟﻛﺛﺎﻓﺔ اﻟﻣﻔﺿل ﺑﺎﻟﻧﺳﺑﺔ ﻣدة اﻟﻌﻼج ﺳوف ﺗﻌﻣل اﻟوﺣدة ﻟﻣدة ۰۳ دﻗﯾﻘﺔ ﻗﺑل أن ﺗﺗوﻗف ﻋن اﻟﻌﻣل (ﻟك )۱ ﻣﻧﺧﻔض - ۰۲ ﻣرﺗﻔﻊ ﺗﻠﻘﺎﺋ ﯾ ًﺎ. وﻧﺣن ﻧوﺻﻲ ﺑﺈﺟراء ﻛل ﺟﻠﺳﺔ ﻋﻼج ﻟﻣدة ﻻ ﺗزﯾد ﻋن ...
- Page 55 اﺑدأ اﻟﻌﻼج اﻟﺧﺎص ﺑك اﻟﺧطوة ٤ – ﺣدد وﺿ ﻌ ً ﺎ ﻣن ﺑﯾن ۹ أوﺿﺎع اﻟوﺳﺎﺋل اﻟﻌﻼﺟﯾﺔ اﻹﺣﺳﺎس اﻟظروف اﻟﻣﺣﺗﻣﻠﺔ ﻣﺻﻣﻣﺔ ﻟـ ،ﺳﻠﺳﻠﺔ ﻣن أﺣﺎﺳﯾس اﻟوﺧز اﻟﻣرﺗﻔﻌﺔ إﻟﻰ اﻟﻣﻧﺧﻔﺿﺔ اﻟﺗﺻﻠب أو اﻟﺗﻘرح أو ﺗﺷﻧﺟﺎت اﻟوﺿﻊ ٥ - أﺳﻔل ﯾﺗﺑﻌﮭﺎ أﺣﺎﺳﯾس ﺑﺎﻟﻧﻘر. ﻣﻊ زﯾﺎدة اﻟﻛﺛﺎﻓﺔ، ﯾﻣﻛن أن .اﻟﻌﺿﻼت...
- Page 56 اﺑدأ اﻟﻌﻼج اﻟﺧﺎص ﺑك اﻟﺧطوة ٤ – ﺣدد وﺿ ﻌ ً ﺎ ﻣن ﺑﯾن ۹ أوﺿﺎع اﻟوﺳﺎﺋل اﻟﻌﻼﺟﯾﺔ اﻹﺣﺳﺎس اﻟظروف اﻟﻣﺣﺗﻣﻠﺔ ﻣﺻﻣﻣﺔ ﻟـ اﻟوﺿﻊ ۱ - اﻟﻧﻘر .ﺳﻠﺳﻠﺔ ﻣن أﺣﺎﺳﯾس اﻟﻧﻘر اﻟﻣﻧﺧﻔﺿﺔ .اﻟﺗﺻﻠب أو اﻟﺗﻘرح أو ﺷﻌور ﺑﺿﯾق ﺳﻠﺳﻠﺔ ﻣن أﺣﺎﺳﯾس اﻟﻧﺑض اﻟﻣﺗوﺳطﺔ اﻟﺗﺻﻠب...
- Page 57 اﺑدأ اﻟﻌﻼج اﻟﺧﺎص ﺑك اﻟﺧطوة ٤ – اﺧﺗر وﺿ ﻌ ً ﺎ واﺣ د ًا ﻣن ﺑﯾن ﺗﺳﻌﺔ اﻟﻣﻧﺎﺳبTENS ﻛﯾﻔﯾﺔ اﺧﺗﯾﺎر وﺿﻊ وﯾﻣﻛن اﺳﺗﺧدام أي ﻣن اﻷوﺿﺎع ﻋﻠﻰ أﺟزاء اﻟﺟﺳم أو اﻵﻻم TENS أوﺿﺎع ﻟﺗﻘﻧﯾﺔ .اﻟﻣوﺻوﻓﺔ ﻓﻲ ھذا اﻟدﻟﯾل ( ﺑﺎﺳﺗﺧدام...
- Page 58 اﺑدأ اﻟﻌﻼج اﻟﺧﺎص ﺑك اﻟﻌﻼج .(- اﻟﺗﺣﻔﯾز اﻟﻛﮭرﺑﻲ ﻓﻘط )ﻟﻣدة ۰۳ دﻗﯾﻘﺔ ٥۱ دﻗﯾﻘﺔ ۰۳ دﻗﯾﻘﺔ START اﻟﺧطوة ۳ – اﺧﺗﯾﺎر إﻋداد اﻟﺣرارة )أﻋﻠﻰ( ﺑﺎﺳﺗﺧدام )ﻣﻧﺧﻔض( أو اﺧﺗر ﻣﺳﺗوى اﻟﺣرارة أزرار اﻷﺳﮭم ►◄ )اﻟﯾﺳﺎر/اﻟﯾﻣﯾن(. ﺛم اﺿﻐط ﻋﻠﻰ زر )ﻣﻧﺧﻔض(: ۲٤ درﺟﺔ ﻣﺋوﯾﺔ ﻣﻼﺣظﺔ: ﻣﺳﺗوى...
- Page 59 اﺑدأ اﻟﻌﻼج اﻟﺧﺎص ﺑك اﻟﺧطوة ۲ – اﺧﺗر اﻟﻌﻼج اﻟﻣﻔﺿل ﺑﺎﻟﻧﺳﺑﺔ ﻟك اﻟﻌﻼج زر )اﻟطﺎﻗﺔ( ﻟﺗﺷﻐﯾل اﻟوﺣدة. ﺣد ﻋﻼﺟً ﺎ ﻟﻣدة ٥۱ دﻗﯾﻘﺔTENS - اﻟﺣرارة ﻟﻣدة ٥۱ دﻗﯾﻘﺔ، ﺗﻘﻧﯾﺔ اﺿﻐط ﻋﻠﻰ ▲▼ واﺣ د ً ا ﻣن ﺑﯾن ۳ ﻋﻼﺟﺎت ﺑﺎﺳﺗﺧدام أزرار اﻷﺳﮭم ...
- Page 60 اﺑدأ اﻟﻌﻼج اﻟﺧﺎص ﺑك اﻟﺧطوة ۱ – وﺿﻊ اﻟوﺳﺎﺋد اﻟﻛﺗف .ﺿﻊ اﻟوﺳﺎدﺗﯾن ﻋﻠﻰ اﻟﻛﺗف وﻓ ﻘ ً ﺎ ﻟﻸﻟم اﻟذي ﺗﺷﻌر ﺑﮫ اﻟﻛﺗف ﺿﻊ وﺳﺎدة واﺣدة ﻋﻠﻰ اﻟﺟزء اﻷﻣﺎﻣﻲ واﻟﺟزء .اﻟﺧﻠﻔﻲ ﻣن ﻛﺗﻔك ﻻ ﺗﺳﺗﺧدم اﻟوﺳﺎﺋد ﺑﺎﻟﻘرب ﻣن اﻟﻘﻠب أو ﻋﻠﻰ ﻛﻼ ﺟﺎﻧﺑﻲ اﻟﻘﻔص اﻟﺻدري أو ﻋﺑر ﺻدرك ﻷن إﺻدار اﻟﺗﯾﺎر اﻟﻛﮭرﺑﻲ ﯾﻣﻛن أن .ﯾﺳﺑب...
- Page 61 اﺑدأ اﻟﻌﻼج اﻟﺧﺎص ﺑك اﻟﺧطوة ۱ – وﺿﻊ اﻟوﺳﺎﺋد اﻟﺳﺎق اﻟﻣﻔﺻل ()رﺑﻠﺔ اﻟﺳﺎق ()اﻟرﻛﺑﺔ .ﻗم ﺑﺗوﺻﯾل ﻛﻼ اﻟوﺳﺎدﺗﯾن ﻋﻠﻰ اﻟرﺑﻠﺔ اﻟﻣﺻﺎﺑﺔ ﺑﺎﻷﻟم ﻗم ﺑﺗوﺻﯾل ﻛﻼ اﻟوﺳﺎدﺗﯾن ﻓوق اﻟرﻛﺑﺔ أو ﻓوق وأﺳﻔل ﯾﺟب أﻻ ﯾﺗم وﺿﻊ اﻟوﺳﺎﺋد ﻋﻠﻰ رﺑﻠﺗﻲ اﻟﺳﺎﻗﯾن ﻓﻲ ﻧﻔس .اﻟﻣﻔﺻل...
- Page 62 اﺑدأ اﻟﻌﻼج اﻟﺧﺎص ﺑك اﻟﺧطوة ۱ – وﺿﻊ اﻟوﺳﺎﺋد ﻗم ﺑﺗﻧظﯾف وﺗﺟﻔﯾف اﻟﻣﻧطﻘﺔ اﻟﺻﺣﯾﺣﺔ ﺣﺗﻰ ﺗﻛون ﺧﺎﻟﯾﺔ ﻣن .ﺟﻣﯾﻊ ﻣﺳﺗﺣﺿرات اﻟﺗرطﯾب/اﻟزﯾوت/اﻟﻌرق/اﻟﻣراھم اﻟذراع اﻟظﮭر ﻣن أﺳﻔل ﻗم ﺑﺗوﺻﯾل ﻛﻼ اﻟوﺳﺎدﺗﯾن ﺿﻊ وﺳﺎدة واﺣدة ﺗﺣت وﻓوق ﻋﻠﻰ أﺣد ﺟﺎﻧﺑﻲ اﻟﻣﻧطﻘﺔ ،اﻟﻣﻧطﻘﺔ اﻟﺗﻲ ﺗﺷﻌر ﻓﯾﮭﺎ ﺑﺎﻷﻟم .اﻟﻣﺻﺎﺑﺔ...
- Page 63 ﺧطوات اﻟﺗﺟﻣﯾﻊ :ﻟﻠﻌﻼج اﻟﻣﺛﺎﻟﻲ اﻟﻐﺷﺎء اﻟﺑﻼﺳﺗﯾﻛﻲ اﻟذي " ﻋﻠﻰSKIN" • ﯾﻧﺑﻐﻲ أن ﺗظﮭر ﻛﻠﻣﺔ ﯾظﮭر ﻋﻠﻰ أﺣد ﺟﺎﻧﺑﯾﮫ ﺿﻊ اﻟوﺳﺎﺋد ﻋﻠﻰ أي ﺟﺎﻧب ﻣن ﺟﺎﻧﺑﻲ ﻣﻧطﻘﺔ اﻷﻟم، وﻟﯾس ( )اﻟﺟﻠدSKIN ﻛﻠﻣﺔ اﻟﺟﺎﻧب اﻟﻌﻠوي. ﻗم ﺑﺈزاﻟﺔ اﻟﻐﺷﺎء .ﻋﻠﻰ ﻣﻧطﻘﺔ اﻷﻟم ﻣﺑﺎﺷرة اﻟﺑﻼﺳﺗﯾﻛﻲ...
- Page 64 ﺧطوات اﻟﺗﺟﻣﯾﻊ اﻟﺧطوة ۲ – ﺿﻊ ﻗطﻊ اﻟﺟل ﻓوق اﻟوﺳﺎﺋد اﻟﺧطوة ۱ – ﺗﺣﺿﯾر اﻟوﺳﺎﺋد .• ﻗم ﺑﺈزاﻟﺔ ﻗطﻊ اﻟﺟل ﻣن اﻟﻐطﺎء اﻟﺑﻼﺳﺗﯾﻛﻲ اﻟﻣﻐﻠق .ﺿﻊ اﻟﻣﻘﺑس داﺧل اﻟﺟﺎﻧب اﻷﯾﺳر اﻟﺳﻔﻠﻲ ﻣن اﻟوﺣدة اﻟرﺋﯾﺳﯾﺔ ﻣﻼﺣظﺔ: ﯾوﺟد ﻏﺷﺎء ﻋﻠﻰ ﻛل ﺟﺎﻧب ﻣن ﺟواﻧب ﻛل ﻗطﻌﺔ ﻣن ﻗطﻊ...
- Page 65 اﻓﺣص اﻟوﺣدة واﺷﺣن اﻟﺑطﺎرﯾﺔ اﻟﺧطوة ۳ – اﻓﺻل ﻗﺎﺑس اﻟطﺎﻗﺔ ﺑﻣﺟرد اﻛﺗﻣﺎل أﯾﻘوﻧﺔ اﻟﺑطﺎرﯾﺔ ﺷﺣن اﻟﺑطﺎرﯾﺔ .ﻣﻼﺣظﺔ: ﻻ ﺗﻌﻣل اﻟوﺣدة اﻟرﺋﯾﺳﯾﺔ ﺑﯾﻧﻣﺎ ﯾﺗم ﺷﺣن اﻟﺑطﺎرﯾﺔ اﻟﻣﺣﺗوﯾﺎت ﺷﺎﺷﺔ اﻟﻌرض ﻣﻘﺑس اﻟﻛﮭرﺑﺎء .ﻣﺳﺗوى ﺷﺣن اﻟﺑطﺎرﯾﺔ ﻛﺎﻣل .ﻣﺳﺗوى ﺷﺣن اﻟﺑطﺎرﯾﺔ وﺻل إﻟﻰ اﻟﻧﺻف ﻣﺳﺗوى...
- Page 66 اﻓﺣص اﻟوﺣدة واﺷﺣن اﻟﺑطﺎرﯾﺔ اﻟﺧطوة ۲ – ﻗم ﺑﺈدﺧﺎل ﻗﺎﺑس اﻟطﺎﻗﺔ داﺧل ﻣﻘﺑس :ﺗﺄﻛد ﻗﺑل اﻻﺳﺗﺧدام ﻣﻣﺎ ﯾﻠﻲ اﻟﻛﮭرﺑﺎء .۱. اﻟﺳﻠك ﻏﯾر ﻣﻘطوع ﻣﻘﺑس اﻟﻛﮭرﺑﺎء .۲. ﻗطﻊ اﻟﺟل ﻏﯾر ﺗﺎﻟﻔﺔ .۳. اﻟوﺻﻠﺔ ﺑﯾن اﻟﺳﻠك واﻟوﺳﺎدة ﻏﯾر ﺗﺎﻟﻔﺔ .٤. اﻟوﺣدة ﺳﻠﯾﻣﺔ :ﻧﺻﺎﺋﺢ...
- Page 67 ﺗﻌرّ ف ﻋﻠﻰ وﺣدﺗك اﻷزرار ووظﺎﺋﻔﮭﺎ ﺧﯾﺎر اﻟﻌﻼج SET/START زر (زر )اﻟطﺎﻗﺔ أوﺿﺎع اﺿﻐط ﻋﻠﻰ ھذا اﻟزر اﺿﻐط ﻋﻠﻰ ھذا اﻟزر TENS ﻣرة واﺣدة ﻟﻠﺗﺷﻐﯾل ﻟﺗﺄﻛﯾد اﻟﻌﻼج، و/أو إﻋداد اﻟﺣرارة ،اﻟﺣرارة، و/أو اﻟوﺿﻊ وﻣرة أﺧرى ﻹﯾﻘﺎف .اﻟﺗﺷﻐﯾل و/أو ﺑدء إﺟراء ﻣﺳﺗوى...
- Page 68 ﺗﻌر ّ ف ﻋﻠﻰ وﺣدﺗك ﻣﺣﺗوﯾﺎت اﻟﻌﻠﺑﺔ ﺣﺎﻣل اﻟوﺳﺎدة ﺳﻠك ﻣﺗﺻل ﺑوﺳﺎﺋد اﻟوﺣدة اﻟرﺋﯾﺳﯾﺔ (HHP-CM11) ﻣﮭﺎﯾﺊ اﻟﺗﯾﺎر اﻟﻣﺗردد دﻟﯾل اﻟﺗﻌﻠﯾﻣﺎت (ﻗطﻊ اﻟﺟل )زوﺟﺎن Pain Reliever HeatTens (HV-F311-UK) • Pain Reliever. Instruction Manual. IM-HV-F311-UK-01-05/2018 3787476-5A اﻟﻣﻠﺣﻘﺎت اﻟطﺑﯾﺔ اﻻﺧﺗﯾﺎرﯾﺔ (93/42/EEC )ﻓﻲ ﻧطﺎق ﺗوﺟﯾﮫ اﻷﺟﮭزة اﻟطﺑﯾﺔ ﻟﻼﺗﺣﺎد اﻷوروﺑﻲ اﻟطراز...
- Page 69 اﺣﺗﯾﺎطﺎت وﺗﺣذﯾرات اﻷﻣﺎن اﻟﮭﺎﻣﺔ اﻟﺗﻔﺎﻋﻼت اﻟﺳﻠﺑﯾﺔ اﻟﻣﺣﺗﻣﻠﺔ اﻟﺳﻠك ﻻ ﺗﺳﺗﺧدم اﻟﺟﮭﺎز ﻟﻌﻼج ﻣﻧطﻘﺔ ﻣن اﻟﻣﻧﺎطق ﻟﻔﺗرات زﻣﻧﯾﺔ ﻻ ﺗﻘم ﺑﺈدﺧﺎل ﻗﺎﺑس اﻟﺳﻠك ﻓﻲ أي ﻣﻛﺎن آﺧر ﺑﺧﻼف اﻟﻣﻘﺑس طوﯾﻠﺔ )أﻛﺛر ﻣن ﺟﻠﺳﺔ واﺣدة ﻟﻣدة ۰۳ دﻗﯾﻘﺔ، وﺑﻣﺎ ﯾﺻل إﻟﻰ .اﻟﻣوﺟود ﻓﻲ اﻟوﺣدة ۳...
- Page 70 اﺣﺗﯾﺎطﺎت وﺗﺣذﯾرات اﻷﻣﺎن اﻟﮭﺎﻣﺔ ﻻ ﺗﻌﻣل اﻟوﺳﺎﺋد ﺑﺎﻟﺷﻛل اﻟﺻﺣﯾﺢ ﻣن دون ﻗطﻊ اﻟﺟل. ﻓﻠﻠﺣﻔﺎظ ،ﯾﺟب أﻻ ﺗﻼﻣس اﻟوﺳﺎﺋد أي أﺷﯾﺎء ﻣﻌدﻧﯾﺔ ﻣﺛل إﺑزﯾم اﻟﺣزام .ﻋﻠﻰ ﺳﻼﻣﺗك واﻟﺗﻣﺗﻊ ﺑﻔﻌﺎﻟﯾﺗﮭﻣﺎ، ﯾﻧﺑﻐﻲ اﺳﺗﺧداﻣﮭﻣﺎ ﻣ ﻌ ًﺎ أو اﻟﻘﻼدات، أو ﻏﯾر ذﻟك ﻣن اﻷﺷﯾﺎء اﻟﻣﻌدﻧﯾﺔ اﻟﺗﻲ ﯾﻣﻛن اﻻﺣﺗﯾﺎطﺎت...
- Page 71 ﻻ ﺗﺳﺗﺧدم اﻟﺟﮭﺎز ﻋﻠﻰ ﻣﻧﺎطق اﻟﺟﻠد اﻟﺣﺳﺎﺳﺔ أو ﻓﻲ .ﻋﻼج، ﻓﻼ ﺗﺗﺎﺑﻊ اﺳﺗﺧدام اﻟﺗﺣﻔﯾز ﻋﻠﻰ ﺗﻠك اﻟﻣﻧطﻘﺔ ﻣن اﻟﺟﻠد .اﻟﻣﻧﺎطق اﻟﺗﻲ ﺗﻌﺎﻧﻲ ﻣن ﺿﻌف اﻟدورة اﻟدﻣوﯾﺔ OMRON ﯾﻣﻛن اﺳﺗﺧدام اﻟوﺳﺎﺋد ﻣﻊ ﻗطﻊ اﻟﺟل اﻟﺧﺎﺻﺔ ﺑـ ﻻ ﺗﺳﺗﺧدم وظﯾﻔﺔ اﻟﺣرارة إذا ﻛﻧت ﻣرﯾ ﺿ ًﺎ ﺗﻌﺎﻧﻲ ﻣن ﻧﻘص .ﻓﻘط...
- Page 72 اﺣﺗﯾﺎطﺎت وﺗﺣذﯾرات اﻷﻣﺎن اﻟﮭﺎﻣﺔ :ﻻ ﺗﺿﻊ اﻟوﺳﺎﺋد ﻣطﻠ ﻘ ً ﺎ ﻋﻠﻰ ھذه اﻟﻣﻧﺎطق ﻣن اﻟﺟﺳم ﻋﻠﻰ ﻛﻼ اﻟﺳﺎﻗﯾن ﻓﻲ ﻧﻔس اﻟوﻗت ﻷن ذﻟك ﯾﻣﻛن .أن ﯾؤدي إﻟﻰ ﻣﺷﻛﻼت ﻓﻲ اﻟﻘﻠب .اﻟرأس أو اﻟﻔم أو أي ﺟزء ﻓﻲ اﻟوﺟﮫ ﻋﻠﻰ اﻟﺟزأﯾن اﻟﺳﻔﻠﯾﯾن ﻣن ﻛﻼ اﻟﻘدﻣﯾن ﻓﻲ ﻧﻔس اﻟرﻗﺑﺔ...
- Page 73 اﺣﺗﯾﺎطﺎت وﺗﺣذﯾرات اﻷﻣﺎن اﻟﮭﺎﻣﺔ ﻻ ﺗﺳﺗﺧدم اﻟﺟﮭﺎز ﻣﻊ ھؤﻻء اﻷﻓراد ﻟﻠﻣﺳﺗﺷﻔﯾﺎت واﻟﻌﯾﺎدات، اﻟﺗﺷﻐﯾل ﻋﻠﻰ ﻣﺳﺎﻓﺔ ﻗرﯾﺑﺔ ﻟﻠﻐﺎﯾﺔ )ﻋﻠﻰ • .اﻟﺳﯾدات اﻟﺣواﻣل ﻣﺳﺎﻓﺔ ﻣﺗر واﺣد ﺗﻘرﯾ ﺑ ًﺎ( ﻣن ﺟﮭﺎز طﺑﻲ إﻟﻛﺗروﻧﻲ ﻋﻼﺟﻲ ﯾﻌﻣل ﻻ ﺗﺳﺗﺧدم اﻟﺟﮭﺎز ﻋﻠﻰ اﻷطﻔﺎل اﻷﺻﻐر ﻣن ٥۱ ﻋﺎ ﻣ ًﺎ ﻷن ﺑﺎﻟﻣوﺟﺎت...
- Page 74 اﺣﺗﯾﺎطﺎت وﺗﺣذﯾرات اﻷﻣﺎن اﻟﮭﺎﻣﺔ ﻣن اﻟﻣﮭم اﻻطﻼع ﻋﻠﻰ ﺟﻣﯾﻊ اﻟﺗﺣذﯾرات واﻻﺣﺗﯾﺎطﺎت ﺧطر اﻟواردة ﻓﻲ ھذا اﻟدﻟﯾل ﻟﻺرﺷﺎدات، ﺣﯾث إﻧﮭﺎ ﺗﮭدف إﻟﻰ :ﻻ ﺗﺳﺗﺧدم ھذه اﻟوﺣدة ﻣﻊ اﻷﺟﮭزة اﻷﺧرى اﻟﺗﺎﻟﯾﺔ اﻟﺣﻔﺎظ ﻋﻠﻰ ﺳﻼﻣﺗك، وﻣﻧﻊ ﺗﻌرﺿك ﻟﻺﺻﺎﺑﺎت، وﻛذﻟك ً إذا ﻛﻧت ﺗﺳﺗﺧدم ﻣﻧظم ﻧﺑﺿﺎت اﻟﻘﻠب، أو ﻣزﯾ ﻼ •...
- Page 75 اﻟﻣﻘدﻣﺔ وﻣﻧذ ﺳﺑﻌﯾﻧﯾﺎت اﻟﻘرن اﻟﻌﺷرﯾن، ﺗم اﺳﺗﺧدام أﺳﻠوب ﺗﺧﻔﯾف اﻷﻟم ﺑﺷﻛل واﺳﻊ اﻟﻧطﺎق ﻣن ﺧﻼل اﻟﻌدﯾدTENS اﻟﻣﻌﺗﻣد ﻋﻠﻰ ﺗﻘﻧﯾﺔ ﻣن ﻣﺣﺗرﻓﻲ اﻟرﻋﺎﯾﺔ اﻟﺻﺣﯾﺔ، ﻣﺛل ﻣﺗﺧﺻﺻﻲ اﻟﻌﻼج اﻟطﺑﯾﻌﻲ .وﻣﺗﺧﺻﺻﻲ ﺗﺧﻔﯾف اﻷﻟم اﻟﻣﺳﺗﺧدم اﻟﻣﻘﺻود ﻣن اﻟﺿروري اﺳﺗﺧدام ھذه اﻟوﺣدة ﻣن ﻗ ِﺑل اﻟﺑﺎﻟﻐﯾن اﻟﻘﺎدرﯾن ﻋﻠﻰ...
- Page 76 اﻟﻣﻘدﻣﺔ .OMRON اﻟﺧﺎص ﺑﺷرﻛﺔHeatTens ﺷﻛرً ا ﻟك ﻟﺷراﺋك ﻣﻧﺗﺞ ۳. ﯾﻌﻣل ﻋﻠﻰ ﺗﺣﺳﯾن اﻟدورة اﻟدﻣوﯾﺔ )ﻧﺗﯾﺟﺔ ﺗﻛرار اﻧﻘﺑﺎض .(اﻟﻌﺿﻼت واﻧﺑﺳﺎطﮭﺎ ﻻﺳﺗﺧدام اﻟوﺣدة ﺑﺷﻛل آﻣن، ﻗم ﺑﻘراءة اﻟدﻟﯾل اﻟﻛﺎﻣل ﺑﻌﻧﺎﯾﺔ ﻗﺑل .اﻟﺷروع ﻓﻲ اﺳﺗﺧدام اﻟوﺣدة ﻟﻠﻣرة اﻷوﻟﻰ اﺣﺗﻔظ ﺑﮭذا اﻟدﻟﯾل ﻟﻺرﺷﺎدات ﻓﻲ ﻣﻛﺎن ﻣﻧﺎﺳب أو ﺿﻌﮫ ﻣﻊ...
- Page 77 ﺟدول اﻟﻣﺣﺗوﯾﺎت اﻟﺧطوة ٤ – اﺧﺗر وﺿ ﻌ ً ﺎ واﺣ د ً ا ﻣن ﺑﯾن ﺗﺳﻌﺔ ۲ ..........ﻗﺑل اﺳﺗﺧدام اﻟوﺣدة ۲۱ .......TENS أوﺿﺎع ﻟﺗﻘﻧﯾﺔ ۲ ............اﻟﻣﻘدﻣﺔ اﻟﺧطوة ٥ – ﺣدد ﻣﺳﺗوى اﻟﻛﺛﺎﻓﺔ اﻟﻣﻔﺿل ٤ .......اﺣﺗﯾﺎطﺎت وﺗﺣذﯾ ر ات اﻷﻣﺎن اﻟﮭﺎﻣﺔ ۲٤...
- Page 78 Manufacturer OMRON HEALTHCARE Co., Ltd. 53, Kunotsubo, Terado-cho, Muko, KYOTO, اﻟﺷرﻛﺔ اﻟ ﻣ ُ ﺻﻧﻌﺔ 617-0002 JAPAN EU-representative OMRON HEALTHCARE EUROPE B.V. Scorpius 33, 2132 LR Hoofddorp, ﺟﮭﺔ اﻟﺗﻣﺛﯾل ﺑﺎﻻﺗﺣﺎد اﻷوروﺑﻲ THE NETHERLANDS www.omron-healthcare.com Production facility OMRON DALIAN Co., Ltd.