
Related Manuals for Omron HeatTens HV-F311-E


Summary of Contents for Omron HeatTens HV-F311-E
- Page 1 Pain Reliever HeatTens (HV-F311-E) IM-HV-F311-E-01-07/2017 3136082-4A...
-
Page 2: Table Of Contents
Table of Contents STEP 4 – Pick 1 out of 9 TENS Introduction ..........3 Modes .......22 Important Safety Precautions and STEP 5 – Select the Preferred Warnings ..........5 Intensity Level (1 low - Know Your Unit ........11 20 high) ...... - Page 3 Thank you for purchasing the OMRON 3. Improves the blood circulation (as result HeatTens. of repeated muscle contracting and In order to use the unit safely, read the relaxing). complete manual carefully before using the Keep this instruction manual in a convenient...
-
Page 4: Introduction
Introduction Since the 1970s, pain relief based on TENS has been widely used by many healthcare professionals, such as physiotherapists and pain specialists. This unit is intended to be operated by adults who can understand this instruction manual. It is not for professional use in hospitals or other medical facilities, it is intended for home use only. -
Page 5: Important Safety Precautions And Warnings
It is important that you read all the DANGER warnings and precautions included in this instruction manual because they are intended to keep you safe, prevent If you have a pacemaker, implanted injury and avoid a situation that could metallic or electronic device. Such result in damage to the unit. - Page 6 Important Safety Precautions and Warnings For Hospitals and Clinics, operation in Pregnant women. close proximity (e.g. 1 m) to a shortwave Do not use on children under 15 years or microwave therapy Medical Electronic old because this unit has not been equipment may produce instability to the evaluated for pediatric use.
- Page 7 Important Safety Precautions and Warnings NEVER APPLY THE PADS TO THESE On both legs at the same time BODY AREAS: because this may cause cardiac disturbance. The head, the mouth, or any area of the face. On the bottom of both feet at the same time because this may The neck or any area of the cause cardiac disturbance.
- Page 8 Do not use heat function if you are a patient stimulation in that area of the skin. with a lack of temperature sensation. The pads can only be used with OMRON If used on the elderly, use caution due to gels.
- Page 9 Important Safety Precautions and Warnings Pads should not touch any metal object, The pads do not work correctly without such as a belt buckle, necklace, or other the gels. For safety and effectiveness, metal worn under clothing. they must be used together. Do not share pads with another person.
- Page 10 Important Safety Precautions and Warnings Do not insert the cord plug into any place Do not use to treat one region for other than the jack on the unit. extended periods of time (more than Do not pull on the cord during treatment. one 30 minutes a session, up to 3 times/ Do not bend or pull the end of the cord.
-
Page 11: Know Your Unit
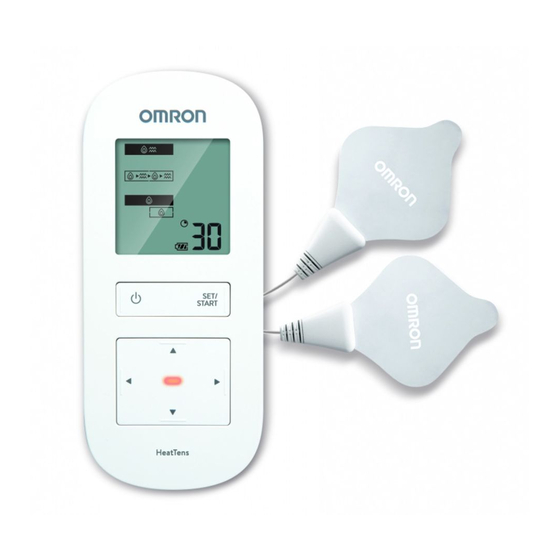
Package Contents Main Unit Cord with Pads Pad Holder Gels (2 pairs) Instruction Manual AC Adapter (HHP-CM11) Optional Medical Accessories (within the scope of EC Medical Device Directive 93/42/EEC) Gels HV-PAD-3E (Contents: 4 pairs) -
Page 12: Buttons And Their Functions
Know Your Unit Buttons and Their Functions (power) SET/START Therapy Button Choice Button TENS Push once for Push to Modes confirm the Heat for OFF. therapy, heat Setting and mode Intensity Minutes and/or to start level Remaining the therapy. of Therapy Red Glow Pad Icon Battery Icon... -
Page 13: Inspect Unit And Charge Battery
STEP 2 – Insert the Power Plug into an Outlet Outlet icon blinks on the display. We recommend charging the battery to a Charging full 100% charge. It takes about 5 hours to charge once battery is empty. Once fully charged, the battery will last for 4 times 30 minutes uses on average. -
Page 14: Battery Icon
Inspect Unit and Charge Battery Battery Icon STEP 3 – Unplug Power Plug Once the Battery is Fully Charged While the battery is charging, the main unit does not work. Outlet Battery charge is full. Battery charge is half. Battery is close to low. Battery is depleted. -
Page 15: Assembly Steps
STEP 1 – Prepare Pads STEP 2 – Place Gels onto the Pads Put the jack into the bottom left side of the main unit. bag. text) the other side has text (“SKIN”). Blank Plastic Film Do not turn the unit on, until pads are on your skin. -
Page 16: Step 3 - Attach The Pads To The Body
Assembly Steps “SKIN” Side’s Plastic Film on top. Remove the “SKIN” the pads onto the skin. STEP 3 – Attach the Pads to the Body Clean and dry the applicable skin area so it is free of all lotions/oils/sweat/ointment. Unplug the AC Adapter when using Make sure that pads stick to the skin. -
Page 17: Get Started With Your Therapy
STEP 1 – Pad Placement Clean and dry the proper area so it is free of all lotions/oils/sweat/ointment. LOWER BACK Attach 1 pad below Attach both pads and above the on either side of the region in pain, both area with pain. on same side. - Page 18 Get Started with Your Therapy STEP 1 – Pad Placement JOINT (KNEE) (CALF) Attach both pads above the knee or Attach both pads on the calf with pain. above and below the joint with pain. Outside Inside FOOT (ANKLE) Attach the pads on the left for pain on the outside of your ankle/foot.
- Page 19 Get Started with Your Therapy STEP 1 – Pad Placement SHOULDER Attach both pads on the shoulder according to your pain. SHOULDER Attach 1 pad on the front and on the back of your shoulder.
-
Page 20: Step 2 - Pick Your Preferred Therapy
Get Started with Your Therapy Therapy STEP 2 – Pick your Preferred - Heat 15 min, TENS 15 min Therapy Push (power) button to turn on. Select 1 arrow buttons. Next, push SET/START to HEAT TENS START 15 min 30 min Therapy - Short sessions of HEAT / TENS/ HEAT / TENS alternating for 30 min. -
Page 21: Step 3 - Pick Heat Setting
Get Started with Your Therapy Therapy - Electrical Stimulation only (for 30 min). 15 min 30 min START STEP 3 – Pick Heat Setting Select Heat (Low) or (High) using the Heat... -
Page 22: Step 4 - Pick 1 Out Of 9 Tens Modes
Get Started with Your Therapy STEP 4 – Pick 1 out of 9 TENS Modes Any of the modes can be used on body Select a (TENS Mode) using the parts or pains described in this manual. 4 arrow buttons. Next, push SET/START to Select the mode that feels comfortable for your pain. - Page 23 Get Started with Your Therapy STEP 4 – Pick 1 of 9 Modes Potential conditions Sensation Stiffness, soreness, tight Series of low rate tapping feeling. sensations. Stiffness, sore or achy, Series of medium rate knotty muscles, tight pulsing sensations to feeling.
- Page 24 Get Started with Your Therapy STEP 4 – Pick 1 of 9 Modes Potential conditions Sensation Stiffness, soreness, Series of high rate to low tingling muscle spasm, nerve sensations, followed by tapping. pain. With higher intensity, you may feel kneading or massage-like sensations. Swelling, fatigue, Series of low to medium tapping and stiffness, muscle or...
-
Page 25: Step 5 - Select The Preferred Intensity Level (1 Low - 20 High)
Get Started with Your Therapy STEP 5 – Select the Preferred The unit will operate for 30 minutes before Intensity Level (1 low - 20 high) it automatically shuts off. A maximum of Push SET/START to start at the lowest one 30 minute therapy per session, up to intensity level and slowly increase it by 3 times/day, is recommended. -
Page 26: How To Manage And Reduce Your Pain
Use as soon as your pain begins. Start with 1 session (the unit automatically turns off after 30 minutes). Turn off with pads still on the skin. 1. If you experienced an adverse reaction If you get to your pain early, it may prevent (skin irritation/redness/burns, headache the pain from becoming worse, or even or other painful sensation, or if you feel... -
Page 27: Cleaning The Cord With Pads
1. Turn the unit off and disconnect the cord with pads from the unit. 2. Clean with a cloth lightly moistened or soaked in a neutral (mild) cleaning 1. Remove the gel and discard before solution and wipe gently. cleaning the pad. 2. -
Page 28: Cleaning And Storage
Cleaning and Storage 1. Turn the unit off and remove the cord from the bottom of the unit. Otherwise, it may damage the cord. 2. Remove the pads from your body. Storage temperature 3. Place the pads Pad facing 0 to +40 °C / 30 to 80 % relative down on the pad humidity. - Page 29 device is within 30cm. If the problem persists, refer to the table below. Are you using only 1 pad? Put the other pad on your skin. You must use both pads for therapy to work. from the gels? surface of gels. Are the pads stacked together or do Check placement of pads.
- Page 30 Troubleshooting The battery may be depleted. Recharge the battery fully. Is the battery properly charged? Check if the AC Adapter is properly connected to the unit. Check if AC Adapter is connected to a power outlet. The battery charge may be extremely Recharge the battery fully.
- Page 31 Troubleshooting from the gels? surface of gels. Is the pad wet? Or is your skin too wet? Air dry the pads. Or dry the skin. Is there any lotions/oils/sweat/ointment Clean and dry skin. on skin? The gel may be damaged. Replace the gel.
- Page 32 Troubleshooting Only 1 pad is attached, or both pads Re-attach dislocated pad(s) onto the are not attached. the gel? surface of gels. Is the cord properly connected to the Connect the cord plug correctly into the main unit? jack at the bottom of the main unit. Is the adhesive surface of gels dirty Replace the gels.
- Page 33 Troubleshooting The cord with pads may be short- Stop using the unit immediately, and circuited. refer to the warranty conditions. Device error. The main unit may be broken. Stop using the unit immediately, and refer to the warranty conditions. The unit is being used outside of the Leave the unit within the operating operating temperature.
- Page 34 Product Category Electroanalgestic Transcutaneous Stimulators Product Description Pain Reliever Model (code) HeatTens (HV-F311-E) Power Source AC Adapter (INPUT 100V-240V 50Hz-60Hz, 10-15VA) Lithium-ion battery built in (3.7 V; Approx. 1510 mAh) Battery Life Will last for 500 times usage when fully charged and in normal temperatures of 23 °C Frequency Approx.
- Page 35 Internally powered (Operating), Class II (AC Adapter), Type BF (Applied part: Gels), IP22 (Ingress Protection) This OMRON product is produced under the strict quality system of OMRON HEALTHCARE Co., Ltd., Japan. Designed for a minimum of 5 years life expectancy except gels. Gels can be used up to 30 times.
- Page 36 Technical Data Description of symbols that, depending on a model, can be found on the product itself, product sales package or IM This product should not be used by persons with medical implants, e.g. heart Applied part - Type BF Degree of protection against electric shock (leakage current) Ingress protection degree IP XX...
- Page 37 HV-F311-E manufactured by OMRON HEALTHCARE Co., Ltd. conforms to EN60601-1-2:2015 Electro Magnetic Compatibility (EMC) standard. Further documentation in accordance with this EMC standard is available at OMRON HEALTHCARE EUROPE at the address mentioned in this instruction manual or at www.omron-healthcare.com. Refer to the EMC information for HV-F311-E on the website.
- Page 38 Transport costs and risks of transport. described in the instruction manual. b. Costs for repairs and / or defects resulting This product is warranted by OMRON for a from repairs done by unauthorised persons. period of 3 years after the date of purchase.
- Page 39 Warranty Should (warranty) service be required please apply to the dealer whom the product was purchased from or an authorised OMRON distributor. For the address refer to the product packaging / literature or to your website (www.omron-healthcare.com) for contact information.
- Page 40 Manufacturer OMRON HEALTHCARE Co., Ltd. Fabricant 53, Kunotsubo, Terado-cho, Muko, KYOTO, Hersteller 617-0002 JAPAN Fabricante Produttore Fabrikant Производитель Üretici ﺍﻝﺵﺭﻙﺓ ﺍﻝ ﻡ ُ ﺹﻥﻉﺓ EU-representative OMRON HEALTHCARE EUROPE B.V. Mandataire dans l’UE Scorpius 33, 2132 LR Hoofddorp, EU-Repräsentant THE NETHERLANDS Representante en la UE www.omron-healthcare.com...