Advertisement
Quick Links
INSTALLATION INSTRUCTIONS FOR PART 99-3308G
Chevy Equinox / GMC Terrain 2013-up
KIT FEATURES
•
ISO DIN radio provision with pocket
• ISO DDIN radio provision
• Painted gray to match factory finish
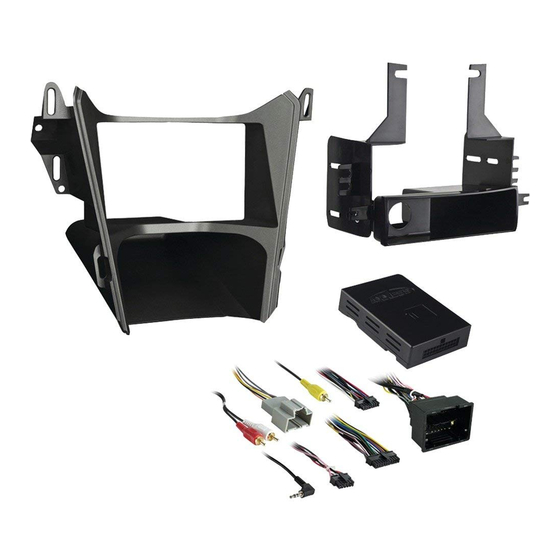
KIT COMPONENTS
• A) Radio trim panel • B) Radio brackets • C) Pocket • D) (6) #8 x 3/8" Phillips screws
• E) (2) #10 x ¾" Phillips screws • F) (2) #10 panel clips • G) Axxess interface and wiring harness (not shown)
A
B
WIRING & ANTENNA CONNECTIONS (sold separately)
Wiring Harness: • Axxess interface and harness included
Antenna Adapter: • 40-EU55
METRA. The World's best kits.
(with color display)
99-3308G
D
C
®
Dash Disassembly ................................................. 2
Kit Preparation ....................................................... 3
- ISO DIN radio provision with pocket ...................... 4
- ISO DDIN radio provision ...................................... 4
Axxess Interface Installation .............................5-7
TOOLS REQUIRED
• Panel removal tool • Phillips screwdriver
• 9/32" socket wrench
E
F
CAUTION!
and especially air bag indicator lights must be connected before
cycling the ignition. Also, do not remove the factory radio with
the key in the on position, or while the vehicle is running.
Table of Contents
All accessories, switches, climate controls panels,
Advertisement

Related Manuals for Metra Electronics 99-3308G


Summary of Contents for Metra Electronics 99-3308G
-
Page 1: Table Of Contents
INSTALLATION INSTRUCTIONS FOR PART 99-3308G Table of Contents Chevy Equinox / GMC Terrain 2013-up (with color display) Dash Disassembly ..........2 99-3308G Kit Preparation ............3 Kit Assembly – ISO DIN radio provision with pocket ...... 4 KIT FEATURES – ISO DDIN radio provision ........4 •... -
Page 2: Dash Disassembly
99-3308G Dash Disassembly 1. With pocket above factory radio 5. Remove (4) 9/32” screws to remove controls - Remove (2) 9/32” the pocket/CD slot panel. Remove screws from inside the pocket, the power outlet and attach it to the then unclip and remove the pocket. -
Page 3: Kit Preparation
99-3308G Kit Preparation 1. A small section of the sub-dash must be cut with a cutting tool to allow the radio to fit: a. Remove the lip from the section of dash just above the original CD slot location by cutting along the dotted line. -
Page 4: Kit Assembly
99-3308G Kit Assembly ISO DIN radio provision with pocket ISO DDIN radio provision 1. Attach the pocket to the radio 1. Attach the radio brackets to the brackets using the (4) #8 x 3/8” radio using the screws supplied Phillips screws provided. -
Page 5: Axxess Interface Installation
99-3308G Axxess Interface Installation Connections to be made From the 16-pin harness with stripped leads to the aftermarket radio: INTERFACE FEATURES • Provides accessory power (12-volt 10-amp) • Connect the (2) Red wires to the accessory wire. • Retains R.A.P. (retained accessory power) Note: If installing an ASWC-1 (sold separately), there will be an accessory wire •... - Page 6 99-3308G Connections to be made Final Assembly (cont.) From the 3308 harness to the aftermarket radio: With the key in the off position: • Connect the Black wire to the ground wire. 1. Connect the 16-pin harness with stripped leads, and the 3308 harness, into the interface.
- Page 7 99-3308G Final Assembly Backup Camera Settings (cont.) 6. Chime level adjustment: From the main OEM screen: a. With the vehicle on, turn it off and leave the keys in the ignition. Open the driver’s door; chimes will be heard. b. Wait 10 seconds, and then with...