Samsung SF 5100 User Manual
Laser facsimile
Hide thumbs
Also See for SF 5100:
- Technical document (11 pages) ,
- Service manual (192 pages) ,
- Manual del usuario (101 pages)
Table of Contents
Advertisement
Quick Links
Advertisement
Table of Contents
Troubleshooting

Related Manuals for Samsung SF 5100


Summary of Contents for Samsung SF 5100
- Page 1 00-Cover 12/10/99 5:16 AM Page 1 Laser Facsimile User’s Guide SF-5100/SF-5100P...
- Page 2 12/10/99 6:42 AM Page 1 Trademark Notices • SF-5100, SF-5100P and Samsung Logo are trademarks of Samsung Electronics Co., Ltd. • Windows is a trademark of Microsoft Corporation. • IBM is a trademark of international Business Machines. • Centronics is a trademark of Centronics Data Computer Corporation.
-
Page 3: Table Of Contents
01-Contents 12/10/99 6:42 AM Contents Installation Chapter 1 Getting started Chapter 2 Basic operation Chapter 3 Page 2 Unpacking _________________________________________ 1.1 Control locations and functions _______________________ 1.2 Choosing a location _________________________________ 1.4 Setting up your machine _____________________________ 1.4 Document tray ___________________________________ 1.4 Paper exit tray ___________________________________ 1.4 Document exit tray _______________________________ 1.5 Handset and handset cradle _______________________ 1.5... - Page 4 01-Contents 12/10/99 6:42 AM Advanced fax Chapter 4 Page 3 Receiving a fax Receiving a fax ______________________________________3.6 Receiving automatically in FAX mode __________________3.7 Receiving manually in TEL mode ______________________3.7 Receiving in AUTO mode ____________________________3.8 Receiving automatically in ANS/FAX mode ____________3.8 Receiving manually using an extension telephone _______3.9 Making a copy Copying overview ___________________________________3.10...
-
Page 5: Chapter 6 Troubleshooting
01-Contents 12/10/99 6:42 AM Additional features Chapter 5 Troubleshooting Chapter 6 Page 4 Printing reports______________________________________ 5.1 System setup ________________________________________ 5.2 Group dialling_______________________________________ 5.7 Clearing memory ____________________________________ 5.9 Troubleshooting Clearing jams _______________________________________ 6.1 LCD error messages _________________________________ 6.5 Fixing problems _____________________________________ 6.7 Maintenance Cleaning the OPC drum ______________________________ 6.9 Adjusting shading ___________________________________ 6.10... -
Page 6: Important Safety Information
01-Contents 12/10/99 6:42 AM Important safety information Always be careful when using the machine. To reduce the risk of fire, electrical shock, and other injuries, keep these safety considerations in mind when installing, using, and maintaining your machine: • Stability. Place the machine on a secure, stable surface. The machine can be seriously damaged if it falls. - Page 7 01-Contents 12/10/99 6:42 AM Precautions When using your machine, these precautions should always be followed. 1. Never push objects of any kind into your machine through the case or cabinet openings. They may touch dangerous voltage points, creating a risk fire or shock. Never spill liquid of any kind onto or into the machine.
-
Page 8: Safety Notes
01-Contents 12/10/99 6:42 AM Safety notes Your machine and the supplies are designed and tested to meet strict safety requirements. Included are safety agency examination and approval and compliance to established environmental standards. Please read the following instructions carefully before operating your machine, and refer to them as needed to ensure the continued safe operation of your machine. - Page 9 02-Installation 12/10/99 6:27 AM Page 2 Installation...
-
Page 10: Unpacking
02-Installation 12/10/99 6:28 AM Unpacking Once you have unpacked your machine, check to make sure that you have all the parts shown here. If any piece is missing or broken, call your dealer. Machine Handset cradle CD-ROM (For SF-5100P only. For information on installing the CD-ROM, see the SF-5100P exclusive user’s guide.) Printer cable... -
Page 11: Control Locations And Functions
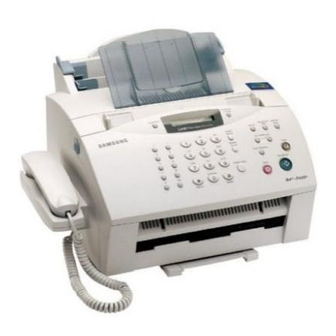
02-Installation 12/10/99 6:28 AM Control locations and functions Take a moment to familiarize yourself with the main components and to understand their functions. Front view Paper guides Document tray Document feeder Control panel Document exit tray Note: Your machine may look slightly different than the illustration. Installation Page 4 Paper exit tray... - Page 12 02-Installation 12/10/99 6:28 AM Page 5 Rear view Power cord connector Telephone line jack Extension telephone jack Printer cable connector Inside Cover Toner cartridge Cover release buttons (right and left) Installation...
-
Page 13: Choosing A Location
02-Installation 12/10/99 6:28 AM Choosing a location To help guarantee the trouble-free operation of your machine, place it on a flat, stable surface near your workstation. Leave enough space to allow for easy paper loading and paper exiting, as well as opening the front cover. -
Page 14: Document Exit Tray
02-Installation 12/10/99 6:28 AM Document exit tray Insert the two tabs on the document exit tray into the slots on the front of your machine. Fold out the extender on the tray, if necessary. Handset and handset cradle 1. Plug the end of the coiled cord of the handset into the jack on the left side of your machine. - Page 15 02-Installation 12/10/99 6:28 AM 3. Attach the handset cradle to the main body. Insert the two tabs of the cradle into the slots on the left side of the machine as shown, and while pressing part A on the bottom of the cradle, push the cradle toward the machine until it clicks into place.
-
Page 16: Telephone Line
02-Installation 12/10/99 6:28 AM Telephone line Plug one end of the telephone line cord into the LINE jack on the back of the machine and the other end into a standard phone wall jack. Note: You must use the telephone line cord which is supplied with your machine. Extension phone (optional) If you want to use a regular phone or answering machine with your machine, connect the phone into the EXT. -
Page 17: Ac Power Cord
02-Installation 12/10/99 6:28 AM Power cord Plug one end of the cord into the back of the machine and the other end into a standard AC power outlet. The machine will turn on and the display will show ‘SYSTEM INITIAL’. If there is no cartridge installed or no paper, the display will show ‘JAM/NO CARTRIDGE’... -
Page 18: Installing The Toner Cartridge
02-Installation 12/10/99 6:28 AM Installing the toner cartridge 1. Pulling the cover release buttons found on both sides of the machine toward you, open the cover. 2. Unpack the cartridge from its plastic bag, and then remove the paper rolled the cartridge. Holding on each end of the paper, pull it straight out, and then carefully remove it. - Page 19 02-Installation 12/10/99 6:28 AM Page 12 4. Find the cartridge slots inside the machine, one on each side. 5. Grasp the handle at the front of the cartridge and slide it down between the cartridge slots, and push it firmly. 6.
-
Page 20: Loading Paper
02-Installation 12/10/99 6:28 AM Loading paper For best results, use high quality xerographic paper. The automatic paper feeder can hold a maximum of 150 sheets of plain paper. The maximum capacity may be less, depending on the paper thickness. Note: SF-5100P contains a manual paper feeder which allows you to feed print 1. - Page 21 02-Installation 12/10/99 6:28 AM 3. Insert the paper with the print side facing you. 4. Adjust the paper guides to the width of the print material. Slide the guides until they lightly touch the stack of print material. Do not bend the print material.
-
Page 22: Paper Type And Size
02-Installation 12/10/99 6:28 AM Paper type and size Satisfactory print and receive quality can be obtained with many types of plain paper. Since the quality of plain paper varies widely, test the print quality before buying large quantities of paper. Your machine uses a variety of papers including: •... -
Page 23: Printing A Demo Page
02-Installation 12/10/99 6:28 AM Page 16 Printing a demo page After installation, you may want to run a simple test on your machine by printing out a demo page. Press and hold down Demo (* button) on the control panel until the machine to print a demo page. -
Page 24: Getting Started
03-Getting Started 12/10/99 6:19 AM Page 1 Getting started... -
Page 25: Using The Control Panel
03-Getting Started 12/10/99 6:19 AM Using the control panel d i a l Use to call most frequently used Getting started Page 2 The display shows the current status of Resolution PQRS Demo Use to dial numbers manually or to enter letters. Press and hold down this button to print a demo page. - Page 26 03-Getting Started 12/10/99 6:19 AM (Receiving mode)/ When a document is loaded, use to choose the contrast characteristic of copied or transmit- ted documents. Rcv.Mode/ Contrast Setup Flash/ Status Scroll/Volume Redial/ Pause Search/Delete WXYZ OHD/V.Req Stop Speed Use to perform a switch-hook operation such as call waiting. Also use to switch the LCD while performing dual jobs.
-
Page 27: Using The Number Keypad
03-Getting Started 12/10/99 6:19 AM Using the number keypad As you perform various tasks, you will need to enter names and num- bers. For example, when you set up your machine you enter your name (or your company’s name) and telephone number. When you store a one- touch dial or speed dial, you also enter the telephone numbers and names. -
Page 28: Keypad Character Assignments
03-Getting Started 12/10/99 6:19 AM 2. When the letter you want appears on the display, press another num- ber key labeled with the next letter you want. If the next letter is printed on the same number button, move the cursor by pressing ❿, then press the button. - Page 29 03-Getting Started 12/10/99 6:19 AM Page 6 Entering numbers You can enter the number of the remote fax machine manually by using the number keypad. The number you pressed appears on the display. TEL:95551212_ When the display asks you to enter a number, you can also use a one- touch dial button (including group dial) or a 2-digit speed dial number.
-
Page 30: Setting Up Your Fax Number And Name
03-Getting Started 12/10/99 6:19 AM Setting up your fax number and name Your fax number and name will be printed at the top of each page sent from your machine. 1. Press Setup on the control panel. The display shows the first setup menu;... -
Page 31: Setting The Time And Date
03-Getting Started 12/10/99 6:19 AM Setting the time and date The current time and date are shown on the display when the machine is on and ready for use (standby mode). The time and date are printed on all faxes you send. Note: If power to the machine is cut off for over 30 minutes, when power 1. -
Page 32: Adjusting Volume
03-Getting Started 12/10/99 6:19 AM Adjusting volume Ringer volume 1. Press ➛!or ❿ in standby mode. The display shows the current ringer volume setting. 2. Press ➛!or ❿!until you find the desired loudness. Four levels are available; 0~3. You will hear the selected volume and the display will show the level. Setting ‘0’... -
Page 33: Basic Operation
04-Basic 12/10/99 6:09 AM Page 2 Basic operation... -
Page 34: Sending A Fax
04-Basic 12/10/99 6:09 AM Sending a fax Preparing documents for faxing or copying You can use the machine to fax or copy documents that are printed on standard letter or A4 size paper. Follow these guidelines to prepare your documents. •... -
Page 35: Setting Document Resolution And Contrast
04-Basic 12/10/99 6:09 AM Page 4 Setting document resolution and contrast We recommend sending documents printed using a typewriter, felt tip pen, black ink or laserwriter. The paper should be white or very light, and of normal weight – not cardboard. Blue lines on a ruled pad do not fax well. When you send normal documents, you need not adjust the resolution and the contrast. -
Page 36: Loading Document
04-Basic 12/10/99 6:09 AM Loading document 1. Turn the page face down. 2. Adjust the document guides to match the width of the document. 3. Slide the sheet down into the document feeder until it is gripped by the machine. Document guide The automatic document feeder seizes and pulls in the page. -
Page 37: Sending A Fax Automatically
04-Basic 12/10/99 6:09 AM Sending a fax automatically 1. After loading a document, enter the number of the remote fax machine using the number keypad. One-touch or speed dialling is also available if you have already stored the number into a one-touch or speed dial number. For information on storing and using numbers in the memory, see page 3.14. -
Page 38: Voice Request
04-Basic 12/10/99 6:09 AM Automatic redial When you send a fax, if the number you have dialled is busy or there is no answer, the machine will automatically redial the number every three minutes up to a maximum of two times. The display shows ‘RETRY REDIAL?’. -
Page 39: Receiving A Fax
04-Basic 12/10/99 6:09 AM Receiving a fax Receiving a fax Receiving modes Your machine has four receiving modes: • In FAX mode, the machine answers an incoming call and immediately goes into receive mode, waiting for a fax to be sent. •... -
Page 40: Receiving Automatically In Fax Mode
04-Basic 12/10/99 6:09 AM Distinctive ring pattern detection (DRPD) You can receive a call using distinctive ring pattern detection (DRPD) feature. “Distinctive ring” is a telephone company service which enables a user to use a single telephone line to answer several different telephone numbers. -
Page 41: Receiving In Auto Mode
04-Basic 12/10/99 6:09 AM Receiving in AUTO mode 1. Press Rcv.Mode/Contrast until the display shows ‘AUTO MODE’. 2. When you get a call, the machine answers it. If a fax is being sent, the machine goes into receiving mode. If the machine does not detect a fax signal, it will continue ringing to tell you it is a phone call. -
Page 42: Receiving Manually Using An Extension Telephone
04-Basic 12/10/99 6:09 AM Receiving manually using an extension telephone This features works best when you are using an extension telephone connected to the extension telephone line jack on the machine. You can receive a fax from someone you are talking to on the extension telephone without having to go to the fax machine. -
Page 43: Making A Copy
04-Basic 12/10/99 6:09 AM Making a copy Copying overview The resolution is automatically set to SUPER FINE while the copy feature is in use. However, the contrast can be changed to produce optimal copy quality for a particular document containing faint markings, dark image, photographs or other halftone images. -
Page 44: Advanced Copy Features
04-Basic 12/10/99 6:09 AM Advanced copy features You can adjust the copy quantity, size and collation. Take the following steps: 1. Load a document with the print side facing down. If necessary, adjust Rcv.Mode/Contrast button to change the contrast. For details on the contrast, see page 3.2. -
Page 45: Other Functions
04-Basic 12/10/99 6:09 AM Other functions Redial To redial the number last called Press Redial/Pause. If a document is loaded in the document feeder, the machine automatically begins to send. To search through redial memory 1. Press and hold Redial/Pause for 2 seconds. The redial memory in your machine retains the last 10 numbers called. -
Page 46: Sending A Recall
04-Basic 12/10/99 6:09 AM Sending a recall Some special phone services require a switch-hook signal for proper operation. For example, if you have call-waiting, you can put a call on hold and take a second call on the same line by pressing the Flash/Status button. -
Page 47: Automatic Dialling
04-Basic 12/10/99 6:09 AM Automatic dialling One-touch dialling One-touch dialling lets you use any one of the 10 one-touch buttons to automatically dial a number. Storing a number for one-touch dialling 1. Press and hold one of ten one-touch buttons for 2 seconds that you want to assign. - Page 48 04-Basic 12/10/99 6:09 AM 3. The display asks you to enter a name. Enter the desired name. For information on how to enter names, see page 2.3. If you do not want to assign a name, skip this step. If you assign a name to the number, the name appears on the display when you press the one-touch button.
-
Page 49: Speed Dialling
04-Basic 12/10/99 6:09 AM Speed dialling You can store up to 80 numbers in 2-digit speed dial locations (01-80). Storing a number for speed dialling 1. Press and hold Speed for 2 seconds. 2. Enter a 2-digit location number (01 through 80) where you want to store a number, then press Start/Enter. - Page 50 04-Basic 12/10/99 6:09 AM Editing a number for speed dialling 1. Press and hold Speed for 2 seconds. 2. Enter the 2-digit location number where the phone number you want to edit has been stored, then press Start/Enter. The display shows the number.
-
Page 51: Searching For A Number In The Memory
04-Basic 12/10/99 6:09 AM Searching for a number in the memory There are two ways to search for a number in the memory. You can either scan from A to Z sequentially, or you can search using the first letter of the name associated with the number. -
Page 52: Using The Phonebook On Your Computer (Sf-5100P Only)
Refer to the SF-5100P exclusive user’s Guide. 1. Start your Windows. 2. Click Start on the taskbar, and select the Programs from the Start menu. 3. Select the Samsung SF-5100P on the Programs menu, and select Phonebook. Page 21 3.19 Basic operation... - Page 53 04-Basic 12/10/99 6:09 AM 4. The SF-5100P Phonebook dialogue box appears. Displays information about the Phonebook. Samsung Web Link button allows you to be linked to Samsung Electronics Web site. Selects the type of automatic dial. Stores or edits the selected number.
- Page 54 04-Basic 12/10/99 6:09 AM 7. Enter any name and number, and click OK to save the information you just entered. 8. Repeat steps 6 and 7 to store more numbers. 9. When you have finished, you must click Send Phonebook to down- load the numbers to your SF-5100P machine.
-
Page 55: Advanced Fax
05-Advanced 12/10/99 5:59 AM Page 2 Advanced... -
Page 56: Broadcasting
05-Advanced 12/10/99 5:59 AM Broadcasting Use this feature to send your documents to multiple locations. After send- ing, the documents are automatically erased from the memory. 1. Load the document face down. If necessary, adjust Resolution, or Contrast. For details, see page 3.2. 2. -
Page 57: Delayed Fax
05-Advanced 12/10/99 5:59 AM Note: If ‘MEMORY FULL’ occurs while scanning into the memory, the display Delayed fax You can set your machine to send a fax at a later time when you will not be present. 1. Load the document face down. If necessary, adjust Resolution, or Contrast. - Page 58 05-Advanced 12/10/99 5:59 AM 6. If you want to send to more than one location, enter another fax number using the number keypad, one-touch dial, or 2-digit speed dial number. Note that you cannot use group dial numbers for another fax number.
-
Page 59: Priority Fax
05-Advanced 12/10/99 5:59 AM Priority fax When the priority fax is enabled, a high priority document can be trans- mitted ahead of reserved operations. The document is scanned into the memory, then transmitted when the current operation is concluded. In addition, a priority transmission will interrupt a broadcast operation between stations (i.e., when transmission to station A ends, before trans- mission to station B begins) or between redial attempts. -
Page 60: Polling
05-Advanced 12/10/99 5:59 AM Polling What is polling? Polling is used when one fax machine requests another to send a docu- ment. This is useful when the person with the original document to be sent is not in the office. The person who wants to receive the document calls the machine holding the original and requests that the document be sent. - Page 61 05-Advanced 12/10/99 5:59 AM 7. The machine stores the document in the memory. The display counts the number of pages being stored in the memory and the memory capacity remaining. The machine returns to standby mode and the display shows a reminder that a send polling is set.
-
Page 62: Adding Documents To A Scheduled Operation
05-Advanced 12/10/99 5:59 AM Adding documents to a scheduled operation You can add documents to the delayed transmission previously reserved in your machine’s memory. 1. Load the document face down. If necessary, adjust Resolution, or Contrast. For details, see page 3.2. 2. -
Page 63: Additional Features
06-Additional 12/10/99 5:51 AM Page 2 Additional features... -
Page 64: Printing Reports
06-Additional 12/10/99 5:51 AM Printing reports Your machine can print reports containing useful information – Schedule Job, System Data, etc. The following reports are available: Help List This list shows the machine’s basic functions and commands to use as a quick reference guide. -
Page 65: System Setup
06-Additional 12/10/99 5:51 AM Note: The list you have set to print out automatically will not print out when To print list 1. Press Report/Help on the control panel. The display shows the first menu; HELP. 2. Press ➛ or ❿ until you find the list you want to print, then press Start/Enter. - Page 66 06-Additional 12/10/99 5:51 AM Selectable options These instructions assume that you have followed the steps on page 5.2 under ‘Setting an option’ and the machine is prompting you to change one of the options listed here. • LANGUAGE — You can select the display language from English, German, French, Italian, Spanish, Portuguese and Dutch.
- Page 67 06-Additional 12/10/99 5:51 AM • AUTO REDUCTION — When receiving a document as long as or longer than the paper loaded in your machine, the machine can reduce the data in the document to fit into your recording paper size. Turn on this feature if you want to reduce an incoming page that may otherwise need to be divided into two pages with only a few centime- ters on the second page.
- Page 68 06-Additional 12/10/99 5:51 AM • RCV. START CODE — The remote receive start code allows you to initiate fax reception from an extension phone plugged into the EXT. jack on the back of your machine. If you pick up the extension phone and hear fax tones, enter the remote code and the machine will start receiving.
- Page 69 06-Additional 12/10/99 5:51 AM • Distinctive Ring Pattern Detection (DRPD)— “Distinctive ring” is a telephone company service which enables a user to use a single tele- phone line to answer several different telephone numbers. The particu- lar number someone uses to call you on is identified by different ring- ing patterns, which consist of various combinations of long and short ringing sounds.
-
Page 70: Group Dialling
06-Additional 12/10/99 5:51 AM Group dialling Numerous one-touch and speed dial numbers can be registered as a group. By using the group number, you can send a document to multiple parties in a single operation. Your machine will dial the remote numbers in stored sequence. - Page 71 06-Additional 12/10/99 5:51 AM 9. To assign a name to the group, enter the desired name. If you do not want to assign a name, skip this procedure. 10. When you are finished, press Stop. Note: You cannot include one group dial number in another group dial number. Editing group dial numbers You can edit one-touch or speed dial numbers stored for group dialling.
-
Page 72: Clearing Memory
06-Additional 12/10/99 5:51 AM Clearing memory You can selectively clear information stored in your machine’s memory. 1. Press Setup on the control panel. The display shows the first menu; FAX NUMBER/NAME. 2. Press ➛ or ❿ until ‘MEMORY CLEAR’ appears, then press Start/Enter. -
Page 73: Troubleshooting
07-Troubleshooting 12/10/99 5:41 AM Page 2 Troubleshooting... -
Page 74: Clearing Jams
07-Troubleshooting 12/10/99 5:41 AM Page 3 Troubleshooting Clearing jams Document jams while sending a fax If a document jams while you are sending it, ‘DOCUMENT JAM’ appears on the display. Do not pull the document out of the slot. If you do this, it could harm your machine. - Page 75 07-Troubleshooting 12/10/99 5:42 AM Paper jams while the machine is printing By carefully selecting the paper type and loading them properly, you should be able to avoid most paper jams. If paper jams occur, an error message appears on the display. Follow the steps below to clear the jam. To avoid tearing the paper, pull the jammed paper out gently and slowly.
- Page 76 07-Troubleshooting 12/10/99 5:42 AM Page 5 IF JAMMED IN THE PRINTER OUTPUT AREA 1. If the paper jams as it exits to the paper exit tray and a long portion of the paper is visible, pull the paper straight out. If there is any resistance, and the paper does not move immediately when you pull, stop pulling.
- Page 77 07-Troubleshooting 12/10/99 5:42 AM 3. Gently pull the paper toward you. 4. Check that there is no other paper in the printer. 5. Reinstall the cartridge, then close the cover. Tips for avoiding paper jams By carefully selecting print materials and loading them properly, you should be able to avoid most paper jams.
-
Page 78: Lcd Error Messages
07-Troubleshooting 12/10/99 5:42 AM Display The loaded document has jammed DOCUMENT JAM in the feeder. The top cover is not securely DOOR OPEN latched. There is a problem in the fuser unit. FUSER ERROR Recording paper has jammed inside the unit, or the toner JAM/NO CARTRIDGE cartridge is not installed. - Page 79 07-Troubleshooting 12/10/99 5:42 AM Display Recording paper has jammed in PAPER JAM 0 the paper feeding area. Jammed paper still remains PAPER JAM 2 inside the unit. The remote fax machine you want to poll is not ready to respond to your poll. POLLING ERROR When setting up to poll another fax machine, you have used an...
-
Page 80: Fixing Problems
07-Troubleshooting 12/10/99 5:42 AM Symptom The machine is not working, there is no display and the buttons are not working. No dial tone. The numbers stored in the memory do not dial correctly. The document does not feed into the machine. You cannot receive faxes automatically. - Page 81 07-Troubleshooting 12/10/99 5:42 AM Symptom You cannot poll another machine. The incoming fax has blank spaces or you received a poor-quality copy. Are some of the words on the incoming fax stretched? There are lines on the copies or documents you send. The machine dials a number, but fails to make a connec- tion with another fax...
-
Page 82: Maintenance
08-Maintenance 12/10/99 5:32 AM Maintenance Cleaning the OPC drum If you are getting streaks or spots on your print, you may clean the OPC drum. 1. Make sure that the paper is loaded. 2. Press Setup on the control panel. The display shows the first setup menu;... -
Page 83: Adjusting Shading
08-Maintenance 12/10/99 5:32 AM Adjusting shading When the scanning unit gets dirty, it might alter the shading value. If your print has black lines or is blurred, adjusting the shading may solve the problem. Take the following steps: 1. Load a sheet of white paper into the document feeder. 2. -
Page 84: Sending Toner Low Information To The Service Company
08-Maintenance 12/10/99 5:32 AM Sending toner low information to the service company If you have set this notify toner low menu option to ON, when the toner cartridge needs to be replaced, your machine automatically sends a fax to your service company or the dealer to notify them that your machine requires a new toner cartridge. - Page 85 08-Maintenance 12/10/99 5:32 AM 2. Disassemble the white roller as follows: Both ends of the white roller have plastic bushings that are snapped shut with small tabs on them. Pull the bushing slightly inward, then rotate the bushing until it reaches a slot (A) . Then pull the roller upward (B) .
- Page 86 08-Maintenance 12/10/99 5:32 AM 5. Carefully wipe the scanning glass with a soft, dry cloth. If the glass is very dirty, first wipe it with a slightly dampened cloth, then with a dry cloth. Be very careful not to scratch the glass surface. 6.
-
Page 87: Managing The Toner Cartridge
08-Maintenance 12/10/99 5:32 AM Page 6 Managing the toner cartridge Expected cartridge life The life of your toner cartridge depends on the amount of toner used in each print job. For instance, when you print a typical business letter with about 5% page coverage, you can expect a toner cartridge life of approxi- mately 2,500 pages (1,000 pages only for the toner cartridge shipped with your machine). - Page 88 08-Maintenance 12/10/99 5:32 AM Take the following steps to replace the toner cartridge: 1. Pulling the cover release buttons toward you, open the cover. 2. Remove the old toner cartridge. Follow the instructions printed on the cartridge box to recycle the used cartridge. 3.
- Page 89 08-Maintenance 12/10/99 5:32 AM 4. Shake the cartridge from side to side 5 or 6 times to distribute the toner evenly inside the cartridge. 5. Find the cartridge slots inside the machine, one on each side. Grasp the handle and slide the cartridge down between the cartridge slots until it drops into place.
- Page 90 08-Maintenance 12/10/99 5:32 AM Page 9 MEMO 6.17 Troubleshooting...
-
Page 91: Appendix
09-Appendix 12/10/99 5:24 AM Page 2 Appendix... -
Page 92: Fcc Regulations
09-Appendix 12/10/99 5:24 AM Page 3 FCC regulations This equipment has been tested and found to comply with the limits for a Class B digital device, pursuant to Part 15 of the FCC Rules. These limits are designed to provide reason- able protection against harmful interference in a residential installation. -
Page 93: Fcc Declaration Of Conformity
: Changes or modifications not expressly approved by the manufacturer responsible for compliance could void the user’s authority to operate the equipment. Party Responsible for Product Compliance Samsung Electronics America American QA Lab 85 West Tasman Dr. San Jose, CA 95134... -
Page 94: Laser Safety Statement
09-Appendix 12/10/99 5:24 AM Laser safety statement The facsimile is certified in the U.S to conform to the requirements of DHHS 21 CFR Subchapter J for Class I(1) laser products, and certified elsewhere as a Class I laser product conforming to the requirements of IEC 825. Class I laser products are not considered to be hazardous. -
Page 95: Safety Information
09-Appendix 12/10/99 5:24 AM Laser product labels are located above the print cartridge. CLASS 1 LASER PRODUCT LASER KLASSE 1 LUOKAN 1 LASERLAITE APPAREILÀ LASER DE CLASSE 1 TO IEC 825 Safety information PRODUCT SAFETY CANADA EEC (EUROPE) LASER SAFETY EEC (EUROPE) Appendix Page 6... -
Page 96: Power Saver
09-Appendix 12/10/99 5:24 AM Power saver This facsimile contains advanced energy conservation technology that reduces power consump- tion when it is not in active use. When the facsimile does not receive data for an extended period of time, power consumption is automatically lowered. -
Page 97: Specifications
09-Appendix 12/10/99 5:24 AM Specifications Applicable line Compatibility Data coding Modem speed Transmission speed Effective scanning width Effective printing width Scanning method Memory Halftone Printing speed Automatic document feeder Dimension (W Weight Power requirements Power consumption Environmental conditions Auto dialer Document size –... -
Page 98: Index
09-Appendix 12/10/99 5:24 AM Index adding documents • 4.7 alarm volume, setup • 2.8 auto reduction • 5.4 automatic dialing • 3.14 automatic redial • 3.5 broadcasting • 4.1 call back message • 5.1 caller ID • 5.5 cancelling schedules • 4.7 cartridge (see toner cartridge) connection... - Page 99 09-Appendix 12/10/99 5:24 AM jam, clearing document • 6.1 paper • 6.2 journal, print • 5.1 junk fax barrier • 5.5 key volume, setup • 2.8 language, select • 5.3 list, print • 5.1 LCD, location • 2.1 loading paper •1.11 document •...
- Page 100 09-Appendix 12/10/99 5:24 AM schedule information • 5.1 searching memory • 3.18 redial memory • 3.12 sending after talking • 3.4 automatically • 3.4 broadcasting • 4.1 delayed fax • 4.2 priority fax • 4.4 polling • 4.5 sending confirmation • 5.1 sent journal •...
- Page 101 00-Cover 12/10/99 5:16 AM Page 2 ELECTRONICS Internet Home page: http://www.samsungelectronics.com P/N: JC68-00251K Rev.1.00...