Table of Contents
Advertisement
Advertisement
Table of Contents

Related Manuals for Kurzweil Andante CUP 310


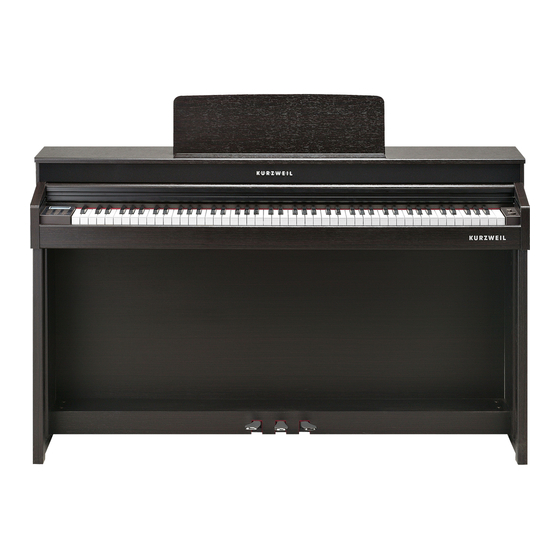
Summary of Contents for Kurzweil Andante CUP 310
-
Page 2: Radio And Television Interference
CAUTION The lightning flash with the arrowhead symbol, within an equilateral triangle is intended to alert the user to the presence of uninsulated RISK OF ELECTRIC SHOCK "dangerous voltage" within the product's enclosure that may be of sufficient magnitude to constitute a risk of electric shock to persons. DO NOT OPEN CAUTION: TO REDUCE THE RISK OF ELECTRIC SHOCK, The exclamation point within an equilateral triangle is intended... -
Page 3: Important Safety Instructions
IMPORTANT SAFETY INSTRUCTIONS 1) Read these instructions. 2) Keep these instructions. 3) Heed all warnings. 4) Follow all instructions. 5) Do not use this apparatus near water. 6) Clean only with dry cloth. 7) Do not block any of the ventilation openings. Install in accordance with the manufacturer’s instructions. - Page 4 Kurzweil International Contacts tive. US Customers: American Music & Sound 925 Broadbeck Dr #220 Newbury Park, CA 91320 Tel: 800-431-2609 Fax: 818-597-0411 Email: info@americanmusicandsound.com Customers Outside the US: HDC Young Chang Co., LTD. 196, Bongsu-daero, Seo-gu, Incheon, Korea South Korea Tel: +82 32 570 1000 www.ycpiano.co.kr...
-
Page 5: Table Of Contents
Table of Contents Introduction Primary Features CUP310 Carton Contents Assembly Instructions Power Connection MP3 - Aux In Volume Headphone Jacks Quick Start Overview Input/Output Panel Control Panel Display, Buttons and Controls Operation Program Mode Selecting a Program Selecting a Program with the Keyboard Play/Pause/Stop Metronome or Rhythm Pattern Demo Mode Selecting Demo Songs... - Page 6 MIDI About MIDI MIDI Channels MIDI In and Out Ports USB MIDI Connection System Mode (Boot Loader) Appendix MIDI Implementation Chart Demo Song List Program List Specifications...
-
Page 7: Introduction
Introduction Congratulations on your purchase of the Kurzweil CUP310. You are certain to enjoy many hours exploring the variety of features as well as the beautiful preset Programs. This manual introduces CUP310, 320. However, collectively, it is introduced as CUP310. -
Page 8: Assembly Instructions
Introduction Assembly Instructions In addition to the main piano cabinet, your instrument comes with a stand requiring assembly, using the parts shown below. Two people may be needed to complete the assembly, as the stand must first rest on the floor and then the instrument must be securely attached on top of it. -
Page 9: Power Connection
CAUTION: Use only the DC power adapter supplied with the CUP310 / 320. Connecting the wrong DC power adapter could damage the instrument. If the power adapter is damaged or lost, contact your Kurzweil dealer to order a replacement. The AC plug shape will vary depending on location of use The AC plug shape will vary depending on location of use. -
Page 10: Mp3 - Aux In
Introduction MP3 - Aux In Connects an external audio source to the CUP310 sound system. Volume Before turning on the CUP310, it’s always a good idea to set the volume at its minimum setting (all the way to the left). For a generally comfortable level of volume while playing, set the knob at its middle position. -
Page 11: Overview
Yamaha and Korg make pedals with the same specifications and should work. Yamaha and Korg pedals typically use an exponential potentiometer and therefore will not work correctly. The CC-1 pedal is available from Kurzweil. You can order the CC-1 through your local Kurzweil dealer. -
Page 12: Control Panel Display, Buttons And Controls
Overview Control Panel Display, Buttons and Controls The features labelled on the CUP310’s front panel below are discussed in detail in the following chapters. Display: The 128 x 64 LCD graphic screen provides the main user interface for the CUP310. The screen displays text indicating the current instrument mode or parameter settings. - Page 13 Overview Category Buttons (Piano, E. Piano, Strings, Organ, Others) Press any of these buttons to select the first program of each instrument category (or the category default program of the selected category). After selecting an instrument category, other programs in the category can be selected by pressing the LEFT or RIGHT navigation buttons.
-
Page 14: Operation
Overview Double Button Presses Several pairs of the buttons on the CUP310 have timesaving secondary functions when pressed simultaneously— think of them as keyboard shortcuts. For convenience of reference, descriptions of all of the double-button press functions appear below. ● To enter Demo Mode, press the RECORD and PLAY/PAUSE buttons simultaneously ●... -
Page 15: Program Mode
Program Mode When you turn on the CUP310, Program Mode is active and the first Grand Piano Program is selected and ready to play. Program Mode is the main mode of the CUP310. You can return to Program Mode at any time by repeatedly pressing the EXIT button. Selecting a Program Follow these steps to select a Program: 1. -
Page 16: Demo Mode
Demo Mode The CUP310 has selection of demo songs songs performed in a variety of classical styles that demonstrate the Grand Piano Program. See the Appendix for a complete list of the demo songs. Selecting Demo Songs Press the RECORD and PLAY/PAUSE buttons simultaneously to enter Demo Mode, and the first demo song will begin playing. -
Page 17: Metronome/Rhythm Mode
Metronome/Rhythm Mode Press the MET/RHY/TAP button to enter Metronome/Rhythm Mode. This mode allows you to select whether a Metronome and/or Rhythm will be played when the PLAY/PAUSE button is pressed in Program Mode. You can select a Rhythm Pattern, set the Rhythm and Metronome volume, and set when the Metronome will be heard. While in Metronome/Rhythm Mode, press the UP or DOWN navigation buttons to select each parameter, then press the LEFT or RIGHT navigation button to select the previous or next setting. -
Page 18: Rhythm Vol
Metronome/Rhythm Mode Rhythm Vol The Rhythm Vol parameter determines the volume of the selected Rhythm in all modes. The volume can be set from 0 (muted/off) through 10 (maximum). Press the LEFT or RIGHT navigation button to select the previous or next setting. Metro Vol The Metro Vol parameter determines the volume of the Metronome in all modes. -
Page 19: Layer/Split/Dual Mode
Layer/Split/Dual Mode The LAYER/SPLIT/DUAL button selects the Layer, Split, and Dual Modes. Press the LAYER/SPLIT/DUAL button repeatedly to select each Mode. ● Layer Mode allows you to layer two different Program sounds on the keyboard. ● Split Mode allows you to split the keyboard into two regions containing two different Program sounds, with adjustable split point. -
Page 20: Using Dual Mode
Layer/Split/Dual Mode Using Dual Mode Dual Mode allows you to split the keyboard into two regions, each transposed to the same range for 4-hand use (ideal for duets or instructors and students). The keyboard regions in Dual Mode are split at the C4 (middle C) key. The left region is transposed up two octaves;... -
Page 21: Song Mode
Song Mode Press the PLAY/PAUSE and STOP buttons simultaneously to enter Song Mode. Use the UP and DOWN navigation buttons to choose between the available parameters Song, Tempo, Rec.Rthm, and Rhythm Vol. Selecting and Playing a Song To select a user song to play, use the UP and DOWN navigation buttons to select the Song parameter, then use the LEFT and RIGHT navigation buttons to select a song. -
Page 22: Tempo, Rec.rthm, And Rhythm Vol
Song Mode Correcting Mistakes (Punch-in Recording) You can fix mistakes in your performance by doing “punch-in” recording. Punch-in recording allows you to re-record a section in the middle of a song. This is useful for correcting mistakes without recording the whole song again. Follow these steps to perform a “punch-in”: 1. -
Page 23: Settings Mode
Settings Mode The Settings Mode includes parameters that allow you to change the overall behavior of the entire instrument. The following parameters are available in Settings Mode: ● Touch ● Tune ● Reverb Lvl (Reverb Level) ● Local Ctrl (Local Control) ●... -
Page 24: Autopwr (Auto Power Off)
Press the LEFT navigation button or the EXIT button to return to the Settings Mode main menu. Visit the Kurzweil website (www.kurzweil.com) to verify that your CUP310 has the latest versions. These are located under the Downloads tab for the CUP310. -
Page 25: About Midi
MIDI About MIDI MIDI is the acronym for Musical Instrument Digital Interface. It is the industry standard protocol which allows the exchange of musical data between electronic musical instruments, devices (such as a sequencer), and computers. MIDI enables MIDI-equipped devices designed by different manufacturers to communicate MIDI data to each other. MIDI data is sent or received using standard MIDI cables to connect to other MIDI devices or a USB cable to connect to a computer. -
Page 26: Usb Midi Connection
MIDI USB MIDI Connection In addition to the conventional MIDI In and Out ports, the CUP310 also has a USB port on the panel on the back of the piano. You can connect the CUP310 directly to a computer with a USB cable. This connection transmits and receives MIDI data between the CUP310 and the computer. - Page 27 Appendix ANDANTE CUP310 / 320 MIDI Implementation Chart MIDI Implementation Chart Models: Andante CUP 310 / 320 Date : 2016-09-14 Manufacturer: Version 1.0 Young Chang Function Transmitted Recognized Remarks Default Basic Channel Memorized Changed 1 - 16 Default Mode 3...
-
Page 28: Demo Song List
Appendix Demo Song List Song Name 5 Mazurkas Valse Op.69 No.2 Grande Valse Valse Op.64 No.2 Nocturne No.2 Valse Op.64 No.1 Preludes in Db Fantaisie Improm Traumerei Frolicher Landma Von fremden Land Liebestraume #3 Dolly's Dreaming Voices of Spring The Swan Blumenlied Valsette Old French Air... -
Page 29: Program List
Appendix Program List VOICE VOICE GrandPno1 AdagioOcts GrandPno2 Violin Bright Piano Cello Dark Piano Clavi 1 Rock Piano 1 Clavi 2 Rock Piano 2 Wah Clavi Piano&Strngs Phase Clavi R&B Stack Harpsichrd1 Piano&Voice Harpsichrd2 UprightPno HpschrdLute PnoBassRide HornSect 1 Pno&Bass HornSect 2 Dual Piano Sax Section... -
Page 30: Specifications
Appendix Specifications CUP310 : 88-Note fully-weighted hammer-action keyboard with 3-point velocity sensor Keyboard CUP320 : 88-Note Graded hammer-action Wood keyboard with 3-point velocity sensor 88 Expressive sounds, 2 Gigabyte sound ROM from the Forte SE featuring German and Japanese Grand Piano, Preset Programs Harpsichord, Clav, 73 Tine EP and Celeste Layer/Split/Dual Mode... - Page 32 196, Bongsu-daero, Seo-gu, Incheon, Korea...