Yamaha NUAGE MASTER Ncs500-CT Operation Manual
Hide thumbs
Also See for NUAGE MASTER Ncs500-CT:
- Supplementary manual (10 pages) ,
- Supplementary manual (10 pages) ,
- Supplementary manual (8 pages)
Table of Contents
Advertisement
Quick Links
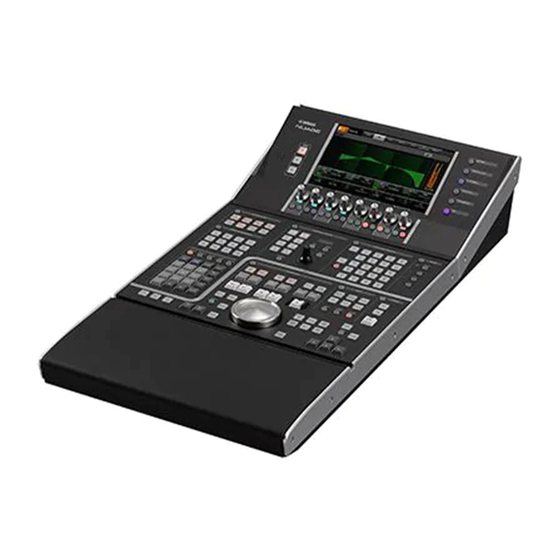
CONTROL SURFACE
NUAGE MASTER
Ncs 500 - CT
Operation Manual
Using this manual
This operation manual supports keyword searching and linking as follows.
Keyword searching
Searching for keywords is performed using your pdf viewer's search function. If you are viewing this manual using
Adobe Reader, type the term you wish to find into the Find toolbar and then press your computer's [Enter] key.
Jumping between pages
If using Adobe Reader, you can jump forwards and backwards to various pages in this manual. This provides a
convenient way to return to your original page after clicking a page link.
EN
Advertisement
Chapters
Table of Contents

Related Manuals for Yamaha NUAGE MASTER Ncs500-CT


Summary of Contents for Yamaha NUAGE MASTER Ncs500-CT
- Page 1 CONTROL SURFACE NUAGE MASTER Ncs 500 - CT Operation Manual Using this manual This operation manual supports keyword searching and linking as follows. Keyword searching Searching for keywords is performed using your pdf viewer’s search function. If you are viewing this manual using Adobe Reader, type the term you wish to find into the Find toolbar and then press your computer’s [Enter] key.
-
Page 2: Table Of Contents
Contents Introduction ..................3 How to Read the Manual ..................3 Description of the Device ..............4 Top Panel ......................4 Front Panel ....................... 26 Rear Panel ......................27 Description of the Software Programs..........28 Pages Shown on the Multi Function Display ............ 28 NUAGE MASTER Setup ................... -
Page 3: Introduction
Introduction Introduction • Screens This manual predominantly uses screenshots of Windows. However, Mac screenshots are used when instructions of the function apply only to the Mac. Also, this manual uses How to Read the Manual screenshots of Nuendo 6. If you are using another version of Nuendo, the actual screenshots might not be the same. -
Page 4: Description Of The Device
Description of the Device Description of the Device Top Panel DAW SELECT Section (page 24) TALKBACK MIC Section MULTI (page 25) FUNCTION DISPLAY Section (page 22) MONITOR CONTROL SOURCE ROOM Section Section (page 5) (page 6) AUTOMATION Section (page 22) CUES Section (page 8) USER... - Page 5 Description of the Device CONTROL ROOM Section [Display access] Calls up the “CONTROL ROOM Page” (page 38) in the [Multi function display]. When the CONTROL ROOM page is shown, you can toggle among the tabs of the CONTROL ROOM page. [DOWNMIX 1] –...
- Page 6 Description of the Device [REF] MONITOR SOURCE Section Sets the Control Room level to the Reference level. When this is on (lit), the level is reset to the Reference level. When you turn this is off (dim), the level is set back to the previous setting.
- Page 7 Description of the Device Controls and Functions [MIX] Switches to the “MIX” Control Room sources. However, when [PHONES] (page 5) in the CONTROL ROOM section is on, you can set the Phones source to “MIX” with this button. Lamp Description The source is set to “MIX.”...
- Page 8 Description of the Device CUES Section [SIG Indicators] Roughly indicates the CUE 1 – CUE 4 levels. Lamp Description Lit (red) Overload Lit (orange) -18 dB or more, but less than 0 dB Lit (green) -40 dB or more, but less than -18 dB Less than -40 dB [MUTE 1] –...
- Page 9 Description of the Device COMMUNICATION Section [C1]/[C2] Executes the assigned function. The button lights while held down. To assign the function, edit it from the “Communication Page” (page 45) in NUAGE MASTER Setup. Lamp Description The function has been assigned. The function has not been assigned yet.
- Page 10 Description of the Device TRANSPORT Section [SYNC ONLINE] Turns Synchronization on and off. Lamp Description Synchronization is on. Synchronization is off. Flash Synchronization is on; however, Nuendo has not yet received external time code or clock. [LEFT] Moves the Project Cursor to the Left Locator position. To set the current Project Cursor position to the Left Overview Locator position, press [LEFT] while the pop-up window...
- Page 11 Description of the Device [ZAP] EDIT Section Recalls the memorized Project Window view, set by [MEM]. Pressing it again restores the view to the previous one. The button lights while being held down. Lamp Description The memorized Project Window view can be recalled.
- Page 12 Description of the Device [CUT] JOG WHEEL Section Executes the Cut operation. The button lights while held down. Lamp Description The Cut operation can be executed. No events have been selected yet. [COPY] Executes the Copy operation. The button lights while held down.
- Page 13 Description of the Device Controls and Functions [SELECT] Operates the Select function. The operation of the Select function differs depending on the selected Tools, Object Selection or Range Selection. To switch between Object Selection and Range Selection, use [OBJECT SELECT] (page 11) and [RANGE SELECT] (page...
- Page 14 Description of the Device [FADE IN] GENERAL CONTROL Section Operates the Fade In function. The following steps illustrate by example. Select the desired event for applying Fade Move the Project Cursor to the desired end, and press [FADE IN] to set it to that point. Set the Fade In position by pressing [FADE IN].
- Page 15 Description of the Device [UNDO] MODIFIER Section Executes Undo. The button lights while held down. To execute Redo, simultaneously hold down [SHIFT] (page 15) in the MODIFIER section and press [UNDO]. The button lights while held down. Overview Lamp Description This section contains the modifier buttons.
- Page 16 Description of the Device NUMERIC PAD Section Controls and Functions Overview [LOCATE] This section is for inputting various parameters by the [Input keys] — which include [0] – [9], [ENTER], [NEXT +], Sets the [Input keys] mode to Locate. In the Locate mode, etc.
- Page 17 Description of the Device Offset for addition/subtraction function Locate To Not applicable. Displays the Project Cursor position including the subtraction value. Locate To When the Subtraction function pop-up window is shown, Inputs Project Cursor position. the [Input keys] have the following functions. When the pop-up window for the Locate function is [Input keys] Function...
- Page 18 Description of the Device When the Addition function pop-up window is shown, the When the MARKER page is called up in the [Multi [Input keys] have the following functions. function display] [Input keys] Function [0] – [9] For inputting numbers to the input position. []/[] Moves the input digit right and left.
- Page 19 Description of the Device Cycle Marker Jump Function [Input keys] Function In the Cycle Marker Jump function, you can set the Project []/[] When the Marker window is open, moves the Cursor to the Cycle Marker position by inputting the marker selection.
- Page 20 Description of the Device ]/[ [DAW] When you press any one of the buttons [0] – [9], [ [BACK SPACE], [CLEAR], [PREV -], [NEXT +], [CYCLE .], Sets the [Input keys] mode to DAW. In the DAW mode, you [ENTER] in the Wheel mode, the pop-up window for can input values to parameters on the DAW software, inputting the parameter is shown on the [Multi function using the [Input keys] instead of the numeric keys on the...
- Page 21 Description of the Device When the pop-up window is shown, the [Input keys] have USER ASSIGNABLE Section the following functions. [Input keys] Function [0] – [9] For inputting numbers to the input position. []/[] Moves the input digit to right and left. [BACK SPACE] Deletes the number at the input position.
- Page 22 Description of the Device AUTOMATION Section [TRIM] Turns Trim on (lit) and off (dim). MULTI FUNCTION DISPLAY Section Overview This section is for operating Automation. The function assignments of the buttons can be changed to other Automation functions as desired. For details on changing the function assignments, see “Automation window”...
- Page 23 Description of the Device [Display access] at right side of the [Multi The following chart indicates the relation between the function display] “Label Pane” and the controllable parameters of the [Multi function knob]. Lit by touching knob Knob parameter value Functions on button A/B Knob Button A/B...
- Page 24 Description of the Device Controls and Functions DAW SELECT Section Overview This section is for selecting the target DAW software for operation. This section allows you to select the particular DAW software when you have connected and configured multiple DAW software programs. For details on [Multi function display] connecting and settings, refer to the NUAGE Workgroup Displays pages for editing parameters in various sections,...
- Page 25 Description of the Device TALKBACK MIC Section Overview This is a section for the talkback microphone. Controls and Functions [TALKBACK microphone] Microphone for Talkback operation. The audio signal input to the [TALKBACK microphone] is output from the [TALKBACK OUT +4dBu] jack (page 27) on the rear panel.
-
Page 26: Front Panel
Description of the Device Front Panel [PHONES A/B] For connection to headphones. Audio input via [TO PHONES L/R] (page 27) on the rear panel is output here. [LEVEL] Adjusts the output signal level of [PHONES A/B]. NUAGE MASTER Operation Manual... -
Page 27: Rear Panel
Description of the Device Rear Panel [AC IN] For connection to the power cable. [RS-232C] For connection to an RS-232C cable. Connect this port to the RS-232C port on the KVM switch. When you switch between multiple DAW applications using the DAW SELECT section with KVM switches connected and the data to be sent to them configured in NUAGE Workgroup Manager, the display content, active keyboard, and active... -
Page 28: Description Of The Software Programs
Description of the Software Programs Description of the To select the pages, press [Display access] in each section, or press the buttons at the right side of the MULTI Software Programs FUNCTION DISPLAY section (page 22), or touch the tabs or buttons at the top of the pages. - Page 29 Description of the Software Programs To input parameter values (which allow number input) in Fader the page, use the Parameter mode in the NUMERIC PAD Adjusts the touch sensitivity of the [Fader] on Nuage section (page 16). To do this: Fader.
- Page 30 Description of the Software Programs • [VOLUME] (JOG WHEEL section) To scroll through the view of the Main area, touch “u”/“d” on the Tool area. • [CYCLE] (TRANSPORT section) • [] (record) (TRANSPORT section) • [TALK BACK] (COMMUNICATION section) When you set this to off, lighting of the buttons while they are held is disabled.
-
Page 31: Track Display
Description of the Software Programs When you touch the upper left of a folder track icon, the Controls and Functions window changes to show the contents of the folder track. Track Select View This view is for selecting tracks. Tracks For selecting the tracks. - Page 32 Description of the Software Programs Solo View Track Turns Record Enable on (lit) and off. You can turn Record This view is for operating Solo or Listen for the tracks. Enable on/off for multiple tracks by simply dragging 1 2 3 across the tracks.
- Page 33 Description of the Software Programs When you touch “Channel information,” the channel By touching “Nuendo” in the Tool area, you can open the selection window is shown. channels configuration window on the screen. However, in the PLUG-IN page, the plug-in effect window is opened. Touch again to close.
- Page 34 Description of the Software Programs S or L Dynamics Graph Turns Solo or Listen on (lit) and off. Displays the parameters as a graph. Level Meter Displays the channel level. Turns Bypass on (lit) and off. Preset Turns Monitor on (lit) and off. Opens the preset selection window.
- Page 35 Description of the Software Programs CUES Page When Mix Convert is selected This page is for controlling the Cues of the selected channel. When a Stereo channel is selected Cue Send Level [ PARAM ] Adjusts the Cue send level. Cue Send Pan [ PARAM ] Adjusts the Cue send pan.
- Page 36 Description of the Software Programs INSERT Page Touch the desired parameter in the Main area to select it. This page is for controlling Inserts for the selected The parameter is temporarily assigned to an channel. “empty” [Multi function knob] (one which does not yet have a locked parameter).
- Page 37 Description of the Software Programs AUTOMATION Page Turns on Read Automation for all tracks. Turns off Read Automation for all tracks. Turns on Write Automation for all tracks. Turns off Write Automation for all tracks. Touch Overview Sets Automation Mode to “Touch.” This page is for controlling the Automation features.
- Page 38 Description of the Software Programs USER ASSIGNABLE Page CONTROL ROOM Page Overview Overview This page is for operating the Control Room functions. To This page is used to execute assigned functions. To open open this page, press the CONTROL ROOM [Display this page, press the USER ASSIGNABLE [Display access] access] button (page...
- Page 39 Description of the Software Programs SPEAKER CONTROL Page Turns Listen on (lit) and off. This page is for operating the Speaker Controls in Control Room. LE Level [ PARAM ] Adjusts Listen level. On/Off Turns the channel on (lit) and off. Level Meter Displays the channel level.
- Page 40 Description of the Software Programs CUES Page MONITOR SOURCE Page Overview Overview This page is for operating Cue functions in the Control This page is for operating Monitor Source in the Control Room. To open this page, press the CUES [Display Room.
- Page 41 Description of the Software Programs COMMUNICATION Page TRANSPORT Page Overview Overview This page is for operating the Transport functions. To open This page is for operating the communication functions in this page, press the TRANSPORT [Display access] button the Control Room. To open this page, press the (page 10).
- Page 42 Description of the Software Programs TEMPO Function Selects the Tempo mode. Operates the Marker functions from the Marker window. SYNC Turns Synchronization on (lit) and off. Scrolls through the Main area view. Time Display [ PARAM ] OVER VIEW Page Sets the Project Cursor position.
- Page 43 Description of the Software Programs EDIT Page Overview This page is used to execute assigned functions. To open this page, press the EDIT [Display access] button (page 11). To assign the function, configure it from “EDIT window” (page 44) in “NUAGE MASTER Setup.” To select the desired bank, touch “BANK 1”...
-
Page 44: Nuage Master Setup
Description of the Software Programs NUAGE MASTER Setup Controls and Functions User Assignable Settings Assigns functions to the buttons. First, click “Category” to Overview select the category. Next, click “Command” to select the command. When you check the “Repeat” box for the This software is for configuring the general settings of function, the corresponding function will operate Nuage Master from Nuendo. - Page 45 Description of the Software Programs Edit Settings Communication Window Assigns functions to the buttons. Click “Command” to select the command. When you check the “Repeat” box Overview for the function, the corresponding function will operate This window is for configuring the function of the buttons continuously by holding down the button.
-
Page 46: Nuage Workgroup Manager
Description of the Software Programs NUAGE Workgroup Manager Overview NUAGE Workgroup Manager is an application that allows control over devices and DAW software programs as a Workgroup on a NUAGE system. For details on NUAGE Workgroup Manager, refer to the NUAGE Workgroup Manager manual (PDF). -
Page 47: Troubleshooting (In Operation)
Troubleshooting (in operation) Troubleshooting (in Appendix operation) Contents of the Getting Started Manual A connection cannot be PRECAUTIONS established with Pro Tools. NOTICE • Ensure that the steps described in “Settings for Pro Information Tools” (page 48) have been completed. Introduction •... -
Page 48: Pro Tools Control
Appendix Pro Tools Control Setting Pro Tools MIDI Controllers Start up Pro Tools. Choose “Setup” “Peripherals” to open Introduction the “Peripherals” dialog. In addition to Nuendo and Cubase, Nuage Fader and Nuage Master devices can also be used to control Pro Click the “MIDI Controllers”... - Page 49 Appendix Button Functions TRANSPORT Section [Display access] This button is used to open and CONTROL ROOM Section close the Transport window. Its indicator lights up while the Transport window is open. [Display access] These controllers are used to operate the DAW A Nuendo. [PRE ROLL] This button is used to turn on and [REF]...
- Page 50 Appendix EDIT Section [Jog wheel] This wheel is used for shuttling and scrubbing. It’s also used for making [Display access] This button is used to switch fine adjustments to the selected between the Edit and Mix windows. region. It is lit when the Edit window is active and is dim when the Mix window is active.
- Page 51 Appendix NUMERIC PAD Section MULTI FUNCTION DISPLAY Section [LOCATE] Not applicable. [Multi function display] These controllers are used to operate the DAW A Nuendo. [MARKER] [SETUP] [PARAM] [TRACK LIST] Not applicable. [DAW] [CHANNEL] [WHEEL] [PLUG-IN] [0] – [9] These buttons correspond to keys [DYNAMICS] [0] to [9] found on Mac keyboards.
-
Page 52: Added Functions In Nuage V2.0
Added functions in NUAGE V2.0 Added support for remote operation of the MMP1 (Nuage Fader, Nuage Master, and NUAGE Workgroup Manager) ..................53 Settings (Preparations)......................53 Selecting a monitor source or a cue output (Nuage Master) ..........55 Displaying the status and adjusting the Cue outputs or Studio Speaker outputs (Nuage Master) .......................... -
Page 53: Added Support For Remote Operation Of The Mmp1 (Nuage Fader, Nuage Master, And Nuage Workgroup Manager)
Added support for remote operation of the MMP1 (Nuage Fader, Nuage Master, and NUAGE Workgroup Manager) Certain MMP1 functions can be controlled from the Nuage series. Settings (Preparations) Set the control source to Nuage Fader and/or Nuage Set the IP address. Master and the control target to MMP1 with the NUAGE To control MMP1 from the Nuage Fader and/or Nuage Workgroup Manager. - Page 54 Confirm the connection between the MMP1 and Nuage device. When the MMP1 and Nuage device is connected correctly, the MMP1 indicator will light up in green. When the MMP1 indicator lights up in red (this means connection failure), the possible causes are as follows: •...
-
Page 55: Selecting A Monitor Source Or A Cue Output (Nuage Master)
Selecting a monitor source or a cue output (Nuage Master) Using the MONITOR SOURCE section of Nuage Master, you can select an audio source or cue output for monitoring. MONITOR SOURCE Section 1 Displays the “Monitor Source” page on the [Multi function display]. - Page 56 MMP1 Editor — Main screen — Monitor Control tab MMP1 Controller — Control view MMP1 Controller — Editor view — Main Monitor Added functions in NUAGE V2.0...
-
Page 57: Displaying The Status And Adjusting The Cue Outputs Or Studio Speaker Outputs (Nuage Master)
Displaying the status and adjusting the Cue outputs or Studio Speaker outputs (Nuage Master) Using the CUES section of Nuage Master, the status of the Cue outputs and Studio Speaker outputs of the MMP1 can be displayed, and the output levels can be adjusted. CUES section 1 Displays the “CUES”... - Page 58 MMP1 Editor — Sub screen Added functions in NUAGE V2.0...
-
Page 59: Monitor Control (Nuage Fader, Nuage Master)
Monitor Control (Nuage Fader, Nuage Master) Using the CONTROL ROOM section of the Nuage Fader and Nuage Master, you can control the Downmix, Dimmer on and off, and monitor output levels. Nuage Fader — CONTROL ROOM section 1 Turns the Downmix audio output on (lit) or off (unlit). NOTE When the Headphone output is selected for control, this button is disabled. - Page 60 Control Room page 1 Turns the Main Monitor output on (lit) or off (unlit). 2 Displays the Monitor Level. 3 Turns the dimmer on (lit) or off (unlit). 4 Changes the Monitor Level value to the reference level value. Holding this down for at least two seconds (until the indicator flashes) stores the current Monitor Level value as the reference level.
- Page 61 MMP1 Editor — Settings screen — Scene tab/MISC/Audio MMP1 Controller — Control view MMP1 Controller — Editor view — Main Monitor NOTE The User Assignable functions that are displayed depend on the settings you’ve made. Added functions in NUAGE V2.0...
-
Page 62: Talkback On Or Off (Nuage Master)
Talkback on or off (Nuage Master) Using the COMMUNICATION section of Nuage Master, you can turn Talkback on or off. COMMUNICATION section 1 Displays the “Communication” page on the [Multi function display]. 2 Turns the Talkback Destination 1 on (lit) or off (unlit). Communication page 1 Turns the Talkback Destination 1-8 on (lit) or off (unlit). -
Page 63: Added Support For Elevation Pattern Selection (Nuage Fader)
Added support for Elevation Pattern selection (Nuage Fader) The Elevation Patterns of the VST MultiPanner plug-in available on Nuendo 7.1 or later can be selected on the Nuage Fader. The Elevation Patterns are displayed in the Label Pane when you select the VST MultiPanner on the Nuendo. You can switch the Elevation Pattern with the corresponding [Multi function button]. -
Page 64: Added Support For Cursor Operation Outside The Project Window (Nuage Master)
Added support for cursor operation outside the Project Window (Nuage Master) The operation target window when []/[]/[]/[] buttons are pressed can be selected from the Project Window or the window displayed in the foreground. Operation Numbers in the illustration below correspond to the instruction steps. -
Page 65: Added Functions In Nuage V1.7
Added functions in NUAGE V1.7 Channel Connection for VCA Fader (Nuage Fader) ............66 Assignment Change for Keys in SECTION CONTROL Section (Nuage Fader) ....66 Assignment Change for Keys in CHANNEL VIEW CONTROL Section (Nuage Fader) .. 67 Expanded CHANNEL VIEW Memory (Nuage Fader) ............. 67 Display All Function for All Channel Types (Nuage Fader) .......... -
Page 66: Channel Connection For Vca Fader (Nuage Fader)
Channel Connection for VCA Assignment Change for Keys Fader (Nuage Fader) in SECTION CONTROL Section (Nuage Fader) You can now use Nuage Fader to connect or disconnect channels for a VCA fader created in Nuendo (7 or later). You can now change the assignment of keys in the Operation SECTION CONTROL section. -
Page 67: Assignment Change For Keys In Channel View Control Section (Nuage Fader)
Assignment Change for Keys Expanded CHANNEL VIEW in CHANNEL VIEW CONTROL Memory (Nuage Fader) Section (Nuage Fader) There are now eight save slots for CHANNEL VIEW memory that can be used for storing and recalling You can now change the assignment of keys in the channel display statuses. -
Page 68: Expanding And Collapsing Folder Tracks (Nuage Master)
Expanding and Collapsing New Parameter Setting Method Folder Tracks (Nuage Master) for Quick Controls (Nuage Fader, Nuage Master) You can now expand and collapse a folder track using Nuage Master when you have selected a folder track in You can now set the parameter assignments for the the project window. -
Page 69: Expanded Adjustment Function For "Mixer" Window Width (Nuage Fader)
Expanded Adjustment Operation (Nuage Master) Numbers in the illustration below correspond to the instruction Function for “Mixer” Window steps. Width (Nuage Fader) In addition to the conventional items, you can now also adjust the “Mixer” bottom positions. Operation Numbers in the illustration below correspond to the instruction steps. -
Page 70: Support For Gpio (Nuage Master)
Support for GPIO (Nuage Device page Enables you to set whether to turn the GPIO function on or Master) off, and perform basic settings for using the GPIO function. You can now receive GPIO input in Nuage Master or output GPIO signals from Nuage Master via JL Cooper eBOX/eBOX GPI8. - Page 71 Port page For Input, this turns on when the input port Enables you to select the GPIO functions. You can select voltage is Low. For Output, the output port voltage is set to Low up to 32 functions for input and output, respectively. when the function is on.
-
Page 72: Setting Automation Mode For Each Track (Nuage Master)
Setting Automation Mode for Insert Operation for Control Each Track (Nuage Master) Room Channels (Nuage Master) You can now use the [Multi function display] to set the automation mode for each track. You can now use the [Multi function display] to operate Operation the “Insert”... -
Page 73: New Parameters In The Control Room Page (Nuage Master)
New Parameters in the Control Room – INSERT page CONTROL ROOM Page (Nuage Master) You can now operate the Click Level, Click Pan, Listen Level, and Listen Dim on the CONTROL ROOM page. Operation Numbers in the illustration below correspond to the instruction steps. -
Page 74: New Settings For Saving Project Files (Nuage Master)
New Settings for Saving Support for Avid Pro Tools Project Files (Nuage Master) Shortcut Keys (Nuage Master) You can now select whether to overwrite the project file or You can now assign Avid Pro Tools shortcut keys to Nuage save as a new file when you press [SAVE] in the Master's USER ASSIGNABLE keys. -
Page 75: Support For The Avid Pro Tools Insert (Nuage Fader)
Support for the Avid Pro Tools User Assignable Setup window Insert (Nuage Fader) You can now use the “Insert” of Avid Pro Tools using Nuage Fader. You can use “Insert” on any channel and edit the “Insert” parameters. Operation (Insert assignment) Numbers in the illustration below correspond to the instruction steps. - Page 76 Turn the 16th [Multi function knob] from the Operation (Parameter change) left of the Nuage Fader CHANNEL STRIP Numbers in the illustration below correspond to the instruction steps. section (the far right knob), then select from group A – D or E for which insert is used. “Insert 1 –...
- Page 77 Press the [Multi function button A] that Turn the [Multi function knob] or press the corresponds to the “Insert” you want to [Multi function button] corresponding to the change the parameters of. parameter and change the parameter’s value. The value you change to will immediately be applied. Insert A or E Insert B Insert C...
-
Page 78: Display Method For Nuage Pt Bridge Window (Nuage Pt Bridge)
Display Method for NUAGE PT Lock Function for the Dante Bridge Window (NUAGE PT Network Interface (Nuage I/O) Bridge) A lock function has been added so that the Dante network interface is not changed while Nuendo or Cubase is The procedures for displaying the following window, running. -
Page 79: Initializing Direct Monitoring Settings (Nuage I/O)
Initializing Direct Monitoring Settings (Nuage I/O) You can now initialize the settings for direct monitoring in Nuage I/O. Operation Numbers in the screen shot below correspond to the instruction steps. From the Nuendo or Cubase menu, click “Devices,” then “NUAGE I/O Setup.” Click the “Direct Monitoring”... -
Page 80: Added Functions In Nuage V1.6
Added functions in NUAGE V1.6 Added Support for Cubase Pro 8 (Nuage Master, Nuage Fader) ........81 Updated Direct Monitoring Window in Nuage I/O Setup (Nuage I/O) ......83 Added Stereo Panner Switching Function (Nuage Fader) ..........83 Added More Parameters to Channel Strip Section (Nuage Fader) ........84 Added Support for Switching Parameters in Channel Setting Mode (Nuage Fader) .. -
Page 81: Added Support For Cubase Pro 8 (Nuage Master, Nuage Fader)
Added Support for Cubase Pro 8 (Nuage Master, Nuage Fader) Cubase Pro 8 is now supported. The following new functions are also supported. VCA Fader You can show/hide the VCA Fader with [OTHERS] in the CHANNEL VIEW CONTROL section. DeEsser You can now adjust the DeEsser parameters with Nuage High Cut and Low Cut Filter Slopes Fader and Nuage Master. - Page 82 Channel Strip Recording MIDI Events to the Tracks You can adjust the following parameters on the INSERT page of Nuage Master CHANNEL CONTROL. MIDI/Audio (Only for Instrument Tracks) Switches the type of plug-in. To record the MIDI events, Channel Setting Mode select “MIDI.”...
-
Page 83: Updated Direct Monitoring Window In Nuage I/O Setup (Nuage I/O)
Updated Direct Monitoring Added Stereo Panner Window in Nuage I/O Setup Switching Function (Nuage (Nuage I/O) Fader) The connection destinations for output buses that are the You can now switch between the types of stereo panners targets of direct monitoring are now displayed in the in Nuage Fader. -
Page 84: Added More Parameters To Channel Strip Section (Nuage Fader)
Added More Parameters to Added Support for Switching Channel Strip Section Parameters in Channel Setting (Nuage Fader) Mode (Nuage Fader) You can now adjust HC SLOPE, LC SLOPE, GAIN, You can now switch sub-parameters in the Channel φ (PHASE), HA HPF, and HA +48V in the channel strip. Setting mode to make adjustments to parameters. -
Page 85: Added Collective Bypass Function For Inserts (Nuage Fader)
Added Collective Bypass Added Collective Bypass Function for Inserts Function for Dynamics (Nuage Fader) (Nuage Master) You can now turn bypass on/off for “Inserts” on the You can now turn bypass on/off for “Dynamics” on the selected channels. selected channels. Operation Operation 1. -
Page 86: Added Support For Rmio64-D (Nuage Workgroup Manager)
Added Support for RMio64-D Output Clock Source Enables you to select the MADI output signal when SRC is (NUAGE Workgroup Manager) on as the word clock source. Same as Input Syncs the MADI output signal with the You can now control the RMio64-D Dante/MADI Clock Source MADI input signal. -
Page 87: Changed Display On The Marker Jump Pop-Up Window Into The List Display (Nuage Master)
Changed Display on the Added a Function for Project Marker Jump Pop-Up Window Cursor Positioning into the List Display (Nuage Master) (Nuage Master) You can now enter values in units of hours, minutes, and seconds to position the “Project Cursor” on the The pop-up display for the Marker Jump function and TRANSPORT page. -
Page 88: Added Enable/Disable Selection For [Jog Wheel] During Project Playback (Nuage Master)
Added Enable/Disable Selection for [Jog wheel] during Project Playback (Nuage Master) You can now disable [Jog wheel] operation during Project playback. Doing so will prevent unintended operation of the Project cursor during playback. Settings Switch the setting by using the “JOG Operation during Playback”... -
Page 89: Added Functions In Nuage V1.5
Added functions in NUAGE V1.5 Added support for remote operation of R series devices (Dante supported I/O rack) (Nuage Fader) ..........................90 Added quick control setting screen (Nuage Master) ............90 Added support for VST instruments control (Nuage Master) ........... 91 Added screen scrolling by dragging (Nuage Master) ............ -
Page 90: Added Support For Remote Operation Of R Series Devices (Dante Supported I/O Rack) (Nuage Fader)
Added support for remote R series settings In the Nuendo menu, select “Devices” “NUAGE HA operation of R series devices Remote Setup” to open the settings screen and configure (Dante supported I/O rack) the Dante Accelerator you will use. (Nuage Fader) The HA gain of R series devices (Rio3224-D, Ri8-D, etc.) Added quick control setting... -
Page 91: Added Support For Vst Instruments Control (Nuage Master)
Added support for W (Write) Turns “Write Automation” on (lit) and off (dark). VST instruments control VST instrument name/library name (Nuage Master) Shows the selected instrument and library. You can control VST instruments on instrument tracks on Parameters the CHANNEL CONTROL page. Touch a parameter to control it with a [Multi function knob]. -
Page 92: Added Support For Track Visibility Configuration Function (Nuage Master)
Added support for track Added support for send visibility configuration panning (Nuage Master) function (Nuage Master) Channel “Sends” can now be panned. You can now use the “track visibility control” function of CHANNEL CONTROL – Nuendo 6.5. This can greatly improve work efficiency on large-scale projects. -
Page 93: Added Support For New Nuendo 6.5 Plug-In (Nuage Master, Nuage Fader)
Added support for new TRANSPORT Section Nuendo 6.5 plug-in (Nuage In ADR mode, the functions of the buttons in the TRANSPORT section change. Master, Nuage Fader) [PREROLL] You can now select [DYN] in the SECTION CONTROL Turns Pre Roll on and off in Free Run mode. section to control the parameters of the new Nuendo 6.5 This button does not function in any mode other than Free plug-in (Magneto II). -
Page 94: Added Selection Function For Ethernet Port To Use With Avid Pro Tools (Nuage Pt Bridge)
Added selection function for Identify Searches for the Dante Accelerator specified with “Dante Ethernet port to use with Avid Interface”. When “Identify” is clicked, all LEDs for the Pro Tools (NUAGE PT Bridge) specified Dante Accelerator flash for a few seconds simultaneously, and then stops automatically. -
Page 95: Added Other Various Functions (Nuage Master)
Added other various functions PAGE 3 (Nuage Master) SETUP Page SETUP page is divided into three pages since the number of configurable settings has been increased. PAGE 1 MUTE Button Behavior Switches the behavior of [MUTE] on the channel strip. When set to Continuous, pressing and holding [MUTE] on one channel while pressing [MUTE] on another channel will simultaneously turn on and off all “mute”... -
Page 96: Added Functions In Nuage V1.2
Added functions in NUAGE V1.2 Added support for remote operation of AD8HR remote preamp from Nuage Master (Nuage Master) ....................... 97 Improved the EQ Band Curve display (Nuage Master) ........... 97 Added support for marker colors in Nuendo (Nuage Master) .......... 97 Improved parameter indications on the Multi Function Display (Nuage Master) ..... - Page 97 Added support for remote Added support for marker operation of AD8HR remote colors in Nuendo preamp from Nuage Master (Nuage Master) (Nuage Master) Marker colors set on the Nuendo are reflected in the MARKER Page. The AD8HR can be controlled also from the Nuage Master.
- Page 98 The Surround Panner Improved pan control Sub parameter 1 Sub parameter 2 Sub parameter 3 operations from the channel strip (Nuage Fader) The pan parameters which were not able to be conventionally operated from the channel strips can be controlled by changing the sub parameters.
-
Page 99: Added Functions In Nuage V1.1
Added functions in NUAGE V1.1 Added the ADR mode (Nuage Master) ................. 100 Added the functions for configuring the buttons in the USER ASSIGNABLE section (Nuage Master, Nuage Fader) ....................101 Added support for remote operation of the AD8HR remote preamp (Nuage Fader) ..102 Added the display in the [Channel name display] (Nuage Fader) ......... -
Page 100: Added The Adr Mode (Nuage Master)
Added the ADR mode ADR Page (Nuage Master) Added the ADR mode corresponding to the ADR function of Nuendo 6. TRANSPORT Section Press [Display access] repeatedly to display an “ADR page” (shown on the right), and then touch “Transport Switch” in the [Multi function Display] to select the ADR mode. -
Page 101: Added The Functions For Configuring The Buttons In The User Assignable Section (Nuage Master, Nuage Fader)
Added the functions for NUMERIC PAD Section configuring the buttons in the USER ASSIGNABLE section (Nuage Master, Nuage Fader) The function assignments can be saved, and the saved assignments can be recalled. The functions can be assigned to each Nuage Fader. USER ASSIGNABLE Page (Nuage Master) [MARKER]... -
Page 102: Added Support For Remote Operation Of The Ad8Hr Remote Preamp (Nuage Fader)
Added support for remote NUAGE MASTER Setup To open this window, click the Nuendo menu “Devices” operation of the AD8HR “NUAGE MASTER Setup.” remote preamp (Nuage Fader) Overview The gains of the AD8HR connected to the Nuage I/O can be controlled. - Page 103 Setting up the Nuage I/O Operation Function Open the “Nuage I/O Properties” from the NUAGE HA +48V Turns +48 V phantom power on and off. To Workgroup Manager, and then set the “ID” number of the turn on phantom power, hold down the AD8HR.
-
Page 104: Added The Display In The [Channel Name Display] (Nuage Fader)
Added the display in the Added display channels on [Channel name display] the LCD (Nuage Fader) (Nuage Fader) The previous view can be called up after using the Agent function ([SEL CH], etc.), and you can scroll through and The whole name of the channel strip can be scrolled and display the selected channels when the desired channel displayed, and the display format can be changed. -
Page 105: Added Some Track Select Operations (Nuage Master)
Added some track select [L] / [R] (left/right) If you use the following functions when the channels operations (Nuage Master) displayed are fewer than the number of faders of the Nuage Fader (e.g., when you are using the Agent Tracks can be selected by the NUMERIC PAD, and function, etc.), you can operate adjacent channels. -
Page 106: Added Some Zoom In And Zoom Out Operations (Nuage Master)
Added some Zoom In and When the Select Track pop-up window is shown, the [input keys] have the following functions. Zoom Out operations [Input keys] Function (Nuage Master) [0] – [9] Inputs the track number to the input position. Some Zoom-related operations were added. [BACK SPACE] Deletes the number at the input position. -
Page 107: Added Some Editing Operations (Nuage Master)
Added some editing Numeric Pad Input Selects the input format when you set the Project Cursor operations (Nuage Master) position in the Locate function. If you set this to “Right,” you can input the Project Cursor position as a text. The waveform offset can be changed, and the cut/copied event(s) can be pasted maintaining the position relative to the Project Cursor. - Page 108 Yamaha Pro Audio global website https://www.yamaha.com/proaudio/ Yamaha Downloads http://download.yamaha.com/ Manual Development Group © 2013 Yamaha Corporation Published 11/2017 MW-C0...